
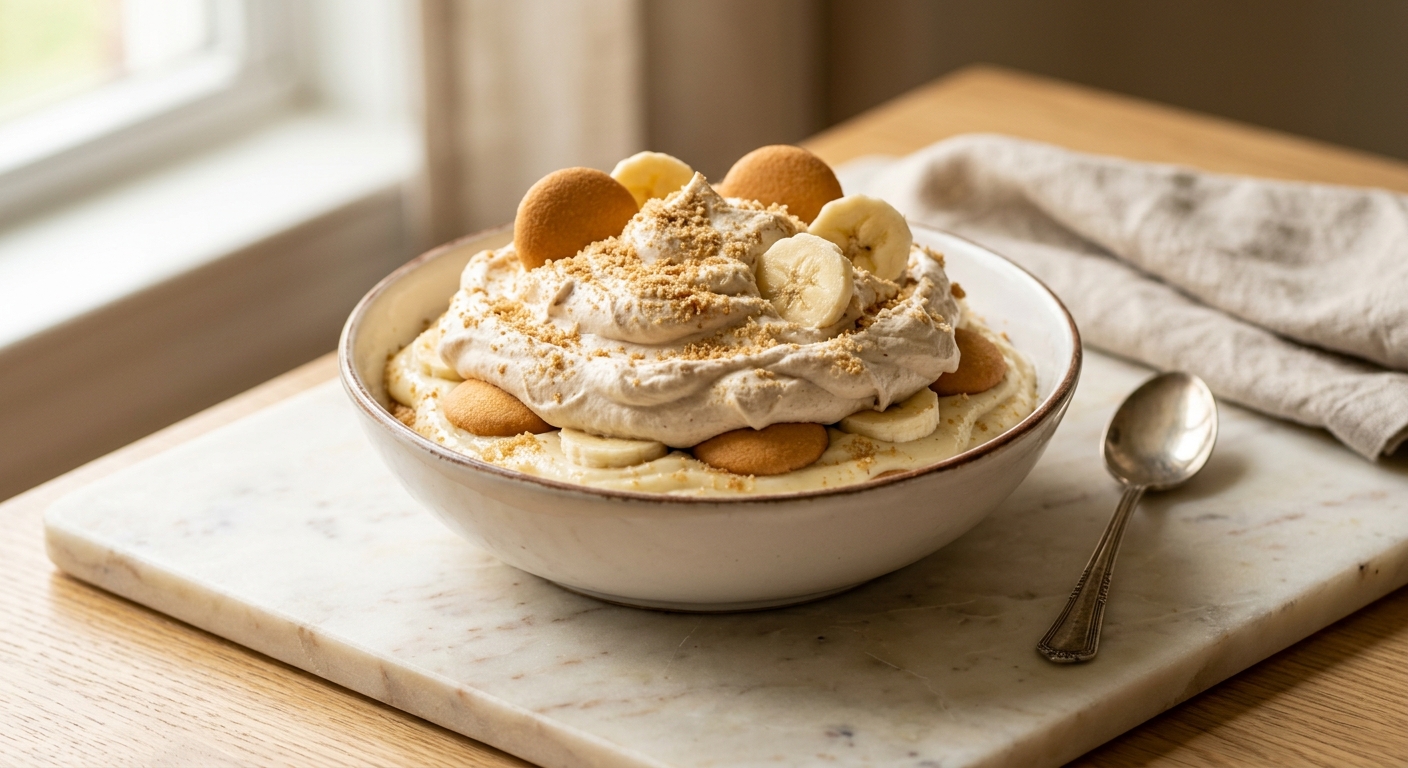
There is a moment, somewhere between the first spoonful and the last scrape of the dish, when Southern banana pudding stops being a dessert and becomes a memory. Maybe it is a church potluck in July, a grandmother’s Pyrex dish covered in plastic wrap on the passenger seat, or a backyard birthday where someone always arrived late but the pudding was always there, patient and generous, waiting under its soft cloud of meringue or whipped cream. This recipe was built to create exactly that feeling, from scratch, in your own kitchen.
What sets this version apart is the pastry cream base. Instead of stirring cold milk into a packet of instant pudding, you are making a proper cooked custard with egg yolks, whole milk, a touch of heavy cream, and real vanilla. The result is a pudding that is thick enough to hold its layers but still spoonable and silky, with a depth of flavor no box can replicate. The brown sugar whipped cream topping adds a gentle caramel note that pairs beautifully with ripe, sweet bananas, and the vanilla wafers soften overnight into something almost cake-like, which is the real magic of letting this dessert rest before serving.
This recipe sits comfortably in the medium difficulty range. The custard requires attention at the stove and a bit of patience with tempering, but there are no advanced techniques here that a careful home baker cannot master. It is ideal for anyone who wants to graduate from the box mix version, for potlucks, holiday gatherings, or any occasion that calls for a dessert people will actually talk about on the drive home.
12
servings
Ingredients
- 600 mlwhole milk (about 2 1/2 cups)
- 120 mlheavy cream (about 1/2 cup)
- 150 ggranulated sugar (about 3/4 cup), divided
- 5 largeegg yolks, at room temperature
- 40 gcornstarch (about 1/3 cup)
- 28 gunsalted butter (2 tablespoons), cut into small cubes
- 2 tsppure vanilla extract
- —Pinch of Colima Sea SaltMicroplastic Free Salt
- 4 mediumripe bananas (about 450g/1 lb peeled), sliced 1/4-inch thick
- 300 gvanilla wafer cookies (one standard 11-oz box), plus a few extra for garnish
- 360 mlheavy cream, very cold (about 1 1/2 cups), for whipped topping
- 45 glight brown sugar, packed (about 3 tablespoons), for whipped topping
- 1 tsppure vanilla extract, for whipped topping
Ingredient Substitutions
Instructions
Click on an item below to shop for the recommended items for this recipe on Amazon.
As an Amazon Associate, we earn from qualifying purchases.
- Make the custard base: In a medium heavy-bottomed saucepan, whisk together the egg yolks, cornstarch, half the granulated sugar (75g), and a pinch of salt until pale and smooth, about 1 minute. Set aside.
- Heat the dairy: Combine the whole milk, heavy cream, and remaining 75g of granulated sugar in a separate medium saucepan over medium heat. Warm, stirring occasionally, until it just begins to steam and small bubbles appear around the edges, about 4 to 5 minutes. Do not let it boil.
- Temper the eggs: Slowly ladle about 120ml (1/2 cup) of the hot milk mixture into the egg yolk mixture while whisking constantly. This raises the temperature of the yolks gradually so they do not scramble. Add another ladleful, whisk again, then pour the entire tempered egg mixture back into the saucepan with the remaining hot milk.
- Cook the custard: Return the saucepan to medium heat. Cook, whisking constantly and scraping the bottom and corners of the pan, until the custard thickens noticeably and large bubbles begin to plop to the surface, about 3 to 5 minutes. Once you see those first big bubbles, continue whisking and cooking for exactly 1 more minute to fully cook out the cornstarch. The custard should be thick enough to coat the back of a spoon.
- Finish and cool: Remove from heat. Whisk in the butter cubes one at a time until fully melted, then whisk in the vanilla extract. Pour the custard through a fine-mesh strainer into a clean bowl to catch any cooked egg bits. Press a sheet of plastic wrap directly onto the surface of the custard (this prevents a skin from forming) and refrigerate until fully cold and firm, at least 2 hours or up to 2 days.
- Make the brown sugar whipped cream: Using a stand mixer with the whisk attachment or a hand mixer, beat the cold heavy cream, brown sugar, and vanilla together on medium speed until soft peaks form, then increase to medium-high until stiff peaks just hold. Do not overwhip. Refrigerate until needed.
- Assemble the pudding: Spread a thin layer of custard across the bottom of your 9×13-inch dish or trifle bowl. Arrange a single layer of vanilla wafers over the custard, covering as much surface as possible. Layer sliced bananas evenly over the wafers. Spoon or pour half of the remaining custard over the bananas and spread gently. Repeat: another layer of wafers, another layer of banana slices, then the rest of the custard.
- Top and chill: Spread or pipe the brown sugar whipped cream over the top in an even layer. Crush a small handful of vanilla wafers and scatter over the cream, or arrange whole wafers and a few extra banana slices for a classic presentation. Cover loosely and refrigerate for at least 2 hours before serving, though overnight is strongly preferred. The wafers will soften into a tender, almost cake-like layer, which is the hallmark of a great Southern banana pudding.
- Prepare the custard mixture: In a large microwave-safe bowl (at least 2-quart capacity to prevent boiling over), whisk together the egg yolks, cornstarch, all of the granulated sugar (150g), and a pinch of salt until smooth. Gradually whisk in the whole milk and heavy cream until fully combined.
- First microwave session: Microwave on HIGH for 3 minutes. Remove and whisk vigorously for 30 seconds, scraping the sides and bottom of the bowl thoroughly.
- Second and third sessions: Return to the microwave and heat in 90-second intervals, whisking thoroughly after each interval. After the first 90-second interval you will notice the mixture beginning to thicken around the edges. After the second 90-second interval it should be noticeably thick. Continue microwaving in 30-second bursts, whisking after each, until the custard is thick enough to coat a spoon heavily and falls from the whisk in thick ribbons. Total microwave time is typically 6 to 8 minutes depending on your microwave wattage.
- Finish the custard: Whisk in the butter and vanilla extract. Pour through a fine-mesh strainer into a clean bowl. Press plastic wrap directly onto the surface and refrigerate until fully cold and set, at least 2 hours.
- Assemble: Make the brown sugar whipped cream, assemble, and chill exactly as described in the Stovetop method steps 6 through 8.
- Make the custard using the full Stovetop Custard method (steps 1 through 5 above). Allow it to chill completely, at least 2 hours.
- Prepare your jars: Set out 12 half-pint (1-cup) wide-mouth mason jars or similarly sized glasses. For a cleaner presentation, crush about a third of the vanilla wafers into coarse crumbs in a zip-top bag using a rolling pin. Leave the rest whole.
- First layer: Spoon about 1 heaped tablespoon of custard into the bottom of each jar. Place 3 to 4 whole vanilla wafers upright around the inside edge of each jar, then fill the center with a few more wafers or crumbs. Add 3 to 4 banana slices in a single layer.
- Second layer: Add another 2 tablespoons of custard over the bananas, pressing it gently into the gaps. Add a few more banana slices and a small handful of wafer crumbs or broken wafers. Top with a final spoonful of custard to fill the jar to within about 1 inch of the top.
- Top and seal: Make the brown sugar whipped cream. Pipe or spoon a generous dollop onto each jar. Top with a single whole vanilla wafer pressed lightly into the cream and, if desired, a thin banana slice. Seal with lids or cover tightly with plastic wrap.
- Chill: Refrigerate for at least 2 hours before serving. The jars can be made up to 24 hours in advance. For longer storage (up to 2 days), add the whipped cream and wafer garnish no more than 2 hours before serving so the garnish stays fresh-looking.
Nutrition Per Serving
Per 1 serving (makes one 9×13-inch dish or a 3-quart trifle bowl)
Why This Recipe Works
The secret to a custard that is silky rather than gluey lies in the balance between egg yolks and cornstarch, and the technique of tempering. Egg yolks contain proteins that coagulate when heated, which gives the custard body and richness. Cornstarch provides extra thickening power and, crucially, stability: a custard thickened with cornstarch will hold its structure through the layering and chilling process without weeping as much as one thickened with flour. The tempering step, where you gradually whisk hot liquid into the cold egg mixture before returning everything to the heat, raises the temperature of the yolks slowly and prevents them from scrambling. Rushing this step is the single most common cause of lumpy custard, which is why using a fine-mesh strainer at the end is a smart safety net every time.
The resting time is not optional, it is the recipe. When the assembled pudding chills in the refrigerator, two important things happen. First, the custard firms further as the cornstarch and egg proteins set fully. Second, the vanilla wafers absorb moisture from the custard and banana juices, transforming from crisp cookies into something soft, pillowy, and almost sponge-like. This is the textural transformation that defines Southern banana pudding and distinguishes it from any other layered dessert. Attempting to serve it before this rest period gives you crunchy cookies and a loose custard, which is an entirely different and less magical experience.
Brown sugar in the whipped cream is a small change with a meaningful impact. The molasses in brown sugar adds a faint caramel bitterness that cuts through the sweetness of the bananas and custard, creating balance. Whipping very cold cream is non-negotiable because fat globules in cold cream trap air bubbles more efficiently than those in warm cream, producing a stable, airy foam. If your whipped cream weeps or goes grainy, the cream was likely too warm or was overwhipped into butter. When in doubt, stop whipping the moment stiff peaks just hold when the whisk is lifted.
Baker’s Tips
- Use bananas that are ripe but not overripe. They should be yellow with a few small brown spots. Overripe bananas turn brown and mushy in the pudding within hours, while underripe bananas are starchy and lack sweetness.
- To slow browning on banana slices, toss them briefly in a tablespoon of lemon juice before layering. The flavor difference is barely detectable in the finished pudding.
- Never stop whisking once the custard goes back on the heat after tempering. The moment you step away is the moment the bottom scorches or eggs scramble.
- Straining the finished custard is a quick step that takes 30 seconds and guarantees a perfectly smooth result. Do not skip it.
- The pudding is genuinely better on day 2. If you have the time, assemble it the night before serving. The flavors meld, the wafers soften completely, and the whole dish becomes more cohesive.
- For a cleaner presentation when serving from a dish, use a large spoon or serving spatula and scoop straight down to the bottom to capture all the layers in each portion.
- Keep your cream and mixing bowl cold. If your kitchen is warm, refrigerate the bowl and whisk attachment for 15 minutes before whipping.
Variations
- Bruleed banana version: Arrange extra banana slices on top before the whipped cream and use a kitchen torch to caramelize a sprinkle of sugar on each slice for a dramatic, creme brulee-inspired finish.
- Coconut banana pudding: Replace the heavy cream in the custard with full-fat coconut cream and add 1/2 teaspoon coconut extract along with the vanilla. Top with toasted coconut flakes.
- Bourbon banana pudding: Whisk 2 tablespoons of good bourbon into the finished custard along with the vanilla for a grown-up Southern twist. The alcohol mellows significantly as the pudding chills.
- Meringue topping: For a more classic diner-style presentation, replace the whipped cream with a Swiss or Italian meringue and toast lightly with a kitchen torch or under a broiler for 2 to 3 minutes.
- Chocolate banana pudding: Whisk 30g (1/4 cup) of Dutch-process cocoa powder into the dry custard ingredients and add 60g of finely chopped dark chocolate at the end with the butter for a rich chocolate-banana layered dessert.
Troubleshooting & FAQ
My custard turned out lumpy. What went wrong?
My custard is not thickening. How long should I cook it?
The pudding is watery at the bottom of the dish after chilling. What happened?
My whipped cream went grainy and curdled. Can I fix it?
The cookies are still crunchy after chilling for 2 hours. Did something go wrong?
Storage & Make-Ahead
- Storage: Cover the dish tightly with plastic wrap and refrigerate for up to 3 days. The wafers will continue to soften over time, which many people prefer. The whipped cream may weep slightly after day 2. For best presentation, add the whipped cream topping no more than a few hours before serving if making this ahead for guests. Do not freeze assembled banana pudding, as the custard will weep and the bananas will turn mushy upon thawing.
- Make-Ahead: The custard can be made up to 2 days ahead and stored with plastic wrap pressed to its surface in the refrigerator. The brown sugar whipped cream can be made up to 4 hours ahead and refrigerated. The fully assembled pudding (without whipped cream) can be assembled up to 24 hours ahead and refrigerated covered. Add the whipped cream topping 1 to 2 hours before serving.


This is the kind of thing I’d make for the crew back when I was still on the job. There’s something about making custard from scratch that feels like you’re actually putting care into it, you know? Those vanilla wafers soaking it up, the brown sugar whipped cream on top, that’s real comfort. Definitely going to try this one.
oh this sounds amazing honestly! from scratch custard makes such a difference – i made vanilla pudding from scratch for my nieces last month and they literally asked why store bought tasted “fake” after that lol. i’m definitely trying this version, especially with the allulose since banana pudding can get pretty heavy with sugar. quick question tho, do you have tips for keeping the wafers from getting soggy if youre making it ahead? thats always my struggle with desserts like this tbh
Oh wow, a from-scratch custard version sounds absolutely incredible. I’m always amazed at how much better things taste when you actually cook the base instead of relying on instant mixes, and I bet that vanilla flavor comes through so much cleaner with allulose. I made a custard tart last month using a sugar alternative and was nervous about the texture, but nailed it on the second try, so I’m really curious about your method here. The brown sugar whipped cream detail is genius too, that caramel note must balance beautifully against the bananas.