

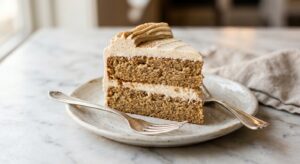
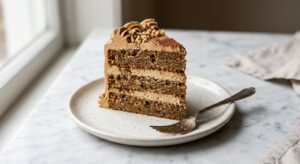
There is something quietly spectacular about a New York cheesecake. No fruit swirls, no chocolate drizzle, no distractions. Just a thick, ivory slab of impossibly creamy filling sitting on a golden, buttery graham cracker base, with a surface so smooth it almost looks like satin. Each forkful is rich and dense but never heavy, with a clean tang from the cream cheese and a faint warmth from the vanilla. It is the kind of dessert that makes a table go quiet.
What sets this version apart is the commitment to two techniques that most home bakers skip. First, a hot-start method, where the cheesecake begins at a high temperature to set the edges and encourage a very gentle dome, then the oven drops low to finish the center slowly. Second, a proper water bath, which keeps the oven environment humid and prevents the top from cracking and the texture from turning grainy or rubbery. The filling uses only full-fat cream cheese, sour cream for subtle tang and silkiness, and a small amount of heavy cream to round out the texture. No flour, no cornstarch, just eggs as the sole structure. The result is the real thing.
This recipe sits comfortably in the medium difficulty range. The steps are straightforward, but the cheesecake rewards patience: patience to let the ingredients come to room temperature, patience to mix gently, and patience to let it cool gradually in the oven. It is a wonderful weekend bake or a showstopper for a dinner party, and the good news is nearly all the work is done the day before you serve it.
12
servings
Ingredients
- Crust
- 200 ggraham crackers, finely crushed (about 14 full sheets or 1.5 cups crumbs)
- 25 ggranulated sugar (2 tbsp)
- Filling
- 0.5 tspground cinnamon
- 85 gunsalted butter, melted (6 tbsp)
- 900 gfull-fat cream cheese, at room temperature (four 8-oz blocks)
- 250 ggranulated sugar (1 cup plus 2 tbsp)
- Water Bath
- 230 gfull-fat sour cream, at room temperature (1 cup)
- 60 mlheavy whipping cream, at room temperature (1/4 cup)
- 2 tsppure vanilla extract
- 1 tspfresh lemon juice
- 0.5 tspColima Sea SaltMicroplastic Free Salt
- 4 largeeggs, at room temperature
- 1 largeegg yolk, at room temperature
- —Boiling water
Ingredient Substitutions
Instructions
Click on an item below to shop for the recommended items for this recipe on Amazon.
As an Amazon Associate, we earn from qualifying purchases.
- Position a rack in the lower third of your oven and preheat to 425°F (220°C). Tightly wrap the outside of a 9-inch springform pan (bottom and sides) with two layers of heavy-duty aluminum foil, pressing it flush against the pan to prevent water from seeping in. Grease the inside of the pan lightly with butter or nonstick spray.
- Make the crust: In a medium bowl, combine the graham cracker crumbs, 2 tablespoons granulated sugar, and cinnamon. Pour in the melted butter and mix with a fork until the crumbs look like damp sand and hold together when pressed. Transfer to the prepared springform pan and press firmly and evenly across the bottom and about 1 inch up the sides. Use the flat bottom of a measuring cup to compact it well. Refrigerate the crust while you make the filling.
- Make the filling: Beat the cream cheese in a stand mixer fitted with the paddle attachment (or with a hand mixer) on medium-low speed for 2 to 3 minutes until completely smooth and no lumps remain. Scrape down the bowl thoroughly. Add the sugar and beat on medium-low for another 2 minutes. Do not whip on high speed at any point; excess air causes cracks.
- Add the sour cream, heavy cream, vanilla extract, lemon juice, and salt. Mix on low speed until just combined, scraping the bowl once more. Add the eggs and egg yolk one at a time, beating on low after each addition only until the yellow disappears into the batter. Overmixing at this stage incorporates too much air. Give the batter a final gentle fold with a rubber spatula to ensure the bottom is fully incorporated.
- Place the foil-wrapped pan inside a large, deep roasting pan. Pour the cheesecake batter over the cold crust. Smooth the top with an offset spatula. Pull out the oven rack and set the roasting pan on it. Pour boiling water into the roasting pan until it reaches about 1 inch up the side of the springform pan. Carefully slide the rack back in.
- Bake at 425°F (220°C) for 20 minutes. Without opening the oven, reduce the temperature to 300°F (150°C) and continue baking for 50 to 55 minutes, until the edges are set and puffed and the center 2 to 3 inches still wobbles like firm jello when you gently nudge the pan. Do not bake until the center is fully still.
- Turn off the oven. Crack the oven door open about 1 inch (prop it with a wooden spoon) and let the cheesecake cool inside the oven for 1 hour. This gradual cooling step is critical for preventing cracks caused by sudden temperature change.
- Remove the cheesecake from the water bath, carefully peel off the foil, and run a thin knife or offset spatula around the inside edge of the pan to loosen the filling from the sides (this also helps prevent cracks as it contracts). Let it cool to room temperature on a wire rack, about 1 more hour. Cover loosely and refrigerate for at least 6 hours, but overnight is strongly preferred. Remove from the springform, slice with a hot clean knife, and serve cold or barely cool.
- Preheat your oven to 350°F (175°C). Make the crust exactly as in the oven method (graham crumbs, sugar, cinnamon, melted butter). Press into the 9-inch springform pan and bake for 10 minutes until golden and fragrant. Let it cool completely to room temperature before adding the filling, at least 30 minutes.
- Beat 680g (three 8-oz blocks) full-fat cream cheese, softened, with 200g (1 cup) powdered sugar, 2 teaspoons vanilla extract, 1 teaspoon fresh lemon juice, and 0.5 teaspoon fine sea salt on medium speed until completely smooth and fluffy, about 3 minutes. Fold in 230g (1 cup) full-fat sour cream and mix until silky.
- In a separate clean, cold bowl, whip 240ml (1 cup) heavy whipping cream to stiff peaks. Gently fold one-third of the whipped cream into the cream cheese mixture to lighten it, then fold in the remaining two-thirds in two additions. Work slowly to keep the filling airy. This whipped cream is what sets the no-bake version.
- Pour the filling over the cooled crust and spread into an even layer with an offset spatula. Tap the pan gently on the counter a few times to release any air bubbles. Cover tightly with plastic wrap pressed directly against the surface and refrigerate for at least 6 hours, or overnight for best results. The filling needs time to firm up fully.
- To serve, run a thin knife around the inside of the pan, release the springform, and slice with a hot clean knife. Serve cold. This version is excellent topped with fresh strawberries or a blueberry compote.
Nutrition Per Serving
Per 1 serving (makes one 9-inch cheesecake)
Why This Recipe Works
The high-then-low oven temperature is not just a stylistic choice. Starting at 425°F (220°C) quickly sets the outer ring of the cheesecake and creates a gentle convective heat that nudges the filling into a very slight dome before the structure firms. Dropping to 300°F (150°C) then allows the interior to reach its safe, set temperature of around 150°F (65°C) very gradually, without the proteins in the eggs tightening or squeezing out moisture. Overbaked cheesecake tastes grainy or rubbery for exactly this reason: the egg proteins have seized, leaving behind a tough, dry matrix instead of a smooth, custardlike one.
The water bath addresses moisture from the outside. Boiling water in the surrounding roasting pan keeps the oven air humid and the temperature around the pan walls gentle and even. Without it, the direct radiant heat from the oven walls would bake the edges far faster than the center, creating a cracked, unevenly textured result. The humidity also keeps the surface of the cheesecake pliable as it expands slightly in the heat, which dramatically reduces surface cracking. If your cheesecake still cracks despite the water bath, the most likely culprits are overmixing (excess air expanding and then collapsing) or skipping the gradual oven cooldown.
Using only eggs and no flour or cornstarch as a binder is the defining characteristic of a true New York cheesecake. Flour or starch-stabilized cheesecakes bake more forgivingly but lose that signature dense, almost fudgy texture. The egg proteins form a delicate but stable custard network within the cream cheese emulsion. Adding the eggs last, one at a time, and beating on low speed prevents over-aeration. The sour cream and heavy cream both contribute fat and liquid to keep that network tender and the final texture genuinely creamy rather than stiff.
Baker’s Tips
- Room temperature is not optional. Cold cream cheese will leave lumps in the batter that cannot be smoothed out once the other ingredients are added. Set your cream cheese, eggs, sour cream, and heavy cream out at least 1.5 to 2 hours before you begin.
- Use a paddle attachment, not a whisk, and keep the mixer on low to medium-low throughout. You want a smooth, dense batter, not a fluffy one. Air is the enemy of a crack-free cheesecake.
- Two full layers of heavy-duty foil around the springform pan is the minimum. If your roasting pan is large enough, you can also place the springform inside a slightly larger cake pan first, then put that inside the water bath, giving you double protection against leaks.
- Trust the wobble test. The cheesecake is done when the outer 2 to 3 inches are set and the very center still has a noticeable jiggle, like a soft set jello. The residual heat will carry it the rest of the way. If you wait for the center to be still, it will be overbaked.
- Run your slicing knife under hot water and wipe it dry between every single cut. This is the easiest way to get clean, professional-looking slices without dragging or tearing.
- If you see small cracks forming after cooling, a simple fix is a thin layer of full-fat sour cream (about 120g mixed with 1 tablespoon sugar) spread over the top and allowed to set in the refrigerator for 30 minutes. It conceals imperfections and adds a lovely finishing note.
Variations
- Lemon cheesecake: Add 2 tablespoons fresh lemon zest to the filling and increase the lemon juice to 2 tablespoons. Top with a thin layer of lemon curd before serving.
- Brown sugar and bourbon: Replace the granulated sugar in the filling with packed light brown sugar (same weight) and add 1 tablespoon good bourbon. The flavor is deeper and more caramel-like.
- Swirl topping: Drop 3 tablespoons of raspberry jam or Nutella over the batter in the pan before baking. Use a toothpick or skewer to draw swirls through the top. Do not over-swirl or the pattern will disappear.
- Chocolate cookie crust: Substitute the graham crackers with 200g of chocolate sandwich cookies (filling removed) for a darker, more bittersweet base.
- Mini cheesecakes: Press the crust into a 12-cup muffin tin lined with paper liners (about 1 tablespoon per cup) and divide the filling evenly. Bake at 325°F (165°C) for 18 to 22 minutes. No water bath needed. Chill for at least 3 hours.
Troubleshooting & FAQ
My cheesecake cracked across the top. What went wrong?
Why is my cheesecake still liquid or very soft in the center after the full bake time?
Water got inside the foil and soaked my crust. How do I prevent that?
My cheesecake has a grainy or lumpy texture inside. What happened?
Can I make this without a springform pan?
Storage & Make-Ahead
- Storage: Store the cheesecake tightly wrapped or in an airtight container in the refrigerator for up to 5 days. For longer storage, freeze individual slices: wrap each slice in plastic wrap, then in foil, and freeze for up to 2 months. Thaw overnight in the refrigerator.
- Make-Ahead: This cheesecake is an ideal make-ahead dessert. It must be made at least 6 hours ahead, and it is genuinely better after a full overnight rest in the refrigerator. Bake it up to 2 days before serving and keep it refrigerated in the pan until ready to release and serve. The crust can also be pressed and refrigerated up to 1 day before baking.
man this is the kind of thing that would’ve blown my mind back when i was figuring out how to cook on a budget, cheesecake always seemed impossible but those two tips about the water bath and low temp really do change everything. been meaning to try one with allulose since my guys at the program have all kinds of dietary stuff going on, gonna give this a shot and report back. thanks for breaking it down so clearly.
omg yes the water bath thing changed everything for me too, like once i realized you could actually control the baking process instead of just hoping it turns out its such a game changer. ive been making cheesecake for my little at her birthday parties now and watching her face light up when she realizes its homemade hits different, especially knowing how many people probably told us both we couldnt do hard things like this. your comment about being on a budget really resonates cause that was my whole life growing up and now i get to show young people that fancy desserts arent some untouchable thing, theyre just technique and patience.
omg reggie this is exactly it, right? like once you understand the why behind the technique instead of just following steps blind, suddenly youre not scared of it anymore and thats when the magic happens. i love that you see it as something thats actually doable cause thats the whole point – these fancy things arent locked behind some expensive door, theyre just skills and honestly teaching that to the young people in my life has been one of my favorite parts of mentoring, watching them realize they can create something beautiful with their own hands hits so different.
yo this is so real, that shift from scared to confident makes all the difference and it sounds like youre passing that on in a serious way. i see it all the time with folks in the program, once they realize they can actually do something well, like really nail it, it opens up this whole other way of seeing themselves and what theyre capable of. cheesecake might sound small but its not, its proof that beautiful things are within reach and thats everything.
Man, you just put into words exactly what I see happen at the pantry and after-school program, and it hits different when it’s about baking. There’s something about mastering a technique like this that shifts something in people, you know? They walk in thinking “cheesecake is for fancy people” and walk out knowing they created something beautiful with their own hands, and suddenly everything feels possible. Thanks for this reminder that these “small” things ripple out in ways we don’t always see coming.
man you nailed it there. my wife used to say baking was the only time our daughter would sit still long enough to listen, and somewhere between measuring flour and pulling something warm from the oven, she just got it. that feeling of making something real with your own hands, i mean that sticks with you. the water bath and low heat thing isnt really about cheesecake, is it – its about patience and knowing you can control the outcome if you slow down enough to pay attention. sounds like youre doing real work at that pantry.