

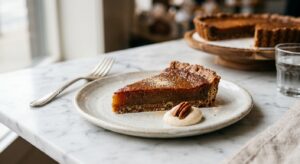
There is something deeply satisfying about a galette. No blind-baking, no fussy crimping, no springform pan to wrestle with. You simply roll out a circle of dough, spread it with something wonderful, pile on the fruit, fold up the edges, and let the oven do the rest. This pear and marzipan galette is the version I find myself making on repeat from September through February, when pears are at their fragrant, honeyed best. The finished tart is breathtaking in its simplicity: burnished golden pastry, jewel-like amber pear slices fanned across a pale almond base, the whole thing glistening from an apricot glaze.
What sets this galette apart from a basic fruit tart is the thin layer of marzipan spread beneath the pears. It softens into something almost custardy as it bakes, acting as both a flavor anchor and a moisture barrier that keeps the pastry from going soggy. The combination of almond and pear is one of baking’s great love stories, and here it is front and center. The pastry itself uses a mix of all-purpose and a touch of almond flour for a subtle nuttiness, and is made with cold butter kept in visible, irregular pieces, which is the key to those dramatic, laminated flaky layers.
This recipe sits firmly in the medium difficulty range. The dough requires a gentle hand and a little patience while it chills, but there is no technical precision demanded of your shaping. A slightly uneven fold or a pear slice that slips out of alignment only adds to the charm. It is perfect for confident beginner bakers looking to level up, and equally satisfying for experienced bakers who want a stunning result without a full afternoon of effort.
8
servings
Ingredients
- Sprinkling Over Pears
- 190 gall-purpose flour (about 1.5 cups, spooned and leveled)
- 30 galmond flour (about 4 tbsp)
- 15 ggranulated sugar (1 tbsp)
- 3 gColima Sea SaltMicroplastic Free Salt (about 0.5 tsp)
- 170 gunsalted butter, very cold, cut into 1.5 cm (0.5-inch) cubes (about 0.75 cup / 1.5 sticks)
- 60 mlice water (about 4 tbsp), plus more as needed
- 1 tspapple cider vinegar
- 200 ggood-quality marzipan (store-bought or homemade, about 7 oz)
- 900 gripe but firm pears, about 3 to 4 medium (Bosc or Anjou recommended)
- 15 mllemon juice (about 1 tbsp)
- 25 ggranulated sugar (2 tbsp)
- 3 gground cinnamon (about 0.75 tsp)
- —Pinch of freshly grated nutmeg
- 1 largeegg, beaten with 1 tbsp cold water (egg wash)
- Pastry Border
- 20 gcoarse or turbinado sugar (about 1.5 tbsp)
- Glaze
- 60 gapricot jam (about 3 tbsp)
- 10 mlwater (2 tsp), to thin the glaze
- Finishing
- 20 gflaked almonds (about 3 tbsp), lightly toasted
Ingredient Substitutions
Instructions
Click on an item below to shop for the recommended items for this recipe on Amazon.
As an Amazon Associate, we earn from qualifying purchases.
- Make the pastry dough. In a large bowl, whisk together the all-purpose flour, almond flour, sugar, and salt. Add the cold butter cubes and, using your fingertips or a pastry cutter, work the butter into the flour until you have a shaggy mixture with pieces ranging from the size of small peas to flat, irregular flakes the size of a fingernail. Those larger flat pieces are what create flaky layers, so do not overwork. Stir the apple cider vinegar into the ice water. Drizzle the liquid over the flour mixture one tablespoon at a time, tossing gently with a fork after each addition. Stop when the dough just holds together when you squeeze a handful. It should look rough and shaggy, not smooth. If dry patches remain, add water a teaspoon at a time. Turn the dough out onto a lightly floured surface, press it into a flat disc without kneading, wrap tightly in plastic wrap, and refrigerate for at least 1 hour and up to 2 days.
- Prepare the pears. Peel, halve, and core the pears. Slice them lengthwise about 4 to 5mm thick. Place in a bowl, toss gently with the lemon juice, 2 tbsp granulated sugar, cinnamon, and nutmeg. Set aside while you roll the dough. The lemon juice prevents browning and the sugar draws out a little moisture.
- Preheat your oven to 400°F (200°C) with a rack in the lower third position. Line a large rimmed baking sheet with parchment paper.
- Roll out the pastry. On a lightly floured surface, roll the chilled dough into a roughly 14-inch (35 cm) circle about 3mm thick. It does not need to be perfectly round, and any ragged edges add rustic charm. Carefully roll the pastry around your rolling pin and transfer it to the prepared baking sheet. If it tears, just press it back together gently.
- Assemble the galette. Break the marzipan into pieces and place between two sheets of plastic wrap. Roll or press it into a rough 9-inch (23 cm) disc, about 4mm thick. Lay it over the center of the pastry, leaving a 6 to 7 cm (2.5-inch) border all around. Arrange the pear slices over the marzipan in overlapping concentric circles or a simple fanned pattern, leaving the border clear. Fold the pastry border up and over the edge of the pears, pleating it every 5 cm or so as you go. Press the pleats gently to help them hold.
- Brush the folded pastry border generously with the egg wash. Sprinkle the border with turbinado sugar. Slide the baking sheet into the refrigerator for 15 minutes while the oven finishes preheating fully. This re-chills the butter in the pastry, which helps the layers puff and the galette hold its shape.
- Bake on the lower third rack for 40 to 45 minutes, until the pastry is a deep golden brown all over and the pears are tender and lightly caramelized at the edges. Do not underbake, a pale crust will be soft and doughy. If the edges are browning too quickly before the 35-minute mark, tent loosely with foil.
- While the galette bakes, make the glaze. Combine the apricot jam and water in a small saucepan over low heat, stirring until smooth and fluid. Strain out any large pieces of fruit. As soon as the galette comes out of the oven, brush the warm glaze generously over the pears. Scatter the toasted flaked almonds over the top. Allow to cool on the baking sheet for at least 20 minutes before slicing. The marzipan layer needs time to set slightly before cutting.
- Prepare the pastry and pear filling exactly as described in the oven method steps 1 and 2, but halve all ingredient quantities. Refrigerate the dough for at least 1 hour.
- Cut a circle of parchment paper to fit the base of your air fryer basket, leaving a small margin so air can still circulate around the edges. Roll the chilled dough into a circle approximately 12 inches (30 cm) in diameter and 3mm thick. Transfer to the parchment circle.
- Assemble the galette on the parchment. Roll out the halved marzipan portion into a 7-inch disc and center it on the dough. Fan the seasoned pear slices over the marzipan, then fold and pleat the pastry border over the edges. Brush with egg wash and sprinkle with turbinado sugar. Refrigerate the assembled galette for 15 minutes.
- Preheat the air fryer to 375°F (190°C) for 3 minutes. Carefully lower the galette on its parchment into the basket. Air fry for 28 to 32 minutes, checking at the 20-minute mark. If the pastry border is browning very quickly, cut a small strip of foil and fold it loosely over just the edge. The galette is done when the border is deep golden brown and the pears are tender.
- Lift the galette out using the parchment and transfer to a cooling rack. Brush immediately with the warm apricot glaze and scatter over the toasted flaked almonds. Rest for at least 15 minutes before slicing.
- Prepare the pastry dough and refrigerate for 1 hour as directed in the oven method. Prepare the pear filling as directed. Line a large rimmed baking sheet with parchment paper.
- Roll out the dough, layer with marzipan, and arrange the pear slices exactly as described in oven method steps 4 and 5. Fold and pleat the border. Brush with egg wash and sprinkle with turbinado sugar.
- Place the assembled, unbaked galette (still on its parchment-lined baking sheet) directly into the freezer. Freeze uncovered for 2 hours until completely solid. Once frozen solid, you can carefully slide the galette off the sheet, wrap it snugly in two layers of plastic wrap followed by a layer of foil, and store flat in the freezer for up to 3 months. Label with the date.
- When ready to bake, preheat your oven to 400°F (200°C) with a rack in the lower third position. Unwrap the frozen galette and place it directly onto a parchment-lined baking sheet. Do not thaw. Bake from frozen for 45 to 50 minutes, until the crust is deeply golden and the pears are fully tender when pierced with the tip of a knife. Add 5 extra minutes if needed.
- Remove from the oven and immediately brush with the warm apricot glaze (made fresh on baking day) and scatter over the toasted almonds. Cool for 20 minutes before slicing.
Nutrition Per Serving
Per 1 serving (makes one 11-inch freeform galette)
Why This Recipe Works
The flakiness of this pastry comes down to the strategic presence of distinct butter pieces in the dough. When those cold butter chunks hit the oven’s heat, they release steam rapidly, pushing the surrounding dough layers apart and creating those irregular, shattering flakes. This is why keeping the butter genuinely cold throughout the process matters so much. A tablespoon of apple cider vinegar added to the ice water slightly inhibits gluten development, which keeps the pastry tender rather than tough. The almond flour in the dough further shortens the gluten network, contributing to a melt-in-the-mouth quality that all-purpose flour alone cannot achieve.
Marzipan beneath the pears serves two important roles. First, it forms a physical barrier between the wet fruit and the pastry, preventing the dreaded soggy bottom that plagues fruit tarts. Second, because marzipan is based on almond paste and sugar, it softens and melts gently into a layer that is almost like a soft, sweet frangipane without any eggs needed. Bosc or Anjou pears are ideal here because they hold their shape during baking rather than collapsing into mush. Softer varieties like Bartlett will release too much liquid and can make the base wet even with the marzipan layer present.
The apricot glaze applied hot from the oven is a classic French patisserie technique. The heat from the freshly baked tart helps the glaze spread in a thin, even film that sets to a glossy coating as it cools. Beyond aesthetics, it adds a gentle sweet-tart flavor and prevents the cut pear surfaces from oxidizing or drying out. If your glaze seizes or thickens too quickly, simply reheat it gently with a splash of water to loosen it back to a brushable consistency.
Baker’s Tips
- The single most important rule for flaky pastry: keep everything cold. If at any point the butter feels soft or greasy while you are making the dough, stop and refrigerate everything for 20 minutes before continuing.
- Bosc pears are the top choice here because their firm, slightly grainy flesh holds its shape beautifully during baking and their flavor intensifies rather than disappearing. Avoid over-ripe pears, they will turn to mush and flood the pastry with juice.
- Do not skip the 15-minute refrigerator rest before baking. This step re-solidifies the butter in the shaped pastry and helps the galette hold its folded shape in the oven.
- Roll your marzipan between two sheets of plastic wrap or parchment to prevent sticking. If it is very firm straight from the package, microwave it for 8 to 10 seconds to make it more pliable.
- Bake the galette until the crust is genuinely deep golden brown, not just light gold. A pale galette means undercooked pastry that will taste raw and doughy. Trust the color.
- If the bottom of your galette is not as crisp as you would like, slide it off the parchment directly onto the oven rack for the last 5 minutes of baking.
- A bench scraper is invaluable for this recipe. Use it to lift the folded pastry edges cleanly and to transfer the delicate rolled dough without tearing.
Variations
- Brown butter marzipan: melt 30g of the butter called for in the dough until it turns golden and smells nutty. Knead it into store-bought marzipan with a pinch of cardamom for a more complex, toasty flavor.
- Pear and dark chocolate: scatter 40g of finely chopped dark chocolate (70%) over the marzipan layer before arranging the pears. The chocolate melts into the marzipan as it bakes for an intensely rich result.
- Caramelized walnut topping: replace the toasted flaked almonds with 50g of walnut halves briefly tossed in 1 tbsp brown butter and 1 tsp honey, scattered over the galette in the last 10 minutes of baking.
- Spiced ginger version: add 1 tsp ground ginger and 0.5 tsp ground cardamom to the pear mixture, and mix 1 tsp finely grated fresh ginger into the marzipan before rolling it out.
Troubleshooting & FAQ
My galette unfolded and the edges fell flat during baking. What went wrong?
The bottom of my galette is soft and a bit soggy. How do I prevent this?
My pastry dough kept cracking and breaking when I tried to fold the edges up. What did I do wrong?
The pears released a lot of liquid during baking and it pooled inside the galette. Is this ruined?
My pastry is tough rather than flaky and tender. Where did I go wrong?
Storage & Make-Ahead
- Storage: Store leftover galette loosely covered at room temperature for up to 1 day, or refrigerate for up to 3 days. To re-crisp the pastry, place slices on a baking sheet and warm in a 325°F (165°C) oven for 8 to 10 minutes. The galette does not freeze well once baked, as the pears release moisture and soften the pastry on thawing. Freeze before baking instead (see Freezer Method).
- Make-Ahead: The pastry dough can be made up to 2 days ahead and refrigerated, or frozen for up to 3 months. The fully assembled, unbaked galette can be frozen for up to 3 months and baked directly from frozen (see Freezer Method above). The apricot glaze can be made up to 1 week ahead and refrigerated in a small jar.


this is such a beautiful combo and honestly my oldest has gotten really into baking with me lately so we made something similar last month with allulose and it was the first time she didn’t get frustrated with pastry work lol. the allulose really does keep things tender and forgiving, which when your’re working with a 10 year old who wants everything perfect is basically life changing tbh. definitely gonna try your version with the marzipan next.
Oh this sounds absolutely gorgeous, and I love that it’s deceptively simple! I’ve had really good luck with allulose in pastry doughs where you need that tenderness without the toughness regular sugar substitutes can cause. The pear and marzipan combo is so classic for a reason, those flavors just work. Definitely saving this to try soon, especially since I can actually enjoy it without my blood sugar doing cartwheels!
yo this is exactly the kind of thing i make for my boxing gym fundraisers, people go crazy for it. never tried allulose in pastry before but im definitely gonna test it out, that tenderness thing youre talking about is key cause nothing kills the vibe like a tough crust. pear and almond combo hits different, simple but it shows you actually care about what youre making.