
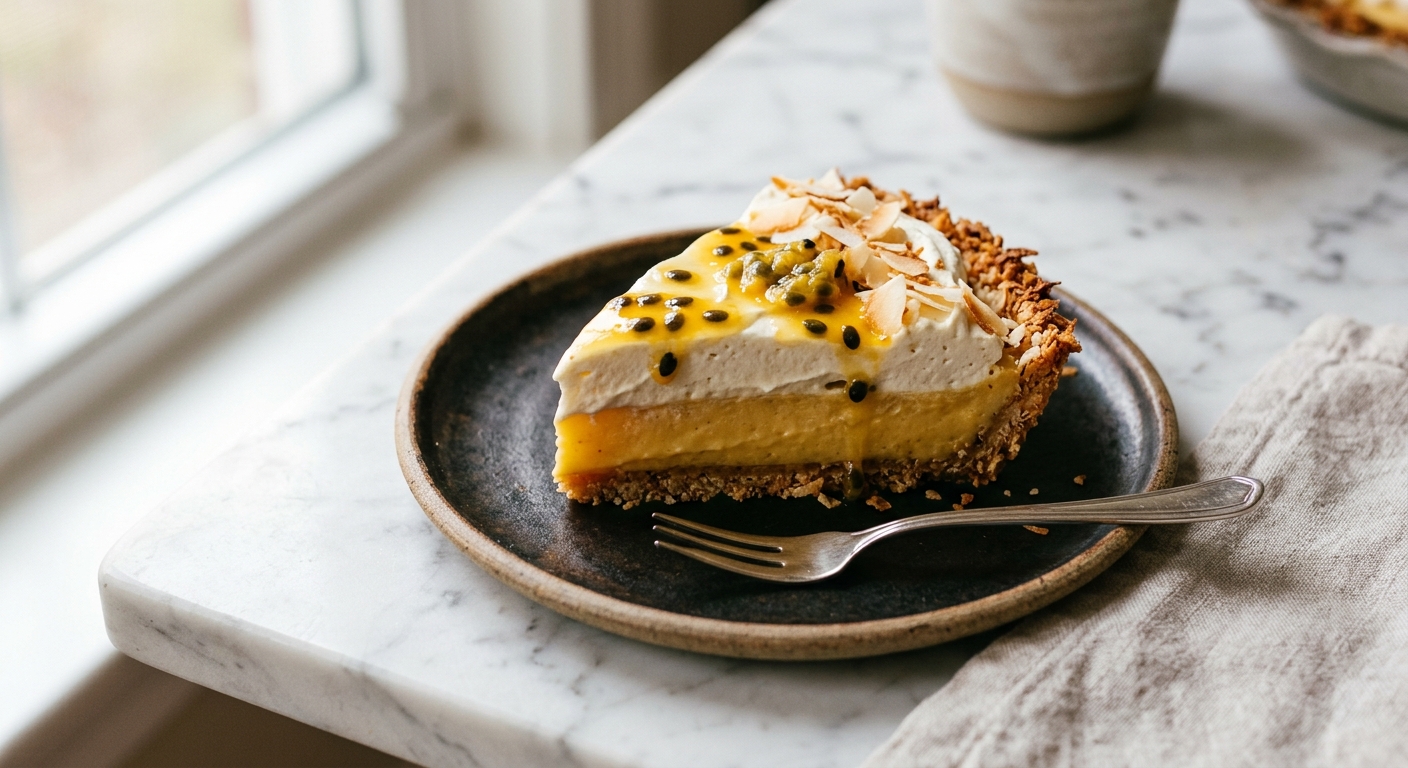
There is something almost impossibly good about passion fruit. That floral, tart, sun-drenched flavour hits you before you even take a bite, and once it meets the cool sweetness of coconut cream, something magic happens. This pie is the kind of dessert that makes guests go quiet for a moment after the first forkful, the kind that gets asked about before the main course is even finished. It is layered, it is lush, and it looks like it took far more effort than it did.
What sets this version apart is the double coconut approach: toasted desiccated coconut is pressed directly into a buttery biscuit crust for a nutty, fragrant base, and then full-fat coconut cream is whipped into a cloud-like topping. In between sits a passion fruit curd made with fresh or frozen pulp, cooked low and slow with egg yolks and butter until it is glossy, thick, and intensely flavoured. Unlike a standard cream pie that relies on gelatine alone, here the curd sets the filling firmly enough to slice cleanly, while remaining creamy rather than rubbery.
This pie sits firmly in the medium difficulty range. None of the components are technically difficult, but the curd does require a little patience and attention at the stove. It is perfect for anyone who is comfortable making a simple custard and wants to try something beyond the everyday. Plan ahead because the pie needs several hours to chill, making it an ideal make-ahead dessert for entertaining, summer celebrations, or any time you want to bring a little tropical sunshine to the table.
10
servings
Ingredients
- Crust
- 200 gdigestive biscuits or graham crackers (about 13 to 14 full crackers), finely crushed
- 60 gdesiccated coconut, unsweetened (about 3/4 cup), toasted until golden
- 30 gcaster sugar or granulated sugar (about 2 tbsp)
- 90 gunsalted butter (6 tbsp), melted and slightly cooled
- —Pinch of Colima Sea SaltMicroplastic Free Salt
- Curd
- 180 mlfresh or thawed frozen passion fruit pulp with seeds (from about 12 to 15 fresh passion fruits or one 250g packet frozen), seeds strained out, seeds reserved for garnish if desired
- 150 gcaster sugar (3/4 cup) for the curd
- 5 largeegg yolks, at room temperature
- 2 largewhole eggs, at room temperature
- 113 gunsalted butter (8 tbsp or 1 stick), cold, cut into 1-cm cubes for the curd
- 30 mlfull-fat coconut cream (2 tbsp)
- —Pinch of Colima Sea SaltMicroplastic Free Salt
- 480 mlfull-fat coconut cream (2 cups), chilled overnight in the refrigerator
- 30 gicing sugar, sifted (about 1/4 cup) for the whipped topping
- 1 tsppure vanilla extract
- 30 glarge-flake or shaved coconut, toasted
Ingredient Substitutions
Instructions
Click on an item below to shop for the recommended items for this recipe on Amazon.
As an Amazon Associate, we earn from qualifying purchases.
- Toast the coconut and make the crust: Spread the desiccated coconut on a dry baking sheet and toast in a preheated 325°F (160°C) oven for 5 to 7 minutes, stirring once halfway, until golden. Watch it closely as it goes from golden to burnt quickly. Transfer to a bowl to cool. In a medium bowl, combine the crushed biscuits, toasted coconut, caster sugar, and salt. Pour over the melted butter and mix with a fork until the mixture looks like wet sand and holds together when pressed between your fingers.
- Press and bake the crust: Tip the mixture into a 9-inch (23cm) deep-dish pie plate. Use the flat bottom of a measuring cup or glass to press the crumbs firmly and evenly across the bottom and up the sides, creating a wall about 1.5cm thick on the sides. Bake for 15 minutes until the crust is set, lightly golden on the edges, and fragrant. It will feel slightly soft when hot but will firm up completely as it cools. Set aside to cool fully, at least 30 minutes.
- Make the passion fruit curd: Strain the passion fruit pulp through a fine-mesh sieve into a medium heatproof bowl, pressing with the back of a spoon to extract as much juice as possible. Reserve the seeds in a small dish for garnish if desired. Measure out 180ml of strained juice. In a medium heavy-bottomed saucepan (not aluminium, which can react with the acid), whisk together the passion fruit juice, caster sugar, egg yolks, whole eggs, coconut cream, and salt until smooth.
- Cook the curd: Place the saucepan over medium-low heat. Cook, whisking constantly and making sure to reach the edges and bottom of the pan, for 10 to 14 minutes until the curd thickens noticeably and coats the back of a spoon. It should read 170 to 175°F (77 to 79°C) on an instant-read thermometer. Do not rush this over high heat or the eggs will scramble. Once thick, remove from the heat and immediately whisk in the cold butter cubes, a few at a time, until each addition is fully melted and incorporated. This technique, called mounting with butter, gives the curd its glossy, velvety texture.
- Strain and fill: Pour the finished curd through a fine-mesh sieve set over a clean bowl or jug to catch any small bits of cooked egg. Press through with a spatula. Pour the warm curd directly into the cooled crust. Smooth the top with an offset spatula. Press a piece of plastic wrap directly onto the surface of the curd to prevent a skin from forming. Refrigerate for at least 4 hours, or overnight, until fully set and firm enough to slice cleanly.
- Make the coconut whipped cream: Remove the chilled coconut cream from the refrigerator without shaking or tipping it. Open the can and scoop the thick, solidified cream from the top into a chilled mixing bowl, leaving behind the watery liquid below. Using a hand mixer or stand mixer fitted with the whisk attachment, whip the coconut cream on medium-high speed for 2 to 3 minutes until soft peaks form. Add the sifted icing sugar and vanilla extract and continue whipping for 1 minute until the cream holds medium peaks. Do not over-whip as coconut cream can become grainy.
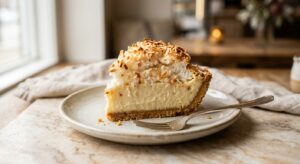
- Top and serve: Remove the plastic wrap from the chilled pie. Either spread the coconut whipped cream over the entire surface or pipe it in swirls or dollops using a large star tip. Scatter the toasted coconut flakes over the top and, if desired, spoon a small amount of reserved passion fruit seeds over the cream for a beautiful, jewel-like garnish. Serve immediately or return to the refrigerator uncovered for up to 2 hours before serving.
- Toast the coconut on the stovetop: Place the desiccated coconut in a dry medium skillet over medium heat. Stir constantly for 3 to 5 minutes until golden and fragrant. Tip into a bowl immediately and let cool. The pan method is faster than the oven but requires constant attention to avoid burning.
- Prepare the no-bake crust: In a medium bowl, combine the crushed biscuits, toasted coconut, caster sugar, and salt. Pour over the melted butter and mix until the mixture resembles wet sand and holds together firmly when pressed. Add an extra 15g (1 tbsp) of melted butter if the mixture feels too dry or crumbly, as a no-bake crust needs to be slightly richer to hold without baking.
- Press and freeze the crust: Press the mixture firmly into a 9-inch deep-dish pie plate, using the flat bottom of a glass to compact it as tightly as possible, particularly on the sides. Place the pie plate in the freezer for 60 minutes, or the refrigerator for 2 hours, until the crust is very firm and holds its shape when you gently press it. Do not fill a soft no-bake crust or it will collapse.
- Make and cool the passion fruit curd: Follow steps 3, 4, and 5 from the oven method exactly to make the curd on the stovetop. After straining, allow the curd to cool at room temperature for 20 minutes, stirring occasionally, until it is warm but no longer hot to the touch. Pouring very hot curd into a frozen no-bake crust can cause the butter in the crust to melt and the crust to slip or become greasy.
- Fill and chill: Pour the slightly cooled curd into the chilled crust and smooth the surface. Press plastic wrap directly onto the curd and refrigerate for at least 4 hours or overnight. Make the coconut whipped cream and top the pie as described in steps 6 and 7 of the oven method.
Nutrition Per Serving
Per 1 serving (makes one 9-inch deep-dish pie)
Why This Recipe Works
The baked biscuit crust works on the same principle as a cheesecake base: butter coats the crumbs and, when heated, melts and then re-sets as it cools, binding everything together into a cohesive, sliceable shell. The addition of toasted coconut introduces both texture and fat, which makes the crust taste richer and more flavourful. Toasting the coconut first is non-negotiable: raw desiccated coconut is sweet but faintly bland, while toasted coconut develops complex, nutty, caramelised notes through the Maillard reaction that make every bite of the crust interesting.
The passion fruit curd is a cooked emulsion, similar in structure to lemon curd. Egg yolks are rich in lecithin, a natural emulsifier that helps fat and liquid stay suspended together in a smooth, creamy texture rather than separating. The combination of yolks and whole eggs gives a curd that is both rich and firm enough to slice cleanly: yolks add silkiness and fat, while egg whites contribute additional protein structure. The technique of adding cold butter off the heat in small pieces, called mounting, creates an ultra-smooth, glossy finish. Each cube of cold butter emulsifies into the warm curd as it melts, adding body and a beautiful sheen. Rushing this step with warm or melted butter risks a greasy, broken curd.
Coconut cream is high in saturated fat, which means it behaves much like dairy cream when chilled: the fat solidifies and can be whipped to incorporate air. However, coconut cream is less stable than heavy cream due to differences in fat structure and the absence of dairy proteins, so it is important not to over-whip it and to keep it very cold throughout. If your coconut whipped cream begins to look grainy or curdled, it has been over-whipped or the cream was not cold enough. Unfortunately, unlike dairy cream, over-whipped coconut cream cannot be rescued, which is why gentle, attentive whipping is key.
Baker’s Tips
- Chill your coconut cream cans in the refrigerator for at least 24 hours, and ideally 48 hours, before whipping. A brief chill of a few hours is rarely enough for the cream to solidify completely.
- Use a non-reactive saucepan (stainless steel or enamel, not aluminium or uncoated cast iron) for the curd. Aluminium reacts with acidic ingredients like passion fruit juice and can give the curd a metallic off-flavour.
- When pressing the crust into the pan, use the flat bottom of a straight-sided measuring cup or glass to get smooth, even sides. Uneven crust walls lead to thin spots that crack or crumble when sliced.
- Strain the finished curd even if it looks smooth. There are almost always a few bits of set egg white that will create an unpleasant texture if left in. This one extra step makes the curd noticeably silkier.
- If your passion fruit curd seems thin after cooking, it will thicken significantly as it chills. The eggs continue to set as the temperature drops. However, if the curd has not thickened at all on the stove after 15 minutes, your heat may be too low or the eggs were added at too high a ratio of liquid. Keep cooking and whisking until it coats the back of a spoon clearly.
- For the cleanest slices, dip a sharp knife in hot water and wipe it clean between each cut.
Variations
- Passion fruit and mango layer: Pour half the curd into the crust, spread a thin layer of fresh mango puree (about 80ml), then pour over the remaining curd. The mango adds a sweeter, softer tropical note and creates a beautiful layered effect when sliced.
- Chocolate coconut base: Substitute chocolate digestives or chocolate graham crackers for the plain version and omit the added sugar. The bittersweet chocolate crust is a stunning contrast to the tart yellow curd.
- Lime and passion fruit curd: Add the finely grated zest of 2 limes to the curd along with the passion fruit juice for a sharper, more citrus-forward flavour. Reduce the passion fruit juice slightly to 160ml to keep the filling firm.
- Individual tartlets: Press the crust mixture into a 12-cup muffin tin lined with strips of baking paper for easy removal. Bake for 10 to 12 minutes. Fill with curd and chill as directed. Perfect for parties.
Troubleshooting & FAQ
My passion fruit curd is lumpy or has little white bits in it. What happened?
My crust is crumbling and falling apart when I try to slice the pie. What went wrong?
My coconut whipped cream is soupy and will not whip at all. What do I do?
The pie looks set after chilling, but when I slice it, the curd is too soft and slides out. How do I get clean slices?
My curd has a slightly greenish or off-colour tint. Is it safe to eat?
Storage & Make-Ahead
- Storage: Store the finished pie loosely covered in the refrigerator for up to 3 days. The coconut whipped cream will soften slightly after the first day but the pie remains delicious. If making ahead, store the baked crust and curd (covered) separately in the fridge and add the whipped topping within a few hours of serving. The crust (baked or no-bake) can be frozen for up to 1 month, well wrapped, before filling.
- Make-Ahead: This pie is an ideal make-ahead dessert. The crust can be baked up to 2 days ahead and stored covered at room temperature. The passion fruit curd can be made up to 3 days ahead and refrigerated with plastic wrap pressed directly onto the surface. On the day of serving, simply pour the curd into the crust, chill until set, then top with freshly whipped coconut cream. For the cleanest results, add the whipped topping no more than 2 to 3 hours before serving.


this sounds exactly like the kind of thing id make for my mom too tbh – passion fruit curd is such a smart move for adding real flavor without all the sugar. ive been experimenting with allulose in custard based stuff and your recipe looks like it nails that silky texture. gonna try this one soon, thanks for sharing.
Oh this sounds absolutely heavenly, and I’m so drawn to the idea of that passion fruit curd layer. My mom and I used to bake together years ago, before things changed, and she was always the one who could taste a recipe and know exactly what it needed. I’ve been trying to recreate some of those moments in the kitchen lately, and I think this pie might be one I attempt soon, maybe with a small batch of that curd to get the balance just right. Thank you for sharing something this beautiful and comforting.
This sounds like such a beautiful combination, and I love that you’re creating something that brings people those moments of peace and warmth. The passion fruit curd is such a smart choice for depth of flavor without the heaviness of traditional sugar, and I bet that toasted coconut crust adds such a lovely texture contrast. I’ve found that cream pies like this can be wonderful to make for people we care about, whether it’s sharing the process or just giving them that little taste of comfort. Thank you for recipes that let us do both.