

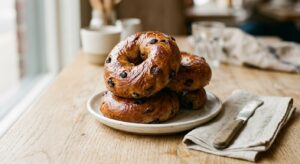
There is something almost magical about pulling a tray of Danishes from the oven. The kitchen fills with the scent of warm butter and caramelized fruit, the pastry puffs and turns deep golden at the edges, and for a moment the whole house feels like a proper European bakery. These Apricot Cream Cheese Danishes have that exact effect every single time. The contrast of the rich, lightly sweetened cream cheese against the bright, jammy apricot preserves is a combination that has stood the test of time for very good reason, and the crisp, laminated pastry beneath it all makes every bite feel like a genuine treat.
What sets this recipe apart is the use of a quick rough-puff pastry rather than store-bought puff pastry or a time-consuming full croissant dough. The technique uses cold butter chunks folded into a simple dough, creating distinct flaky layers without a full lamination process. You get that authentic bakery texture, with visible buttery layers that shatter when you bite in, in a fraction of the time. The cream cheese filling is stabilized with a touch of egg yolk and cornstarch so it holds its shape during baking rather than weeping or spreading, and a small amount of lemon zest brightens the whole thing beautifully.
These Danishes sit comfortably at a medium difficulty level. You do not need any professional equipment or special skills, but you do need to respect the chilling times, as cold butter is the secret to every flaky layer. They are perfect for a leisurely weekend morning, a brunch spread, or any time you want to genuinely impress people with something homemade. First-time Danish makers and experienced home bakers alike will find this recipe reliable and deeply satisfying.
12
servings
Ingredients
- Cream Cheese Filling
- 300 gall-purpose flour (about 2.5 cups, spooned and leveled), plus extra for dusting
- 2 tspinstant yeast
- 30 ggranulated sugar (about 2.5 tbsp)
- 0.75 tspColima Sea SaltMicroplastic Free Salt
- 120 mlwhole milk, warmed to about 100°F (38°C) (about 0.5 cup)
- 2 largeeggs, at room temperature (1 for the dough, 1 for the egg wash)
- 225 gunsalted butter, very cold, cut into 1 cm cubes (2 sticks or about 1 cup)
- 225 gfull-fat cream cheese, at room temperature (8 oz or 1 block)
- 50 gpowdered sugar, sifted (about 0.5 cup)
- 1 largeegg yolk, at room temperature
- 1 tsppure vanilla extract
- 1 tspcornstarch
- 1 tspfinely grated lemon zest (from about half a lemon)
- 240 ggood-quality apricot preserves (about 0.75 cup), stirred smooth
- Egg Wash
- 1 tbspwhole milk
- Vanilla Glaze
- 120 gpowdered sugar, sifted (about 1 cup)
- 2 tbspwhole milk
- 0.5 tsppure vanilla extract
- —Pinch of Colima Sea SaltMicroplastic Free Salt
Ingredient Substitutions
Instructions
Click on an item below to shop for the recommended items for this recipe on Amazon.
As an Amazon Associate, we earn from qualifying purchases.
- Make the rough-puff dough: In a large bowl, whisk together the flour, instant yeast, granulated sugar, and salt. Add the cold butter cubes and toss to coat with flour. Using your fingertips, quickly flatten the butter pieces into thin, irregular shards – you want visible streaks of butter throughout the dough, not a sandy mixture. Work quickly so the butter stays cold.
- Add the warm milk and one egg to the flour-butter mixture. Stir with a fork until a shaggy dough forms. Turn it out onto a lightly floured surface and press it together just until it holds. Do not knead. The dough should look rough and uneven – that is correct. Flatten it into a rectangle, wrap tightly in plastic wrap, and refrigerate for 30 minutes.
- On a lightly floured surface, roll the chilled dough into a rectangle approximately 12 x 18 inches (30 x 45 cm). Fold it into thirds like a letter (fold one third over the center, then the remaining third over the top). Rotate the dough 90 degrees, roll it out again to the same size, and fold again. Wrap and refrigerate for another 30 minutes. This second chill is important – warm butter will melt into the dough rather than creating layers.
- Make the cream cheese filling: In a medium bowl, beat the cream cheese with an electric mixer or by hand until smooth and lump-free, about 2 minutes. Add the sifted powdered sugar, egg yolk, vanilla extract, cornstarch, and lemon zest. Beat until combined and silky. Set aside at room temperature.
- Preheat your oven to 375°F (190°C). Line two large baking sheets with parchment paper. Remove the dough from the refrigerator and roll it out on a floured surface to a rectangle about 12 x 18 inches (30 x 45 cm) and roughly 4 mm thick. Using a sharp knife or pizza cutter, cut the dough into 12 equal squares, approximately 4 x 4.5 inches each.
- Shape the Danishes: Place each dough square on the prepared baking sheets, spaced at least 2 inches apart. Spoon about 1.5 tablespoons of cream cheese filling into the center of each square. Make a small well in the center of the cream cheese and add 1 heaped teaspoon of apricot preserves. Fold two opposite corners of each square toward the center and press them firmly onto the filling to anchor them. The sides will remain open, which is classic Danish style.
- Make the egg wash by whisking together the remaining egg and 1 tbsp milk. Brush the exposed pastry edges and the folded corners of each Danish with egg wash, being careful not to drip it down the cut sides, as this can prevent the layers from rising. Let the shaped Danishes rest at room temperature for 20 minutes while the oven finishes preheating – this brief rest allows the yeast to wake up and start a gentle rise.
- Bake for 22 to 25 minutes, until the pastry is deep golden brown and the cream cheese filling has set with just a slight wobble when you gently shake the pan. The apricot filling will be bubbling at the edges. Transfer the Danishes to a wire cooling rack and allow to cool for at least 15 minutes before glazing.
- Make the vanilla glaze: Whisk together the sifted powdered sugar, 2 tbsp milk, vanilla extract, and a pinch of salt until completely smooth. It should fall from the spoon in a slow, steady ribbon. If too thick, add milk half a teaspoon at a time. Drizzle generously over the warm (not hot) Danishes. Serve warm or at room temperature.
- Prepare the rough-puff dough and cream cheese filling exactly as described in the oven method, including both sets of folds and chilling times. The lamination process is identical regardless of cooking method.
- Shape the Danishes as described in the oven method. Since air fryer baskets vary in size, plan to work in batches of 2 to 4 Danishes. Cut and shape only the number you plan to cook immediately, keeping the remaining dough refrigerated until needed.
- Preheat your air fryer to 340°F (170°C) for 5 minutes. Cut a piece of parchment paper to fit your air fryer basket, leaving a small gap around the edges for air circulation. Place the shaped Danishes on the parchment, spacing them at least 1.5 inches apart.
- Brush the exposed pastry with egg wash as described in the oven method. Do not let the Danishes rest for the 20-minute proof in this method as the air fryer’s circulating heat can dry out the surface quickly. Proceed directly to baking.
- Air fry at 340°F (170°C) for 12 to 14 minutes. Check at the 10-minute mark: the pastry should be golden brown and puffed, and the cream cheese should be set. If the tops are browning too quickly before the pastry is cooked through, loosely tent a small piece of foil over the basket for the final 2 to 3 minutes. Remove carefully using tongs and the parchment. Cool on a wire rack for 10 minutes before drizzling with the vanilla glaze.
- Prepare the rough-puff dough and cream cheese filling exactly as described in the oven method, including both sets of folds and all chilling times.
- Shape all 12 Danishes and place them on a parchment-lined baking sheet. Apply the egg wash at this stage. Do not allow them to proof at room temperature. Instead, slide the entire tray into the freezer and freeze uncovered for 1 to 2 hours until the Danishes are completely solid.
- Once frozen solid, transfer the Danishes to a zip-top freezer bag or airtight container, placing a small sheet of parchment between layers to prevent sticking. Label with the date. Frozen unbaked Danishes keep for up to 6 weeks.
- To bake from frozen: Preheat your oven to 375°F (190°C). Place the frozen Danishes on a parchment-lined baking sheet at least 2 inches apart. Do not thaw them first. Apply a second light brush of egg wash to refresh the shine. Let them sit at room temperature for 15 minutes while the oven heats.
- Bake for 28 to 32 minutes, until deeply golden brown and the cream cheese filling is fully set with no jiggle. Because they go in cold, they will need the extra time compared to the fresh method. The layers will still be beautifully flaky. Cool on a wire rack for 15 minutes, then drizzle with freshly made vanilla glaze before serving.
Nutrition Per Serving
Per 1 serving (makes 12 individual Danishes)
Why This Recipe Works
The rough-puff technique in this recipe is rooted in the same science as classic laminated doughs like croissant and puff pastry, but streamlined for the home kitchen. When you press cold butter into flat shards and fold the dough repeatedly, you are creating alternating layers of fat and dough. In the oven’s heat, the water content in both the butter and the dough converts to steam, and that steam pushes the layers apart from the inside out, creating the characteristic lift and flakiness. Keeping the butter cold throughout the process is non-negotiable: if it softens and smears into the dough rather than remaining as distinct pieces, the layers will merge and the pastry will bake up dense and bready rather than shattering and flaky.
The cream cheese filling uses two stabilizers working in tandem. The egg yolk adds fat and protein that set when heated, helping the filling firm up and hold its shape in the center of the pastry rather than melting and running. The cornstarch absorbs excess moisture from both the cream cheese and the apricot preserves during baking, preventing the dreaded soggy bottom and watery filling. Using full-fat cream cheese is important here: reduced-fat versions have a higher water content and will weep more readily even with the stabilizers in place.
The small amount of yeast in the dough is deliberate and serves a specific purpose. Unlike a true croissant dough where the yeast creates significant rise and an open crumb, here the yeast is present in a modest amount to add a subtle fermented complexity to the flavor and to give the pastry just enough of a lift to remain tender rather than brittle. The brief 20-minute room-temperature rest before baking allows the yeast to begin activating without over-proofing the dough, which would disrupt the layered structure. If your kitchen is particularly warm, keep this rest closer to 15 minutes.
Baker’s Tips
- Keep everything cold. Chill your mixing bowl, work quickly, and return the dough to the refrigerator immediately if you feel the butter starting to soften. Cold butter is the single most important factor in flaky pastry.
- When cutting the dough squares, use one clean, decisive downward press with a sharp knife rather than a sawing motion. Dragging the blade through the dough compresses the layers at the edges and prevents a clean rise.
- Press the folded corners firmly onto the cream cheese filling. They need something to grip or they will unfurl and open up during baking. A dab of egg wash under the corners also helps them stay put.
- Do not overfill. It is tempting to add extra cream cheese and preserves, but overfilling causes the filling to bubble over onto the pastry and steam the layers, preventing a proper flake. Stick to the stated amounts.
- Let the Danishes cool for at least 15 minutes before glazing. If they are too hot, the glaze will run completely off and will not set attractively. You want them warm enough that the glaze drizzle softens slightly and clings.
- For the most even browning, rotate your baking pans halfway through the bake time, especially if your oven has hot spots.
- Bring the cream cheese fully to room temperature before making the filling. Cold cream cheese will not beat smooth and will leave lumps that are very difficult to incorporate once the egg yolk and sugar are added.
Variations
- Raspberry cream cheese Danish: Replace the apricot preserves with seedless raspberry jam. Add a few fresh raspberries on top of the jam before baking for extra color and tang.
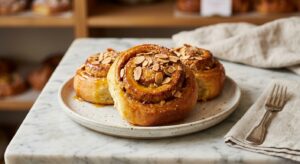
- Almond cream cheese Danish: Add 0.5 tsp almond extract to the cream cheese filling and sprinkle sliced almonds over the egg-washed pastry before baking. Top with the glaze as written.
- Blueberry lemon Danish: Replace the apricot preserves with blueberry jam and increase the lemon zest in the cream cheese filling to 1 full tablespoon. Add a squeeze of fresh lemon juice to the glaze.
- Savory prosciutto and fig Danish: Omit the sugar from the cream cheese filling and add fresh thyme and black pepper. Replace the apricot preserves with fig jam and drape a small piece of prosciutto over the filling before baking. Skip the vanilla glaze and finish with a drizzle of honey instead.
Troubleshooting & FAQ
My pastry came out dense and bready instead of flaky. What went wrong?
My cream cheese filling spread out and made the pastry soggy. How do I prevent this?
The folded corners on my Danishes opened up completely during baking. How do I keep them closed?
My Danishes did not rise or puff at all. What happened?
My vanilla glaze is lumpy and will not drizzle smoothly. How do I fix it?
Storage & Make-Ahead
- Storage: Store cooled Danishes in an airtight container at room temperature for up to 2 days, or refrigerate for up to 4 days. To refresh, warm in a 325°F (165°C) oven for 5 to 8 minutes until the pastry crisps up again. The vanilla glaze may absorb slightly into the pastry when refrigerated, which is normal.
- Make-Ahead: The rough-puff dough can be made through both folds, wrapped tightly, and refrigerated for up to 2 days or frozen for up to 1 month. The cream cheese filling can be made up to 3 days ahead and stored covered in the refrigerator. For the most efficient approach, use the Freeze-Ahead and Bake method above to have ready-to-bake Danishes on hand for up to 6 weeks.


oh man this looks incredible, my kids would go absolutely crazy for these and honestly so would i. been looking for something special to make for our neighborhood coffee meet-up next weekend and this might be it, especially since i can keep the sugar down with your recipes. do you have any tips for keeping the pastry flaky when you’re working with the allulose, or is the technique pretty much the same as regular danish dough?
oh these look absolutely gorgeous and i love that theyre made with allulose because my son can actually enjoy them without the blood sugar spikes, you know? we do so much baking together and its one of our favorite ways to spend time, so finding recipes that work for his body while still tasting like the real deal is just… it means everything. definitely saving this for our next baking date, hes gonna love the apricot and cream cheese combo!
man these look incredible, especially with allulose so your blood sugar stays stable afterwards. ive been there with the whole “what can i actually eat” thing and baking with better sweeteners changed everything for me tbh. the apricot and cream cheese combo sounds perfect – do you find the preserves stay in place during the bake or does it leak out the sides?