
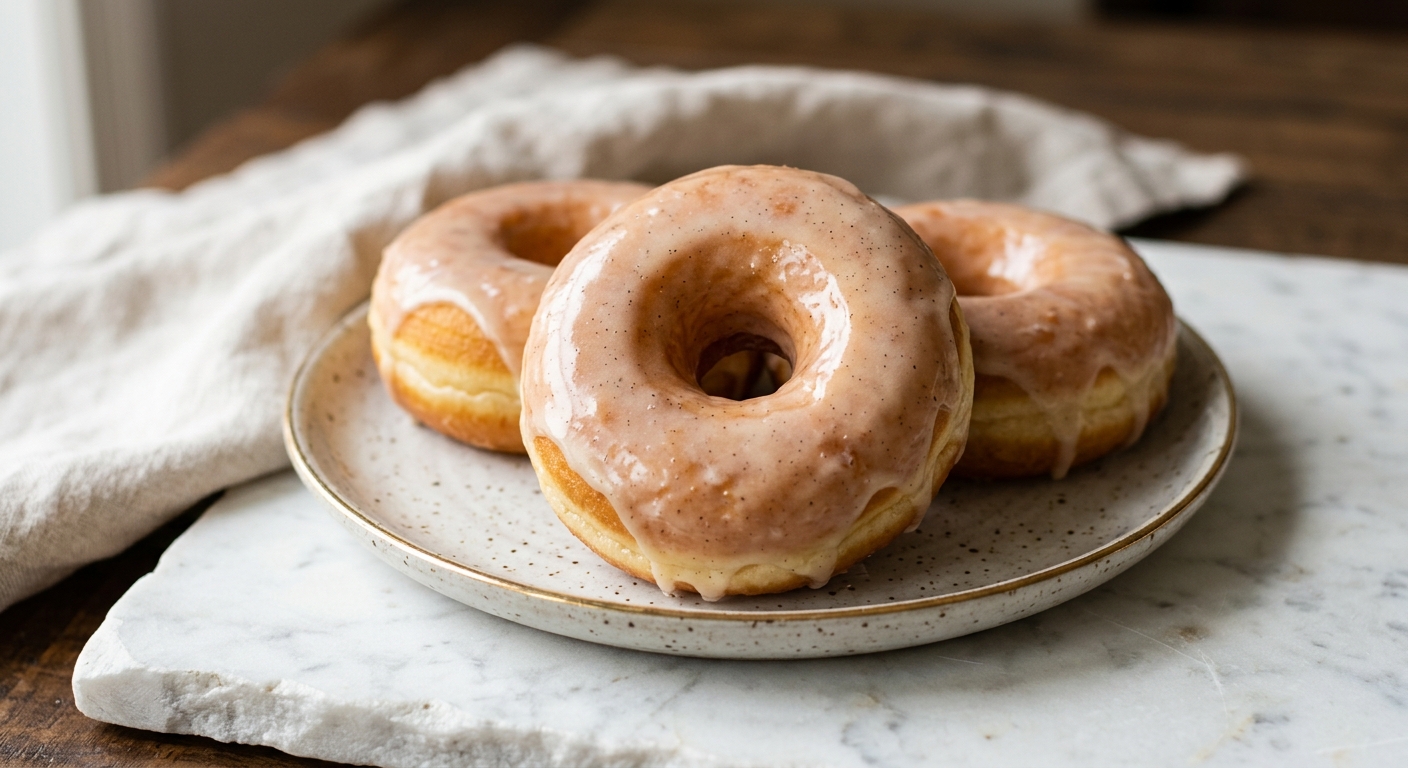
There is a particular magic that happens on a slow weekend morning when the kitchen smells of warm yeast dough and hot oil, and a tray of golden rings sits cooling on a rack, about to be dipped into a pool of glossy vanilla glaze. These are the doughnuts of childhood memory and bakery daydreams – pillowy and light, with a tender crumb that pulls apart in soft, airy layers. They have just enough chew from the yeast fermentation, a whisper of nutmeg in the dough, and that impossibly thin glaze that sets into a delicate, crackling shell over the warm surface.
What sets this recipe apart is a slow, cold overnight rise in the refrigerator. Most home recipes rush the fermentation with a single warm rise, but the extended cold fermentation develops a depth of flavour you simply cannot shortcut. The yeast works slowly and steadily, building complex, mildly tangy notes that make these doughnuts taste like they came from a serious bakery. The dough also uses whole milk and egg yolks for richness, plus a touch of butter worked in after the initial mix, creating a supple, smooth dough that fries up evenly golden without absorbing excess oil.
This recipe is rated medium difficulty – not because any single step is complicated, but because it requires patience and a bit of planning. You will need a thermometer (for both the dough liquid and the frying oil), and the overnight chill means you must start the evening before you plan to serve them. That said, the hands-on time is surprisingly modest, and the result is genuinely extraordinary. This recipe is perfect for the home baker who loves a weekend project with a breathtaking payoff.
12
servings
Ingredients
- 120 mlwhole milk, warmed to 110°F (43°C) (about 1/2 cup)
- 120 mlwater, warmed to 110°F (43°C) (about 1/2 cup)
- 7 gactive dry yeast (1 standard packet, 2 1/4 tsp)
- 50 ggranulated sugar (about 1/4 cup), divided
- 480 gall-purpose flour (about 4 cups, spooned and leveled), plus more for dusting
- 1 tspColima Sea SaltMicroplastic Free Salt
- 0.25 tspfreshly grated nutmeg
- 3 largeegg yolks, at room temperature
- 1 tsppure vanilla extract
- 57 gunsalted butter, softened to room temperature (4 tbsp or 1/2 stick)
- —Avocado Oil100% Pure Avocado Oil for frying (vegetable, canola, or refined coconut), about 2 litres (2 quarts)
- 360 gpowdered sugar, sifted (about 3 cups)
- 80 mlwhole milk, warm (about 1/3 cup), plus more as needed for glaze consistency
- 1 tsppure vanilla bean paste (or seeds of 1 vanilla bean)
- —Pinch of Colima Sea SaltMicroplastic Free Salt (for the glaze)
Ingredient Substitutions
Instructions
Click on an item below to shop for the recommended items for this recipe on Amazon.
As an Amazon Associate, we earn from qualifying purchases.
- Make the dough: In a small bowl or the bowl of your stand mixer, combine the warm milk, warm water, yeast, and 1 tsp of the granulated sugar. Whisk gently and let sit for 5 to 10 minutes until foamy and fragrant. If the yeast does not foam, it is likely dead or the liquid was too hot – start again with fresh yeast.
- Add the flour, remaining sugar, salt, nutmeg, egg yolks, and vanilla extract to the yeast mixture. Mix on low speed with the dough hook (or stir with a wooden spoon) until a shaggy dough forms, about 2 minutes. Increase to medium speed and knead for 5 minutes until the dough comes together but may still look a little rough.
- Add the softened butter one tablespoon at a time, waiting for each piece to be fully incorporated before adding the next. This will take about 4 to 5 minutes. The dough will look greasy and fall apart at first – keep going. Once all butter is incorporated, knead on medium-high for another 4 to 5 minutes until the dough is smooth, supple, and only slightly tacky. It should pass the windowpane test: stretch a small piece gently and it should become thin and translucent without tearing.
- Shape the dough into a ball and place it in a lightly oiled bowl, turning once to coat. Cover tightly with plastic wrap. Let it rise at room temperature for 30 minutes, then transfer to the refrigerator and chill for 8 to 12 hours (overnight). The dough will rise slowly in the fridge and develop its flavour. Do not skip the cold rise.
- The next morning, line two large baking sheets with parchment paper and dust lightly with flour. Turn the cold dough out onto a lightly floured surface. It will be firm and easy to work with straight from the fridge. Roll it to about 1.5 cm (5/8 inch) thick. Use a 3-inch (7.5 cm) round cutter to cut doughnuts, and a 1-inch (2.5 cm) cutter for the holes. Re-roll scraps once. Place the cut doughnuts and holes on the prepared baking sheets, spacing about 5 cm (2 inches) apart.
- Cover the cut doughnuts loosely with a clean kitchen towel or lightly oiled plastic wrap. Let them proof at room temperature for 1 to 1.5 hours, until they look noticeably puffed and feel light and pillowy when you gently prod one. They will not double in size, but they should jiggle slightly. Doughnuts that are under-proofed will be dense; over-proofed ones will blister or fall apart in the oil.
- While the doughnuts finish proofing, heat the frying oil in a large, heavy-bottomed pot or Dutch oven. You want at least 10 cm (4 inches) of oil. Use a deep-fry or candy thermometer and bring the oil to 350°F (175°C). Maintain this temperature throughout frying. Too cool and the doughnuts absorb oil and become greasy; too hot and the outside scorches before the inside is cooked.
- Set a cooling rack over a paper-towel-lined baking sheet. Using a flat spatula or bench scraper, gently lower 2 to 3 doughnuts into the oil – do not crowd the pot. Fry for 90 seconds to 2 minutes per side, until deep golden brown. Use a spider strainer or slotted spoon to flip once and to remove them. Transfer to the rack. Fry doughnut holes for about 60 seconds per side, turning frequently. Allow the oil to return to 350°F between each batch.
- Make the glaze: Whisk together the sifted powdered sugar, warm milk, vanilla bean paste, and pinch of salt until completely smooth and pourable. It should coat the back of a spoon and drip in a slow, steady ribbon. If it is too thick, add milk one teaspoon at a time. If too thin, whisk in a little more powdered sugar.
- Glaze while warm: Dip the top of each doughnut into the glaze, let the excess drip off, then flip and set glazed-side up on the rack. The glaze will begin to set in about 5 minutes. Doughnut holes can be tossed directly in the glaze or rolled in cinnamon sugar. Serve within 1 to 2 hours of glazing for the best texture.
- Prepare and cold-rise the dough following steps 1 through 4 of the deep-fry method. The dough preparation is identical regardless of cooking method.
- Roll out the cold dough to 1.5 cm (5/8 inch) thick on a lightly floured surface. Cut doughnuts and holes as directed. Place on parchment-lined baking sheets and proof at room temperature for 1 to 1.5 hours, covered loosely, until puffed and pillowy.
- Cut small squares of parchment paper (about 4 x 4 inches / 10 x 10 cm) and place one doughnut on each square. This makes them far easier to transfer into the air fryer basket without deflating them. Do not skip this step.
- Preheat your air fryer to 375°F (190°C) for 3 minutes. Lightly spray the basket with cooking spray. Lower 2 to 3 doughnuts (still on their parchment squares) into the basket, spacing them so they do not touch. Air fry for 5 to 6 minutes, flipping carefully at the 3-minute mark, until both sides are golden brown. Remove the parchment squares after the first minute of cooking – they will release on their own once the doughnuts set.
- Immediately brush the hot doughnuts generously on all sides with 2 tbsp of melted unsalted butter. This step is important: it adds fat and richness that the doughnuts would otherwise absorb from the frying oil, and it helps the glaze adhere. Repeat with remaining doughnuts, working in batches. Air fry doughnut holes for 3 to 4 minutes, shaking the basket halfway through.
- Glaze as directed in the deep-fry method while the doughnuts are still warm. Air-fried doughnuts are best eaten within 1 hour of cooking, as the exterior can firm up more quickly than the deep-fried version.
- Prepare and cold-rise the dough following steps 1 through 4 of the deep-fry method. The dough is the same regardless of how you cook it.
- Roll and cut the doughnuts as directed. Transfer to two baking sheets lined with parchment paper. For the cleanest shape, use the parchment-square trick: cut individual squares for each doughnut so you can move them without distortion. Proof at room temperature for 1 to 1.5 hours, covered, until puffed and airy.
- Preheat your oven to 375°F (190°C). Bake one sheet at a time on the middle rack. Do not glaze or brush with anything before baking. Bake for 10 to 12 minutes, until the tops are light golden brown and the doughnuts spring back when lightly pressed. Do not over-bake or they will dry out quickly. They should look barely golden, not deeply browned.
- Remove from the oven and immediately brush every surface – top, sides, and bottom through the rack – with 3 to 4 tablespoons of melted unsalted butter. Be generous. This is the most important step for baked doughnuts: the butter adds fat, flavour, and creates the surface the glaze needs to adhere to. Let them cool on a rack for 3 minutes.
- Prepare the glaze as directed and dip the still-warm buttered doughnuts. The glaze will set more slowly on baked doughnuts, so give them at least 8 to 10 minutes before serving. Baked doughnut holes can be rolled in cinnamon sugar while still warm and buttered. Serve within 2 to 3 hours for best texture.
Nutrition Per Serving
Per 1 serving (makes 12 doughnuts plus 12 doughnut holes)
Why This Recipe Works
The overnight cold fermentation is the single most important technique in this recipe, and it works on two levels. First, the slow, cool environment allows the yeast to produce carbon dioxide at a very measured pace, resulting in a fine, even crumb with many small bubbles rather than a few large, uneven ones. Second, and more importantly for flavour, the extended time allows enzymes in the flour to break down starches and proteins into smaller, more flavourful compounds, including esters and organic acids that create that distinctive, subtly complex taste you find in bakery-quality doughnuts. This is the same principle behind overnight bread doughs and long-fermented pizza dough.
The technique of adding butter after the initial dough has come together is borrowed from enriched French doughs like brioche. Adding fat too early coats the flour proteins and physically prevents them from hydrating and forming gluten strands. By allowing the flour to fully hydrate and the gluten network to begin developing first, then slowly incorporating the butter, you end up with a dough that has both strength (from well-developed gluten) and tenderness (from the fat dispersed throughout). The result is a doughnut that holds its ring shape beautifully in the oil but pulls apart into soft, delicate layers when you bite in.
Frying temperature is critically important to both texture and appearance. At 350°F (175°C), the exterior of the doughnut sets quickly enough to trap steam inside (which puffs the doughnut) while the interior has time to cook through without the outside over-browning. If the oil is too cool (below 340°F / 171°C), the dough absorbs oil before a crust can form, leading to greasy, heavy doughnuts. Above 365°F (185°C), the crust browns and hardens before the centre is done, and the doughnut may split along the sides. A reliable thermometer is not optional here.
Baker’s Tips
- Temperature is everything: use an instant-read or candy thermometer for the liquid when proofing the yeast (aim for 105 to 115°F / 40 to 46°C) and a deep-fry thermometer throughout frying. These two temperatures are the difference between success and failure.
- The windowpane test tells you when the dough is properly developed: take a small piece and gently stretch it between your fingers. If it stretches into a thin, translucent membrane without tearing, the gluten is ready. If it tears immediately, keep kneading for 2 more minutes.
- Cold dough is your friend. Working with the dough straight from the refrigerator makes rolling and cutting far easier and produces cleaner shapes. Do not let it warm to room temperature before rolling.
- Do not discard the doughnut holes. They are the cook’s reward, and they fry up in about 60 seconds. Toss them in cinnamon sugar while still hot or dip them in the glaze.
- Use a digital scale. This is a dough where precision matters. Flour especially varies wildly between cups – too much makes a dense, tight doughnut; too little and the dough will be unworkably sticky and the doughnuts will spread.
- Fry in small batches of 2 to 3 doughnuts at a time. Adding too many at once dramatically drops the oil temperature, leading to uneven cooking and oil absorption.
- To check if a proofed doughnut is ready for frying, gently poke it with a floured fingertip. The indentation should slowly spring back about halfway. If it springs back completely and immediately, it needs more time. If the indent stays and does not spring back at all, it is over-proofed.
- Glaze while the doughnuts are warm (not hot) for the best set. A warm surface helps the glaze adhere and creates that classic crackle as it cools.
Variations
- Cinnamon sugar doughnuts: Skip the glaze entirely. While the doughnuts are still hot from frying, toss them in a bowl of 100g (1/2 cup) granulated sugar mixed with 2 tsp ground cinnamon.
- Chocolate glaze: Replace the vanilla bean paste in the glaze with 2 tbsp sifted Dutch-process cocoa powder and 60g (2 oz) melted dark chocolate. Add a tiny pinch of espresso powder to deepen the chocolate flavour.
- Filled doughnuts: Do not cut holes. After frying and cooling for 5 minutes, use a piping bag fitted with a Bismarck tip to fill with vanilla pastry cream, lemon curd, or seedless raspberry jam. Dust generously with powdered sugar instead of glazing.
- Maple bacon glaze: Add 2 tbsp pure maple syrup to the base glaze in place of 2 tbsp of the milk. After dipping, top each doughnut with 1 tbsp of finely crumbled crispy bacon before the glaze sets.
- Cardamom rose: Add 1/2 tsp ground cardamom to the dough with the nutmeg. For the glaze, replace the vanilla bean paste with 1 tsp rose water and add 1 drop of pink food colouring for a delicate blush.
Troubleshooting & FAQ
My yeast did not foam during proofing. What went wrong?
My doughnuts came out greasy and heavy, not light and airy. What happened?
The doughnuts are browning on the outside but raw and doughy inside. How do I fix this?
My doughnuts puffed unevenly or split along the sides while frying. What caused this?
My glaze is too thick and clumps on the doughnuts instead of coating smoothly. How do I fix it?
Storage & Make-Ahead
- Storage: Yeast doughnuts are best eaten the day they are made, ideally within 2 to 3 hours of glazing. Store leftovers in an airtight container at room temperature for up to 1 day. Do not refrigerate glazed doughnuts – the cold air stales them rapidly. Unglazed fried doughnuts can be frozen in a zip-lock bag for up to 1 month; thaw at room temperature and re-glaze after warming briefly in a 300°F (150°C) oven for 5 minutes.
- Make-Ahead: The dough can be made up to 2 days ahead and stored covered in the refrigerator. The cut, unproofed doughnuts can also be frozen on a baking sheet until solid, then transferred to a freezer bag for up to 1 month. To use from frozen, place on a parchment-lined tray, cover, and proof at room temperature for 3 to 4 hours before frying. The glaze can be made up to 3 days ahead and stored in an airtight jar in the refrigerator; whisk well and warm gently before using.


oh these are gonna be dangerous in my kitchen – i made something similar last month and my oldest (stepdaughter, number three of the crew) ate like four before i could even get them boxed up. the vanilla bean glaze is calling my name, especially since allulose wont mess with blood sugar like regular sugar does and means i can actually enjoy these without feeling guilty about feeding them to the whole chaotic bunch of us. definitely trying the overnight rise thing ruth mentioned, that’s the kind of slow baking that actually fits my life instead of fighting it.
These sound absolutely divine, and I really appreciate how you’re honoring the craft here. I’ve found that slowing down with yeast doughs, especially letting them rise overnight in a cool spot like Ruth mentioned, gives you time to breathe too – there’s something grounding about working with your hands and trusting the process. Can’t wait to try this vanilla bean glaze.
These sound absolutely heavenly, and I love that you’re bringing back the real thing. I’ve had the best luck with yeast doughs when I slow down and let them rise in a cool spot overnight, kind of like how horses teach you that good things can’t be rushed, and something about that patience seems to translate into the most tender crumb. The vanilla bean glaze is calling to me especially, that shatteringly thin layer sounds like just enough sweetness without overwhelming things. Can’t wait to try this one.