
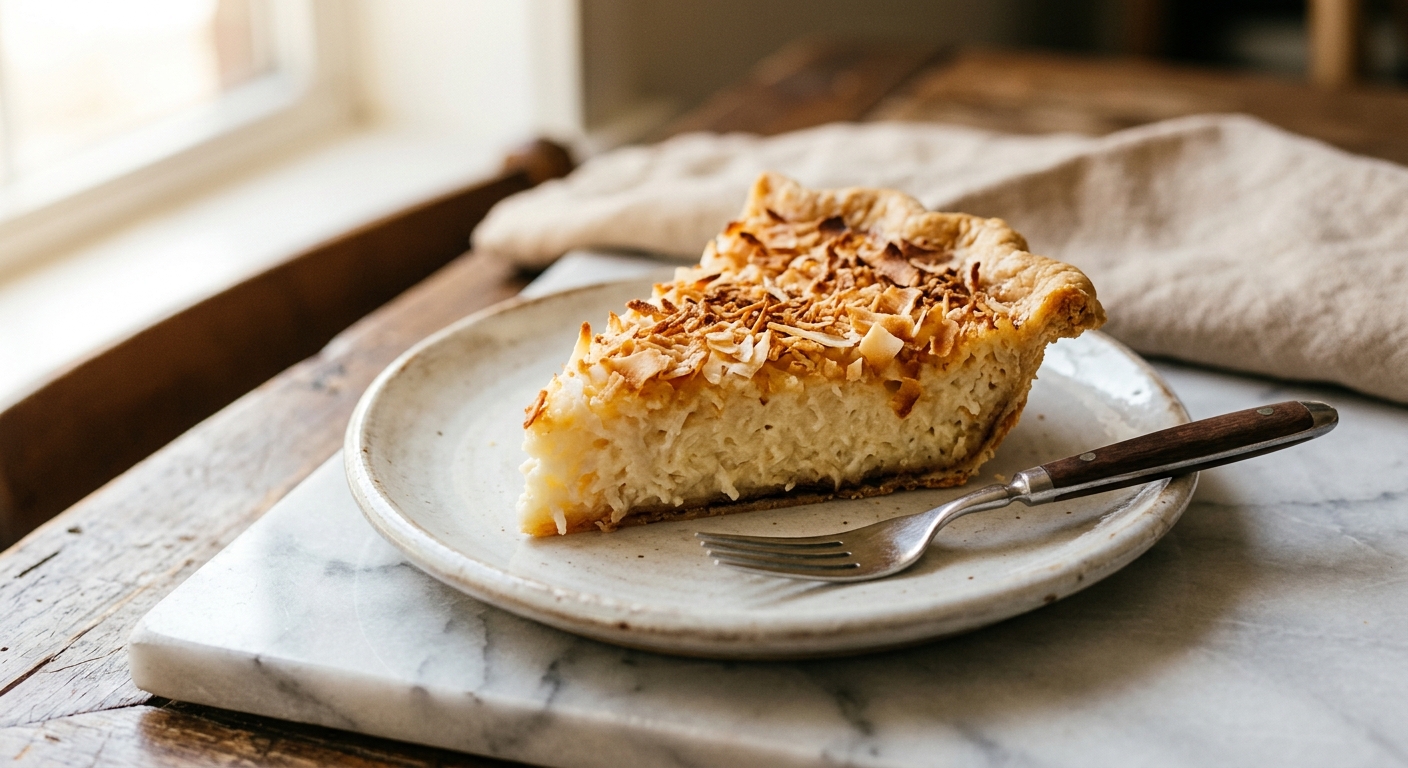
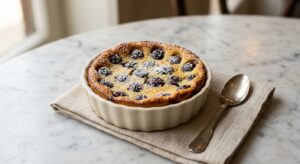
There is something quietly extraordinary about a well-made coconut custard pie. The filling trembles just slightly when you pull it from the oven, pale and fragrant, the kitchen smelling of warm vanilla and toasted coconut. It is not a showy dessert – no towering layers or dramatic glazes – just pure, honest comfort in a fluted crust. The kind of pie your grandmother might have made on a Sunday afternoon without consulting a single recipe, and somehow it was always perfect.
What sets this version apart is the combination of full-fat coconut milk alongside whole milk, which gives the custard a deeper, more rounded coconut flavor without tipping into sweetness. The eggs are tempered gently before joining the warm dairy, which prevents any hint of scrambled texture and produces that famously smooth, spoonable custard. A pre-baked crust is non-negotiable here – it keeps the bottom crisp and golden rather than soggy – and a generous handful of coconut is toasted separately and scattered over the top just before serving so every bite has a little texture and warmth.
This pie sits firmly in the medium difficulty range. There are a few steps that require your attention, particularly the tempering of the eggs and the blind-baking of the crust, but nothing here is beyond a home baker with a little patience. It is an ideal weekend bake, lovely for a family dinner, a potluck, or any occasion where you want to bring something genuinely impressive that tastes like it took far more effort than it did.
8
servings
Ingredients
- Crust
- 190 gall-purpose flour (about 1.5 cups, spooned and leveled)
- 1 tbspgranulated sugar
- 0.5 tspColima Sea SaltMicroplastic Free Salt
- 115 gcold unsalted butter, cut into 1/2-inch cubes (about 1/2 cup)
- 3 tbspice water, plus more as needed
- 400 mlfull-fat coconut milk, well shaken (one 13.5 oz can)
- 240 mlwhole milk (1 cup)
- 150 ggranulated sugar (3/4 cup)
- 3 largeeggs
- 2 largeegg yolks
- 2 tbspcornstarch
- 1 tsppure vanilla extract
- Deeper Coconut Flavor)
- 0.25 tspcoconut extract (optional
- Filling
- 0.25 tspColima Sea SaltMicroplastic Free Salt
- 80 gsweetened shredded coconut (about 1 cup), divided: half stirred into the filling, half toasted for topping
- Egg Wash On The Crust
- —1 egg beaten with 1 tbsp water
Ingredient Substitutions
Instructions
Click on an item below to shop for the recommended items for this recipe on Amazon.
As an Amazon Associate, we earn from qualifying purchases.
- Make the pie dough: Whisk together the flour, 1 tablespoon sugar, and 1/2 teaspoon salt in a large bowl. Add the cold butter cubes and, using your fingertips or a pastry cutter, work the butter into the flour until the mixture resembles coarse crumbs with some pea-sized pieces of butter remaining – those chunks are what create flakiness. Drizzle in 3 tablespoons ice water and stir with a fork until the dough just comes together, adding water one teaspoon at a time if needed. The dough should hold when pressed but not feel wet or sticky. Shape into a flat disc, wrap tightly in plastic wrap, and refrigerate for at least 1 hour or up to 2 days.
- Blind-bake the crust: Preheat your oven to 375°F (190°C). On a lightly floured surface, roll the chilled dough into a 12-inch circle about 1/8-inch thick. Carefully transfer it to a 9-inch pie dish, pressing gently into the bottom and sides. Trim any overhang to about 1 inch and fold it under itself to create a thick edge, then crimp decoratively. Refrigerate for 15 minutes. Line the crust with parchment paper and fill with pie weights or dried beans. Bake for 15 minutes, then remove the parchment and weights. Brush the inside of the crust lightly with egg wash and return to the oven for 5 to 7 minutes more, until the bottom looks dry and pale gold. Remove and reduce the oven temperature to 325°F (165°C).
- Make the custard filling: Combine the coconut milk, whole milk, and sugar in a medium saucepan over medium heat. Whisk occasionally and heat until the mixture is steaming and just beginning to simmer at the edges – do not boil. Meanwhile, whisk the whole eggs, egg yolks, and cornstarch together in a large bowl until completely smooth and no lumps remain.
- Temper the eggs: Very slowly pour the hot milk mixture into the egg mixture in a thin, steady stream, whisking constantly as you pour. Go slowly at first – if you rush, the heat will scramble the eggs. Once about half the hot milk is incorporated, you can pour the rest more steadily. Stir in the vanilla extract, coconut extract if using, and 1/4 teaspoon salt. Stir in half the shredded coconut (about 40g).
- Fill and bake: Pour the custard mixture through a fine-mesh strainer into the pre-baked crust to catch any stray egg bits and ensure a silky texture. Bake at 325°F (165°C) for 40 to 45 minutes, until the edges are set but the center 2 to 3 inches still has a gentle jiggle when you nudge the pan. The custard will continue to firm up as it cools – if you wait until it looks completely set in the oven, it will be overbaked.
- Cool and chill: Remove the pie from the oven and let it cool on a wire rack at room temperature for 1 hour. Then refrigerate uncovered for at least 1 hour (or up to overnight) until fully chilled and set. The custard needs this chill time to slice cleanly.
- Toast the coconut topping: While the pie chills, spread the remaining 40g of shredded coconut in a single layer in a dry skillet over medium-low heat. Stir frequently for 3 to 5 minutes until golden and fragrant. Watch carefully – coconut goes from golden to burnt very quickly. Immediately transfer to a plate to cool. Scatter generously over the top of the fully chilled pie just before serving.
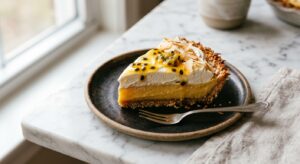
- Prepare your crust: Use a 9-inch store-bought graham cracker crust, or make one by combining 200g (about 1.5 cups) graham cracker crumbs, 50g (1/4 cup) sugar, and 85g (6 tablespoons) melted butter. Press firmly into a 9-inch pie dish, going up the sides, and refrigerate for 30 minutes to firm up. No baking required.
- Cook the stovetop custard: Whisk together the whole eggs, egg yolks, sugar, cornstarch, and salt in a medium heavy-bottomed saucepan until smooth. Gradually whisk in the coconut milk and whole milk. Place over medium heat and cook, whisking constantly and making sure to reach into the corners of the pan, for 8 to 12 minutes until the custard thickens noticeably, begins to bubble gently, and coats the back of a spoon. Once it bubbles, cook for a full 1 minute more, whisking vigorously – this ensures the cornstarch is fully activated and the custard will hold its set.
- Finish the filling: Remove from heat immediately. Stir in the vanilla extract, coconut extract if using, and half the shredded coconut (40g). To ensure a silky texture, pour the hot custard through a fine-mesh strainer into a clean bowl or large measuring cup, pressing gently with a spatula.
- Fill and chill: Pour the strained custard into the prepared crust. Press a sheet of plastic wrap directly onto the surface of the custard – this prevents a skin from forming. Refrigerate for at least 2 hours, or until completely cold and firmly set.
- Finish and serve: Peel away the plastic wrap carefully. Toast the remaining 40g of coconut in a dry skillet over medium-low heat, stirring constantly, for 3 to 5 minutes until golden. Cool completely, then scatter over the pie. Slice with a sharp knife dipped in warm water and wiped clean between cuts.
Nutrition Per Serving
Per 1 serving (makes one 9-inch single-layer pie)
Why This Recipe Works
Custard pies set through the coagulation of egg proteins. As the eggs heat in the oven (or on the stovetop), their proteins gradually unfold and link together, forming a delicate but stable gel that holds the liquid dairy in suspension. The key word here is gradually – that is why we bake this pie at a relatively low 325°F (165°C). High heat causes the proteins to seize and tighten too aggressively, squeezing out liquid and creating a rubbery, weeping custard. A gentle oven means even, slow coagulation and that coveted silky texture. The slight jiggle in the center when you pull it from the oven is not a sign of underbaking; it is a sign you have done everything right.
The combination of whole eggs and egg yolks is deliberate. Whole eggs contribute both the white proteins (which set firmly) and the yolk fats (which enrich and smooth). The additional yolks tip the balance toward creaminess and a deeper golden color, since yolks are rich in emulsifying lecithin. Meanwhile, the cornstarch acts as a safety net: it gelatinizes around 203°F (95°C) and adds body to the custard, giving it a little extra insurance against weeping or a soft set – especially useful for the no-bake stovetop method where the eggs must be cooked through directly rather than gently in the oven.
Tempering is the most important technique in this recipe. When you pour hot liquid slowly into raw eggs while whisking, you gradually raise the egg temperature without shocking and curdling them. If you dump all the hot milk in at once, the eggs cook unevenly and you will end up with sweet, vanilla-scented scrambled eggs rather than custard. Take your time, pour in a thin stream, and whisk constantly – it takes about 60 seconds and is entirely worth it. Straining the finished mixture before pouring into the crust is your final safeguard, catching any small bits of cooked egg white that sneak through despite careful tempering.
Baker’s Tips
- Keep your butter genuinely cold for the crust. If it warms up while you are working, pop the whole bowl in the freezer for 10 minutes before continuing. Visible butter chunks in the dough are a good thing – they create steam during baking, which is what makes pastry flaky.
- Do not skip the chill time for the dough before rolling. Resting relaxes the gluten, making the dough easier to roll and less likely to shrink dramatically during blind-baking.
- Use pie weights all the way to the top of the crust during blind-baking. If the weights only fill the bottom, the sides will still slump and slide down.
- When tempering the eggs, use one hand to pour the hot milk and the other to whisk continuously. If you are nervous, have someone else pour while you whisk, or set the bowl on a damp kitchen towel to prevent it from spinning.
- The jiggle test: gently nudge the pan. The outer inch or two should be set and barely move, while the center 2 to 3 inches should wobble like soft Jello. If the whole surface ripples like water, it needs more time. If there is no jiggle at all, pull it immediately.
- Toast the coconut topping in small batches if you have never done it before. It goes from pale to golden to scorched in less than a minute once it gets going. Stay at the stove and stir the entire time.
Variations
- Lime coconut custard: Add the zest of 2 limes and 1 tablespoon of fresh lime juice to the custard for a brighter, more tropical flavor profile.
- Dark rum and coconut: Stir 1.5 tablespoons of dark rum into the finished custard just before pouring into the crust for a grown-up, Caribbean-inspired twist.
- Chocolate coconut: Melt 60g of good-quality dark chocolate and spread a thin layer over the blind-baked crust before adding the custard. Let it set for 5 minutes before filling. The thin chocolate layer creates a barrier that also keeps the crust extra crisp.
Troubleshooting & FAQ
My custard has a watery layer on the bottom after it chills. What went wrong?
My custard looks set but tastes eggy or has a slightly rubbery texture. How do I fix this?
The bottom of my pie crust is soggy even though I blind-baked it. What happened?
My custard did not set and is still liquid even after chilling for hours. What went wrong?
My pie crust shrank a lot during blind-baking and now the filling will overflow. How do I prevent this?
Storage & Make-Ahead
- Storage: Store the pie loosely covered in the refrigerator for up to 4 days. Add the toasted coconut topping only just before serving, as it softens in the fridge. The pie does not freeze well once filled, as the custard can weep and become grainy upon thawing.
- Make-Ahead: The pie dough can be made up to 2 days ahead and refrigerated, or frozen for up to 1 month. The blind-baked crust can be prepared 1 day ahead and stored covered at room temperature. The fully baked and filled pie (without the coconut topping) can be made 1 day ahead and refrigerated. Toast and add the coconut topping within an hour of serving.

This sounds absolutely incredible, and I’m so here for a pie that doesn’t need a mountain of sugar to taste amazing. I’ve been baking more with allulose since my treatment ended (turns out chemo brain made me extra motivated to find recipes that won’t spike my blood sugar), and coconut custard is legitimately one of my favorite flavors to work with because it’s naturally rich. The blind-baking tip is chef’s kiss important too, because nothing’s worse than fighting a soggy crust halfway through eating. Definitely bookmarking this one!
man this hits different, im so glad youre baking again anya – thats real strength right there. made a coconut custard situation a few months back at the program and watching people light up over something homemade and actually good for them, no guilt attached, that stayed with me. this recipe looks solid and the allulose swap is clutch, no weird aftertaste like some alternatives get. gonna try it with the blind bake technique you mentioned cause thats usually where i fumble.
I’m so glad you’re finding your way back to baking, Anya – that takes real courage and it sounds like you’re discovering something beautiful in the process. I bet this pie would be perfect for sharing with folks who’ve supported you through everything, and there’s something special about a dessert that lets the real flavors shine without all the extra sweetness getting in the way. Can’t wait to hear how it turns out for you.