

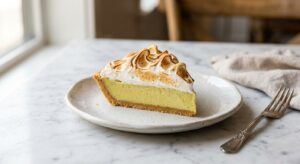
There is something almost magical about the first slice of a chocolate cream pie. The crust shatters ever so slightly under the knife, the filling holds its shape with a gentle wobble, and the scent of cool peppermint mingles with deep, bittersweet chocolate in a way that feels unmistakably festive. Whether it is sitting on a Christmas Eve dessert table or being pulled from the fridge on a cold Tuesday night when you simply need something extraordinary, this pie delivers every single time.
What sets this version apart is a from-scratch cooked custard filling rather than the instant pudding shortcut. Cooking the filling on the stovetop allows the cornstarch to fully gelatinize, the egg yolks to enrich the custard, and the chocolate to melt into something genuinely luxurious rather than starchy or gummy. A measured amount of pure peppermint extract is stirred in off the heat so the bright, cooling flavor stays vivid and clean, never soapy or medicinal. The Oreo cookie crust adds a satisfying bitterness that keeps the whole pie from feeling overly sweet.
This pie sits at a medium difficulty level, mainly because the stovetop custard requires your attention and a confident hand with a whisk. But there is no complicated pastry to roll, no blind-baking, and no water bath. If you have made a pudding or pastry cream before, you are well prepared. If you have not, this is an excellent place to start. It is ideal for anyone who loves a make-ahead dessert, since the pie actually needs several hours in the refrigerator to set properly, meaning most of the work happens the day before serving.
10
servings
Ingredients
- Filling
- 300 gOreo cookies, filling included (about 26 cookies), finely crushed
- 75 gunsalted butter, melted (about 5 tbsp)
- 1 tbspgranulated sugar
- 200 ggranulated sugar (about 1 cup)
- 40 gcornstarch (about 5 tbsp)
- 30 gunsweetened Dutch-process cocoa powder (about 4 tbsp)
- —Pinch of Colima Sea SaltMicroplastic Free Salt
- 720 mlwhole milk (about 3 cups)
- Custard
- 120 mlheavy cream (about 1/2 cup)
- 5 largeegg yolks
- 170 gbittersweet chocolate (60 to 70% cacao), finely chopped
- Filling
- 30 gunsalted butter, cut into pieces (about 2 tbsp)
- 1 tsppure peppermint extract
- 1 tsppure vanilla extract
- Topping
- 360 mlheavy cream, cold (about 1.5 cups)
- Whipped Cream
- 30 gpowdered sugar, sifted (about 4 tbsp)
- 0.5 tsppure peppermint extract
- Garnish (about 2 Tbsp)
- 30 gcrushed candy canes or peppermint candies
- Garnish (optional)
- 30 gdark chocolate shavings or curls
Ingredient Substitutions
Instructions
Click on an item below to shop for the recommended items for this recipe on Amazon.
As an Amazon Associate, we earn from qualifying purchases.
- Make the crust: Preheat your oven to 350°F (175°C). In a food processor, pulse the Oreo cookies (filling and all) into fine crumbs. You should have about 360g of crumbs. Stir in the melted butter and 1 tbsp granulated sugar until the mixture looks like wet sand and holds together when pressed. Press firmly and evenly into the bottom and up the sides of a 9-inch deep-dish pie plate, using the flat bottom of a measuring cup to compact it. Bake for 10 minutes, until the crust feels set and smells toasty. Transfer to a wire rack and let cool completely before filling.
- Make the custard base: In a medium heavy-bottomed saucepan, whisk together 200g granulated sugar, the cornstarch, cocoa powder, and a pinch of salt until combined. Gradually whisk in the whole milk and 120ml heavy cream in a slow, steady stream until smooth, with no dry pockets of cornstarch remaining.
- Temper the egg yolks: In a medium bowl, whisk the egg yolks until smooth. Place the saucepan over medium heat and cook the milk mixture, whisking constantly, until it begins to steam and just barely bubble at the edges, about 8 to 10 minutes. Ladle roughly 240ml (1 cup) of the hot milk mixture into the egg yolks in a thin, steady stream while whisking vigorously. This is tempering: it gently warms the yolks so they do not scramble when added to the hot saucepan.
- Cook the custard to a thick finish: Pour the tempered egg mixture back into the saucepan, whisking as you pour. Return to medium heat and cook, whisking constantly and reaching into the corners of the pan, until the custard thickens noticeably and large bubbles pop slowly at the surface, about 3 to 5 more minutes. Once you see those slow, thick bubbles, cook for exactly 2 more minutes, whisking the whole time. This step cooks out the raw starch flavor and ensures the cornstarch is fully activated.
- Finish the filling: Remove the pan from the heat. Add the finely chopped chocolate and the 30g butter pieces and stir gently until both are completely melted and incorporated. Stir in the peppermint extract and vanilla extract. Taste the filling and note how the peppermint blooms as it cools slightly. If you prefer a stronger peppermint flavor, add an additional 1/4 tsp.
- Fill and chill: Pour the warm filling through a fine-mesh strainer set over a bowl to catch any accidentally cooked bits of egg, then pour it directly into the cooled Oreo crust. Smooth the top with an offset spatula. Press a sheet of plastic wrap directly onto the surface of the filling to prevent a skin from forming. Refrigerate for at least 4 hours, or overnight. The pie is fully set when the center does not jiggle when the plate is gently nudged.
- Whip the cream and serve: When ready to serve, combine the cold 360ml heavy cream, sifted powdered sugar, and 1/2 tsp peppermint extract in a large chilled bowl. Whip with a hand mixer or stand mixer on medium-high speed until soft peaks form, then continue to stiff peaks. Spread or pipe the whipped cream over the chilled pie. Scatter crushed candy canes and chocolate shavings over the top. Slice with a sharp knife warmed briefly under hot water and wiped dry between cuts.
- Make the no-bake crust: In a food processor, pulse the Oreo cookies into fine crumbs. Stir in the melted butter and 1 tbsp granulated sugar. The mixture should hold together firmly when squeezed in your fist. Press it evenly and firmly into a 9-inch deep-dish pie plate, going up the sides. Place the crust in the freezer for 30 minutes minimum while you make the filling. Do not skip this step: the freezer cold sets the butter so the crust holds its shape when the warm custard is added.
- Prepare the custard: In a medium heavy-bottomed saucepan, whisk together the 200g granulated sugar, cornstarch, cocoa powder, and salt. Slowly whisk in the whole milk and 120ml heavy cream until completely smooth. In a separate bowl, whisk the egg yolks until smooth. Set both aside.
- Cook and temper: Place the saucepan over medium heat. Cook, whisking constantly, until the mixture steams and barely bubbles at the edges, about 8 to 10 minutes. Ladle 240ml of the hot liquid into the yolks in a thin stream while whisking. Pour the yolk mixture back into the saucepan. Return to medium heat and cook, whisking constantly, until large slow bubbles appear on the surface. Cook 2 more minutes. Remove from heat.
- Finish and cool slightly: Stir in the chopped chocolate, 30g butter, peppermint extract, and vanilla extract until fully melted and smooth. Strain the filling through a fine-mesh strainer. Allow the strained filling to cool for 10 minutes at room temperature, stirring occasionally. This brief rest prevents the very hot filling from softening the chilled crust too dramatically.
- Fill and chill: Remove the crust from the freezer. Pour the slightly cooled filling into the crust and smooth the top. Press plastic wrap directly onto the surface. Refrigerate for at least 4 hours or overnight until completely set. When ready to serve, whip the cold heavy cream, powdered sugar, and peppermint extract to stiff peaks, top the pie, and garnish with crushed candy canes and chocolate shavings.
Nutrition Per Serving
Per 1 serving (makes one 9-inch deep-dish pie, serving 10)
Why This Recipe Works
The foundation of a great chocolate cream pie is a properly cooked cornstarch custard, and the technique here is deliberate. Cornstarch thickens liquids through gelatinization: starch granules absorb water and swell when heated, creating the network that gives the custard its sliceable body. The crucial step of cooking the custard for a full 2 minutes after the first big bubbles appear is not optional; it ensures the amylase enzymes in the egg yolks (which would otherwise break down the starch and cause the filling to weep and thin out) are deactivated by the heat. Skipping this step is the most common reason chocolate cream pies end up soupy after a day in the fridge.
Tempering the egg yolks rather than adding them directly to the hot mixture prevents scrambled eggs in your custard. By slowly raising the temperature of the yolks with hot liquid before introducing them to the full pan, you bring them gradually into the cooking zone without shocking them. The yolks contribute richness and a silky mouthfeel that you simply cannot replicate with cornstarch alone. Adding the chopped chocolate and butter off the heat (rather than back on the burner) ensures the chocolate is not overheated, preserving its glossy texture and nuanced flavor. The butter adds a final layer of smoothness and a gentle sheen to the finished surface.
Peppermint extract is added off the heat for an important reason: high temperatures cause volatile aromatic compounds to evaporate quickly. Adding it once the pan is removed from the burner preserves the cool, bright peppermint flavor rather than cooking it into a flat or harsh note. If your pie ever tastes faintly of spearmint rather than peppermint, check your extract label: true peppermint extract comes from peppermint oil and has a sharper, cooler profile than spearmint. For the same reason, the whipped cream gets its own small dose of extract rather than relying on the filling to carry all the peppermint flavor through the cream layer.
Baker’s Tips
- Use a deep-dish 9-inch pie plate for this recipe. A standard pie plate may not hold the full volume of filling and you risk overflow.
- Chop the chocolate as finely as possible before starting. Smaller pieces melt faster and more evenly into the hot custard, reducing the risk of any unmelted lumps.
- Whisk constantly and do not walk away from the stove during the custard cooking step. Even a minute without stirring can lead to scorched spots on the bottom of the pan.
- If your finished custard has any lumps from bits of cooked egg, straining it through a fine-mesh sieve before pouring it into the crust will give you a perfectly smooth filling every time.
- Chill your mixing bowl and whisk or beaters in the freezer for 10 minutes before whipping the cream. Cold equipment means faster, more stable whipped cream.
- For clean, beautiful slices, run a sharp knife under very hot water, wipe it completely dry, and make one smooth cut. Repeat the hot-water-and-wipe process between every slice.
- Start with a modest amount of peppermint extract and taste as you go. Peppermint varies in intensity between brands, and the flavor intensifies as the pie chills.
Variations
- Mocha peppermint version: Whisk 1.5 tsp instant espresso powder into the dry ingredients with the cocoa. The coffee deepens the chocolate flavor without tasting distinctly like coffee.
- White chocolate peppermint: Replace the bittersweet chocolate with 200g finely chopped good-quality white chocolate, reduce granulated sugar to 120g, and omit the cocoa powder. The filling will be ivory-colored and intensely sweet, perfect for a striking visual contrast with the dark Oreo crust.
- Mint chocolate chip version: Stir 80g mini chocolate chips into the finished custard just before pouring into the crust for bursts of chocolate throughout the filling.
- Individual mini pies: Divide the crust mixture and filling among a 12-cup standard muffin tin lined with plastic wrap for neat removal. Reduce chilling time to 2 hours. Ideal for parties or buffet tables.
Troubleshooting & FAQ
My custard filling is runny and will not set. What went wrong?
My filling has lumps of what looks like scrambled egg. Can I fix it?
The peppermint flavor tastes harsh or almost soapy. Did I use too much?
My Oreo crust is crumbling apart when I try to slice the pie. What did I do wrong?
My whipped cream topping has gone flat and watery by the time I serve the pie. How do I prevent this?
Storage & Make-Ahead
- Storage: Cover the finished pie loosely with plastic wrap or a pie dome and refrigerate for up to 4 days. Note that the candy cane garnish will begin to dissolve after the first day, so add it just before serving if making ahead. The pie does not freeze well once assembled, as the custard can weep and the whipped cream deflates on thawing. However, the baked crust alone can be wrapped and frozen for up to 1 month.
- Make-Ahead: This pie is a brilliant make-ahead dessert. The crust can be baked and stored at room temperature (covered) up to 2 days ahead. The chocolate filling can be made and poured into the crust up to 2 days before serving. Cover and refrigerate. Add the whipped cream topping no more than 2 to 3 hours before serving to keep it looking fresh and billowy. The candy cane garnish should always go on at the last minute.


This is the kind of dessert that makes sense to me – looks impressive but straightforward to execute, and using allulose means people can actually enjoy it without the sugar crash afterward. I’ve baked plenty over the years and I’ve learned that the best recipes are the ones that don’t require a chemistry degree or hours of fussing. Will definitely be trying this one out.
oh my gosh this sounds absolutely DIVINE!! i used to make something similar for christmas dinner but mine always had so much sugar the kids would be bouncing off the walls, so im so excited to try this with the allulose because you KNOW i still want that perfect creamy texture, not that weird aftertaste situation, you know? this is exactly what i need to bring to my nephews thanksgiving next month and everyone will think im some kind of fancy baker when really im just following your gorgeous recipe, god bless you for these creations!
this is exactly the kind of dessert i love teaching people to make at the house, bc it looks fancy but doesnt require an oven and honestly thats half the battle when youre learning to build confidence in the kitchen. the peppermint and chocolate combo is perfect too, feels celebratory without needing to go overboard on sweetness, and having the kids actually enjoy dessert without the sugar crash is a win nobody talks about enough. gonna try this one with my group next week.