
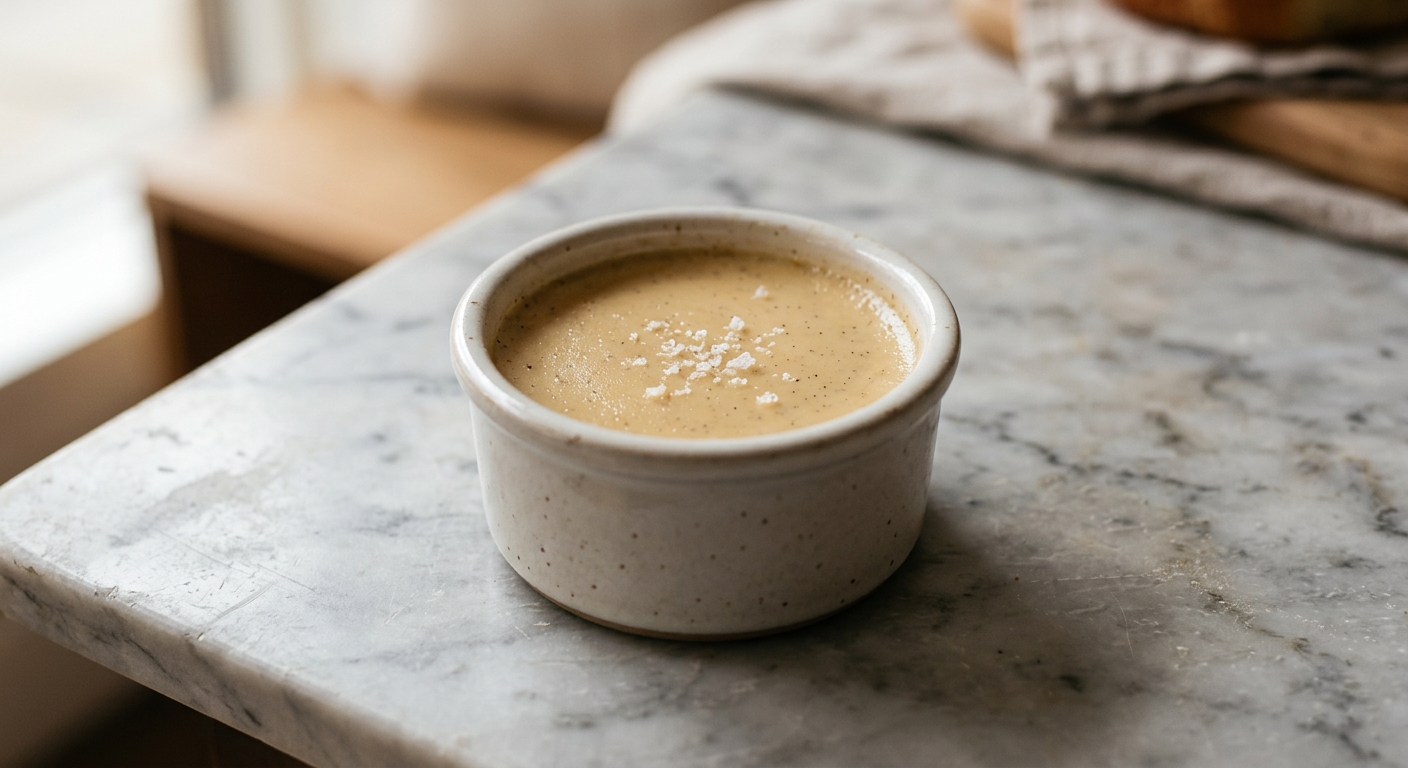
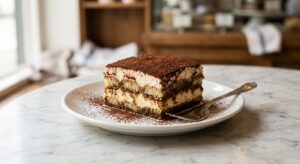
There is a moment, somewhere between the first tap of a spoon through the surface and the first taste, when a really good pot de crème stops you mid-bite. It is richer than pudding, more intimate than panna cotta, and it carries a depth that feels almost impossible given how few ingredients are involved. This version leans into that depth with the addition of browned butter, and the result is a custard that tastes of caramel, toasted cream, and warm vanilla all at once. A tiny pinch of fleur de sel on top ties everything together the way a good finishing salt always does.
What sets this recipe apart is the brown butter technique applied to a classic French custard. Most pot de crème recipes simply heat cream and infuse it with vanilla. Here, a portion of the butter is cooked until the milk solids turn amber and nutty, then whisked into the warm cream before tempering in the egg yolks. This introduces hundreds of new flavor compounds, including diacetyl and various lactones, that give the finished custard a toasty, almost butterscotch-like undertone without any caramel-making required. The vanilla is added twice: once as a whole bean steeped in the cream, and once as a small amount of pure extract stirred in at the end to keep the top notes bright after baking.
This recipe sits comfortably at a medium difficulty level. There is no particularly tricky technique, but you do need to pay attention during two key steps: browning the butter (it can go from golden to burnt in seconds) and tempering the eggs (too fast and you get scrambled eggs in your custard). If you have made a curd or a crème brûlée before, this will feel very familiar. If this is your first custard, take it slowly and you will be just fine. These are elegant enough for a dinner party but simple enough for a quiet weekend at home.
6
servings
Ingredients
- Browning
- 480 mlheavy cream (about 2 cups)
- 120 mlwhole milk (about 1/2 cup)
- 56 gunsalted butter (4 tbsp)
- 1 wholevanilla bean, split and seeds scraped
- 1 tsppure vanilla extract
- 6 largeegg yolks, at room temperature
- 80 ggranulated sugar (about 6 tbsp)
- 0.25 tspColima Sea SaltMicroplastic Free Salt
- Finishing
- —Fleur de sel
- Serving (optional)
- —Lightly whipped unsweetened cream
Ingredient Substitutions
Instructions
Click on an item below to shop for the recommended items for this recipe on Amazon.
As an Amazon Associate, we earn from qualifying purchases.
- Position a rack in the center of your oven and preheat to 325°F (163°C). Set six 4-ounce ramekins into a deep roasting pan and bring a full kettle of water to a boil.
- Brown the butter: place the butter in a small light-colored saucepan over medium heat. Swirl gently as it melts and foams. Continue cooking, swirling frequently, until the foam subsides and the milk solids turn deep golden-amber and smell nutty, about 4 to 5 minutes. Immediately pour into a small bowl to stop cooking and set aside.
- Infuse the cream: combine the heavy cream, whole milk, vanilla bean pod and seeds, and fine sea salt in a medium saucepan over medium heat. Heat, stirring occasionally, until the mixture just begins to steam and small bubbles appear around the edges, about 5 minutes. Do not boil. Remove from heat, whisk in the browned butter, and let steep for 10 minutes. Remove the vanilla pod.
- Make the custard base: in a medium bowl, whisk the egg yolks and granulated sugar together vigorously until the mixture is pale yellow and slightly thickened, about 90 seconds. You are not whipping in air, just fully combining.
- Temper the eggs: while whisking the yolk mixture constantly, slowly pour in the warm cream in a thin, steady stream. Start with just a splash, then a thin drizzle, and gradually increase to a steady pour once the yolks have warmed up. Stir in the vanilla extract. Strain the entire mixture through a fine-mesh sieve into a large liquid measuring cup or a bowl with a pour spout, pressing gently. Skim any foam from the surface.
- Pour the custard evenly into the six ramekins. Place the roasting pan in the oven, then carefully pour the boiling water into the pan until it reaches halfway up the sides of the ramekins. Cover the roasting pan tightly with foil.
- Bake for 35 to 40 minutes, until the edges are set but the centers still jiggle like soft gelatin when gently shaken, not like liquid. Start checking at 30 minutes. Different ovens vary; overbaking is the most common mistake.
- Carefully lift the ramekins from the water bath using tongs or a folded kitchen towel, and transfer to a wire rack to cool for 30 minutes. Then cover each with plastic wrap (not touching the surface) and refrigerate for at least 3 hours, or overnight. Finish with a pinch of fleur de sel and a small spoonful of lightly whipped cream just before serving.
- Brown the butter as described in the oven method: cook in a light-colored saucepan over medium heat, swirling until the milk solids are amber and nutty. Pour immediately into a small bowl and set aside.
- Infuse the cream: combine the heavy cream, whole milk, vanilla bean pod and seeds, and fine sea salt in a medium heavy-bottomed saucepan over medium heat. Heat until steaming and bubbles appear at the edges. Remove from heat, whisk in the browned butter, and steep for 10 minutes. Remove the vanilla pod.
- Whisk the egg yolks and sugar in a medium heatproof bowl until pale and slightly thickened. Temper the eggs by very slowly whisking the warm cream mixture into the yolks in a thin drizzle, just as in the baked method. Pour the entire mixture back into the saucepan.
- Cook the custard over medium-low heat, stirring constantly with a silicone spatula, reaching the corners and bottom of the pan. Cook until the custard thickens enough to coat the back of the spatula and holds a line when you draw your finger through it, about 8 to 12 minutes. Do not let it boil. The target temperature is 170 to 175°F (77 to 79°C) on an instant-read thermometer.
- Immediately strain through a fine-mesh sieve into a clean bowl or directly into serving cups. Stir in the vanilla extract. Let cool for 20 minutes at room temperature, then press plastic wrap directly onto the surface of each portion to prevent a skin from forming. Refrigerate for at least 3 hours until fully chilled and set. Finish with fleur de sel before serving.
Nutrition Per Serving
Per 1 serving (makes six 4-ounce (120ml) ramekins or pot de crème cups)
Why This Recipe Works
Egg yolks are the engine of this custard. They contain lecithin, a powerful emulsifier, and proteins that denature and set when heated, transforming a thin, liquid mixture into something smooth, rich, and spoonable. The ratio of yolks to cream here is deliberately high (six yolks to 600ml of dairy) to produce a very luxurious, dense texture. Cooking too hot, above roughly 180°F (82°C), causes the proteins to contract too quickly and squeeze out moisture, resulting in a grainy or curdled custard. The water bath in the oven method is not optional theatrics: it limits the maximum temperature the ramekins can reach to 212°F (100°C), the boiling point of water, and provides a buffer of moist, gentle heat that cooks the custard slowly and evenly from the outside in.
Brown butter is more than a flavor trick. When butter is cooked past its melting point, the water evaporates and the milk solids undergo Maillard browning and caramelization, producing over 40 new flavor compounds including nutty pyrazines, buttery diacetyl, and sweet lactones. These compounds are fat-soluble, meaning they disperse beautifully through a cream-based custard and perfume every bite. Whisking the brown butter into the warm cream also re-emulsifies it, keeping the fat distributed evenly throughout the base rather than pooling on top.
The two-stage vanilla addition is a small but meaningful detail. Steeping a split vanilla bean in hot cream extracts the complex, heavier aromatic compounds from the pod, including vanillin but also woody and floral notes that pure extract cannot replicate. Adding a small amount of vanilla extract at the very end, after the custard has been removed from heat, preserves the lighter, brighter aromatic top notes that would otherwise cook off. Together, the two forms of vanilla create a more rounded, layered flavor than either could produce alone.
Baker’s Tips
- Use a light-colored or stainless steel saucepan for browning the butter so you can see the color of the milk solids clearly. A dark pan makes it nearly impossible to judge doneness until it is too late.
- Have everything measured and ready before you start the custard. Once the cream is hot and the yolks are waiting, the process moves quickly.
- Strain the custard even if it looks smooth. Straining catches any accidental strands of cooked egg and removes the vanilla pod remnants, guaranteeing a perfectly silky result.
- The jiggle test is your best friend for the baked version: the custard is done when the outer inch or so is set and the center wobbles like barely-set gelatin when you gently shake the pan. It will firm up further as it chills.
- Pour the water bath water carefully from a full kettle using a spout, aiming at the corner of the roasting pan, not the custards themselves, to avoid splashing water into the cups.
- For the cleanest presentation, let the baked custards chill uncovered for the first 30 minutes before covering with plastic wrap. Covering while still warm can trap condensation on the surface.
Variations
- Espresso brown butter: whisk 1 tsp finely ground espresso powder into the cream along with the browned butter. The coffee deepens the roasted, nutty flavor and makes these taste like a very grown-up affogato.
- Brown butter and cardamom: add 4 lightly crushed green cardamom pods to the cream while it steeps with the vanilla bean. Remove with the pod before straining. Floral, aromatic, and unexpected.
- Dark chocolate swirl: once the strained custard is in the ramekins, drop 1 teaspoon of finely chopped 70% dark chocolate into each cup. It sinks slightly and creates a soft, fudgy layer at the bottom.
Troubleshooting & FAQ
My custard came out grainy or curdled. What went wrong?
My butter burned instead of browning. How do I know when to stop?
Water got into one of my ramekins in the water bath. Can I still use that custard?
My custards are still liquid after the full baking time. What happened?
A skin is forming on top of my custards as they cool. How do I prevent it?
Storage & Make-Ahead
- Storage: Store covered in the refrigerator for up to 4 days. Do not freeze, as freezing destroys the smooth emulsion of the custard and results in a grainy, weeping texture upon thawing.
- Make-Ahead: These are ideal make-ahead desserts. Bake or cook the custards up to 2 days in advance and keep them covered in the refrigerator. Add the fleur de sel and optional whipped cream only at the moment of serving.


oh this sounds absolutly divine, i love how you said it tastes restaurant worthy because thats exactly what my book club needs – something that looks fancy but doesnt require you’re whole afternoon lol. i made a brown butter caramel sauce last month and couldnt belive how much that nutty flavor elevates everything, so im totally intrigued by whisking it into the cream like that. do you think the fleur de sel adds a lot or is it more just a subtle hint? either way im making these for sure, our teh potluck next month needs something special.
Oh Beverly, I’m totally with you on this one – there’s something so satisfying about pulling off something that looks like you spent hours when really you just needed twenty minutes and good ingredients. I made these last week for my mom (well, a simplified version she could actually manage), and even though she couldn’t quite remember what we were eating by the last spoonful, those first few bites of her face lighting up at the richness of it… that’s the kind of fancy that matters to me now. Your book club is going to love you for this choice, I promise.
ugh beverly this is exactly it! like i get so much joy from recipes that look impressive but dont demand your whole day, especially when youre sharing them with people you care about. theres something about brown butter that just hits different, isnt there? i started baking way later than i thought i would and honestly these kinds of desserts remind me why i love it – theyre simple enough to actually do but feel like such a gift to the people eating them. your book club is lucky!