
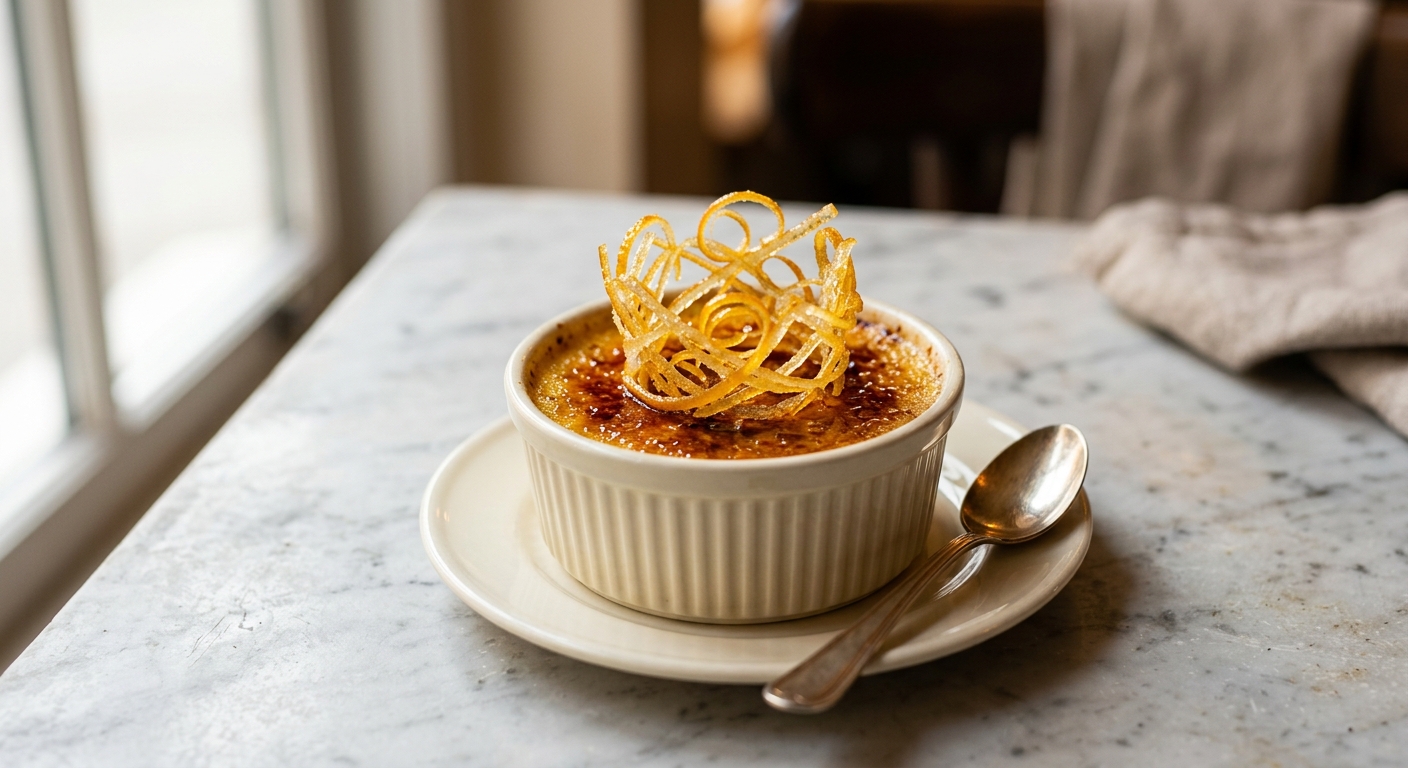
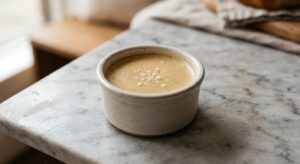
There is something almost theatrical about crème brûlée. The little ramekins arrive at the table looking demure and creamy, and then a spoon taps the surface and that satisfying crack rings out like a tiny, delicious thunderclap. Beneath the amber shell of caramelised sugar lies a custard so smooth it trembles when you nudge it, rich with cream and perfumed with real vanilla. Add the sunny fragrance of fresh orange zest and a few curls of candied peel on top, and you have a dessert that feels genuinely special without asking an enormous amount of you.
What sets this version apart is a two-part orange technique. Finely grated zest is steeped directly in the warm cream before straining, which coaxes out the delicate floral oils without any bitterness, and a small measure of fresh orange juice is whisked into the yolks to reinforce that brightness. The result is unmistakably orange, but in a refined, perfume-like way rather than a synthetic citrus punch. The custard base uses a higher ratio of egg yolks to whole eggs, which gives it an extraordinarily silky, almost pourable set that holds its shape beautifully without ever turning rubbery or grainy.
Crème brûlée sits comfortably in the medium-difficulty category. There is no special pastry training required, but there are a few moments that demand your attention: tempering the eggs carefully, knowing when the custard is just barely set, and torching the sugar at the right speed. If you have made a baked custard before, you will feel right at home. If this is your first, the detailed steps below will walk you through every stage with confidence. This recipe is perfect for a dinner party dessert you can prepare entirely the day before, or for a slow, indulgent weekend treat for someone you want to impress.
6
servings
Ingredients
- 600 mlheavy cream (double cream, about 2.5 cups)
- 2 tspfinely grated orange zest (from about 1 large navel orange), plus extra for garnish
- 30 mlfresh orange juice (about 2 tbsp), strained
- 1 tsppure vanilla extract
- 6 largeegg yolks, at room temperature
- 80 gcaster sugar (superfine sugar, about 6 tbsp) for the custard
- —Pinch of Colima Sea SaltMicroplastic Free Salt
- 60 gcaster sugar (superfine sugar, about 4 tbsp) for brûléeing, divided equally across ramekins
- 6 stripsthin orange peel (for candied garnish, optional but recommended)
- 30 ggranulated sugar (about 2 tbsp) for candying the peel strips
Ingredient Substitutions
Instructions
Click on an item below to shop for the recommended items for this recipe on Amazon.
As an Amazon Associate, we earn from qualifying purchases.
- Preheat your oven to 325°F (160°C). Set six 150ml (5 oz) ramekins into a deep roasting pan or baking dish large enough to hold them without touching. Bring a full kettle of water to a boil and set aside.
- Combine the heavy cream and orange zest in a medium saucepan. Heat over medium-low, stirring occasionally, until the cream just begins to steam and tiny bubbles appear around the edges (about 70°C/160°F). Do not let it boil. Remove from heat, stir in the vanilla extract, cover, and steep for 10 minutes to infuse the orange flavour into the cream.
- While the cream steeps, whisk the 6 egg yolks, 80g caster sugar, and pinch of salt together in a large bowl until the mixture is pale and slightly thickened, about 2 minutes. Whisk in the strained orange juice.
- Strain the infused cream through a fine-mesh sieve to remove the zest, discarding the solids. Temper the eggs: slowly pour the warm cream into the yolk mixture in a thin, steady stream, whisking constantly and gently. You want to raise the temperature of the yolks gradually without scrambling them. Avoid whisking vigorously, which creates excess foam.
- Skim off any foam from the surface of the custard mixture with a spoon, or press a sheet of paper towel lightly on the surface to absorb it. Foam will bake into unsightly bubbles on the surface.
- Divide the custard evenly among the six ramekins. Place the roasting pan in the oven, then carefully pour the hot water from the kettle into the pan until it reaches halfway up the sides of the ramekins. The water bath (bain-marie) ensures the custard cooks gently and evenly from all sides, preventing curdling.
- Bake for 35 to 40 minutes. The custard is ready when the edges are set and the centres have a gentle wobble, like barely-set jelly, when the pan is nudged. They will continue to firm up as they cool. An instant-read thermometer inserted into the centre should read 77 to 79°C (170 to 175°F).
- Remove the ramekins from the water bath using tongs or a spatula and place on a wire rack. Allow to cool to room temperature, about 1 hour, then cover each ramekin loosely with plastic wrap and refrigerate for at least 3 hours, or up to 2 days.
- To brûlée: remove the ramekins from the fridge 10 minutes before serving. Pat the surface of each custard dry with a small piece of paper towel if any condensation has formed. Sprinkle about 1.5 to 2 tsp (10g) of caster sugar evenly over each custard. Using a kitchen torch held about 5cm (2 inches) from the surface, melt the sugar in slow, circular motions until it bubbles, turns amber, and forms a continuous glassy sheet. Allow the caramel to harden for 1 to 2 minutes before serving. Garnish with a candied orange peel strip and a pinch of extra zest if desired.
- Infuse the cream with orange zest and vanilla exactly as described in the oven method (heat cream to steaming, steep 10 minutes, strain). Set aside.
- In a medium heavy-bottomed saucepan, whisk together the 6 egg yolks, 80g caster sugar, salt, and strained orange juice until smooth and pale. Do not use a thin saucepan; heavy-bottomed is essential to prevent hot spots that will scramble the eggs.
- Slowly pour the strained warm cream into the saucepan with the yolk mixture, whisking constantly. Place the saucepan over medium-low heat. Switch to a silicone spatula or wooden spoon and stir continuously, scraping the bottom and corners of the pan in a figure-eight pattern.
- Cook the custard, stirring constantly, for 15 to 18 minutes until it thickens enough to coat the back of the spatula and holds a clean line when you run your finger through it. The temperature should reach 77 to 80°C (170 to 176°F). Do not let it boil or the eggs will curdle into a scrambled texture.
- Immediately remove from heat and strain the custard through a fine-mesh sieve into a jug. Divide evenly among six ramekins. Allow to cool at room temperature for 45 minutes, then cover and refrigerate for at least 3 hours until fully set.
- Brûlée and garnish exactly as described in the final step of the oven method.
- Prepare the custard mixture exactly as in steps 2 through 5 of the oven method: infuse cream with zest, temper into yolks with orange juice and sugar, skim foam. Pour into ramekins.
- Preheat the air fryer to 300°F (150°C) for 3 minutes. Place two or three filled ramekins in the air fryer basket, spaced apart. Do not stack. If your model has a strong fan, loosely place a sheet of aluminium foil over the tops of the ramekins to prevent a skin from forming on the custard surface.
- Air fry at 300°F (150°C) for 25 to 28 minutes. Begin checking at 23 minutes: the custard should have set edges with a 2 to 3cm wobble in the very centre when gently shaken. Because there is no water bath, keep a close eye from the 20-minute mark.
- Using oven mitts, carefully remove the ramekins and place on a wire rack. Cool to room temperature, about 45 minutes, then cover and refrigerate for at least 3 hours. Repeat with remaining ramekins if needed.
- Brûlée and garnish exactly as described in the final step of the oven method. The kitchen torch step is unchanged regardless of how the custard was cooked.
Nutrition Per Serving
Per 1 serving (makes six 150ml (5 oz) ramekins)
Why This Recipe Works
Crème brûlée is essentially an emulsified fat-and-protein gel, and understanding that helps you avoid the most common mistakes. The egg yolks contain lecithin and proteins that, when heated to between 77 and 80°C (170 and 176°F), unfold and cross-link to trap the cream in a smooth, semi-solid network. Go below that temperature and the custard never sets; go above it and the proteins contract too tightly, squeezing out liquid and producing a grainy, curdled texture. The water bath in the oven method is your insurance policy: water cannot exceed 100°C at atmospheric pressure, so the ramekins are bathed in a heat source that is physically incapable of overcooking them, no matter how long they stay in the oven. It is one of the most elegant pieces of food science in classic pastry.
Steeping the orange zest in the warm cream rather than zesting it directly into the batter is a deliberate technique rooted in flavour chemistry. The aromatic compounds in citrus zest, primarily d-limonene and linalool, are fat-soluble, meaning they dissolve readily into cream but do not infuse well into a water-based liquid. Warming the cream accelerates this extraction. By straining the zest out before adding the yolks, you get all the fragrant, floral citrus flavour with none of the slightly bitter, fibrous texture that zest can contribute to a delicate custard. The small amount of orange juice adds a water-soluble brightness that the fat-soluble compounds alone cannot provide.
The brûlée crust is Maillard reaction and caramelisation working together. Caster sugar melts at around 160°C (320°F) and begins caramelising between 160 and 180°C (320 to 356°F), creating hundreds of flavour compounds including diacetyl (buttery notes) and furans (nutty, toasty notes). A thin, even layer of fine sugar is critical: too thick and the outer layer burns before the inner layer melts, leaving raw sugar beneath a scorched crust. Too thin and the crust will be fragile and pale. Two level teaspoons per ramekin, spread in a single layer, is the sweet spot. If your brûlée crust softens before serving, it means moisture from the cold custard migrated upward, which is why torching just before serving is non-negotiable.
Baker’s Tips
- Use ramekins of a consistent size (150ml is ideal). Shallower, wider ramekins give a better crust-to-custard ratio, while very deep ramekins are harder to brûlée evenly.
- Room temperature egg yolks incorporate more easily into warm cream and reduce the risk of accidental scrambling during tempering.
- Strain the custard mixture through a fine-mesh sieve a second time before pouring into ramekins if you want an especially smooth surface. This catches any stray bits of cooked egg that may have formed during tempering.
- Dry the custard surface with paper towel before adding the sugar. Even a thin film of condensation will cause the sugar to dissolve and clump rather than caramelise smoothly.
- Keep the torch moving constantly. Holding it in one spot, even for a second, will burn the sugar black before the surrounding area has melted. Think of it like spray painting: slow, even circles.
- If you do not own a kitchen torch, the oven grill (broiler) method works in a pinch. Set ramekins on a baking sheet as close to the grill element as possible and watch constantly. It takes about 3 to 5 minutes but the edges of the custard may warm through slightly.
- For perfectly even sugar layers, use a small offset spatula or the back of a spoon to spread the sugar across the surface before torching.
Variations
- Earl Grey and Orange: Add 2 tsp loose-leaf Earl Grey tea to the cream along with the zest during steeping. Strain out with the zest. The bergamot in the tea echoes and deepens the citrus notes beautifully.
- Dark Chocolate Orange: After straining the custard in the stovetop method, whisk in 60g of finely chopped dark chocolate (70% cocoa) until melted. Proceed as normal. A thin orange caramel crust on top is extraordinary.
- Spiced Orange: Add 1 cinnamon stick and 3 cardamom pods (lightly crushed) to the cream during infusion for a warm, spiced version that is perfect at Christmas.
- Blood Orange: Substitute blood orange zest and juice for the navel orange for a more complex, slightly berry-like flavour with a stunning pink tint to the custard.
Troubleshooting & FAQ
My custard is grainy or has small lumps. What went wrong?
The custard is still liquid after the full bake time. What happened?
My brûlée crust is not shattering properly. It is soft and sticky.
There are small bubbles or a pocked surface on my custard. How do I prevent that?
The orange flavour is barely detectable in the finished custard. What can I do?
Storage & Make-Ahead
- Storage: Finished brûlée (before torching) can be refrigerated, covered, for up to 2 days. Once the sugar crust has been torched, serve within 30 minutes as the caramel will absorb moisture from the custard and soften. Do not freeze crème brûlée; the custard will weep and separate on thawing.
- Make-Ahead: This dessert is ideal for making ahead. Bake or cook the custards up to 2 days in advance, cover with plastic wrap, and refrigerate. Add the sugar and torch just before serving. The candied orange peel garnish can be made up to 1 week ahead and stored in an airtight container at room temperature.


Oh, this sounds absolutely lovely. I made a citrus custard last winter after a particularly crisp morning hike, and there’s something about that bright orange flavor that feels like bottling sunshine. The candied zest crown is such a nice touch, too, it’s like the delicate frost you’d find on evergreen needles at dawn. I’d love to know if allulose caramelizes as cleanly as regular sugar does, since that shattering crust is really the whole magic of it.
honestly this looks perfect tbh – ive been craving something elegant but not crazy heavy and allulose brûlée has been my go to since it caramelizes so nice without that chemical aftertaste. love what you said elena about bottling sunshine, thats exactly why i keep coming back to citrus flavors especially after treatment when everything tasted meh for a while. oranges just hit diferent lol
oh my gosh this is making me emotional in the best way – i’ve been trying to perfect a lighter dessert for our break room at work and something about that orange and vanilla combo just feels like hope, you know? plus ive found that allulose really does caramelize so beautifully for brûlée, so im definitely trying this soon, especially that candied zest crown because honestly who doesnt love a little sparkle with their dessert!