
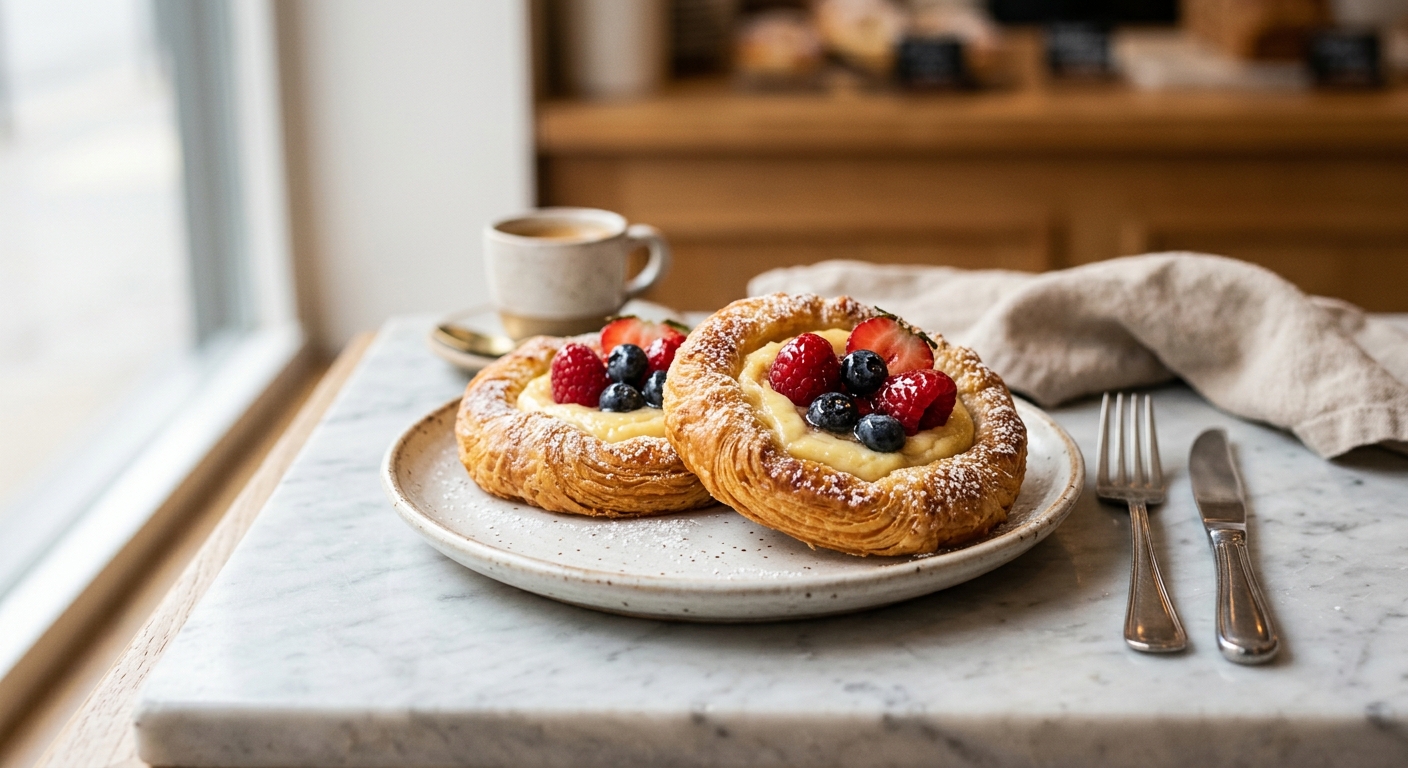
There is something almost magical about pulling a tray of golden Danish pastries from the oven, the butter-layered dough puffed and crackling, the cream cheese filling just set, and a scatter of fruit glistening on top. The kitchen smells like a proper Scandinavian bakery, and for a moment everything feels unhurried and special. These are the kind of pastries that make a slow Saturday morning feel like a genuine occasion, the kind you linger over with a good cup of coffee and absolutely no guilt about seconds.
What sets this recipe apart is the rough puff dough, a faster, more forgiving cousin to traditional croissant-style laminated dough. Instead of spending two days on precise butter blocks and chilled rests, you grate frozen butter directly into the flour and fold the dough three times to create those signature flaky, pull-apart layers. The cream cheese filling is sweetened just enough, brightened with a little lemon zest, and stabilized with an egg yolk so it stays creamy rather than weeping during baking. For the fruit, you have complete freedom: raspberries and apricots in summer, sliced pears and cranberries in winter, or a simple spoonful of good-quality jam any time of year.
This recipe is rated medium difficulty, not because anything is technically complicated, but because the dough benefits from patience and cold hands. If you have ever made scones or pie crust, you already have the instincts you need. This is a perfect weekend bake for anyone who wants to impress guests or simply treat themselves to something genuinely beautiful from their own oven.
12
servings
Ingredients
- Glazing
- 300 gall-purpose flour (about 2 1/2 cups, spooned and leveled), plus extra for dusting
- 7 ginstant yeast (1 packet or 2 1/4 tsp)
- 30 ggranulated sugar (about 2 1/2 tbsp)
- 1 tspColima Sea SaltMicroplastic Free Salt
- 225 gunsalted butter, frozen (about 1 cup or 2 sticks), divided: 200g for laminating, 25g melted for dough
- 120 mlwhole milk, warmed to about 110°F (43°C) (about 1/2 cup)
- 1 largeegg, room temperature
- 1 tsppure vanilla extract
- 225 gfull-fat block cream cheese, softened to room temperature (8 oz)
- 50 gpowdered sugar, sifted (about 1/2 cup)
- 1 largeegg yolk, room temperature
- 1 tspfinely grated lemon zest (from about half a lemon)
- 0.5 tsppure vanilla extract (for filling)
- 200 gfresh or thawed-and-drained fruit of your choice (about 1 1/2 cups): raspberries, blueberries, sliced strawberries, apricot halves, or cherry-pie filling
- 1 largeegg, beaten with 1 tbsp milk (egg wash)
- 60 gapricot jam or neutral fruit preserves (about 3 tbsp)
- 1 tbspwater (to thin the glaze)
- Serving)
- —Powdered sugar for dusting (optional
Ingredient Substitutions
Instructions
Click on an item below to shop for the recommended items for this recipe on Amazon.
As an Amazon Associate, we earn from qualifying purchases.
- Make the dough: Whisk together the flour, instant yeast, sugar, and salt in a large bowl. Grate the 200g of frozen butter on the large holes of a box grater directly into the flour mixture, tossing frequently with a fork so the butter shreds stay coated and separate. Drizzle in the warm milk, 25g melted (but not hot) butter, the egg, and vanilla. Stir with a fork until a shaggy dough forms, then turn it out onto a lightly floured surface and knead very briefly, just 4 to 5 turns, until it barely holds together. It will look rough and you will see butter streaks. That is exactly right.
- Laminate the dough: On a lightly floured surface, roll the dough into a rectangle roughly 12 by 8 inches. Fold the bottom third up and the top third down, like a business letter. Rotate 90 degrees and roll out again to 12 by 8 inches. Repeat the fold. Wrap in plastic wrap and refrigerate for at least 45 minutes, or up to overnight. The cold rest firms the butter, which is what creates the distinct flaky layers when it hits the hot oven.
- Make the cream cheese filling: Beat the softened cream cheese with the sifted powdered sugar, egg yolk, lemon zest, and vanilla extract until completely smooth and creamy, about 2 minutes with a hand mixer or vigorous stirring. Cover and refrigerate until ready to use.
- Shape the Danishes: Line two large baking sheets with parchment paper. Remove the chilled dough and roll it out on a lightly floured surface to a 16 by 12 inch rectangle, about 1/4 inch thick. Using a sharp knife or pizza cutter, cut into 12 equal squares (approximately 4 by 4 inches each). Transfer squares to the prepared baking sheets, spacing them at least 2 inches apart. For a pinwheel shape: make a 1 1/2-inch diagonal cut from each corner toward the center without cutting all the way through. Fold every other point into the center and press lightly. For a simple envelope shape: bring all four corners to the center and press. Alternatively, leave as a flat square and simply press a well into the center with your fingers.
- Fill, proof, and egg wash: Spoon a heaped tablespoon of cream cheese filling into the center of each shaped pastry. Add 3 to 4 pieces of fruit on top of the filling, pressing them in gently. Cover the trays loosely with lightly oiled plastic wrap and let the pastries proof at room temperature for 30 to 40 minutes, until slightly puffed. They will not double in size like a yeasted bun. A gentle puff is enough. Brush the exposed dough edges carefully with egg wash.
- Bake: Preheat the oven to 375°F (190°C) while the pastries are proofing. Bake for 20 to 22 minutes, rotating the trays halfway through, until the pastries are deeply golden brown on the edges and the bottoms feel firm and sound hollow when tapped. The cream cheese filling will puff up but will settle as it cools.
- Glaze and cool: While the pastries bake, warm the apricot jam with 1 tablespoon of water in a small saucepan over low heat, stirring until fluid. Strain out any solids. As soon as the pastries come out of the oven, brush the warm glaze over the fruit and exposed dough. Transfer to a cooling rack. Let rest at least 15 minutes before serving. Dust with powdered sugar just before serving if desired.
- Prepare the dough and filling through all chilling and shaping steps exactly as described in the oven method. The dough preparation is identical. Proof the shaped and filled pastries on a parchment-lined tray for 30 to 40 minutes as directed.
- Preheat your air fryer to 340°F (170°C) for 3 minutes. Cut parchment paper to fit your air fryer basket, or use a perforated air fryer liner. Do not skip this: the cream cheese filling can drip and the fruit juices will burn onto the basket without it.
- Brush the proofed pastry edges with egg wash. Carefully transfer 2 to 3 pastries to the air fryer basket, leaving at least 1 inch of space between them. Do not overcrowd. Air fry at 340°F (170°C) for 10 to 12 minutes, until the edges are deep golden brown. The lower temperature compared to the oven prevents the outsides from over-browning before the center is cooked. Check at the 9-minute mark: air fryer wattages vary.
- Remove carefully using tongs or a spatula. The pastries and filling will be extremely hot. Transfer to a cooling rack. Brush immediately with the warm apricot glaze while the pastries are still hot. Repeat with the remaining batches. Let cool for at least 10 minutes before eating.
- Note on texture: Air-fried Danishes have a slightly crispier exterior and a more pronounced snap to the layers than oven-baked ones. The filling will be a touch more set. Both are delicious; it simply depends on your preference.
- Complete the dough and filling through the shaping and filling steps exactly as in the oven method. Place the shaped, filled, and un-proofed Danishes on a parchment-lined baking sheet, spacing them apart so they do not touch. Do not brush with egg wash yet.
- Freeze the tray uncovered for 1 to 2 hours until the pastries are solid. Once firm, transfer them to a zip-lock freezer bag or airtight container, layering with parchment between each one. They will keep in the freezer for up to 6 weeks. Label with the date.
- When ready to bake, preheat the oven to 375°F (190°C). Remove as many pastries as you need from the freezer and place on a parchment-lined baking sheet. Do not thaw. Let them sit at room temperature for 15 minutes only, just long enough to take the worst of the chill off so the egg wash can adhere properly.
- Brush the edges with egg wash and bake at 375°F (190°C) for 22 to 25 minutes, slightly longer than fresh, until deeply golden. The yeast will still activate and provide a gentle puff during the extended bake time. Rotate the tray at the halfway point.
- Glaze with warmed apricot jam as soon as they come out of the oven and transfer to a cooling rack. The texture and flavor will be every bit as good as freshly baked. This is the secret to effortless impressive breakfasts and brunches.
Nutrition Per Serving
Per 1 serving (makes 12 individual Danish pastries)
Why This Recipe Works
Traditional Danish pastry dough, known as wienerbrød, is a yeasted laminated dough, meaning it contains both yeast for lift and distinct butter layers for flakiness. The magic happens in the oven when the water content in those cold butter layers converts rapidly to steam, forcing the dough apart into dozens of thin, crispy sheets. In classic lamination, you encase a solid butter block in dough and fold it repeatedly in a highly controlled process. This recipe uses a shortcut called rough puff or blitz lamination, where frozen butter is grated into the flour so you begin with hundreds of tiny butter pieces already distributed throughout the dough. Each fold then flattens and layers those pieces, and as long as the dough stays cold throughout, you still get gorgeous, distinct flaky layers without the two-day process.
The cream cheese filling is stabilized with an egg yolk, which is key. Cream cheese on its own can weep liquid and separate when heated, leaving a wet, sunken puddle in the center of your pastry. The egg yolk adds fat and protein that coagulate gently during baking, keeping the filling soft and creamy but structurally cohesive. The lemon zest is not merely decorative: its aromatic oils cut through the richness of the cream cheese and brighten the overall flavor in a way that lemon juice alone cannot, because juice adds acidity but loses the fragrant top notes.
The apricot glaze serves two practical purposes beyond beauty. First, it seals the surface of the fruit, slowing oxidation and keeping cut fruit from browning. Second, it creates a moisture barrier that keeps the pastry layers from absorbing humidity from the fruit during storage. If your pastries come out with a soggy bottom, the most common culprit is fruit that was not drained thoroughly enough. Fresh berries are naturally high in moisture, and that liquid is driven out by heat. Pat your fruit dry with paper towels before using, and if using thawed frozen fruit, drain it in a sieve for at least 30 minutes first.
Baker’s Tips
- Keep everything cold. If at any point the dough becomes greasy or you can see the butter smearing rather than staying in distinct pieces, wrap it and refrigerate for 15 minutes before continuing. Warm butter absorbs into the dough and you lose the layers.
- Do not skip flouring the grater. Toss the butter shreds in the flour mixture frequently as you grate to prevent clumping. The goal is individual coated butter pieces, not a single lump.
- Use full-fat block cream cheese, not the spreadable kind in a tub. Spreadable cream cheese has added stabilizers and air whipped in, which makes the filling looser and more prone to weeping during baking.
- Score or cut the dough with a very sharp knife or bench scraper. A dull knife drags and compresses the layers at the cut edge, which prevents them from opening up during baking.
- Resist the urge to overfill. One heaped tablespoon of cream cheese filling and a modest amount of fruit is plenty. Overfilled Danishes leak and the filling can prevent the dough from puffing around it.
- Rotate your baking trays halfway through baking. Most home ovens have hot spots, and Danishes at the back of the oven can over-brown on one side while those at the front are still pale.
- Brush the glaze on hot pastries, not cooled ones. The heat helps the glaze flow into crevices and adhere properly. On a cool pastry, it sits in a thick, sticky puddle.
Variations
- Lemon curd and blueberry: Replace the cream cheese filling with 2 tablespoons of good-quality lemon curd per Danish, then top with fresh blueberries. Intensely tangy and beautiful.
- Apple cinnamon: Top the cream cheese filling with finely diced apple tossed in 1 tsp cinnamon, 1 tbsp brown sugar, and a squeeze of lemon juice. Tastes like apple pie in pastry form.
- Chocolate hazelnut: Swap the fruit for a teaspoon of chocolate hazelnut spread nestled into the cream cheese filling before baking. Finish with a drizzle of melted dark chocolate instead of the jam glaze.
- Savory version: Omit the sugar from the filling and fruit entirely. Fill with herbed cream cheese and top with caramelized onions and a small slice of smoked salmon added after baking.
Troubleshooting & FAQ
My pastries came out flat with no flaky layers. What went wrong?
The cream cheese filling puffed up and then collapsed into a wet, sunken pool. How do I fix this?
My pastries leaked butter all over the baking sheet and the layers are greasy rather than crispy.
My Danishes are golden on top but the bottoms are pale and doughy.
The dough tore and fell apart when I was rolling it out after chilling.
Storage & Make-Ahead
- Storage: Store cooled pastries in a single layer in an airtight container at room temperature for up to 2 days. For longer storage, refrigerate for up to 4 days, though the layers will soften slightly. To refresh, warm in a 325°F (160°C) oven for 5 to 8 minutes or in an air fryer at 300°F (150°C) for 3 minutes. Do not microwave; it makes the pastry tough and soggy.
- Make-Ahead: The rough puff dough can be made through the lamination folds and refrigerated overnight before shaping. The cream cheese filling can be made up to 3 days ahead and stored in an airtight container in the fridge. Unbaked shaped pastries can be frozen for up to 6 weeks and baked directly from frozen (see Freezer Method above). Fully baked pastries can also be frozen for up to 2 months and reheated in the oven.


marcus thats really encouraging to hear, tbh. ive been hesitant about laminated doughs too but ur right that allulose keeps that structure intact in a way regular sugar alternatives sometimes dont. my grandkids got excited when i made these last month and didnt even notice the difference from what there used to getting at the bakery, which meant the world to me. gonna try you’re approach next time.
man, these look incredibl. ive been experimenting w allulose in my laminated doughs and honestly the texture is so much better than i expected, teh flakiness stays just as good. been through enough dietary changes over the years that i really apreciate when a recipe actually delivers on taste without feeling like you’re sacrificing anything. def gonna try this w fresh berries from the farmers market, your photos are making me hungry lol
marcus thats really encouraging to hear, tbh. ive been hesitant about laminated doughs too but your right that allulose keeps that structure intact in a way regular sugar alternatives sometimes dont. my grandkids got excited when i made these last weekend, kept asking for seconds which says everything lol. farmers market berries sound perfect, thatll make em even more sepcial.