
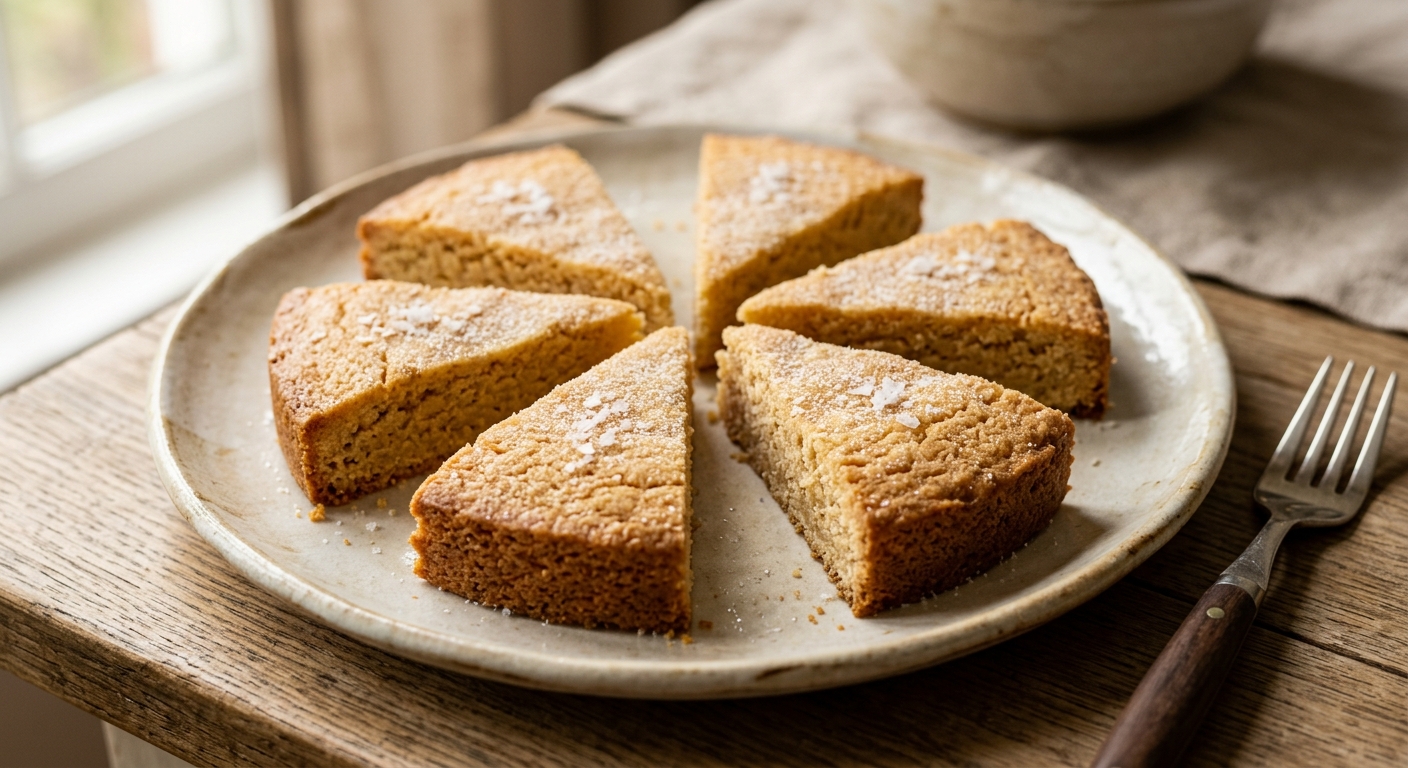
There is a moment, somewhere between pulling these golden wedges from the oven and the first cool bite, where time seems to slow down. The kitchen smells of warm butter and toasted grain, and the shortbread sits there on the rack looking almost too humble for what it truly is: one of the finest things a baker can make. Scottish shortbread has been baked in home kitchens for centuries, and the reason it has endured is simple. When made with care and quality ingredients, it is extraordinary.
What sets this version apart is a single, deliberate step: browning the butter before you begin. Called beurre noisette in French, brown butter develops hundreds of new flavor compounds as the milk solids caramelize, transforming a standard stick of butter into something nutty, complex, and deeply aromatic. The fat is then chilled back to a solid before creaming, so you keep the classic crumbly, sandy texture shortbread is famous for, but with a flavor that tastes like it has a secret. A scatter of fleur de sel on top before baking draws out every note of that richness.
This is an easy recipe with a medium level of technique, ideal for bakers of any experience who want to move beyond the basics. You do not need a stand mixer or any special equipment. If you have ever felt intimidated by shortbread because it seems like it should be more complicated, this recipe will reassure you. It is honest, approachable baking at its best, and it is the kind of thing you will make again and again.
8
servings
Ingredients
- Finishing
- 225 gunsalted butter (1 cup / 2 sticks), cut into tablespoon-sized pieces
- 100 gcaster sugar or superfine sugar (about 1/2 cup) – see note on substitutions
- 280 gall-purpose flour (about 2 1/4 cups, spooned and leveled)
- 45 grice flour or cornstarch (about 3 tbsp) – adds the classic sandy crumb
- 0.5 tspColima Sea SaltMicroplastic Free Salt
- —1/2 tsp fleur de sel or Colima Sea SaltMicroplastic Free Salt
- Dusting After Baking (optional)
- —1 tbsp caster sugar
Ingredient Substitutions
Instructions
Click on an item below to shop for the recommended items for this recipe on Amazon.
As an Amazon Associate, we earn from qualifying purchases.
- Brown the butter: place the butter pieces in a light-colored saucepan over medium heat. Swirl occasionally as it melts, foams, then subsides. Continue cooking until the milk solids at the bottom turn a deep golden amber and the butter smells nutty, about 5 to 7 minutes. Pour immediately into a large heatproof mixing bowl, scraping in all the browned bits. Press a sheet of plastic wrap directly onto the surface and refrigerate until solidified but still slightly soft, about 45 minutes to 1 hour. It should feel like cool, slightly firm butter, not rock hard.
- Preheat your oven to 325°F (160°C). Do not line the pan with parchment. Grease one 8-inch round cake pan very lightly with butter, then dust with a thin coat of flour, tapping out any excess. This bare-pan method helps the bottom of the shortbread develop a golden crust.
- In a medium bowl, whisk together the all-purpose flour, rice flour, and fine sea salt. Set aside.
- Using a wooden spoon or a hand mixer on low speed, beat the solidified brown butter with the caster sugar until the mixture is pale, fluffy, and well combined, about 2 to 3 minutes. Do not over-beat. The goal is to cream them together without incorporating too much air, which would make the shortbread puff and crack.
- Add the flour mixture to the butter mixture and stir gently with a wooden spoon or spatula until the dough just comes together. It will look crumbly at first but will cohese into a soft dough as you work it. Do not knead. Overworking develops gluten and will toughen the shortbread.
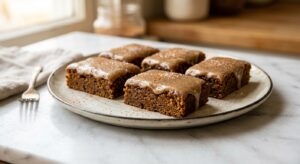
- Press the dough evenly into the prepared pan using your fingertips or the base of a flat measuring cup. It should be about 1/2 inch thick. Use a fork or wooden skewer to prick the surface all over at 1-inch intervals (this ‘docking’ prevents the shortbread from puffing). Score the dough into 8 wedges by pressing a sharp knife gently into the surface without cutting all the way through. Scatter the fleur de sel evenly over the top.
- Bake on the center rack for 30 to 35 minutes, until the shortbread is pale golden all over and a slightly deeper gold at the edges. It should not brown heavily. The center may look slightly underdone but will firm up as it cools.
- Remove from the oven and immediately re-cut along the scored lines while the shortbread is still warm and pliable. Dust with the optional tablespoon of caster sugar if desired. Allow to cool completely in the pan on a wire rack before removing. The shortbread will crisp up significantly as it cools.
- Brown and chill the butter as directed in the oven method. Alternatively, use the butter at cool room temperature (about 65°F / 18°C) for a more straightforward shortbread.
- Grease a 7-inch round pan that fits inside your air fryer basket. Dust lightly with flour and tap out the excess.
- Prepare the dough exactly as in the oven method: cream the butter and sugar, then stir in the combined flours and salt until just combined. Press into the greased pan to an even 1/2-inch thickness, dock all over with a fork, and score into 8 wedges. Scatter fleur de sel on top.
- Place the pan in the air fryer basket. Set to 300°F (150°C) and bake for 18 to 22 minutes. Check at the 18-minute mark: the shortbread is done when the surface is a uniform pale gold and the edges are just beginning to turn a slightly deeper color. Air fryers vary significantly, so check a minute or two early on your first attempt.
- Carefully remove the pan from the basket using silicone-tipped tongs or oven mitts. Re-cut the wedges immediately while warm, dust with caster sugar if desired, and allow to cool completely in the pan on a wire rack before serving.
- Brown and chill the butter as directed in the oven method. Prepare the dough identically: cream the solidified brown butter with the sugar, then stir in the flour mixture until a dough just forms.
- Turn the dough out onto a lightly floured surface. Divide in half. Roll each half into a log about 2 inches in diameter. Wrap each log tightly in plastic wrap, twisting the ends to compress the dough into a firm, even cylinder. Refrigerate for at least 2 hours or overnight. The logs can be frozen for up to 3 months at this stage.
- When ready to bake, preheat your oven to 325°F (160°C). Line two baking sheets with parchment paper.
- Remove one log from the refrigerator. Using a sharp knife, slice into rounds about 1/2 inch thick. If the dough crumbles at the edges as you cut, let it sit at room temperature for 5 minutes to soften slightly, then try again. Place rounds 1 inch apart on the prepared baking sheets.
- Lightly press a pinch of fleur de sel onto the top of each round. Bake for 20 to 24 minutes, rotating the baking sheet halfway through, until the cookies are pale golden and just set. They will continue to firm up on the hot pan, so remove them promptly. Transfer to a wire rack to cool completely.
Nutrition Per Serving
Per 1 serving (makes one 8-inch shortbread round, cut into 8 wedges)
Why This Recipe Works
Shortbread contains no eggs, no leavening, and no liquid, which makes it one of the purest expressions of fat, flour, and sugar in all of baking. The extraordinarily high ratio of butter to flour is what gives shortbread its defining crumbly, ‘short’ texture. In baking science, ‘short’ refers to the way fat coats the flour proteins and physically prevents them from bonding with each other to form long gluten strands. More fat means shorter, weaker gluten networks, which translates directly to that tender, sandy crumb that shatters pleasantly when you bite into it.
Rice flour is the other key player in achieving the classic texture. Because rice flour contains virtually no gluten-forming proteins, its addition further dilutes the overall gluten potential of the dough. It also has a slightly coarser particle size than wheat flour, which contributes directly to the gritty, sandy quality that distinguishes great shortbread from a merely good butter cookie. If you have ever wondered why Scottish shortbread feels different from other cookies, rice flour is a large part of the answer. Docking the dough with a fork before baking serves a practical function: it creates pathways for steam to escape, preventing the shortbread from puffing up unevenly and keeping it flat and dense.
Temperature is everything in shortbread. Baking low and slow at 325°F (160°C) allows the butter to set gently without the edges over-browning before the center has cooked through. If your shortbread is browning too quickly, drop the temperature by 10 to 15 degrees and add a few minutes. Conversely, if your shortbread looks pale but still seems soft after the stated time, do not panic: it firms dramatically as it cools. The best test is the color and a gentle press with your finger in the center. It should feel just set, not wet or yielding, even if it looks soft.
Baker’s Tips
- Quality of butter matters more here than in almost any other recipe. Because butter is the dominant flavor, use the best European-style or high-fat unsalted butter you can find (at least 82% butterfat). The difference in flavor is noticeable.
- Do not skip chilling the brown butter back to a solid. Liquid brown butter mixed with sugar will not cream properly and will produce a greasy, flat shortbread.
- The dough should be crumbly and dry-looking at first. This is correct. Trust the process and keep pressing it together gently. If it absolutely refuses to come together, add 1 teaspoon of cold water at a time, but this is rarely necessary.
- Re-cut the wedges while the shortbread is still warm. Once it cools and hardens, cutting through it cleanly is very difficult and the wedges may crack.
- A light-colored metal pan gives the best bottom crust. Dark non-stick pans can over-brown the base before the interior is done.
- For perfectly even thickness when pressing the dough into the pan, use two rubber bands wrapped around a rolling pin set to 1/2 inch as a guide, or simply use the bottom of a smooth flat-bottomed glass.
- Shortbread is done when it is pale gold, not brown. If in doubt, pull it earlier rather than later. A slightly underdone shortbread will crisp up on the rack; an overbaked one will taste dry and floury.
Variations
- Lavender and lemon: add 1 tsp dried culinary lavender (finely crushed) and the zest of one lemon to the dough with the flour. Dust with icing sugar after baking instead of caster sugar.
- Earl Grey and orange: steep 2 tsp loose Earl Grey tea in the warm brown butter for 5 minutes, then strain before chilling. Add the zest of one orange to the dough.
- Chocolate-dipped: melt 100g dark chocolate (70% cacao) and dip the cooled wedges halfway. Place on a parchment-lined tray to set at room temperature.
- Spiced: whisk 1 tsp ground cinnamon and 1/4 tsp ground cardamom into the flour mixture before adding to the butter. A natural fit for this blog.
- Millionaire’s shortbread: use the baked shortbread as the base layer. Top with a layer of salted caramel and a thin coat of tempered dark chocolate to make the classic Scottish confection.
Troubleshooting & FAQ
My shortbread spread and lost its shape in the oven. What went wrong?
My shortbread is very crumbly and falls apart when I try to remove the wedges. Did I do something wrong?
The bottom of my shortbread is much darker than the top. How do I fix this?
My shortbread tastes a little bland or floury. What happened?
Can I double this recipe?
Storage & Make-Ahead
- Storage: Store cooled shortbread in an airtight tin or container at room temperature for up to 10 days. Shortbread keeps exceptionally well and actually improves after 24 hours as the flavors meld. Do not refrigerate, as moisture will soften the crisp texture. Freeze baked wedges, layered with parchment, for up to 3 months. Thaw at room temperature for 1 hour.
- Make-Ahead: The icebox log method is ideal for making ahead: the unbaked logs keep in the refrigerator for up to 5 days or in the freezer for up to 3 months. The baked shortbread is itself an excellent make-ahead item, as its flavor and texture actually improve after resting for a day.


yo this is right up my alley, theres something about shortbread thats just timeless you know. ive made a bunch of these for the program’s community events and people lose their minds over em, especially when you hit em with that fleur de sel at the end. the brown butter takes it next level too, gives it that nutty depth without trying too hard. sandra’s right about the bake sale thing, simple recipes that hit different are always the move.
I love this so much, honestly. There’s something about those three simple ingredients that actually forces you to show up and do the technique right, and that’s where the magic happens. I’ve found brown butter shortbread is perfect for people getting back into baking after taking time away, because it rebuilds confidence without the overwhelm. Can’t wait to try your version with the fleur de sel.
oh this sounds perfect for our school bake sale fundraiser next month, ive been looking for something simple that still feels special and these wedges are gonna be such a crowd pleaser. brown butter shortbread is honestly one of those things that tastes fancy but doesnt stress you out in the kitchen, which is my favorite kind of recipe when i’m juggling work and actually having time to help out at school. definitely bookmarking this one