
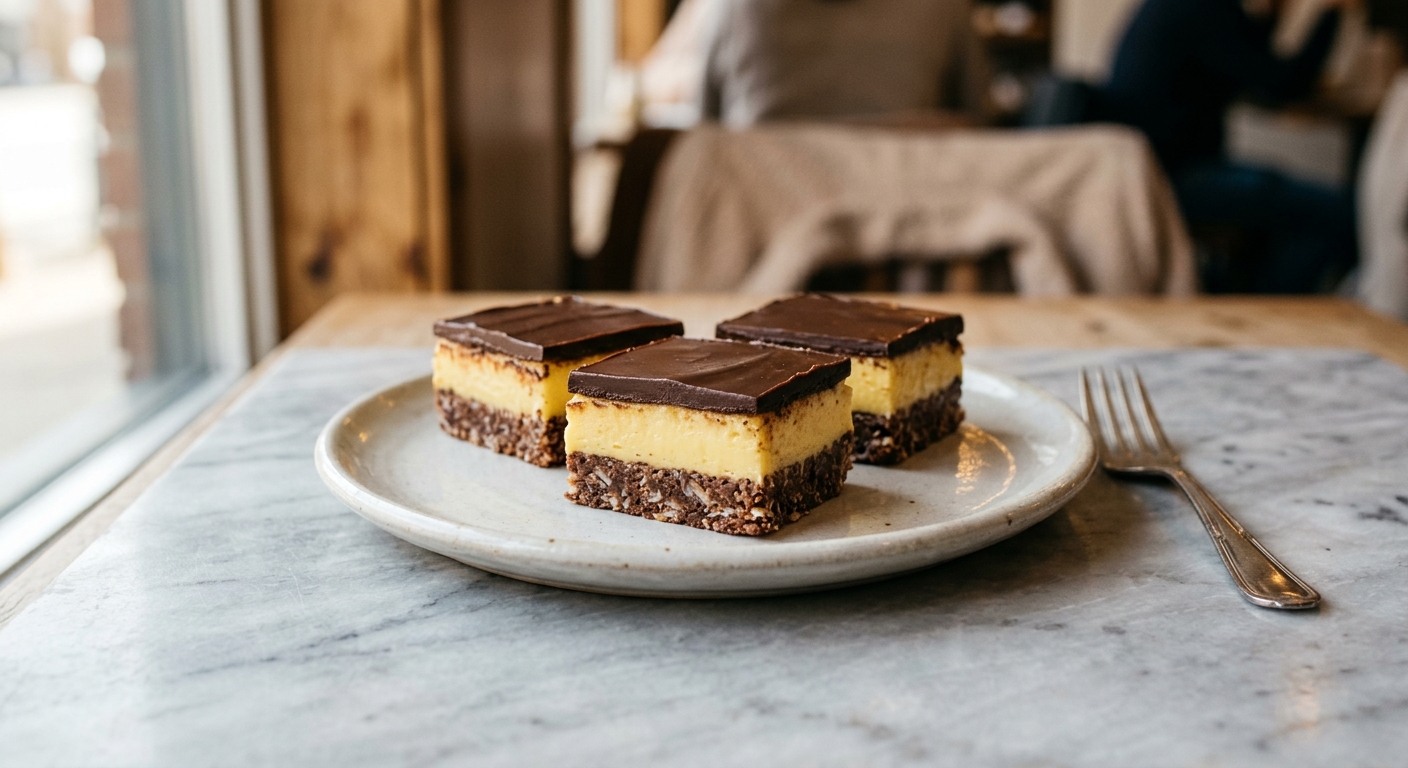
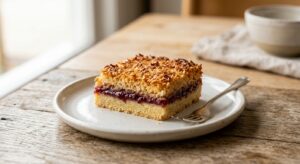
There is something almost magical about a dessert that requires no oven yet manages to feel deeply indulgent. Nanaimo bars, named after the city on Vancouver Island in British Columbia, have been a fixture on Canadian dessert tables since at least the 1950s, appearing at church potlucks, holiday cookie exchanges, and family gatherings coast to coast. Three distinct layers sit in perfect harmony: a dense, fudgy base packed with cocoa, shredded coconut, graham cracker crumbs, and toasted walnuts; a pale yellow custard buttercream that is as soft as a cloud; and a snappy dark chocolate glaze on top. The contrast in textures and the interplay between sweet, bitter, and buttery is what keeps people reaching for just one more square.
What sets this version apart is the custard filling. Many recipes use plain icing sugar and butter, which produces a sweet but flat middle layer. Here, Bird’s custard powder (the classic British-Canadian pantry staple) is blended with butter and icing sugar to create a filling that has genuine vanilla-custard depth and a slightly firmer, creamier texture that holds its shape when sliced but melts the moment it hits your tongue. The base also includes a gentle bain-marie melt for the butter and chocolate, which ensures a smooth, cohesive crumb that binds without becoming greasy. And the chocolate top is cut with a small amount of coconut oil, giving it that satisfying snap and a glossy shine without turning brittle or cracking the filling beneath.
Nanaimo bars are a fantastic project for beginner no-bake bakers and a deeply satisfying make-ahead treat for anyone who wants an impressive result without turning on the oven. The technique involves three simple stages with short chill times between each, and the whole thing comes together in under 30 minutes of active work. They are ideal for holiday cookie trays, potlucks, or any afternoon when you want something genuinely special waiting in the fridge.
16
servings
Ingredients
- 115 gunsalted butter (1/2 cup), cut into pieces
- 50 ggranulated sugar (1/4 cup)
- 30 gunsweetened cocoa powder (1/3 cup), sifted
- 1 largeegg, beaten
- 1 tsppure vanilla extract
- 200 ggraham cracker crumbs (about 1 3/4 cups, from roughly 14 full crackers)
- 80 gsweetened shredded coconut (1 cup, lightly packed)
- 60 gwalnuts (1/2 cup), toasted and finely chopped
- —— Custard Filling —
- 115 gunsalted butter (1/2 cup), softened to room temperature
- 30 gBird’s custard powder (3 tbsp)
- 240 gicing sugar, also called powdered sugar (2 cups), sifted
- 30 mlheavy cream or whole milk (2 tbsp)
- —— Chocolate Topping —
- 170 ggood-quality dark chocolate (60 to 70% cacao), roughly chopped
- 15 mlrefined coconut oil or Avocado Oil100% Pure Avocado Oil (1 tbsp)
Ingredient Substitutions
Instructions
Click on an item below to shop for the recommended items for this recipe on Amazon.
As an Amazon Associate, we earn from qualifying purchases.
- Line an 8-inch square baking pan with parchment paper, leaving an overhang on two sides so you can lift the bars out cleanly. Set aside.
- Make the base: Set a heatproof bowl over a saucepan of barely simmering water (the bottom of the bowl should not touch the water). Add the 115g of butter, granulated sugar, and sifted cocoa powder to the bowl. Stir gently and continuously until the butter melts and the mixture is smooth and glossy, about 3 to 4 minutes. Remove the bowl from the heat.
- Whisk the beaten egg and vanilla extract into the warm chocolate mixture immediately and quickly, stirring constantly so the egg cooks from the residual heat and thickens the mixture slightly rather than scrambling. The mixture will tighten and become glossy and fudgy. This takes about 30 to 60 seconds of vigorous stirring.
- Add the graham cracker crumbs, shredded coconut, and toasted walnuts to the bowl. Stir well until every crumb is evenly coated and the mixture holds together when pressed. Press the mixture firmly and evenly into the prepared pan using the flat bottom of a measuring cup or your fingers. Refrigerate for 15 minutes while you make the filling.
- Make the custard filling: Beat the softened 115g butter with a hand mixer or stand mixer fitted with the paddle attachment on medium speed until very pale and fluffy, about 2 to 3 minutes. Add the custard powder and mix on low to combine. Add the sifted icing sugar in two additions, mixing on low after each. Add the cream and increase speed to medium, beating for 1 to 2 minutes until the filling is smooth, light, and spreadable. It should be thick but still spreadable, not stiff.
- Spread the custard filling evenly over the chilled base using an offset spatula. Work gently so you do not disturb the base layer. Smooth the top as flat as possible for clean, professional-looking bars. Refrigerate for at least 30 minutes, or until the filling is firm to the touch.
- Make the chocolate topping: Combine the chopped dark chocolate and coconut oil in a heatproof bowl set over barely simmering water. Stir until completely melted and smooth, about 3 to 4 minutes. Remove from heat and let cool for 5 minutes, stirring occasionally, until the chocolate is around 90 to 95°F (32 to 35°C) and no longer feels warm to a fingertip but is still fully fluid.
- Pour the chocolate over the chilled custard layer and tilt the pan gently to spread it into an even, thin layer. You can also use an offset spatula. Refrigerate for at least 1 hour, or until the chocolate is fully set and firm.
- To cut: Lift the slab out of the pan using the parchment overhang. Let it sit at room temperature for 5 minutes. Using a sharp chef’s knife warmed under hot water and wiped dry, score the chocolate top lightly first, then cut through with a single downward press (not a sawing motion) to get clean edges. Wipe the blade between cuts. Cut into 16 squares or bars and serve.
- Line an 8-inch square baking pan with parchment paper, leaving an overhang on two sides. Set aside.
- Make the base: Place the 115g of butter in a large microwave-safe bowl. Microwave in 20-second bursts, stirring between each, until just melted. Do not let the butter bubble or overheat. Stir in the granulated sugar and sifted cocoa powder until smooth.
- Let the mixture cool for 2 minutes so it is warm but no longer hot. This is important: if it is too hot it will scramble the egg. Add the beaten egg and vanilla extract, stirring vigorously for 30 to 60 seconds until the mixture thickens and becomes glossy from the residual heat. If it does not thicken, microwave in a single 10-second burst while stirring, then check again.
- Stir in the graham cracker crumbs, shredded coconut, and toasted walnuts until fully combined. Press firmly and evenly into the prepared pan. Refrigerate for 15 minutes.
- Make the custard filling exactly as in the classic method: beat softened butter until fluffy, add custard powder, then icing sugar in two additions, then cream. Beat until smooth and light. Spread evenly over the chilled base and refrigerate for at least 30 minutes.
- Make the chocolate topping: Place the chopped dark chocolate and coconut oil in a microwave-safe bowl. Microwave in 20-second bursts, stirring well between each, until the chocolate is about 75% melted. Remove from the microwave and stir continuously until fully smooth and glossy. This avoids overheating the chocolate. Let cool for 5 minutes before pouring over the custard layer.
- Pour and spread the chocolate over the chilled filling, refrigerate for at least 1 hour until set, then cut as described in the classic method.
Nutrition Per Serving
Per 1 serving (makes one 8-inch square pan, cut into 16 bars)
Why This Recipe Works
The bain-marie (double boiler) technique for the base is not just tradition: it is essential food science. By melting the butter and cocoa over gentle indirect heat rather than directly on the stovetop, you prevent scorching and keep the temperature controlled. When the beaten egg is stirred into the warm chocolate mixture off the heat, it reaches a temperature of roughly 160 to 170°F (71 to 77°C) from the residual warmth, which is enough to gently cook and thicken the proteins in the egg without scrambling them. This creates a soft, cohesive binder that holds the crumbs and coconut together into a dense, fudgy slab rather than a crumbly loose base. The ratio of crumbs to fat to binder is carefully balanced here so the base is firm enough to slice cleanly but moist enough to eat comfortably without feeling dry.
Bird’s custard powder is the backbone of the authentic filling and the reason it tastes so different from a plain buttercream. Custard powder is essentially cornstarch flavored with vanilla, and when worked into buttercream it serves two purposes: it absorbs some of the moisture from the cream and butter, giving the filling a slightly firmer, denser body that holds its layer beautifully when cut, and it adds the distinctive mild vanilla-custard flavor that defines a true Nanaimo bar. Beating the butter thoroughly before adding the sugar is not optional. This aeration creates tiny air pockets that give the filling its characteristic lightness and pale color, preventing the heavy, gluey texture you get when the fat is under-beaten.
The coconut oil in the chocolate topping is a small but important addition. Pure melted chocolate without any added fat sets very hard and tends to crack dramatically when you try to cut the bars, splintering and dragging the custard layer with it. The coconut oil lowers the viscosity of the chocolate as it sets, resulting in a topping that snaps cleanly under a warm knife rather than shattering. Allowing the melted chocolate to cool to around 90 to 95°F before pouring also prevents it from melting the custard layer beneath, which would create an uneven, marbled appearance in the filling.
Baker’s Tips
- Toast the walnuts in a dry skillet over medium heat for 3 to 4 minutes, stirring often, until fragrant. This takes barely any extra time and dramatically deepens their flavor in the finished bar.
- Make sure your butter for the custard filling is genuinely soft, not cold and not melted. It should leave an indent when pressed but not feel greasy or slick. Cold butter will create a lumpy filling that never fully smooths out.
- When spreading the custard filling over the base, work with a light touch using an offset spatula. If the filling drags and pulls at the base, let the base chill for an extra 10 minutes until it is more firmly set.
- For the cleanest cuts, run your chef’s knife under very hot water for 10 seconds, wipe dry with a clean cloth, and use a single firm downward press for each cut rather than a sawing motion. Repeat the warming and wiping between every cut.
- Do not skip the cooling step before pouring the chocolate topping. Pouring hot chocolate directly onto the chilled custard layer causes the surface to melt and the two layers to combine, ruining the distinct separation.
- If your chocolate topping starts to set before you finish spreading it, do not panic. Gently tilt the pan to let it self-level rather than over-working it with a spatula, which can create streaks and dull the finish.
Variations
- Mint Nanaimo Bars: Add 1/2 tsp peppermint extract to the custard filling in place of any additional vanilla, and tint the filling pale green with a drop of gel food coloring for a festive holiday version.
- Peanut Butter Nanaimo Bars: Replace the custard filling with a mixture of 115g softened butter, 120g smooth peanut butter, and 180g sifted icing sugar beaten together until fluffy. Rich, salty, and incredibly satisfying.
- Mocha Nanaimo Bars: Dissolve 1 tsp instant espresso powder in the cream before adding it to the custard filling for a subtle coffee note that deepens the chocolate flavor throughout.
- Nut-Free Version: Simply omit the walnuts and increase the graham cracker crumbs by 30g to maintain the correct base consistency. Suitable for nut-free households.
Troubleshooting & FAQ
My base crumbled when I tried to press it into the pan. What went wrong?
The chocolate topping cracked when I cut the bars. How do I prevent this?
My custard filling looks greasy and separated. Can I fix it?
The custard layer and chocolate layer are fusing together when I cut. What happened?
My bars taste overly sweet. Is there a way to balance them?
Storage & Make-Ahead
- Storage: Store Nanaimo bars in a single layer, or between sheets of parchment paper, in an airtight container in the refrigerator for up to 1 week. Serve slightly chilled or at cool room temperature for the best texture. Freeze in an airtight container with parchment between layers for up to 3 months; thaw overnight in the refrigerator.
- Make-Ahead: Nanaimo bars are an ideal make-ahead treat and actually taste better after a full overnight rest in the refrigerator, as the layers set firmly and the flavors meld. You can prepare the entire pan up to 5 days before serving. Cut just before serving for the cleanest edges, or cut ahead and store layered with parchment.

I’ve found that the custard layer is where patience really pays off, kind of like working with horses – you can’t rush it or it gets tense and breaks. The allulose keeps that silky texture without the graininess that can happen with other sweeteners, and I love that you’re creating something the kids genuinely want to eat rather than something they have to settle for. There’s something healing about that, honestly, about nourishing the people we care about without compromise.
yo these look incredible, my team at the gym is gonna lose it when i bring these in. ive been trying to figure out how to make the treats the kids actually want without spiking their sugar levels and this custard layer sounds perfect for that. the no bake part is huge too since i can prep em the night before instead of stressing over an oven after a long day of training. definitely trying this version this weekend.
Oh Marco, this is such a thoughtful approach! I love that you’re thinking about what goes into the kids’ bodies – honestly, seeing how many treats marketed to children are basically just sugar delivery systems really gets to me. The allulose version here should give you that same satisfying sweetness without the crash, and the texture on those Nanaimo bars is seriously buttery and indulgent, so nobody will feel like they’re missing out. Definitely let the custard layer set properly in the fridge though, or it can get a bit soft when you’re cutting into them!