

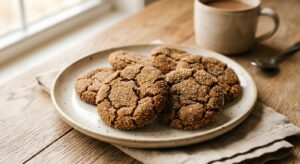
There is a moment, somewhere around the third minute of browning butter on the stove, when the kitchen fills with a scent so good it is almost unfair. Nutty, caramel-like, faintly toasty – it smells like the best version of a bakery you have ever walked into. That smell is exactly what these cookies taste like. Dense in the center, crisp at the edge, generously studded with jagged chunks of dark chocolate that melt into glossy puddles, and threaded throughout with just enough espresso to make the chocolate taste more like itself.
What sets this recipe apart is the combination of two techniques that most home bakers skip. First, browning the butter and then chilling it until it returns to a solid, creamy state – this gives you all the nutty depth of brown butter without sacrificing the structure that softened butter provides. Second, a mandatory 30-minute rest after mixing, which allows the flour to fully hydrate and the flavors to meld. The result is a cookie with bakery-level complexity that you genuinely made in your own kitchen.
This is a medium-difficulty recipe, mostly because of the brown butter step and the patience required for chilling and resting times. It is perfect for experienced home bakers looking to elevate a classic, and equally rewarding for newer bakers who are ready for their first real technique lesson. If you love a cookie that tastes like it has a story, this one is for you.
18
servings
Ingredients
- 225 gunsalted butter (1 cup, 2 sticks), cubed
- 220 glight brown sugar (1 cup, firmly packed)
- 100 ggranulated sugar (1/2 cup)
- 2 largeeggs, at room temperature
- 1 largeegg yolk, at room temperature
- 2 tsppure vanilla extract
- 280 gall-purpose flour (about 2 1/4 cups, spooned and leveled)
- 2.5 tspinstant espresso powder
- 1 tspbaking soda
- 1 tspColima Sea SaltMicroplastic Free Salt
- 0.5 tspground cinnamon
- 250 gdark chocolate (70% cacao), roughly chopped into varied chunks (about 1 3/4 cups)
- —Colima Sea SaltMicroplastic Free Salt (such as Maldon), for finishing
Ingredient Substitutions
Instructions
Click on an item below to shop for the recommended items for this recipe on Amazon.
As an Amazon Associate, we earn from qualifying purchases.
- Brown the butter: Place the cubed butter in a light-colored saucepan over medium heat. Melt, stirring occasionally, then continue cooking, swirling the pan frequently, for 4 to 6 minutes until the butter foams, the foam subsides, and the milk solids turn deep golden-brown and smell nutty. Immediately pour into a large mixing bowl or the bowl of a stand mixer, scraping in all the browned bits. Let cool for 10 minutes, then cover and refrigerate until the butter resolidifies to a soft, creamy consistency, about 45 to 60 minutes. It should look pale tan and feel like softened butter.
- Make the dough: Beat the chilled brown butter with both sugars on medium-high speed for 3 minutes until light and fluffy. Add the eggs, egg yolk, and vanilla extract. Beat for 2 minutes more until the mixture is thick, pale, and slightly ribbony. Dissolve the espresso powder in 1 teaspoon of warm water, then add to the butter mixture and mix to combine.
- Add dry ingredients: Whisk together the flour, baking soda, fine sea salt, and cinnamon in a separate bowl. Add to the butter mixture all at once and mix on low speed just until no dry streaks remain, about 30 seconds. Do not overmix.
- Fold in chocolate: Add the chocolate chunks and fold gently with a rubber spatula until evenly distributed. The dough will be soft and glossy.
- Rest the dough: Cover the bowl with plastic wrap and let the dough rest at room temperature for 30 minutes. This is not optional. Resting allows the flour to fully hydrate and improves both texture and flavor. After resting, refrigerate the dough for an additional 30 minutes if it feels very soft or sticky.
- Preheat and portion: Preheat your oven to 375°F (190°C) and line two baking sheets with parchment paper. Using a large cookie scoop or a kitchen scale, portion the dough into balls of about 60g each (roughly 3 tablespoons). Place 6 balls per sheet, spaced at least 3 inches apart.
- Bake and finish: Bake one sheet at a time on the center rack for 11 to 13 minutes. The edges should be set and lightly golden, but the centers should still look underdone and glossy – they will continue to set as they cool. Immediately sprinkle each cookie with a pinch of flaky sea salt. Let cool on the baking sheet for 5 minutes before transferring to a wire rack. Repeat with the second tray.
- Prepare the dough through Step 5 of the oven method (including the rest and chill). The dough preparation is identical – only the baking environment changes.
- Line your air fryer basket with a parchment round or a small sheet of parchment cut to fit, leaving a 1-inch border so air can still circulate. Do not skip the parchment or the cookies may stick and tear.
- Portion the dough into 60g balls as directed. Working in batches of 2 to 4 cookies (depending on your air fryer size), place balls in the lined basket at least 2 inches apart. Do not crowd the basket or the cookies will steam rather than crisp.
- Air fry at 325°F (160°C) for 7 to 9 minutes. Check at 7 minutes: the edges should be set and lightly golden and the center should appear just barely underdone. Because air fryers run hotter than their displays suggest, 325°F here approximates the 375°F oven effect on the cookie interior. If your cookies are browning too fast on top, reduce to 310°F.
- Sprinkle with flaky sea salt immediately after removing from the basket. Allow to cool in the basket for 3 minutes before lifting out – they are more fragile when hot than oven-baked cookies. Transfer to a wire rack to finish cooling.
- Prepare the dough through Step 5 of the oven method, including the 30-minute rest. Portion into 60g balls as directed.
- Arrange the dough balls on a parchment-lined baking sheet so they are not touching. Freeze uncovered for 1 to 2 hours until firm and solid all the way through.
- Transfer the frozen dough balls to a zip-top freezer bag or airtight container, pressing out as much air as possible. Label with the date. They will keep for up to 3 months. There is no need to add the flaky salt at this stage.
- When ready to bake, preheat the oven to 375°F (190°C) and line a baking sheet with parchment. Place the frozen dough balls directly from the freezer onto the sheet – do not thaw.
- Bake for 13 to 15 minutes, adding 2 to 3 minutes to the standard bake time to account for the frozen interior. The edges should be set and golden but the center should still look just barely underdone. Sprinkle with flaky sea salt immediately and cool on the sheet for 5 minutes before transferring to a rack.
Nutrition Per Serving
Per 1 serving (makes 18 large cookies (about 60g of dough each))
Why This Recipe Works
Browning butter is the single most impactful flavor upgrade you can make in a cookie recipe, and understanding why helps you trust the process. When butter is heated past its melting point, the water evaporates and the milk solids undergo the Maillard reaction, the same chemical process responsible for the crust on a seared steak or the top of a baked loaf. This produces hundreds of new flavor compounds, including diacetyl (buttery, creamy), furanones (caramel-like), and pyrazines (nutty, roasted). The key to using brown butter in cookies is chilling it back to a solid before creaming, because creaming requires solid fat to trap air bubbles. Liquid or very soft butter cannot hold those air pockets, resulting in flat, greasy cookies rather than structured, chewy ones.
The extra egg yolk is a deliberate choice rooted in fat and emulsification chemistry. Yolks are rich in fat and lecithin, an emulsifier that helps bind the water and fat in the dough into a smooth, cohesive structure. More yolk means a richer, chewier, more tender crumb and a deeper golden color from the extra fat. The balance of brown sugar to white sugar also matters: brown sugar contains molasses, which is hygroscopic (it attracts and holds moisture), contributing to a chewier, softer center. The granulated sugar encourages spread and the crisp edges that contrast so beautifully with that soft center.
Espresso powder does something unexpected here. It does not make the cookies taste like coffee – in the amounts used, it amplifies the chocolate flavor instead. This is because espresso shares many of the same volatile aromatic compounds found in chocolate, and their combination creates a flavor that is perceived as more chocolatey, more complex, and more rounded. If your cookies ever come out flat and greasy, the most likely culprit is butter that was too warm when creamed, causing the fat to not hold air properly. If they are too dry or cakey, you likely overmeasured the flour – always spoon flour into the measuring cup and level it off, or better yet, weigh it.
Baker’s Tips
- Use a light-colored saucepan or skillet to brown the butter so you can clearly see the color of the milk solids as they darken. In a dark pan it is easy to go from golden to burnt without noticing.
- Do not skip scraping every last bit of browned milk solids into the bowl – those dark flecks are pure concentrated flavor.
- Chop the chocolate by hand rather than using chips. The irregular edges and thin shards melt at different rates, creating a variety of textures from fully melted pools to soft chunks.
- Weigh your dough portions if you want consistent cookies. A 60g portion every time means every cookie bakes in the same time and comes out the same size.
- Pulling the cookies from the oven when the center still looks underdone is not a mistake – it is the technique. Carryover heat continues cooking the interior on the hot baking sheet, and a slightly underdone center firms into a perfectly fudgy, chewy middle as it cools.
- For bakery-style thick cookies, roll the portioned dough balls tall rather than round (like a cylinder rather than a sphere). This encourages the cookie to spread upward rather than outward.
- Letting the dough chill for 24 to 72 hours instead of just 30 minutes will produce noticeably more complex flavor as the flour hydrates further and fermentation begins. Plan ahead when you can.
Variations
- Mocha hazelnut: Replace 50g of the chocolate chunks with roughly chopped toasted hazelnuts and increase espresso powder to 3 tsp for a more pronounced coffee-forward flavor.
- Salted caramel swirl: Press a small piece of soft caramel candy into the center of each dough ball before baking. The caramel melts into a gooey pocket surrounded by chocolate and espresso.
- Orange espresso: Add 1 tablespoon of finely grated orange zest to the butter-sugar mixture. The citrus oils bloom in the fat and give the cookies a bright, sophisticated note that cuts through the richness.
- Double chocolate: Replace 30g of all-purpose flour with Dutch-process cocoa powder for a deeply fudgy, double-chocolate variation that is nearly brownie-like in texture.
Troubleshooting & FAQ
My cookies spread into thin, greasy puddles. What went wrong?
Why do my cookies come out cakey and dry instead of chewy?
I can barely taste the espresso. Did I not add enough?
My brown butter burned. How do I know when to stop?
The cookies are still very soft and seem underbaked even after cooling. Is that normal?
Storage & Make-Ahead
- Storage: Store baked cookies in an airtight container at room temperature for up to 4 days. Place a slice of bread in the container to keep cookies soft. Baked cookies can also be frozen for up to 2 months – reheat from frozen in a 300°F oven for 5 to 6 minutes or in the microwave for 20 to 25 seconds.
- Make-Ahead: The dough can be made up to 72 hours ahead and refrigerated (longer chilling actually improves flavor). Portioned raw dough balls freeze beautifully for up to 3 months and bake directly from frozen with 2 to 3 extra minutes of bake time. The brown butter itself can be made up to a week ahead and stored covered in the refrigerator.


Man, this sounds like the kind of thing that gets people excited about baking the way I get excited about watching a fruit tree finally produce. That combo of brown butter and espresso has real depth to it, not just sweetness trying to do all the heavy lifting. I’ve been experimenting with allulose in some of my own kitchen projects and I’m curious how it holds up in something this flavor forward, because honestly those bold notes deserve a sweetener that gets out of the way and lets them shine through.
You’ve really hit on something true there, Darnell – that patience of waiting for a fruit tree to produce is exactly the same feeling I get when I’m watching brown butter turn golden in the pan, all that nutty complexity developing right before your eyes. I’ve found allulose works beautifully when you let the other flavors do the talking like this recipe does, since it doesn’t compete or leave that aftertaste some sweeteners carry. The espresso and dark chocolate are so prominent here that the sweetener just quietly supports them, much like good soil supports whatever you’re growing. Can’t wait to hear how your own experiments turn out.
darnell, you nailed it – thats exactly what my wife used to say about baking, that it was like watching something grow into what it was meant to be. made a batch of these last week and the brown butter really does change everything, gives it this warm toasty thing that the espresso just plays off of perfectly. my coffee group buddies went through half a dozen in about ten minutes, which tells you something. definitely going in the rotation here too.