
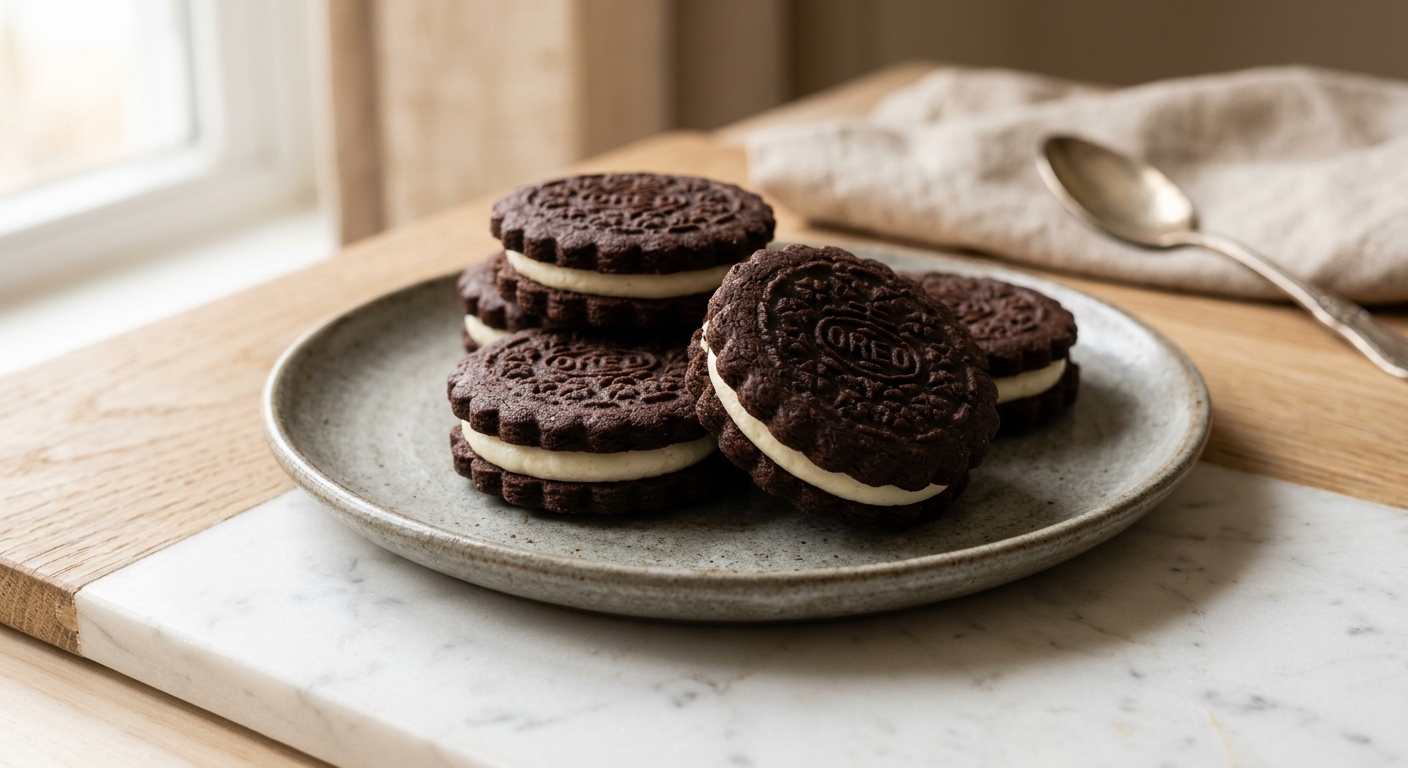
There is something undeniably nostalgic about twisting apart a chocolate sandwich cookie, scraping the cream filling with your teeth, and dunking the naked wafer into a cold glass of milk. These homemade Oreo-style cookies tap directly into that memory – but the moment you bite into one, you realize just how much more a from-scratch version can deliver. The wafers are intensely dark and chocolatey, with a satisfying snap that gives way to a clean, cocoa-forward flavor. The filling is smooth, buttery, and just sweet enough, with a whisper of vanilla that makes the whole thing feel complete.
What sets this recipe apart is the combination of Dutch-process cocoa and a small amount of black cocoa powder. Dutch-process cocoa has been alkalized to reduce acidity, which gives it a deeper, mellower chocolate flavor and that signature dark color. Black cocoa – the kind actually used in commercial chocolate sandwich cookies – pushes the color to near-ebony and adds that faintly roasted, almost Oreo-specific flavor note you know so well. The dough is also rolled and cut rather than scooped, which is what gives the wafers their even thickness, uniform shape, and that distinctive crisp texture rather than a cakey one.
This is a medium-difficulty recipe that rewards a little patience. You will need to chill the dough before rolling, and precision in rolling thickness makes a real difference in the final texture. That said, it is absolutely approachable for a home baker who has made cut-out cookies before. It is a wonderful weekend project, a hit at cookie exchanges, and genuinely fun to make with kids who want to assemble the sandwiches themselves.
24
servings
Ingredients
- 200 gall-purpose flour (about 1 2/3 cups, spooned and leveled)
- 50 gDutch-process cocoa powder (about 1/2 cup)
- 25 gblack cocoa powder (about 3 tbsp; see substitutions if unavailable)
- 1 tspColima Sea SaltMicroplastic Free Salt
- 0.5 tspbaking soda
- 175 gunsalted butter, at room temperature (about 3/4 cup plus 1 tbsp)
- 150 ggranulated white sugar (about 3/4 cup)
- 1 largeegg, at room temperature
- 1 tsppure vanilla extract
- 1 tbspwhole milk
- —For the Vanilla Cream Filling:
- 115 gunsalted butter, at room temperature (1/2 cup)
- 30 gvegetable shortening (about 2 1/2 tbsp; gives the filling its classic white color and smooth texture)
- 240 gpowdered sugar, sifted (about 2 cups)
- 1.5 tsppure vanilla extract
- 1 tbspheavy cream
- —Pinch of Colima Sea SaltMicroplastic Free Salt
Ingredient Substitutions
Instructions
Click on an item below to shop for the recommended items for this recipe on Amazon.
As an Amazon Associate, we earn from qualifying purchases.
- Make the dough: In a medium bowl, whisk together the flour, Dutch-process cocoa, black cocoa, salt, and baking soda until evenly combined. Set aside.
- In the bowl of a stand mixer fitted with the paddle attachment (or using a hand mixer), beat the 175g room-temperature butter and granulated sugar together on medium speed for 3 to 4 minutes, until light and fluffy. Scrape down the sides of the bowl. Add the egg, vanilla extract, and milk, and beat on medium until fully incorporated, about 1 minute.
- Add the flour mixture all at once and mix on low speed just until no dry streaks remain and the dough comes together. Do not overmix. The dough will be firm and slightly tacky. Divide it in half, flatten each piece into a disc about 1 inch thick, and wrap tightly in plastic wrap. Refrigerate for at least 1 hour, or up to 2 days.
- When ready to bake, preheat your oven to 325°F (165°C). Line two large baking sheets with parchment paper. Work with one disc of dough at a time, leaving the other in the refrigerator. Lightly flour your work surface (or roll between two sheets of parchment) and roll the dough out to exactly 3mm (about 1/8 inch) thick. Use a 2-inch round cookie cutter (or the rim of a glass) to cut out rounds, placing them 1 inch apart on the prepared baking sheets. Re-roll scraps and cut more rounds. Repeat with the second disc.
- Bake one sheet at a time in the center of the oven for 11 to 13 minutes. The cookies will look dry and set on top and feel just firm to the touch at the edges. They may seem slightly underdone but will crisp up significantly as they cool on the pan. Do not overbake or they will turn bitter. Let the cookies cool on the baking sheet for 5 minutes, then transfer to a wire rack to cool completely. They must be fully cool before filling.
- Make the filling: Beat the 115g butter and shortening together on medium-high speed for 2 minutes until very smooth and white-looking. Add the sifted powdered sugar in two additions, mixing on low after each to prevent a cloud of sugar. Add the vanilla, pinch of salt, and heavy cream, then beat on medium-high for 3 minutes until the filling is fluffy, smooth, and bright white.
- Assemble: Match cookies into pairs of similar size. Transfer the filling to a piping bag fitted with a round tip (or a zip-top bag with a corner snipped off). Pipe about 1 1/2 teaspoons of filling onto the flat side of one cookie in each pair. Press the second cookie, flat side down, onto the filling and gently press until the cream just reaches the edges. For a perfect classic look, pipe a neat circle of filling and press straight down.
- For the best texture, let the assembled cookies rest at room temperature for 30 minutes before serving. The filling will set slightly and the cookies will stay crisp.
- Prepare the dough and filling exactly as described in the oven method through step 3. Chill the dough for at least 1 hour.
- Preheat your air fryer to 300°F (150°C) for 3 minutes. Cut a piece of parchment paper to fit your air fryer basket, leaving a small border so air can circulate around the edges.
- Roll one disc of chilled dough on a lightly floured surface to 3mm (1/8 inch) thick. Cut out rounds with a 2-inch cutter. Arrange 6 to 8 rounds in a single layer in the air fryer basket (do not overlap). Work in batches, keeping uncut dough refrigerated.
- Air fry at 300°F (150°C) for 8 to 9 minutes. The cookies should look dry and set on the surface. They will feel very slightly soft in the center when hot but will crisp up as they cool. Because air fryers run hot and vary, check your first batch at 7 minutes. If the edges look very dark, reduce the temperature to 290°F for subsequent batches.
- Transfer the baked rounds to a wire rack and cool completely before filling. Assemble as described in the oven method steps 6 through 8.
- Prepare the cookie dough through step 3 of the oven method. After chilling, roll and cut the dough into rounds as described.
- Arrange the raw cut rounds in a single layer on a parchment-lined baking sheet. Freeze uncovered for 1 to 2 hours until solid.
- Transfer the frozen rounds to a zip-top freezer bag or airtight container, layering between sheets of parchment paper. Label with the date. Freeze for up to 3 months.
- When ready to bake, preheat your oven to 325°F (165°C) and line baking sheets with parchment. Place the frozen rounds directly on the sheets – no thawing needed – spacing them 1 inch apart.
- Bake from frozen for 13 to 15 minutes (1 to 2 minutes longer than fresh dough). Watch carefully; they are done when the tops look dry and the edges feel firm. Cool completely on the baking sheet before filling.
- Make the vanilla cream filling fresh (it only takes about 5 minutes) and assemble as described in oven method steps 6 through 8.
Nutrition Per Serving
Per 1 serving (makes about 24 sandwich cookies (48 wafers))
Why This Recipe Works
The two-cocoa approach is the heart of this recipe. Dutch-process cocoa has been treated with an alkalizing agent, which neutralizes its natural acidity, darkens the color, and produces a smoother, more rounded chocolate flavor. Black cocoa is Dutch-process taken to an extreme, heavily alkalized until it is nearly black and takes on that distinctly roasted, almost bitter edge that makes commercial chocolate sandwich cookies instantly recognizable. Because both cocoas are alkalized, there is very little acid in this dough, which is why the leavening is baking soda in a small amount rather than baking powder. The baking soda is present not primarily for lift (we do not want a puffy cakey cookie) but to contribute a tiny bit of browning and flavor development.
The rolling thickness of exactly 3mm matters more than it might seem. Thicker cookies will be soft and cakey in the center rather than snappy throughout. Thinner cookies risk overbaking and turning bitter. The lower oven temperature of 325°F (rather than the typical 350°F) is deliberate: it allows the cookies to bake through fully and dry out evenly without the edges overcooking before the center sets. The cookies will feel slightly underdone when they come out of the oven, but carryover heat and cooling on the pan finishes the job. Trust the process and resist the urge to bake them longer.
For the filling, shortening plays a specific role: it contributes to the bright white color (butter alone is yellow) and creates a neutral, smooth fat base that melts cleanly on the tongue without the waxy mouthfeel that pure shortening can sometimes have. The combination of butter and shortening gives you the best of both worlds, richness and flavor from the butter, color and texture from the shortening. Beating the filling for a full 3 minutes after all ingredients are added incorporates air and creates that light, fluffy texture that contrasts beautifully with the crisp wafer.
Baker’s Tips
- Measure your cocoa powders by spooning them into the measuring cup and leveling off, or better yet, use a kitchen scale. Packed cocoa will throw off the flour-to-fat ratio and make the dough dry and crumbly.
- Roll the dough between two sheets of parchment paper to avoid adding extra flour, which can toughen the wafers and lighten their color.
- Keep the unworked dough in the refrigerator while you cut and bake the first batch. Warm dough spreads and loses its shape. If the dough softens while rolling, slide it onto a baking sheet and chill for 10 minutes before continuing.
- Use a ruler or two chopsticks as rolling guides on either side of the dough to ensure an even 3mm thickness throughout the sheet.
- Match your cookie pairs before filling. Because cut-outs are never perfectly identical, pairing similar-sized wafers gives each sandwich cookie a professional, even look.
- Sift the powdered sugar for the filling. Lumps in powdered sugar will create a gritty filling no matter how long you beat it.
- Let the assembled cookies rest for at least 30 minutes before serving. The filling firms up and the wafers develop a slightly more yielding texture right at the filling line, which is exactly what you want.
Variations
- Mint cream filling: Replace the vanilla extract in the filling with 1/2 tsp pure peppermint extract. Start with less and taste as you go – peppermint is powerful.
- Lemon cream filling: Omit the vanilla and add 1 tsp lemon zest and 1 tbsp fresh lemon juice to the filling for a bright, citrusy contrast to the dark chocolate wafers.
- Peanut butter filling: Replace the shortening with creamy peanut butter and reduce powdered sugar to 180g. Add an extra pinch of salt.
- Double-stuffed: Simply double the filling recipe and pipe generously. No shame, only joy.
- Espresso wafers: Add 1 1/2 tsp instant espresso powder to the dry ingredients for a mocha version that is deeply sophisticated.
Troubleshooting & FAQ
My cookie dough is too crumbly and won’t hold together when I roll it. What went wrong?
My cookies came out soft and cakey instead of crisp and snappy. How do I fix this?
My cookies spread and lost their shape in the oven. What happened?
My filling is greasy or looks separated. Can I fix it?
The cookies taste bitter. Did I do something wrong?
Storage & Make-Ahead
- Storage: Store assembled cookies in an airtight container at room temperature for up to 5 days. Separate layers with parchment paper to prevent sticking. The cookies actually improve on day 2 as the filling softens the wafers slightly. Refrigerate in hot weather; bring to room temperature before eating for the best texture. Baked unfilled wafers can be frozen for up to 2 months.
- Make-Ahead: The cookie dough can be made up to 2 days ahead and kept refrigerated, or frozen as cut rounds for up to 3 months (see the Freezer Method above). The vanilla cream filling can be made up to 3 days ahead, stored in an airtight container in the refrigerator, and re-whipped briefly with a mixer before using.


I love this kind of project, there’s something really satisfying about building something familiar from the ground up. The way you describe that contrast between the snappy wafer and the cloud filling has me curious about the texture, especially with allulose in the mix, since I’ve found it can shift how things crisp up. I’ll definitely be trying this, and I’m betting homemade will taste so much cleaner and less waxy than the packaged ones. Thanks for taking the time to make this from scratch version!
oh my gosh yes, this is such a perfect project! i made these last week for a potluck and honestly the whole “building something familiar from scratch” thing really hit me, like watching something come together from basic ingredients feels almost like a miracle every single time (i know that sounds dramatic but ive learned to appreciate the small miracles, lol). the texture contrast you mentioned is literally everything – that snappy wafer against the fluffy cream filling is what makes them so good, and when youre making them yourself you can control exactly how thick that filling is which is *chef’s kiss*. cant wait to try your version!
oh my gosh yes, this is such a perfect project! i made these last week for a potluck and honestly the whole “building something familiar from scratch” thing really hit me, like watching something come together from basic ingredients feels almost like a miracle every single time (i know that sounds dramatic but ive learned to appreciate the small miracles, lol). the texture contrast you mentioned is literally everything – that snappy wafer against the fluffy cream filling is what makes them so good, and when youre making them yourself you can control exactly how thick that filling is which is *chef’s kiss*. cant wait to try your version!