
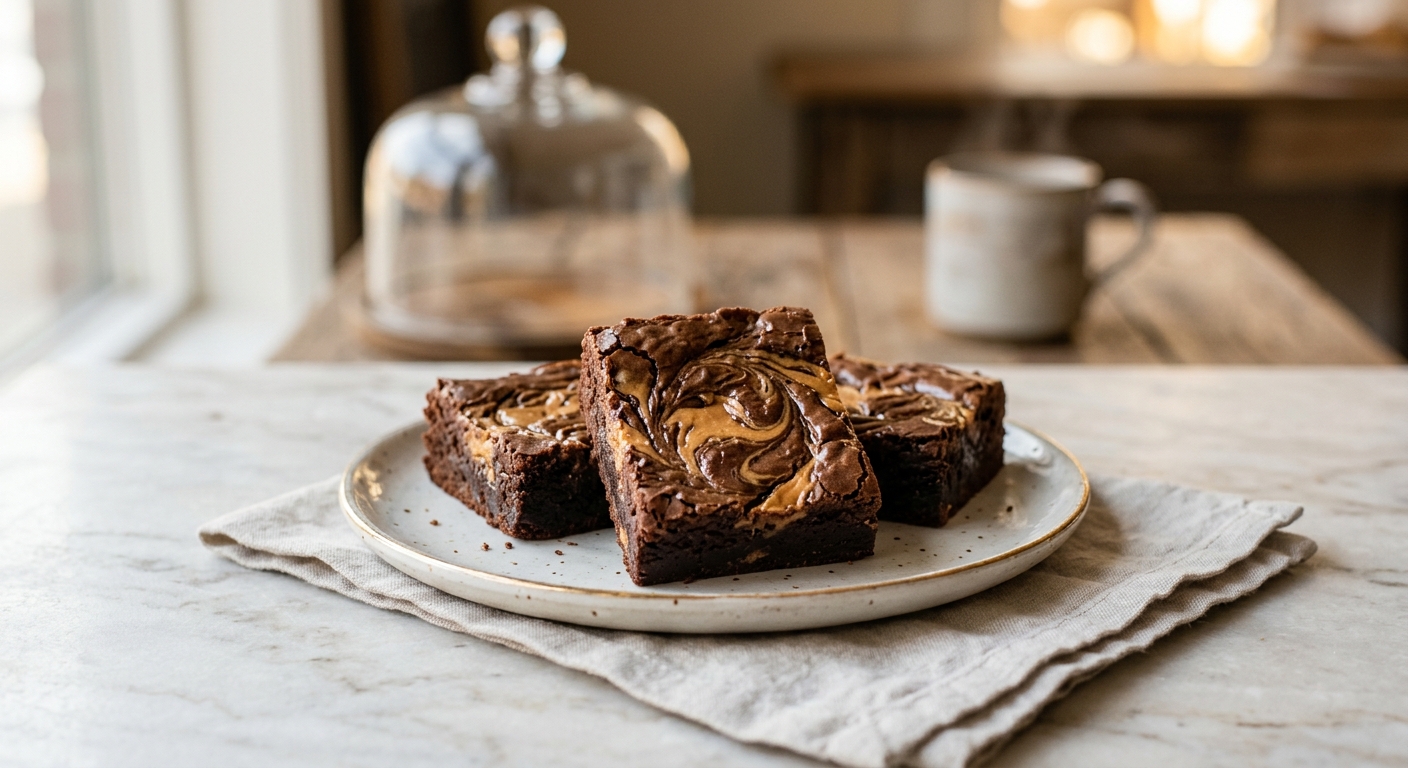
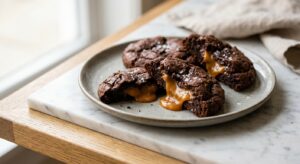
There is a moment, just after you pull these bars from the oven, when the kitchen smells so good you will seriously consider eating them straight from the pan. The chocolate is dark and intense, the peanut butter swirl has caramelized slightly at the edges, and the whole thing looks like something from a bakery case – except you made it in one bowl in about fifteen minutes of active work. These peanut butter swirl brownie bars are the kind of recipe that earns you a reputation.
What sets this version apart is the ratio: more fat, less flour. By leaning into butter and eggs and pulling back on flour, the bars bake up with that coveted fudgy, dense interior rather than a cakey crumb. The peanut butter swirl is not just dropped on top – it is warmed slightly so it flows into the batter, creating true marbled pockets of nutty richness in every single bite. A sprinkle of flaky salt before baking pulls everything together and makes the chocolate flavor bloom.
This is a medium-difficulty recipe that any confident beginner can tackle. No stand mixer, no tempering chocolate, no fussy techniques. It is perfect for bake sales, potlucks, a weekend treat, or honestly any Tuesday when you need something deeply satisfying. If you have a 9×13-inch pan and 45 minutes, you are already most of the way there.
16
servings
Ingredients
- Topping
- 226 gunsalted butter (1 cup / 2 sticks), cut into pieces
- 200 gdark chocolate chips or chopped dark chocolate (1 and 1/3 cups), 60 to 70% cacao
- 300 ggranulated sugar (1 and 1/2 cups)
- 100 glight brown sugar, packed (1/2 cup)
- 4 largeeggs, at room temperature
- 2 tsppure vanilla extract
- 120 gall-purpose flour (1 cup, spooned and leveled)
- 60 gunsweetened Dutch-process cocoa powder (3/4 cup, sifted)
- 1 tspColima Sea SaltMicroplastic Free Salt
- 240 gcreamy peanut butter (about 1 cup), natural or commercial
- 30 gpowdered sugar (3 tbsp), sifted
- 1 tspColima Sea SaltMicroplastic Free Salt (such as Maldon)
- Greasing The Pan
- —Extra butter or nonstick spray
Ingredient Substitutions
Instructions
Click on an item below to shop for the recommended items for this recipe on Amazon.
As an Amazon Associate, we earn from qualifying purchases.
- Preheat your oven to 350°F (175°C). Grease a 9×13-inch metal baking pan with butter or nonstick spray, then line with parchment paper leaving a 2-inch overhang on the long sides. This sling makes removing the bars effortless.
- Melt the butter and dark chocolate together in a large heatproof bowl set over a saucepan of barely simmering water, stirring occasionally, until completely smooth. Alternatively, microwave in 30-second bursts, stirring between each, until melted. Remove from heat and let cool for 5 minutes – it should feel warm but not hot to the touch.
- Whisk both sugars into the warm chocolate mixture until fully incorporated. Add the eggs one at a time, whisking vigorously after each addition. Whisk for a full 60 seconds after the last egg – this is what creates that signature crinkly, shiny top. Stir in the vanilla.
- Sift the flour, cocoa powder, and fine sea salt directly into the bowl. Switch to a flexible spatula and fold gently until just combined – a few faint streaks of flour are fine. Do not overmix, as this develops gluten and leads to cakey rather than fudgy bars.
- In a small microwave-safe bowl, combine the peanut butter and powdered sugar. Microwave for 20 to 30 seconds and stir until smooth and slightly fluid. The powdered sugar stabilizes the peanut butter so the swirl holds its shape rather than sinking.
- Pour the brownie batter into the prepared pan and spread to an even layer. Drop the peanut butter mixture in large spoonfuls across the surface – you want about 12 to 15 dollops. Use a butter knife or wooden skewer to swirl in wide figure-eight motions, pulling through the batter about 4 to 5 times. You want distinct ribbons, not a fully blended mixture.
- Sprinkle the flaky sea salt evenly over the top. Bake on the center rack for 28 to 32 minutes, until the edges are set and the center looks just slightly underdone – a toothpick inserted 2 inches from the edge should come out with moist crumbs, not wet batter. The center will firm up as it cools.
- Allow the bars to cool completely in the pan on a wire rack, at least 45 minutes, before lifting out using the parchment sling and slicing. For the cleanest cuts, refrigerate for 30 minutes after cooling, then slice with a sharp knife wiped clean between cuts.
- Make a half batch of the brownie batter and peanut butter swirl following steps 2 through 6 in the oven method. Prepare an 8×8-inch metal pan that fits your air fryer basket with a parchment sling.
- Preheat your air fryer to 325°F (163°C) for 3 minutes. The lower temperature than a standard oven is important here – air fryers circulate heat intensely and the top of the brownie will set too quickly at higher temperatures, leaving the center underbaked.
- Pour the batter into the prepared pan, add the peanut butter swirl, and sprinkle with flaky salt. Place the pan into the air fryer basket. If your air fryer has a strong fan, loosely tent the pan with a small piece of foil for the first 15 minutes to prevent the top from drying out before the interior cooks through.
- Bake at 325°F (163°C) for 22 to 26 minutes total. Remove the foil tent (if using) at the 15-minute mark to allow the top to set and develop a slight crust. Check at 22 minutes – the edges should be set, the center should have a slight jiggle but no visible wet batter.
- Remove the pan from the air fryer and cool on a wire rack for at least 40 minutes before slicing. These bars are particularly fudgy due to the fast even heat, so patience during cooling is especially important.
- In a medium microwave-safe mug or ramekin (at least 12 oz capacity), combine 2 tbsp unsalted butter and 3 tbsp dark chocolate chips. Microwave in 20-second bursts, stirring between each, until fully melted and smooth.
- Whisk in 3 tbsp granulated sugar, 1 egg yolk (not the whole egg – the white makes it rubbery in the microwave), and 1/4 tsp vanilla extract until smooth. Add 2 tbsp all-purpose flour, 1 tbsp Dutch-process cocoa, and a tiny pinch of fine salt. Stir until just combined.
- In a separate small bowl, stir together 1 tbsp peanut butter and 1/2 tsp powdered sugar until smooth. Drop half onto the surface of the batter in each mug and swirl once with a toothpick. Sprinkle a tiny pinch of flaky salt over the top.
- Microwave on High (100% power) for 60 seconds. Check the texture – the edges should be set and the very center may look slightly underdone. If the center is still visibly wet batter, microwave in 15-second increments until just set. Do not overcook or the texture becomes rubbery and dry.
- Let the mug brownie rest for 2 minutes before eating – it will continue to cook slightly from residual heat and the center will firm to a soft, fudgy texture. Serve directly in the mug, optionally topped with a small scoop of vanilla ice cream.
Nutrition Per Serving
Per 1 serving (makes one 9×13-inch pan, cut into 16 bars)
Why This Recipe Works
The fudgy texture of these bars comes down to fat-to-flour ratio. By using 226g of butter and melted chocolate alongside only 120g of flour, we ensure there is far more fat than structure – and fat is what creates that dense, moist, almost truffle-like interior. The two sugars play different roles: granulated sugar contributes to the crinkly top crust (as it dissolves and re-crystallizes on the surface during baking), while brown sugar adds moisture and a subtle molasses depth that makes the chocolate flavor more complex.
Whisking the eggs vigorously into the warm chocolate mixture for a full minute is not just about combining them – it incorporates tiny air bubbles and partially emulsifies the batter, which is exactly what creates that glossy, papery top crust that brownie lovers obsess over. The warm (not hot) chocolate mixture is key here: too hot and the eggs scramble, too cool and the sugar does not dissolve properly. The brief cooling period before adding eggs is a step worth taking seriously.
The peanut butter swirl is warmed and mixed with a small amount of powdered sugar before it goes on top. This serves two purposes: warming loosens it enough to create real ribbons rather than stiff blobs, and the powdered sugar (which contains a small amount of cornstarch) slightly thickens the mixture so it stays suspended in the batter rather than sinking to the bottom. If your swirl ever disappears into the batter, it is usually because the peanut butter was too warm and thin. A brief rest in the refrigerator can help firm it back up before swirling.
Baker’s Tips
- Use a metal baking pan rather than glass or ceramic. Metal conducts heat more efficiently and evenly, giving you better-set edges without overbaking the center.
- Room temperature eggs are not optional here – cold eggs can cause the warm melted chocolate to seize or the batter to look broken. If you forgot to take them out, submerge them in warm (not hot) water for 5 minutes.
- The toothpick test for brownies is tricky because fudgy brownies should NOT come out clean. Look for moist crumbs clinging to the toothpick when tested 2 inches from the edge. Wet smeared batter means more time is needed; a clean toothpick means they are overbaked.
- Let the bars cool completely before cutting, or refrigerate for 30 minutes after cooling. Warm brownies are glorious to eat but impossible to slice cleanly.
- If using natural peanut butter (the kind where the oil separates), stir it very thoroughly before measuring. The oil separation can make the swirl greasy if unmixed.
- Sift the cocoa powder even if you are in a hurry – cocoa clumps stubbornly and unsifted cocoa creates dry bitter pockets in the finished bars.
Variations
- Chocolate chips addition: Fold 100g (2/3 cup) of semi-sweet chocolate chips into the batter just before pouring into the pan for extra pockets of melted chocolate.
- Espresso boost: Add 1 tsp of instant espresso powder to the melted butter and chocolate mixture – this deepens the chocolate flavor without making the bars taste like coffee.
- Crunchy peanut butter version: Use crunchy peanut butter in the swirl for added texture and little nuggets of peanut throughout each bite.
- Salted caramel swirl: Replace the peanut butter swirl with 80g of thick salted caramel sauce for a different but equally indulgent variation.
- Gluten-free: Substitute the all-purpose flour with an equal weight of a 1:1 gluten-free baking flour blend containing xanthan gum. Results are nearly identical.
Troubleshooting & FAQ
My brownie bars came out cakey instead of fudgy. What went wrong?
The peanut butter swirl disappeared into the batter and I cannot see it in the baked bars. What happened?
My batter looked broken and greasy after adding the eggs. Is it ruined?
The edges are overbaked and dry but the center is still underdone. How do I fix this?
Can I double this recipe, and if so, do I need to adjust anything?
Storage & Make-Ahead
- Storage: Store cut bars in an airtight container at room temperature for up to 4 days. Layer between sheets of parchment paper to prevent sticking. Refrigerate for up to 1 week – the cold temperature firms them up nicely for an even fudgier texture. Freeze individually wrapped bars for up to 3 months; thaw at room temperature for 30 minutes before serving.
- Make-Ahead: The brownie batter (without the peanut butter swirl) can be made up to 24 hours ahead, covered tightly, and refrigerated. Before baking, let it come to room temperature for 20 minutes, then add the peanut butter swirl and bake as directed. Fully baked and cooled bars keep well and actually improve in texture after a day, making them an ideal make-ahead treat for events.
oh man these are gonna be perfect for our unit potlucks, ive been trying to find desserts i can actually bring that work with peoples dietary restrictions and this hits different. peanut butter swirl sounds like the kind of thing that disappears fast without anyone realizing they’re not eating regular sugar, which honestly is half the battle when youre feeding a bunch of people who just want something that tastes good. the one bowl thing is huge too – last thing i need is more dishes piling up on deployment weekends lol, thanks for this!
yo this is exactly the move – i love that youre thinking about making sure everyone can actually enjoy desserts at your potlucks, that matters more than people realize. peanut butter and chocolate is literally a flavor combo that works for everyone and honestly with allulose you probably wont even notice the difference from regular brownies. the one bowl thing is chef’s kiss too because less cleanup means more time for actually celebrating with your people. definitely report back if you make them, id bet theyre gonna disappear fast
honestly this whole thread is making me smile – theres something really special about making sure everyones included at the table, you know? my kids have gotten me thinking a lot about how food is kinda the universal language of “i see you, i want you here” and these brownies sound like teh perfect way to do that. gonna try them this weekend and yeah ill definitely report back, fingers crossed they disappear as fast as you’re predicting lol