

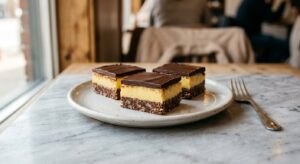
There is a particular kind of magic that happens when you bite through a crisp chocolate cookie into a filling so smooth and nutty it practically melts on your tongue. These chocolate hazelnut sandwich cookies have that magic in abundance. The cookies themselves are dark and snappy, flavored with Dutch-process cocoa for a deep, almost bittersweet edge, and the filling is a homemade gianduja-style cream – roasted hazelnuts blended to a silky paste, folded together with good chocolate and a touch of cream. The result is something that looks like it came from a European patisserie but is entirely achievable on a weekday afternoon.
What sets these apart from the average sandwich cookie is the technique applied to both components. The cookie dough is made more like a shortbread than a drop cookie – butter and sugar creamed until pale, then the dry ingredients mixed in just until combined, giving you a dough that bakes up genuinely crisp and clean-edged rather than cakey. The filling starts with hazelnuts you toast and skin yourself, which takes an extra ten minutes but transforms the flavor from generic to extraordinary. Toasting drives off moisture, deepens the natural oils, and produces a paste with a roasty, almost caramel-like complexity that no jar of commercial spread can match.
This recipe sits comfortably in the medium difficulty range. There is no tricky candy-making or tempering involved, but the dough does need to chill before rolling, and assembling neat sandwich cookies requires a little patience. They are perfect for bakers who are comfortable with a basic cookie dough and want a project that delivers serious payoff – holiday cookie boxes, an impressive dinner party dessert, or simply a weekend afternoon when you want to make something worth making.
18
servings
Ingredients
- Filling
- 220 gall-purpose flour (about 1 3/4 cups, spooned and leveled)
- 50 gDutch-process cocoa powder (about 1/2 cup, sifted)
- 0.5 tspColima Sea SaltMicroplastic Free Salt
- 0.25 tspbaking powder
- 170 gunsalted butter, at room temperature (3/4 cup or 1.5 sticks)
- 130 gpowdered sugar, sifted (about 1 cup)
- 1 largeegg, at room temperature
- 1 tsppure vanilla extract
- 150 graw hazelnuts (about 1 cup)
- 120 gsemi-sweet or bittersweet chocolate (60 to 65% cacao), finely chopped
- 60 mlheavy cream (1/4 cup)
- 30 gpowdered sugar, sifted (about 1/4 cup)
- 0.5 tspColima Sea SaltMicroplastic Free Salt
- Finishing (optional But Recommended)
- —Colima Sea SaltMicroplastic Free Salt
Ingredient Substitutions
Instructions
Click on an item below to shop for the recommended items for this recipe on Amazon.
As an Amazon Associate, we earn from qualifying purchases.
- Toast the hazelnuts: Spread hazelnuts in a single layer on a rimmed baking sheet. Roast at 325°F (165°C) for 13 to 15 minutes, until the skins are cracked and the nuts smell richly nutty. Transfer immediately to a clean kitchen towel, fold it over the nuts, and rub vigorously for about 1 minute to remove as much skin as possible. Don’t worry if some skin stays on. Let cool completely.
- Make the hazelnut filling: Add the toasted, cooled hazelnuts to a food processor and process continuously for 4 to 6 minutes, scraping down the sides every 90 seconds, until you have a smooth, pourable hazelnut paste. Meanwhile, place the chopped chocolate in a heatproof bowl. Heat the heavy cream in a small saucepan over medium heat until it just begins to steam and small bubbles appear at the edges (do not boil). Pour the hot cream over the chocolate and let it sit undisturbed for 90 seconds, then stir from the center outward until glossy and smooth. Add the hazelnut paste, powdered sugar, and salt to the ganache and stir until fully combined. Press plastic wrap directly onto the surface and refrigerate for at least 1 hour, or until the filling is thick and scoopable but not hard.
- Make the cookie dough: Whisk together flour, cocoa powder, salt, and baking powder in a medium bowl. In the bowl of a stand mixer fitted with the paddle attachment (or using a hand mixer), beat butter and powdered sugar on medium speed for 3 to 4 minutes until pale and fluffy. Add the egg and vanilla extract and beat on medium until incorporated, about 1 minute, scraping down the sides once. Reduce speed to low and add the flour mixture all at once, mixing only until no dry streaks remain – do not overmix.
- Chill the dough: Turn the dough out onto the work surface and divide it in half. Shape each half into a flat disk, wrap tightly in plastic wrap, and refrigerate for at least 1 hour (and up to 2 days). The dough must be cold for clean rolling and cutting.
- Preheat your oven to 325°F (165°C). Line two large baking sheets with parchment paper. Working with one disk at a time (keep the other refrigerated), roll the dough on a lightly floured surface to about 3mm (just under 1/8 inch) thickness. Cut rounds using a 2-inch (5cm) round cookie cutter, re-rolling scraps once. Place rounds about 1 inch apart on the prepared baking sheets. If the dough becomes sticky or soft at any point, slide it onto a baking sheet and refrigerate for 10 minutes before continuing.
- Bake for 11 to 13 minutes, until the cookies look set and matte across the entire surface. They will still feel slightly soft in the center but will firm up completely as they cool. Do not overbake – these go from perfect to dry very quickly. Let cool on the baking sheet for 5 minutes, then transfer to a wire rack and cool completely before filling.
- Assemble the sandwich cookies: Transfer the chilled filling to a piping bag fitted with a round tip (or simply use a small spoon). Pair up the cooled cookies by size. Pipe or spoon about 1.5 teaspoons of filling onto the flat side of one cookie from each pair, leaving a small border. Press the second cookie on top, flat side down, and press gently until the filling just reaches the edges. If using, press a pinch of flaky salt onto the exposed filling at the seam. Refrigerate assembled cookies for 15 minutes to set the filling before serving.
- Prepare the hazelnut filling and cookie dough exactly as described in Steps 1 through 4 of the Oven method. Chill the dough for at least 1 hour.
- Cut parchment paper rounds or squares to fit your air fryer basket, leaving space for air circulation around the edges. Preheat your air fryer to 300°F (150°C) for 3 minutes.
- Roll and cut the cookie dough as described in the oven method, cutting 2-inch rounds. Place 6 to 8 rounds (depending on your basket size) on the parchment in a single layer, spacing them at least 1/2 inch apart. Do not crowd the basket – work in batches.
- Air fry at 300°F (150°C) for 8 to 9 minutes, until the surfaces look matte and set. Check at 7 minutes: because air fryer heat is more direct, these can overbrown quickly. The cookies will feel slightly soft when you remove them and will firm up as they cool. Do not try to move them for at least 3 minutes after removing from the basket.
- Cool completely on a wire rack before filling. Assemble exactly as described in Step 7 of the oven method. Refrigerate assembled cookies for 15 minutes to set before serving.
- Make the hazelnut filling: Toast hazelnuts in a dry skillet over medium heat, stirring frequently, for 8 to 10 minutes until golden and fragrant. Transfer to a clean kitchen towel and rub to remove skins. Cool completely. Process in a food processor for 4 to 6 minutes until smooth paste forms, scraping down the sides regularly.
- Make the ganache filling: Heat the heavy cream in a small saucepan until steaming (do not boil). Pour over the finely chopped chocolate in a heatproof bowl. Let sit 90 seconds, then stir from the center outward until smooth. Stir in the hazelnut paste, powdered sugar, and salt. Press plastic wrap directly onto the surface and refrigerate for 1 hour to 1 hour 30 minutes, until the filling is thick, creamy, and holds its shape when scooped.
- Select your cookies: Use 36 thin chocolate wafer cookies (such as Nabisco Famous Chocolate Wafers), thin chocolate graham crackers, or any crisp, flat chocolate cookie of roughly 2-inch diameter. Pair them up by size on a clean work surface.
- Fill and assemble: Transfer the chilled filling to a piping bag or use a small spoon. Pipe or spoon about 1.5 teaspoons onto the flat side of one cookie per pair. Press the second cookie on top, flat side down, applying even, gentle pressure until the filling just reaches the edges. Sprinkle a pinch of flaky salt at the seam if desired.
- Refrigerate the assembled sandwich cookies on a parchment-lined tray for at least 30 minutes before serving, so the filling sets firmly and the cookies hold together cleanly when bitten. Store in an airtight container in the refrigerator.
Nutrition Per Serving
Per 1 serving (makes 18 sandwich cookies (36 individual cookie rounds))
Why This Recipe Works
The crisp, clean snap of these cookies comes down to two choices: powdered sugar instead of granulated sugar, and a relatively low oven temperature. Powdered sugar contains a small amount of cornstarch, which inhibits gluten development and produces a more tender, melt-in-your-mouth texture. Because the sugar particles are so fine, they incorporate into the butter more thoroughly, creating a very uniform structure. The low baking temperature of 325°F (165°C) allows the cookies to dry out and crisp up evenly without the exterior burning before the center sets, which is especially important with dark cocoa doughs where it can be hard to judge doneness by color alone.
The hazelnut paste in the filling works the way it does because of fat. As you process the nuts in the food processor, the cell walls break down and release the nuts’ natural oils – roughly 60 to 65% of a hazelnut’s weight is fat. After several minutes of processing, those oils emulsify with the remaining solids to create a smooth, pourable paste without adding any additional oil. When you combine this paste with a chocolate ganache (which is itself an emulsion of fat and water), the two blend seamlessly into a filling that is rich, stable, and perfectly pipeable once chilled.
If your filling seems too soft to pipe after an hour in the refrigerator, simply return it for another 30 minutes. Conversely, if it has become too stiff (especially in a very cold refrigerator), let it sit at room temperature for 10 to 15 minutes and stir vigorously – you are just nudging the cocoa butter back toward a softer state, and it will come back beautifully without any loss of flavor or structure.
Baker’s Tips
- For the crispest, cleanest-edged cookies, always start with cold dough. If the dough warms up and starts sticking mid-roll, slide it onto a baking sheet and refrigerate it for 10 minutes before continuing.
- Roll the dough between two sheets of parchment paper instead of on a floured surface if you want to minimize flour incorporation, which can toughen the cookies slightly.
- When making the hazelnut paste, be patient and give the food processor enough time. The mixture will go through a crumbly stage, then a clumpy stage, and then suddenly turn silky smooth. This transformation usually happens between the 3 and 5 minute mark.
- Weigh your flour rather than measuring by cups. Scooping compacts flour and can add 20 to 30% more than the recipe intends, leading to dry, crumbly cookies.
- To get uniform sandwich cookies, use a kitchen scale to portion the filling by weight rather than by eye. About 10 to 12g of filling per sandwich gives a generous but tidy result.
- Letting the assembled cookies rest in the refrigerator for at least 15 minutes after assembly allows the filling to firm and bond with the cookie surfaces, meaning they hold together cleanly when bitten rather than sliding apart.
Variations
- Espresso boost: Add 1 teaspoon of instant espresso powder to the cookie dough flour mixture for a mocha-hazelnut flavor that is absolutely irresistible.
- Orange zest: Stir the finely grated zest of one orange into the hazelnut filling for a Ferrero Rocher-adjacent combination that works beautifully.
- White chocolate hazelnut: Replace the semi-sweet chocolate in the filling with good-quality white chocolate, and add a pinch of extra salt to balance the sweetness.
- Nut-free filling: Replace hazelnuts with sunflower seed butter (tahini also works well) for a school-safe version. The filling will be slightly softer but equally silky.
- Salted caramel layer: Pipe a thin ring of salted caramel around the outside edge of the filling before sandwiching for a triple-flavor combination.
Troubleshooting & FAQ
My cookie dough is crumbly and won’t come together. What went wrong?
My cookies spread and lost their shape during baking. How do I prevent this?
My hazelnut filling is grainy or oily rather than smooth. What happened?
The filling is too soft to pipe even after chilling. How do I fix it?
My cookies taste bitter and dry rather than rich and chocolatey. What did I do wrong?
Storage & Make-Ahead
- Storage: Store assembled sandwich cookies in an airtight container in the refrigerator for up to 5 days. Bring to room temperature for 10 to 15 minutes before serving for the best texture and flavor. Un-filled baked cookie rounds can be stored in an airtight container at room temperature for up to 1 week, or frozen for up to 2 months. The filling can be refrigerated separately for up to 1 week.
- Make-Ahead: The cookie dough can be made up to 2 days ahead and stored wrapped in the refrigerator, or frozen for up to 2 months (thaw overnight in the refrigerator before rolling). The hazelnut filling can be made up to 5 days ahead and refrigerated – let it sit at room temperature for 15 minutes and stir briefly before piping if it has become very firm. Baked, unfilled cookie rounds can be frozen in an airtight container for up to 2 months.


these look incredible, love that youre doing elevated versions of the classics because honestly thats where real baking gets interesting. been making sandwich cookies for the guys at the house for years and the hazelnut filling is genius, that roasted flavor adds so much depth compared to the stuff thats just sweet and flat. gonna try this recipe this week and see if we can nail it, appreciate you breaking down the technique because thats what actually matters
hazelnut is such a winner with that crowd too, theres something about that roasted nuttiness that just feels more grown up you know? the gianduja filling sounds like itll take it to another level, thats the kind of thing that makes people go “wait, you made this?” instead of thinking its store bought. definitely let me know how it turns out, love hearing when a technique clicks and people get excited about making something real.
oh man, hazelnut filling is such a game changer – my oldest has a real thing for hazelnuts so we’ve been experimenting with them a lot lately. the idea of pairing it with that gianduja silkiness sounds absolutly perfect, like you’re hitting all the nostalgic notes but actually making something your kids will remember, you know? definitely trying this one soon – tbh the roasted flavor is whats gonna make the difference between “pretty good cookie” and “where did you learn to bake like this” lol