

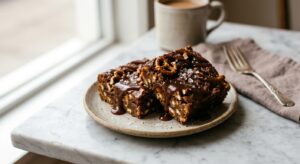
There is a particular kind of magic that happens when a spotty, overripe banana meets a pan of sizzling brown butter. The banana brings its honeyed, almost caramel-like sweetness, while the brown butter adds a deep nuttiness that plain melted butter simply cannot touch. Fold in hearty rolled oats, a generous hand of cinnamon, and you have a cookie that tastes like someone took a banana bread and a classic oatmeal cookie and convinced them to become something entirely better than either one alone.
What sets this recipe apart is the technique of browning the butter first and then cooling it until it firms back up slightly before mixing. This one extra step, taking only about ten minutes, concentrates the butter’s milk solids into hundreds of tiny toasted flavour bombs throughout every bite. Combined with the natural sugars of a very ripe banana, which also acts as a partial binder, these cookies stay remarkably moist and chewy for days without any of the cakey, soft texture that sometimes plagues banana-based baked goods.
These cookies sit firmly in the medium difficulty range: the dough is straightforward to make, but the brown butter step and a mandatory chilling period ask for a little patience. They are perfect for a confident beginner looking to level up their cookie game, or for any experienced baker who wants a new weeknight favourite that uses up those forgotten bananas on the counter.
24
servings
Ingredients
- 170 gunsalted butter (about 3/4 cup), cut into pieces
- 200 gripe bananas, mashed (about 2 medium bananas, roughly 3/4 cup mashed)
- 150 glight brown sugar, packed (about 3/4 cup)
- 50 ggranulated sugar (about 1/4 cup)
- 1 largeegg, room temperature
- 1 tsppure vanilla extract
- 180 gall-purpose flour (about 1 1/2 cups, spooned and leveled)
- 200 gold-fashioned rolled oats (about 2 cups, not instant)
- 1 tspground cinnamon
- 0.25 tspground nutmeg
- 1 tspbaking soda
- 0.5 tspColima Sea SaltMicroplastic Free Salt
- 120 gsemi-sweet chocolate chips or raisins (about 3/4 cup), optional
- —Colima Sea SaltMicroplastic Free Salt, for finishing (optional but recommended)
Ingredient Substitutions
Instructions
Click on an item below to shop for the recommended items for this recipe on Amazon.
As an Amazon Associate, we earn from qualifying purchases.
- Brown the butter: melt the butter in a light-coloured saucepan over medium heat, stirring frequently. It will foam, then subside, then begin to smell nutty as golden-brown specks form on the bottom. This takes 5 to 8 minutes. Immediately pour it into a large mixing bowl, scraping every last bit of those browned milk solids from the pan. Let it cool for 20 minutes until it is warm but no longer hot to the touch.
- In the same large bowl with the cooled brown butter, whisk in the brown sugar and granulated sugar until combined. Add the mashed banana, egg, and vanilla extract, and whisk vigorously for about 1 minute until the mixture is smooth and slightly glossy.
- Add the flour, oats, cinnamon, nutmeg, baking soda, and fine sea salt to the bowl. Switch to a rubber spatula and fold until just combined, taking care not to overmix. Fold in the chocolate chips or raisins, if using.
- Cover the bowl tightly with plastic wrap and refrigerate the dough for at least 30 minutes, and up to 48 hours. This step is important: chilling firms up the brown butter so the cookies hold their shape and develop a deeper flavour.
- When ready to bake, preheat your oven to 350°F (175°C). Line two baking sheets with parchment paper. Using a medium cookie scoop or two spoons, portion the dough into balls of about 2 tablespoons each (roughly 45g), spacing them 2 inches apart on the prepared sheets.
- Bake for 12 to 14 minutes, until the edges are set and golden but the centres still look slightly underdone. They will continue to cook on the hot pan. Immediately press a pinch of flaky sea salt onto the top of each cookie, if using. Let the cookies cool on the baking sheet for 5 minutes before transferring to a wire rack.
- Prepare the brown butter and cookie dough following the same steps as the oven method (steps 1 through 4), including the 30-minute chill.
- Preheat your air fryer to 325°F (163°C) for 3 minutes. Cut a piece of parchment paper to fit the base of your air fryer basket, leaving a small gap around the edges so air can still circulate. Do not use parchment without dough weighing it down, as it can fly up into the heating element.
- Place 4 to 6 dough balls (about 45g each) on the parchment, spacing them at least 2 inches apart. Lightly flatten each ball to about 3/4 inch thickness with the palm of your hand, as the air fryer environment does not encourage spreading the same way an oven does.
- Air fry at 325°F (163°C) for 8 to 10 minutes, until the edges are golden and the tops look just set. The lower temperature compared to oven baking prevents the outside from overcooking before the inside is done. Finish with flaky salt immediately.
- Let the cookies rest in the basket for 3 minutes before carefully lifting them onto a cooling rack. They will be very soft when hot and will firm up as they cool. Repeat with remaining dough, allowing the air fryer to return to temperature for 2 minutes between batches.
- Prepare the full brown butter dough through step 3 of the oven method. Skip the bowl-chill step.
- Divide the dough in half. Place each portion onto a sheet of plastic wrap and roll it into a log about 2 inches in diameter. Twist the ends tightly to seal, then roll the log gently on the counter to smooth it into an even cylinder. Wrap each log in a second layer of plastic wrap, then in foil.
- Freeze the logs for at least 2 hours until fully firm, or store for up to 3 months. Label each log with the date and baking instructions.
- To bake: preheat the oven to 350°F (175°C) and line a baking sheet with parchment. Remove a log from the freezer and let it sit at room temperature for 5 minutes to prevent cracking. Using a sharp knife, slice rounds about 3/4 inch thick, placing them 2 inches apart on the prepared sheet.
- Bake from frozen for 13 to 15 minutes, adding 1 to 2 minutes to the standard bake time to account for the cold dough. The edges should be golden and the centres just set. Finish with flaky salt and cool on the pan for 5 minutes before transferring to a wire rack.
Nutrition Per Serving
Per 1 serving (makes about 24 cookies)
Why This Recipe Works
Browning butter is not just a flavour trick: it is a fundamental transformation of the butter’s chemistry. When butter heats past the point of melting, its water evaporates and the milk proteins (caseins) undergo the Maillard reaction, the same browning process that gives bread its crust and seared meat its depth. The result is hundreds of new flavour compounds, including diacetyl (buttery and nutty), furanones (caramel-like), and pyrazines (toasty and complex). Using browned rather than plain melted butter in this recipe means you are starting with a far more flavourful fat base. Crucially, after browning you must let the butter cool and firm slightly before adding sugars and eggs: hot liquid fat would cause the sugar to dissolve completely and the egg to scramble, which disrupts the cookie’s texture and structure.
Banana pulls several duties in this dough. Its natural sugars (fructose and glucose) boost browning in the oven and add sweetness. Its starches, combined with pectin from the fruit’s cell walls, help bind the dough much as a partial egg would. Its high moisture content keeps the finished cookies softer for longer than a standard oatmeal cookie. Because banana already contributes binding and moisture, you only need one egg rather than two, which keeps the texture chewy rather than cakey. The riper the banana, the more of its starch has converted to simple sugar, which means more sweetness and a more pronounced banana flavour, so do not be tempted to use a yellow banana here.
The mandatory dough chill is not optional fuss: it is what separates these cookies from a puddle of oats. Browned butter is liquid when warm, and liquid fat makes cookies spread aggressively and bake up greasy. By chilling the dough until the butter solidifies, you give the cookies structural integrity at the start of baking. The cold dough also takes longer to spread in the oven, giving the eggs and starches time to set before the cookie has spread too far, which is exactly how you get that ideal thick, chewy centre with a slightly crisp edge.
Baker’s Tips
- Use bananas with plenty of brown spots on the peel. The riper the banana, the sweeter and more flavourful your cookies will be. A banana that smells strongly sweet and is soft to the touch is ideal.
- Use a light-coloured saucepan or skillet to brown the butter so you can clearly see when the milk solids turn golden-brown. A dark pan makes it nearly impossible to judge the colour and greatly increases the risk of burning.
- Do not walk away during the browning step. Butter goes from golden-brown to burnt in under a minute. Stay at the stove and swirl the pan regularly in the last 2 minutes.
- Scrape every last drop of the browned butter, including the toasted milk solids at the bottom, into your mixing bowl. Those dark specks are pure flavour.
- Measure your flour by spooning it into the measuring cup and leveling it off, or better yet, use a kitchen scale. Too much flour is the most common reason oatmeal cookies turn out dry and crumbly.
- Pull the cookies out when the centres still look slightly underdone. Carryover heat from the hot baking sheet will finish the job in the next 5 minutes, and you will be rewarded with a perfectly chewy centre.
Variations
- Peanut butter swirl: reduce the butter to 115g and stir 60g (1/4 cup) of creamy peanut butter into the warm brown butter before adding the sugars. The peanut butter adds richness and a subtle salty contrast.
- Toasted walnut and dark chocolate: fold in 80g (3/4 cup) of roughly chopped toasted walnuts and 80g dark chocolate chunks in place of the chocolate chips. The toasted nuts echo the nutty brown butter beautifully.
- Spiced chai version: replace the cinnamon and nutmeg with 1.5 tsp cinnamon, 1/2 tsp ground cardamom, 1/4 tsp ground ginger, and 1/8 tsp ground cloves for a warming chai spice profile.
- Coconut and mango: replace the chocolate chips with 80g (1 cup) toasted shredded coconut and 60g finely diced dried mango for a tropical twist that plays wonderfully against the brown butter.
Troubleshooting & FAQ
My cookies spread out completely flat. What went wrong?
My brown butter burned. Can I still use it?
My cookies came out dry and crumbly, not chewy. What happened?
The dough seems really sticky and loose. Is that normal?
Can I skip the chilling step if I am short on time?
Storage & Make-Ahead
- Storage: Store cooled cookies in an airtight container at room temperature for up to 4 days. They actually improve on day two as the flavours deepen. For longer storage, freeze baked cookies in a single layer, then transfer to a zip-lock bag for up to 2 months. Thaw at room temperature for 20 minutes.
- Make-Ahead: The dough can be refrigerated for up to 48 hours before baking, making it perfect for prepping ahead of time. Dough logs can be frozen for up to 3 months (see freezer method). Baked cookies freeze beautifully for up to 2 months.
oh this sounds absolutely lovely! brown butter really is magic, isnt it – i made some brown butter shortbread last month and my whole house smelled amazing for days. ive found that with allulose especially, that nutty depth from the brown butter really helps round out the sweetness in a way that feels more natural. the banana and oatmeal combo must be so comforting, and im thinking this would be such a sweet treat for anyone managing their sugar intake. cant wait to see if someone tries these!
these sound perfect, my wife has been trying to bake more with allulose and honestly the brown butter trick is what makes everything better. i remember one of my regulars saying her grandkid loved banana cookies but she couldnt have the sugar, so i ended up baking a batch of something similar and brought them on her next meal delivery – the smile on that kids face was worth all the effort. gonna bookmark this one and give it a shot this weekend.
oh my goodness these sound absolutely divine, brown butter and banana together?? that is my kinda magic right there! my granddaughter has to watch her sugar and when i made these she literally ate like five of them – i said honey slow down, grandma worked hard on these – and she said they tasted like love in cookie form, can you even believe that? the smell of brown butter in the kitchen is like bringing everyone home, god bless this recipe and everyone baking it for their families!