
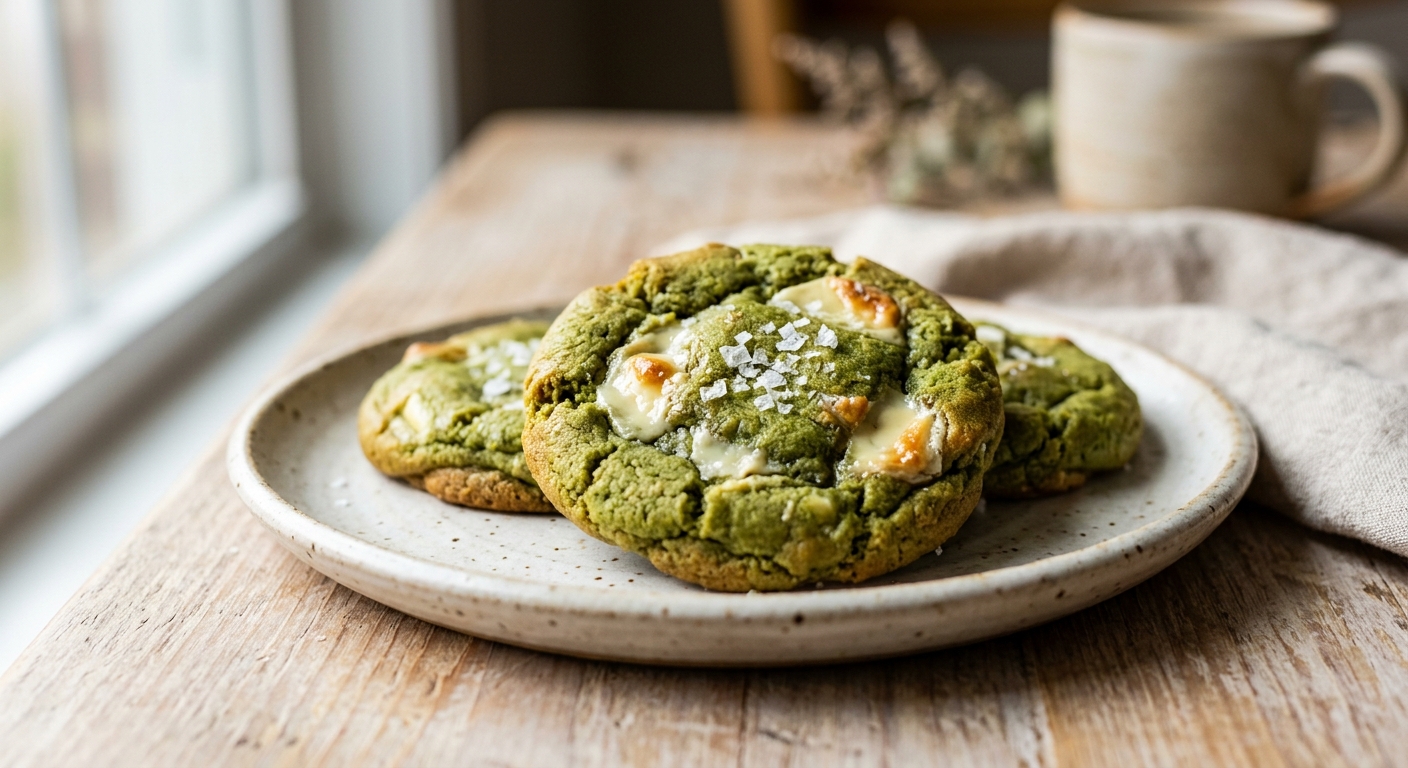
There is something almost magical about the moment a tray of matcha cookies comes out of the oven. The kitchen fills with a gentle, grassy warmth that is nothing like the usual vanilla-and-butter scent, and the cookies themselves are a deep, mossy green with golden edges and molten pockets of white chocolate. They look like they belong in a boutique patisserie window, but the secret is that they are genuinely simple to make at home, with no stand mixer and no overnight chill required.
What makes this version stand out is the brown butter. Cooking the butter until the milk solids turn golden and nutty adds a depth of flavor that plain melted butter simply cannot match, and it plays beautifully against the slight bitterness of the matcha. We also use a combination of bread flour and all-purpose flour, which gives the cookies that satisfying chew without making them tough. Ceremonial-grade matcha is not required here, but a good culinary-grade powder with a vibrant green color will give you both better flavor and a more striking result.
These cookies sit comfortably in the medium difficulty range. If you have made drop cookies before, you will find this process familiar. The one technique that is new to most beginners is browning butter, which sounds intimidating but takes less than ten minutes and is almost impossible to mess up once you know what to look for. This recipe is perfect for anyone who wants to bring something a little unexpected to a cookie tin, a dinner party, or honestly just a quiet Tuesday afternoon.
18
servings
Ingredients
- 170 gunsalted butter (3/4 cup, 1.5 sticks), cut into pieces
- 200 glight brown sugar, packed (1 cup)
- 50 ggranulated sugar (1/4 cup)
- 1 largeegg, at room temperature
- 1 largeegg yolk, at room temperature
- 2 tsppure vanilla extract
- 150 gall-purpose flour (1 1/4 cups, spooned and leveled)
- 60 gbread flour (1/2 cup, spooned and leveled)
- 18 gculinary-grade matcha powder (3 tablespoons), sifted
- 0.5 tspbaking soda
- 0.5 tspColima Sea SaltMicroplastic Free Salt
- 200 ggood-quality white chocolate, roughly chopped into chunks (about 1 1/3 cups), plus extra for topping
- —Colima Sea SaltMicroplastic Free Salt (such as Maldon), for finishing
Ingredient Substitutions
Instructions
Click on an item below to shop for the recommended items for this recipe on Amazon.
As an Amazon Associate, we earn from qualifying purchases.
- Brown the butter: melt the butter in a light-colored saucepan over medium heat, swirling occasionally. After about 5 to 7 minutes it will foam, then subside, and you will see golden-brown specks form on the bottom. The moment it smells nutty and toasty, pour it immediately into a large heatproof mixing bowl. Let it cool for 10 minutes until warm but not hot.
- Preheat your oven to 375°F (190°C). Line two large baking sheets with parchment paper.
- Whisk both sugars into the warm brown butter until well combined. Add the whole egg, egg yolk, and vanilla extract and whisk vigorously for about 60 seconds until the mixture looks slightly paler and thickened, almost like a loose caramel-colored ribbon. This step is important for texture.
- Sift together the all-purpose flour, bread flour, sifted matcha powder, baking soda, and fine sea salt directly over the butter-sugar mixture. Use a flexible spatula to fold everything together until just combined. Do not overmix. The dough will be soft and slightly sticky.
- Fold in the white chocolate chunks, making sure they are evenly distributed. Reserve a small handful of chunks to press onto the tops of the cookies before baking.
- Scoop the dough into balls using a large cookie scoop or two spoons, about 50g (roughly 3 tablespoons) each. Place them at least 3 inches apart on the prepared baking sheets. Press a few extra white chocolate chunks on top of each ball.
- Bake one sheet at a time on the center rack for 11 to 13 minutes, until the edges are set and just lightly golden but the centers still look slightly underdone and glossy. They will firm up as they cool. Do not overbake.
- As soon as the cookies come out of the oven, sprinkle each one with a pinch of flaky sea salt. Let them cool on the baking sheet for at least 10 minutes before transferring to a wire rack. They will be very fragile when hot.
- Prepare the dough following steps 1 through 5 of the oven method exactly, including browning the butter and folding in the white chocolate chunks.
- Preheat your air fryer to 325°F (165°C) for 3 minutes. Cut a piece of parchment paper to fit the air fryer basket, leaving a small gap around the edges for airflow. Do not use parchment without food on top, as it can fly into the heating element.
- Scoop dough balls about 50g each and place 2 to 3 in the basket, spacing them at least 2 inches apart. Press extra white chocolate chunks on top. The cookies will spread, so do not crowd the basket.
- Air fry at 325°F (165°C) for 8 to 9 minutes. The edges should look set and the top should appear just barely dry. The centers will look very soft and underdone, which is exactly right. Air fryers run hot, so check at 7 minutes the first time you make these.
- Carefully lift the parchment out of the basket and place it on a heatproof surface. Sprinkle with flaky sea salt immediately. Leave the cookies on the parchment for at least 12 minutes before touching them, as they are extremely soft and will fall apart if moved too soon. Bake remaining dough in batches.
- Make the full dough following steps 1 through 5 of the oven method. Scoop all the dough into balls of about 50g each and place them on a parchment-lined baking sheet or plate. Press the reserved white chocolate chunks on top of each ball.
- Freeze the dough balls uncovered for at least 1 hour, until fully solid. Once frozen solid, transfer them to a zip-lock freezer bag or airtight container. Label with the date and baking instructions. The dough keeps frozen for up to 3 months.
- When you are ready to bake, preheat the oven to 375°F (190°C) and line a baking sheet with parchment. You do not need to thaw the dough balls.
- Place the frozen dough balls on the prepared sheet at least 3 inches apart. Bake directly from frozen for 13 to 15 minutes, until the edges are set and lightly golden but the centers still appear slightly underdone.
- Sprinkle with flaky sea salt immediately out of the oven. Allow to cool on the baking sheet for at least 12 minutes before eating. The cookies will be notably thicker and have an even fudgier center than cookies baked from fresh dough, because the outside sets before the inside has a chance to fully spread.
Nutrition Per Serving
Per 1 serving (makes 18 large cookies)
Why This Recipe Works
The foundation of this cookie’s texture is brown butter. When butter is cooked past the melting point, the water in it evaporates and the milk solids undergo the Maillard reaction, producing hundreds of new flavor compounds with nutty, toffee-like notes. Crucially, removing that water also concentrates the fat, which contributes to a chewier, denser cookie rather than one that spreads too thin. Using the butter while still warm, and then whisking it vigorously with the sugars and eggs, dissolves the sugars more thoroughly and creates a slightly emulsified base that gives the final cookie its signature glossy, crackled top.
The combination of bread flour and all-purpose flour is deliberate. Bread flour has a higher protein content, around 12 to 13 percent compared to all-purpose at 10 to 11 percent, which means more gluten development. In a cookie, this translates directly to chew. Too much bread flour and the cookies become tough; the small proportion here, just one-third of the total flour weight, gives a noticeable chew without any toughness. Matcha is quite delicate and its green color can turn dull or olive-brown with heat, which is why we sift it carefully into the dry ingredients and bake at a relatively high temperature for a short time, rather than a long, slow bake.
The extra egg yolk, without its white, is a classic bakery trick. Egg whites contain water and protein that can make cookies more cakey and puffed. The yolk, rich in fat and emulsifiers, adds richness and binds the dough without tightening it. If your cookies spread too much, the most common culprits are butter that was too hot when you added the sugars, or flour that was measured by scooping the cup directly into the bag, which compacts it. Always spoon flour into your measuring cup or, better yet, use a kitchen scale for consistent results every time.
Baker’s Tips
- Sift your matcha powder without exception. Matcha clumps intensely and unsifted powder will leave bitter, gritty green specks in the finished cookie.
- Let the brown butter cool for at least 10 minutes before adding the eggs. If it is too hot, it will scramble the eggs or melt the sugars unevenly, affecting texture.
- Weigh your dough balls for consistency. Fifty grams each gives you a large, bakery-style cookie with a perfectly underdone center. Smaller scoops should be reduced in bake time by 2 to 3 minutes.
- Pull the cookies out when they look underdone. The centers should still appear wet and glossy. Carryover heat and cooling on the pan will set them perfectly. Overbaked matcha cookies lose their vibrant color and chew.
- Use a good-quality white chocolate with at least 25 percent cocoa butter. Budget white chocolate chips are mostly sugar and palm oil and will not melt into those gorgeous golden pools.
- A round cookie cutter or the rim of a glass can be used to ‘scoot’ the cookies into perfect circles immediately after they come out of the oven, before they firm up. This is the trick bakeries use for that uniform, thick-edged look.
Variations
- Double matcha: Melt 100g white chocolate and stir in 1 tsp matcha, then drizzle over cooled cookies for an extra matcha punch and a stunning finish.
- Matcha and dark chocolate: Swap the white chocolate for 70% dark chocolate chunks. The bitterness of both matcha and dark chocolate creates an intense, sophisticated flavor for those who prefer less sweetness.
- Sesame swirl: Add 2 tbsp toasted sesame seeds to the dough and replace 30g of the white chocolate with tahini chips or swirl 1 tbsp tahini into each cookie just before baking for a nutty, Japanese-inspired variation.
- Citrus lift: Add the finely grated zest of one orange or yuzu to the dough along with the sugars. The brightness cuts through the richness of the brown butter and white chocolate beautifully.
Troubleshooting & FAQ
My cookies spread out flat and thin instead of staying thick and chewy. What went wrong?
The cookies look green going in but came out brownish or olive-colored. How do I keep them vibrant?
My butter burned instead of browning. What should I do?
My cookies are cakey and puffy, not chewy and dense. What happened?
The white chocolate chunks turned dark or seedy-looking after baking. Is that normal?
Storage & Make-Ahead
- Storage: Store cooled cookies in an airtight container at room temperature for up to 4 days. They are best on day 1 and 2. For longer storage, freeze baked cookies in a single layer, then transfer to a freezer bag. Reheat from frozen in a 300°F (150°C) oven for 5 minutes or in a microwave for 20 seconds.
- Make-Ahead: The dough can be made up to 3 days ahead and refrigerated in an airtight container or as pre-scooped balls. Bake straight from the refrigerator, adding 1 to 2 minutes to the bake time. The dough also freezes beautifully for up to 3 months as described in the Freezer method above.
I’m so glad you brought up the chewiness factor, Sage! I’ve had the same experience with allulose in my baking, and I think it’s because it caramelizes just slightly differently than regular sugar, which keeps cookies from getting that stale crisp. I’m planning to make these this week, and I’m especially curious about how the white chocolate holds up since it can sometimes seize with different sweeteners – would love to hear if you end up trying them!
Oh these sound absolutely lovely! I’ve been experimenting with allulose in my cookies too and found that the chewiness is just chef’s kiss compared to other sweeteners, so I’m really curious how you got that texture here. The matcha and sea salt combo is *perfect* – there’s something about that briny edge that makes the sweetness sing. Definitely adding this to my weekend bake list!
You’ve totally nailed it about the briny edge, Sage – that sea salt is doing so much heavy lifting here! I think what you’re discovering with allulose is exactly right, and I’d add that a touch of vanilla extract (even though matcha is the star) seems to enhance that chewy texture even more. Can’t wait to hear how your batch turns out this weekend!