
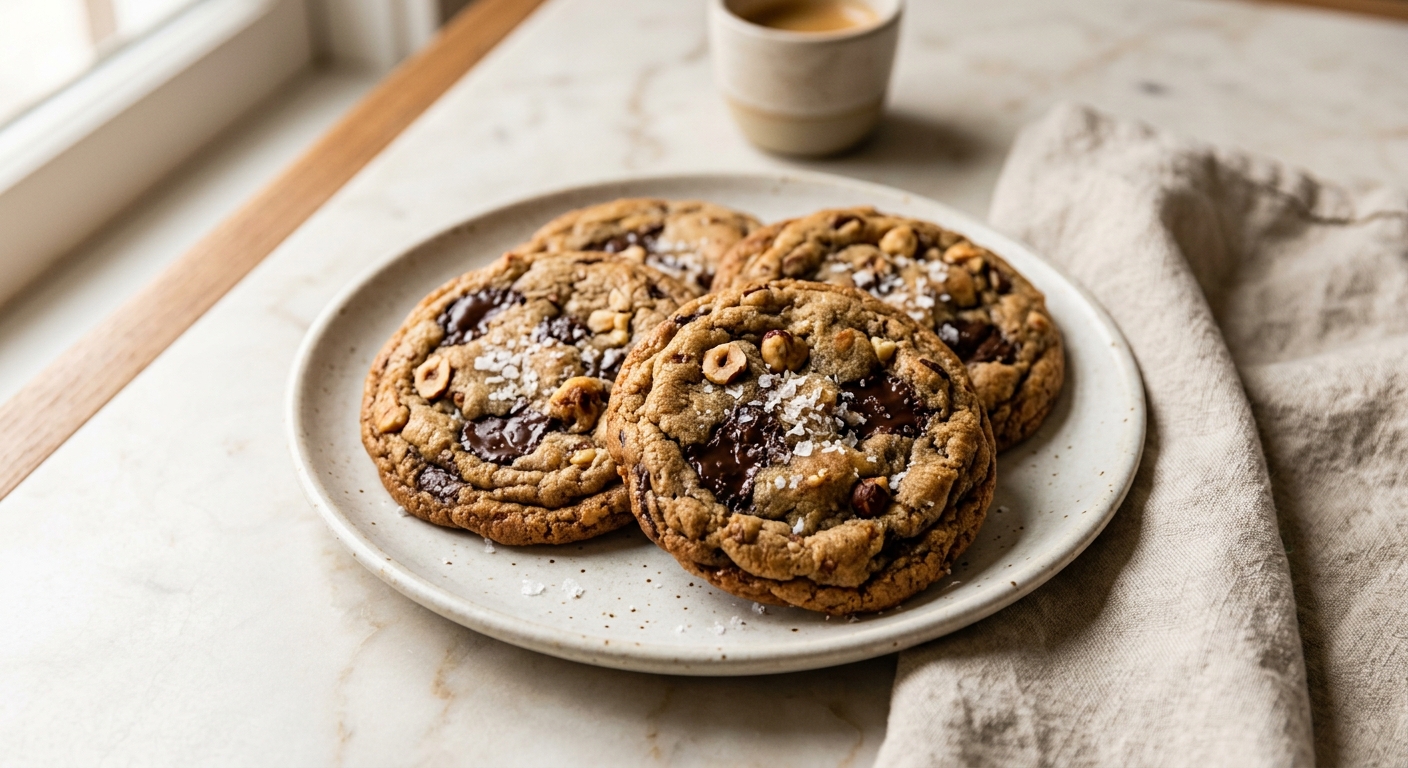
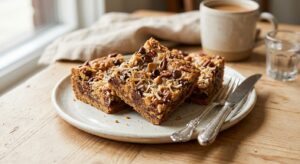
There is something almost magical about the moment a pan of these cookies comes out of the oven – the kitchen smells of toasted nuts and warm chocolate, the edges are golden and just set, and the centers still look dangerously soft. That flaky sea salt on top catches the light and practically begs you to take one before they are even cool. These are not quiet, polite cookies. They are rich, complex, and just a little bit dramatic, exactly the way a great cookie should be.
What sets this recipe apart is the brown butter. Instead of creaming soft butter the usual way, you melt and cook it until the milk solids turn deep golden and the whole pot smells like toasted hazelnuts – which is a beautiful coincidence, since hazelnuts are already in the dough. That nutty, caramel depth carries through every bite. Paired with roughly chopped bittersweet dark chocolate (not chips, which are designed to hold their shape, but a good bar, broken into irregular pieces so you get pools of melted chocolate throughout) and a generous handful of skinned toasted hazelnuts, the result is a cookie that tastes far more sophisticated than the effort involved.
These are a medium-difficulty bake, meaning they are well within reach for anyone who has made cookies before, but with a couple of steps – browning butter and toasting nuts – that reward a little attention. They are perfect for gifting, for a weekend bake when you want something impressive without an all-day project, and for anyone who thinks they have already found their favorite chocolate cookie and is about to be proven wrong.
20
servings
Ingredients
- 170 gunsalted butter (about 3/4 cup), cut into pieces
- 200 glight brown sugar, packed (about 1 cup)
- 50 ggranulated white sugar (about 1/4 cup)
- 2 largeeggs, at room temperature
- 2 tsppure vanilla extract
- 240 gall-purpose flour (about 1 3/4 cups, spooned and leveled)
- 1 tspbaking soda
- 0.5 tspColima Sea SaltMicroplastic Free Salt
- 200 gbittersweet dark chocolate (70% cacao), roughly chopped into irregular chunks (about 1 1/3 cups)
- 130 gblanched hazelnuts, toasted and roughly chopped (about 1 cup)
- —Colima Sea SaltMicroplastic Free Salt (such as Maldon), for finishing
Ingredient Substitutions
Instructions
Click on an item below to shop for the recommended items for this recipe on Amazon.
As an Amazon Associate, we earn from qualifying purchases.
- Preheat your oven to 375°F (190°C). Line two large baking sheets with parchment paper and set aside. If your hazelnuts are not yet toasted, spread them on a baking sheet and toast in the preheating oven for 8 to 10 minutes until golden and fragrant, then let cool and chop roughly.
- Brown the butter: place the butter pieces in a light-colored medium saucepan over medium heat. Melt, stirring frequently, and continue cooking for 4 to 6 minutes until the foam subsides, the milk solids at the bottom turn golden brown, and the butter smells nutty and toasty. Watch it carefully – it can go from brown to burnt quickly. Immediately pour into a large heatproof mixing bowl, scraping in all the browned bits from the bottom. Let cool for 10 minutes.
- Whisk both sugars into the warm brown butter until well combined. Add the eggs one at a time, whisking vigorously after each addition for about 30 seconds – this is important for creating a slightly shiny, crackled top. Whisk in the vanilla extract.
- Add the flour, baking soda, and fine sea salt to the bowl. Switch to a rubber spatula and fold until just combined and no dry streaks remain. Do not overmix. Fold in the chopped chocolate and hazelnuts.
- Scoop the dough into balls of about 2 tablespoons each (roughly 45g) and place 3 inches apart on the prepared baking sheets. Press a few extra chocolate chunks and hazelnut pieces onto the tops if you like. Sprinkle each ball with a generous pinch of flaky sea salt.
- Bake one sheet at a time on the center rack for 11 to 13 minutes, until the edges are set and golden but the centers still look slightly underdone and soft. They will firm up as they cool. Do not overbake.
- Let the cookies cool on the baking sheet for 5 minutes before transferring to a wire cooling rack. For perfectly round cookies, use a large round cookie cutter or a glass to scoot the edges into a circle right when they come out of the oven, while still soft.
- Prepare the brown butter dough following steps 1 through 4 of the oven method (toasting the hazelnuts in a dry skillet over medium heat for 5 to 6 minutes works well if the oven is not on). Preheat your air fryer to 325°F (165°C) for 3 minutes.
- Cut a piece of parchment paper to fit the air fryer basket, trimming so it does not cover the edges (airflow around the sides is important). Lightly spray with cooking spray.
- Scoop dough balls of about 2 tablespoons each and place 3 to 4 in the basket, spacing them at least 2 inches apart. They will spread. Sprinkle generously with flaky sea salt.
- Air fry at 325°F (165°C) for 7 to 9 minutes. The cookies are done when the edges look set and golden but the centers appear underdone – this is correct. They continue to cook on the hot parchment as they rest.
- Leave the cookies in the basket for 4 to 5 minutes before carefully lifting the parchment out and transferring to a cooling rack. Repeat with remaining dough. Store cooled baked cookies at room temperature while batches finish.
- Prepare the full brown butter dough as described in the oven method through step 4. Scoop all the dough into 2-tablespoon balls and place them on a parchment-lined baking sheet. Press extra chocolate and hazelnut pieces on top of each ball. Do not add sea salt yet.
- Place the tray of unbaked dough balls in the freezer for at least 2 hours, until completely solid. Once frozen solid, transfer the dough balls to a zip-top freezer bag or airtight container, label with the date and baking instructions, and store in the freezer for up to 3 months.
- When ready to bake, preheat your oven to 375°F (190°C). Place as many frozen dough balls as you want directly on a parchment-lined baking sheet (no need to thaw). Sprinkle generously with flaky sea salt.
- Bake from frozen on the center rack for 13 to 15 minutes, until the edges are set and golden. The centers will look underdone at 13 minutes, which is exactly right. Add 1 to 2 minutes only if the edges are not yet set.
- Cool on the baking sheet for 5 minutes, then transfer to a wire rack. Freshly baked cookies from frozen are indistinguishable from freshly made ones – possibly better, since the dough has had time to develop more flavor.
Nutrition Per Serving
Per 1 serving (makes about 20 large cookies)
Why This Recipe Works
Browning the butter before building the dough is the single most important technique in this recipe, and the science behind it is genuinely fascinating. When butter is heated past its melting point, the water evaporates and the milk solids undergo a Maillard reaction, the same browning process responsible for the crust on bread, the sear on steak, and the depth of flavor in roasted coffee. Hundreds of new flavor compounds are created in minutes, including nutty, caramel-like pyrazines and furanones. Because the butter is now fully liquid, the resulting cookie also spreads slightly more and bakes with chewier, crispier edges compared to creamed-butter versions.
Using a higher ratio of brown sugar to white sugar is a deliberate choice for texture and flavor. Brown sugar contains molasses, which is hygroscopic – meaning it attracts and holds onto moisture from the air and from the batter itself. More moisture means a softer, chewier cookie with a deeper, almost toffee-like flavor. The small amount of white sugar encourages the edges to spread and crisp up, giving you that ideal contrast of crispy perimeter and fudgy center. Whisking the eggs vigorously into the warm butter and sugar mixture dissolves the sugars and incorporates just enough air to encourage a slightly crinkled, shiny top.
If your cookies are spreading too thin, your brown butter was still too warm when you mixed in the sugars, your baking sheets are too dark or too thin (which causes the bottoms to spread before the structure sets), or your flour was under-measured. Try chilling the dough for 30 minutes before baking. If your cookies are too thick and puffy, the flour was over-measured, or the baking soda is old. The baking soda activates immediately on contact with the eggs (which are slightly acidic), and stale baking soda loses its potency, resulting in less spread and a cakey texture.
Baker’s Tips
- Do not skip toasting the hazelnuts. Raw hazelnuts are pleasant, but toasted hazelnuts in a cookie are deeply nutty and aromatic in a way that makes a real difference.
- Use a kitchen scale if you have one. Measuring flour by weight (240g) is far more accurate than by volume, and under or over-measuring flour is the most common reason cookies do not turn out as expected.
- Chop the chocolate from a bar rather than using chips. Chips contain stabilizers that prevent them from melting fully. Chopped bar chocolate creates gorgeous irregular puddles and shards throughout the cookie.
- The cookies should look underdone when you pull them from the oven. The centers will appear glossy and soft, almost wet. Trust the timing and let them finish on the hot pan – this is what gives you that fudgy, brownie-like interior.
- Let the brown butter cool for at least 10 minutes before adding the sugar and eggs. If it is too hot, it can scramble the eggs or cause the dough to be greasy.
- For bakery-style presentation, reserve a small handful of chocolate chunks and hazelnut pieces and press them onto the tops of the dough balls just before baking, in addition to what is mixed into the dough.
Variations
- Espresso boost: dissolve 1 teaspoon of instant espresso powder in the vanilla extract before adding it to the dough. It does not make the cookies taste like coffee, but it deepens and intensifies the chocolate flavor significantly.
- Dried cherry and hazelnut: replace half the chocolate with 80g of roughly chopped dried tart cherries for a fruity, almost brownie-like cookie.
- Hazelnut spread swirl: press a small frozen teaspoon of Nutella or other hazelnut spread into the center of each dough ball before baking for a molten hazelnut center.
- Orange zest: add the finely grated zest of one large orange to the dough with the sugars. Dark chocolate, hazelnut, and orange is a classic and stunning combination.
Troubleshooting & FAQ
My cookies spread too thin and look almost like lace. What went wrong?
My cookies came out puffy and cakey instead of flat and chewy. How do I fix this?
My brown butter burned before I noticed. Can I still use it?
The cookies stuck to my baking sheet. What should I do?
Can I make the dough ahead of time, and does chilling change the cookies?
Storage & Make-Ahead
- Storage: Store cooled cookies in an airtight container at room temperature for up to 4 days. To keep them soft, place a slice of white bread in the container. Baked cookies can also be frozen for up to 2 months – thaw at room temperature for 30 minutes or warm in a 300°F (150°C) oven for 5 minutes.
- Make-Ahead: The dough balls can be frozen for up to 3 months and baked directly from frozen (add 2 to 3 minutes to the bake time). The mixed dough can also be refrigerated, covered tightly, for up to 48 hours before baking – chilled dough actually produces slightly thicker, more flavorful cookies.

okay these sound INCREDIBLE and im so here for a one bowl situation because lets be real, the cleanup is half the battle lol. the brown butter hazelnut combo with dark chocolate and salt is literally calling my name, especially since im always looking for desserts that dont mess with my blood sugar but still taste like the real deal. gonna make these this weekend and ill probably eat half the batch before anyone else even knows theyre done, no shame in that game
omg the brown butter hazelnut thing is totally calling to me too – there’s something about how those flavors actually need each other yknow? tbh my kids are way more willing to eat “fancy” cookies if theres dark chocolate involved, so this is like the perfect sneak attack to get them to try something with real depth. and one bowl?? you’re speaking my language, destiny. gonna make these this weekend and honestly expecting them to vanish before anyone realizes we made them lol
oh yes, the sneak attack approach is so real! my kiddo is the same way with dark chocolate – suddenly he’s trying flavor combos he’d normally skip right over, and thats when the magic happens. brown butter has this almost savory thing going on that makes dark chocolate taste even richer, so honestly you might be creating a cookie convert here lol. one bowl is also my love language because it means more time actually enjoying the baking part instead of stress cleaning, so definitely report back on how fast they disappear!