

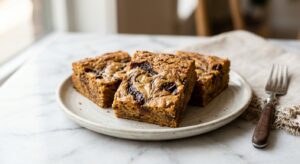
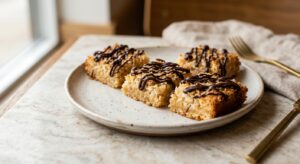
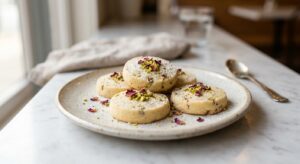
There is a moment, right when these brownies come out of the oven, when the kitchen smells like a bakery that has been perfecting its craft for decades. The top is glossy and crackled, the cream cheese swirl has puffed ever so slightly into pale ribbons across the dark chocolate surface, and it takes every ounce of willpower not to cut straight in. These are the kind of brownies people ask you to bring to every gathering, the ones that disappear before anything else on the table.
What sets this version apart is a double dose of chocolate – both Dutch-process cocoa for depth and a generous amount of melted dark chocolate for that fudgy, almost truffle-like interior. The cream cheese layer is kept intentionally simple: just cream cheese, sugar, an egg yolk, and pure vanilla. No lemon juice, no extra flour. You want it rich and tangy and creamy, not cheesecake-dense. The swirl technique here uses a skewer or butter knife in slow, confident figure-eight strokes rather than aggressive zigzags, which keeps the two batters distinct and creates those beautiful marble patterns you see on the surface.
These brownies sit comfortably in the medium difficulty range. You do not need a stand mixer or any special equipment, just two bowls, a saucepan, and a steady hand for the swirl. They are ideal for weekend bakers who want something that looks impressive without a complicated process, and they are genuinely perfect for anyone who has ever stood in front of a bakery case and wished they could make that at home.
16
servings
Ingredients
- 115 gunsalted butter (1/2 cup or 1 stick), cut into pieces
- 170 gdark chocolate (about 6 oz, 60 to 70% cacao), roughly chopped
- 200 ggranulated sugar (1 cup)
- 2 largeeggs, room temperature
- 1 tsppure vanilla extract
- 30 gDutch-process cocoa powder (3 tablespoons), sifted
- 80 gall-purpose flour (about 2/3 cup, spooned and leveled)
- 0.5 tspColima Sea SaltMicroplastic Free Salt
- —For the cream cheese swirl:
- 225 gfull-fat block cream cheese (8 oz), softened to room temperature
- 50 ggranulated sugar (1/4 cup)
- 1 largeegg yolk, room temperature
- 0.5 tsppure vanilla extract
Ingredient Substitutions
Instructions
Click on an item below to shop for the recommended items for this recipe on Amazon.
As an Amazon Associate, we earn from qualifying purchases.
- Preheat your oven to 325°F (163°C). Line an 8×8-inch baking pan with two overlapping strips of parchment paper, leaving a 2-inch overhang on all four sides. Lightly grease the parchment. This lower temperature is intentional – it bakes the brownies gently and keeps the interior fudgy rather than cakey.
- Make the cream cheese layer first so it is ready when you need it. In a medium bowl, beat the softened cream cheese with a hand mixer or stiff spatula until completely smooth with no lumps, about 1 to 2 minutes. Add the sugar, egg yolk, and vanilla extract and beat again until silky and uniform. Set aside at room temperature.
- Make the brownie batter. In a medium saucepan over low heat, melt the butter and chopped dark chocolate together, stirring constantly, until just smooth. Remove from heat immediately and let cool for 5 minutes – you do not want to scramble the eggs when you add them.
- Whisk the granulated sugar into the warm chocolate mixture until combined. Add the eggs one at a time, whisking well after each addition. The batter should look glossy and start to thicken slightly. Whisk in the vanilla extract. Sift in the cocoa powder, flour, and salt and fold gently with a rubber spatula just until no dry streaks remain. Do not overmix.
- Pour about three-quarters of the brownie batter into the prepared pan and spread into an even layer using an offset spatula. Drop the cream cheese mixture over the brownie layer in large spoonfuls, distributed across the surface. Drizzle or drop the remaining brownie batter over and around the cream cheese mounds.
- To swirl, drag a butter knife or skewer through the batters in slow, deliberate figure-eight motions. Aim for 6 to 8 passes total. Less is more here – you want distinct swirls, not a muddy blend. Gently tap the pan on the counter once or twice to settle the batter.
- Bake for 33 to 37 minutes, until the edges are set and a toothpick inserted into a chocolatey section (not the cream cheese) comes out with a few moist crumbs, not wet batter. The cream cheese portions will look slightly puffed and just set. Do not overbake.
- Let the brownies cool in the pan on a wire rack for at least 30 minutes before lifting them out using the parchment overhang. For the cleanest cuts, refrigerate for an additional 30 minutes before slicing with a sharp knife wiped clean between each cut.
- Prepare all batters exactly as directed in the oven method (steps 2 through 6), using a 7-inch square or round baking pan lined with parchment. Do not use a glass dish in the air fryer.
- Preheat your air fryer to 300°F (150°C) for 5 minutes. This lower temperature compensates for the intense circulating heat and prevents the edges from overbaking before the center sets.
- Lower the pan carefully into the air fryer basket. If your basket has a rack, place the pan directly on it. Avoid using foil to cover the top – the open top helps the cream cheese swirl set properly.
- Air fry at 300°F (150°C) for 22 to 26 minutes, checking at the 20-minute mark. The edges should be visibly set and pulling away slightly from the pan, the cream cheese should look puffed and just dry to the touch, and a toothpick into the chocolate portion should come out with moist crumbs. If your air fryer runs very hot, check as early as 18 minutes.
- Carefully remove the pan using silicone tongs or oven mitts and place on a wire rack. Cool in the pan for at least 30 minutes. The brownies will continue to set as they cool. Refrigerate for 30 minutes before slicing for clean edges.
- For the single-serving mug brownie base, combine 1 tablespoon melted butter, 1 tablespoon cocoa powder (Dutch-process), 3 tablespoons granulated sugar, 1 beaten egg, 2 tablespoons all-purpose flour, a pinch of salt, and 2 tablespoons finely chopped dark chocolate in a microwave-safe mug (at least 10 oz capacity) or ramekin. Stir until a smooth batter forms.
- For the cream cheese swirl, stir together 2 tablespoons softened cream cheese, 1 teaspoon sugar, and a small drop of vanilla in a separate small bowl until smooth.
- Drop the cream cheese mixture in three small blobs across the top of the brownie batter. Drag a toothpick through in two or three strokes to create a light swirl. Do not overmix – the cream cheese will sink slightly during cooking and that is perfectly fine.
- Microwave on 50% power (medium) for 90 seconds. Check the center – it should look just set on the edges but still slightly glossy and soft in the very middle, similar to a lava cake. If still very liquid, microwave in 10-second bursts at 50% power until just set. Overcooking at this stage produces a rubbery texture, so err on the side of underdone.
- Let the mug rest on the counter for 2 minutes before eating. The residual heat finishes the cooking. Eat directly from the mug with a spoon. A small scoop of vanilla ice cream on top makes this genuinely special.
Nutrition Per Serving
Per 1 serving (makes one 8×8-inch pan, cut into 16 brownies)
Why This Recipe Works
The combination of melted dark chocolate and Dutch-process cocoa gives these brownies their layered, complex chocolate flavor. Melted chocolate contributes fat and solids that create a dense, fudgy crumb, while cocoa powder adds intensity and a slightly dry, powdery texture that balances the richness. Dutch-process cocoa has been alkalized to neutralize its natural acidity, which results in a smoother, earthier flavor and a darker color compared to natural cocoa. Together, they produce a brownie batter that is richer than either ingredient alone could achieve.
The relatively low baking temperature of 325°F is a deliberate choice rooted in carryover cooking. Brownies continue to bake for several minutes after they leave the oven as the residual heat in the pan finishes the job. Baking at a lower temperature gives you a wider window of doneness and dramatically reduces the chance of overbaking, which is the leading cause of dry, cakey brownies. The eggs, which are added to a slightly cooled (not hot) chocolate mixture, are essential for structure: the proteins in the eggs coagulate during baking and hold the brownies together, while the fat in the yolks contributes to that glossy, crackly top.
The cream cheese layer works because full-fat block cream cheese has a high fat content and low moisture compared to tub-style cream cheese or ricotta, which means it bakes up firm and sliceable rather than watery or sunken. The single egg yolk (rather than a whole egg) adds richness and helps the layer set without turning it into a dense cheesecake. If your swirl ever looks sunken or wet after baking, the most likely cause is underbaking or using a cream cheese product with higher moisture content. When in doubt, choose block-style cream cheese every time.
Baker’s Tips
- Bring your cream cheese and eggs to room temperature before starting. Cold cream cheese will be lumpy and impossible to swirl smoothly, and cold eggs can cause the melted chocolate mixture to seize slightly.
- Use a kitchen scale for this recipe, particularly for the flour. Scooping flour directly from the bag can pack up to 30% more flour into your cup, which leads to cakey, dry brownies rather than fudgy ones.
- Let the melted chocolate and butter mixture cool for at least 5 minutes before adding the eggs. If the mixture is too hot, you risk cooking the eggs and ending up with scrambled bits in your batter.
- Swirl with restraint. Six to eight slow passes is all you need. Overswirling blends the batters together into a muddy brownish-tan and you lose those beautiful defined ribbons.
- For the cleanest, bakery-style cuts, refrigerate the fully cooled brownies for 30 minutes, then cut with a sharp chef’s knife. Wipe the blade clean with a damp cloth between every single cut.
- Do not skip lining the pan with parchment overhang. Cream cheese swirl brownies stick far more than plain brownies, and the parchment handles make removal effortless and mess-free.
Variations
- Raspberry cream cheese swirl: Add 2 tablespoons of seedless raspberry jam to the cream cheese mixture along with the sugar and egg yolk. The tartness of the raspberry cuts beautifully through the rich chocolate.
- Espresso brownie base: Dissolve 1 teaspoon of instant espresso powder into the melted butter and chocolate mixture before adding the sugar. The coffee amplifies the dark chocolate flavor without making the brownies taste like coffee.
- Peanut butter swirl instead of cream cheese: Replace the cream cheese layer with a mixture of 120g smooth peanut butter, 30g powdered sugar, and a pinch of salt beaten until smooth. Swirl in the same way for a peanut butter cup-inspired result.
- Gluten-free version: Replace the all-purpose flour with an equal weight of a 1-to-1 gluten-free flour blend. The texture will be very slightly denser but still fudgy. Alternatively, use 60g of almond flour for a naturally gluten-free brownie with a richer, nuttier base.
Troubleshooting & FAQ
My brownies came out cakey instead of fudgy. What went wrong?
The cream cheese layer sank to the bottom of my pan. What happened?
My cream cheese swirl looks lumpy and uneven, not smooth. How do I fix it?
Why did the top of my brownies not get that shiny, crackly crust?
My brownies are oily and the chocolate has a grainy, separated texture. What happened?
Storage & Make-Ahead
- Storage: Store cooled brownies in an airtight container in the refrigerator for up to 5 days (the cream cheese layer requires refrigeration). Bring to room temperature for 20 to 30 minutes before serving for the best fudgy texture. To freeze, wrap individual cut brownies tightly in plastic wrap, then place in a freezer bag for up to 2 months. Thaw overnight in the refrigerator.
- Make-Ahead: The full pan of brownies can be baked up to 2 days ahead and stored covered in the refrigerator – they actually improve as the flavors meld. You can also make the cream cheese swirl mixture up to 1 day ahead and refrigerate it in a covered bowl; bring it back to room temperature for 15 minutes and stir before using. The brownie batter should be made fresh and used immediately.

oh this is wonderful – i remember making cream cheese brownies for the library bake sale back in the 90s and they were always the first thing to go! tbh the swirl makes it feel extra special without being complicated, and if your using allulose i bet these are perfect for kids who need to watch their sugar. my granddaughter (shes 8 now, third generation through the library!) loves helping me bake and cream cheese swirls are her favrite because she can see the marbling happen. definitely saving this one!
Oh man, these look incredible – I’ve been trying to figure out how to make brownies that actually work for our after-school program without spiking the kids’ energy through the roof, and the cream cheese swirl idea is genius for adding that richness without going overboard on sugar. Been baking with allulose for a few months now and I’m still amazed at how it browns and caramelizes just like the real thing, so I’m definitely trying this recipe. Thanks for keeping these kinds of recipes accessible, it makes such a difference when you’re feeding a community and want everyone to feel included in the good stuff.
honestly this sounds perfect for me because i tend to stress bake when im feeling anxious, and having a recipe thats actually lower sugar means i can indulge that impulse without feeling terrible about it afterwards. the cream cheese swirl thing is genius too, ive always found that tanginess cuts through rich chocolate in a way that just hits different. definitely making these this week and probably bringing them to my running club because honestly nothing bonds people like showing up with homemade brownies that actually taste indulgent.