
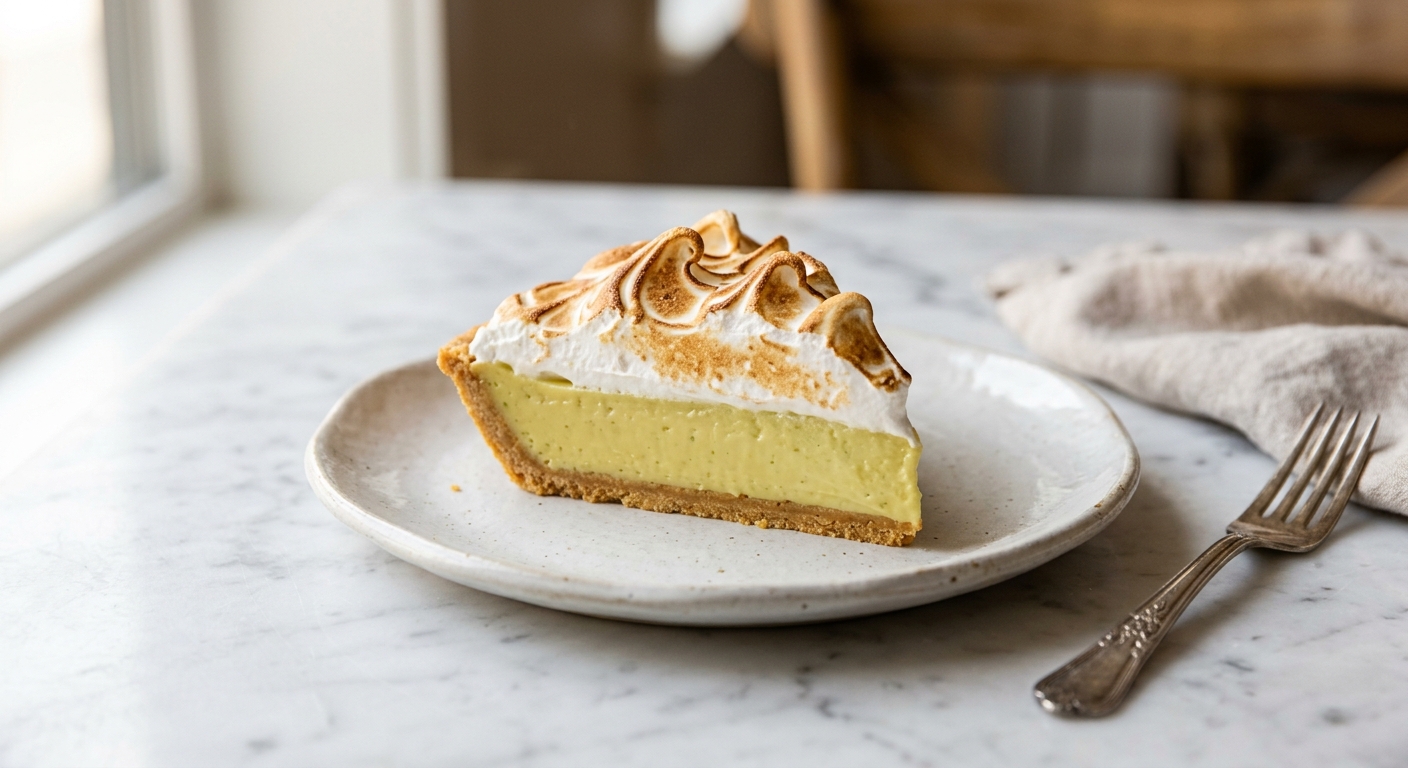
There is something almost magical about a slice of key lime pie: that first bite where the graham cracker crust shatters, the custard gives way in a cool, trembling wave of citrus, and the meringue dissolves on your tongue like a sweet cloud. This is summer on a plate, a little bit of Florida sunshine regardless of what the weather outside is doing. The scent alone – warm toasted sugar and zesty lime – is enough to stop anyone in their tracks as they walk past the kitchen.
What sets this version apart is the meringue. Most key lime pies settle for whipped cream or a temperamental French meringue that weeps and deflates within hours. Swiss meringue changes everything. By gently cooking the egg whites and sugar together over a double boiler before whipping, you create a meringue that is glossy, dense, and marshmallow-smooth, structurally far more stable than its alternatives. It toasts beautifully under a broiler or kitchen torch, developing those gorgeous amber peaks without breaking a sweat. The filling itself relies on the natural chemical reaction between sweetened condensed milk and fresh key lime juice, which thickens the custard without any cornstarch or fuss – just pure, clean lime flavor that sets into something perfectly sliceable.
This recipe sits comfortably in the medium difficulty range. The crust is simple, the filling is nearly effortless, and the Swiss meringue requires a little patience and a candy thermometer but no advanced skill. It is an ideal weekend bake for anyone who wants to impress guests without spending all day in the kitchen, and it makes an exceptional dessert for summer gatherings, dinner parties, or any occasion that deserves something a little extraordinary.
10
servings
Ingredients
- Crust
- 200 ggraham cracker crumbs (about 14 full crackers, finely crushed, roughly 1 and 3/4 cups)
- 30 ggranulated white sugar (about 2 tbsp)
- 0.25 tspColima Sea SaltMicroplastic Free Salt
- 85 gunsalted butter, melted (about 6 tbsp)
- 4 largeegg yolks (reserve the whites for the meringue)
- 2 tspfinely grated key lime zest (from about 8 to 10 key limes, or 3 regular Persian limes)
- 150 mlfresh key lime juice (about 1/2 cup plus 2 tbsp, from 18 to 20 key limes)
- 800 gsweetened condensed milk (two 14-oz or 400g cans, about 2 and 2/3 cups)
- 4 largeegg whites, at room temperature (from the reserved yolks above)
- Swiss Meringue
- 200 ggranulated white sugar (about 1 cup)
- 0.25 tspcream of tartar
- Meringue
- —Pinch of Colima Sea SaltMicroplastic Free Salt
- 1 tsppure vanilla extract
Ingredient Substitutions
Instructions
Click on an item below to shop for the recommended items for this recipe on Amazon.
As an Amazon Associate, we earn from qualifying purchases.
- Preheat your oven to 350°F (175°C). In a medium bowl, stir together the graham cracker crumbs, 30g sugar, and 1/4 tsp salt. Pour in the melted butter and mix with a fork until the mixture resembles damp sand and holds together when you squeeze a small amount in your fist.
- Press the crumb mixture firmly and evenly into the bottom and up the sides of a 9-inch pie dish. Use the flat bottom of a measuring cup to really compact the crust – this prevents crumbling when slicing. Bake for 10 minutes, until the edges are just golden and the crust smells toasty. Transfer to a wire rack while you prepare the filling. Do not turn off the oven.
- In a large bowl, whisk the egg yolks with the lime zest for about 2 minutes, until slightly thickened and pale. Whisk in the sweetened condensed milk until fully combined, then stir in the fresh lime juice. The mixture will thicken noticeably as the acid from the lime juice begins to react with the milk proteins – this is exactly what you want. Let it rest for 3 minutes, then give it one final stir.
- Pour the filling into the pre-baked crust. Bake at 350°F (175°C) for 15 minutes, until the edges are just set but the center still has a gentle wobble when you nudge the pan. It will firm up as it cools and chills. Do not overbake – a dry, cracked filling means it has gone too far. Remove from the oven and cool completely on a wire rack, about 1 hour, then refrigerate uncovered for at least 3 hours (or overnight) until fully set and cold.
- When ready to top the pie, make the Swiss meringue. Set a medium heatproof bowl over a saucepan of barely simmering water, making sure the bottom of the bowl does not touch the water. Add the 4 egg whites, 200g sugar, cream of tartar, and pinch of salt. Whisk constantly by hand until the mixture reaches 160°F (71°C) on an instant-read thermometer and the sugar is completely dissolved – rub a bit between your fingers; it should feel completely smooth with no graininess. This takes about 4 to 5 minutes.
- Transfer the warm egg white mixture to the bowl of a stand mixer fitted with the whisk attachment (or use a large bowl with a hand mixer). Beat on medium speed for 2 minutes, then increase to high and beat for 6 to 8 minutes, until the meringue is thick, glossy, and holds stiff, billowy peaks. Beat in the vanilla extract during the last 30 seconds. The bowl should feel cool to the touch when the meringue is ready.
- Pile the meringue onto the cold pie, starting from the edges and working toward the center to ensure the meringue touches the crust all the way around (this seal prevents weeping). Use a spatula or spoon to create swoops and peaks.
- To toast: position an oven rack in the highest position and switch the oven to broil on High. Place the pie on a baking sheet and broil for 2 to 3 minutes, watching constantly, until the peaks are deeply golden and the edges are just catching a touch of char. Alternatively, use a kitchen torch, moving it in small circles from a distance of about 4 inches for more precise control. Slice and serve immediately, or refrigerate uncovered for up to 4 hours before serving.
- Make the no-bake crust: combine the graham cracker crumbs, 30g sugar, and 1/4 tsp salt in a medium bowl. Pour in the melted butter and mix until the texture resembles wet sand. Press firmly into the bottom and sides of a 9-inch pie dish, pressing especially hard to compact it well since there is no baking to bind the butter. Freeze the crust for 20 minutes until firm.
- In a large bowl, whisk the egg yolks with the lime zest for 2 minutes until slightly pale. Add the sweetened condensed milk and whisk until smooth. Pour in the lime juice and stir well. The acid will begin to thicken the mixture slightly. Pour the filling directly into the frozen crust.
- Cover the pie loosely with plastic wrap, being careful not to let the wrap touch the filling surface. Refrigerate for a minimum of 6 hours, or ideally overnight, until the filling is fully set and sliceable. The no-bake filling sets through acid-protein coagulation alone rather than heat, so it needs extra time in the cold to achieve a clean slice.
- Make the Swiss meringue exactly as described in Steps 5 and 6 of the oven method: double boiler to 160°F (71°C), then whip to stiff glossy peaks with vanilla. Pile onto the cold set pie, sealing the edges to the crust.
- Use a kitchen torch to toast the meringue: hold the flame 4 inches from the surface and move in small steady circles until the peaks are richly golden with some amber edges. Work quickly so the heat does not warm the filling beneath. Serve immediately or refrigerate uncovered for up to 2 hours.
Nutrition Per Serving
Per 1 serving (makes one 9-inch pie, 10 slices)
Why This Recipe Works
The magic of key lime pie filling comes down to chemistry, specifically the reaction between the acidic lime juice and the proteins in sweetened condensed milk. When you combine the two, the citric acid causes the milk proteins to denature and begin to coagulate, which is why the filling visibly thickens in the bowl before it ever sees the oven. Baking it briefly at 350°F (175°C) completes this process, setting the custard to a smooth, sliceable consistency without curdling. The egg yolks add richness and color, and their lecithin contributes to a creamy, cohesive texture. This is why the pie filling needs relatively little time in the oven: most of the work has already been done by the acid before baking even begins.
Swiss meringue is fundamentally different from French meringue (raw whites beaten with sugar) because the heat-treatment step is doing two critical jobs at once. First, it dissolves every last grain of sugar into the egg whites, which produces that signature smooth, dense, satiny texture rather than the slightly grainy quality of uncooked meringue. Second, and crucially for food safety, heating the mixture to 160°F (71°C) pasteurizes the egg whites, making the finished meringue safe to eat even if it is not subjected to further baking. This also makes Swiss meringue structurally far more stable: the dissolved sugar forms a thick syrup around the protein network as the whites are whipped, resulting in a foam that resists weeping for days rather than hours.
Cream of tartar plays a supporting but meaningful role. As an acidic salt, it lowers the pH of the egg whites, which tightens the protein bonds as they form during whipping and creates a more stable, fine-textured foam. It also inhibits sugar recrystallization, helping the meringue stay glossy. If your finished pie weeps a little liquid between the meringue and filling (called syneresis), it is most likely because the meringue was applied to a warm filling rather than a fully chilled one, or because the meringue was overwhipped past stiff peaks into a dry, broken foam. Always apply meringue to a cold, fully set pie for the best result.
Baker’s Tips
- Key limes are small, seedy, and yield very little juice – plan on 18 to 20 limes for 150ml. Rolling them firmly on the counter before cutting helps release more juice. A small citrus press is far more efficient than squeezing by hand.
- Zest the limes before juicing them. Once cut, the soft interior makes it nearly impossible to zest cleanly.
- Make sure your mixing bowl and whisk are completely grease-free before making meringue. Any trace of fat (including egg yolk) will prevent the whites from whipping properly. Wipe everything down with a paper towel dampened with white vinegar.
- Do not rush the crust. Firmly pressing and compacting the crumbs is the single most important step for a crust that slices cleanly without crumbling.
- The filling should still wobble in the center when you remove it from the oven. It firms up dramatically during chilling. A fully set filling fresh from the oven will be overbaked and grainy.
- When spreading the meringue, use the back of a spoon to physically press it against and slightly over the edge of the crust all the way around. This contact seal is what prevents the meringue from shrinking away from the edges as it cools.
- For the cleanest slices, dip your knife in hot water and wipe it clean between each cut.
Variations
- Key Lime and Coconut: Add 60g toasted shredded coconut to the graham cracker crust mixture and use sweetened condensed coconut milk in the filling for a tropical double-coconut version.
- Grapefruit and Lime: Replace 50ml of the key lime juice with fresh ruby grapefruit juice for a more complex, slightly bitter citrus note. Reduce condensed milk by 50g to balance the lower acidity.
- Chocolate Crust: Replace the graham crackers with 200g crushed Oreo cookies (filling included) and reduce the butter to 70g. The deep chocolate crust against the bright green filling is visually stunning.
- Individual Tartlets: Divide the crust and filling among 10 standard muffin cups lined with parchment strips for easy removal. Reduce bake time for the filling to 10 minutes. Top each with a small swirl of meringue and torch individually.
Troubleshooting & FAQ
My filling did not set – it is still jiggly and soft even after chilling for hours. What went wrong?
My meringue is weeping – there is liquid pooling between the meringue and the filling. How do I prevent this?
My Swiss meringue is not thickening or reaching stiff peaks, even after 10 minutes of whipping. What is happening?
My crust is crumbling when I try to slice the pie. How do I fix this?
My filling is a yellow-green or even pale yellow color rather than the bright green I see in photos. Is something wrong?
Storage & Make-Ahead
- Storage: Store the finished pie loosely covered in the refrigerator for up to 3 days. The Swiss meringue holds exceptionally well without weeping, making it ideal for make-ahead entertaining. Do not freeze a finished pie with meringue, as it will become watery upon thawing. The baked, unfilled crust can be frozen (well-wrapped) for up to 1 month.
- Make-Ahead: The crust can be baked and stored at room temperature (covered) up to 2 days ahead, or frozen for 1 month. The filling can be poured and baked, then refrigerated overnight – in fact, overnight chilling produces the cleanest slices. The Swiss meringue is best made and applied on the day of serving, though the finished meringue-topped pie holds well in the fridge for up to 2 days.


This sounds absolutely beautiful, and I love that you emphasize the stability of Swiss meringue – that’s what makes it worth the extra care. I’ve found that taking time with the technique means less stress on the day you’re serving it, which honestly matters more than people realize. Can’t wait to try this version.
oh my goodness this sounds like heaven! my family always had key lime at christmas and let me tell you, if this version is half as good as you describe im making it for our next sunday dinner because everyone needs to taste what a REAL key lime pie tastes like, you know? the swiss meringue thing has me so excited because my old recipes always got all weepy and sad sitting out, so this is exactly what i need, god bless this blog for sharing such wonderful recipes with us!
This is exactly the kind of thing I’d bring to the firehouse potluck, honestly. Swiss meringue is worth the extra steps, and that golden toasting detail is what separates a good pie from one people actually remember. I’ll be making this soon.