
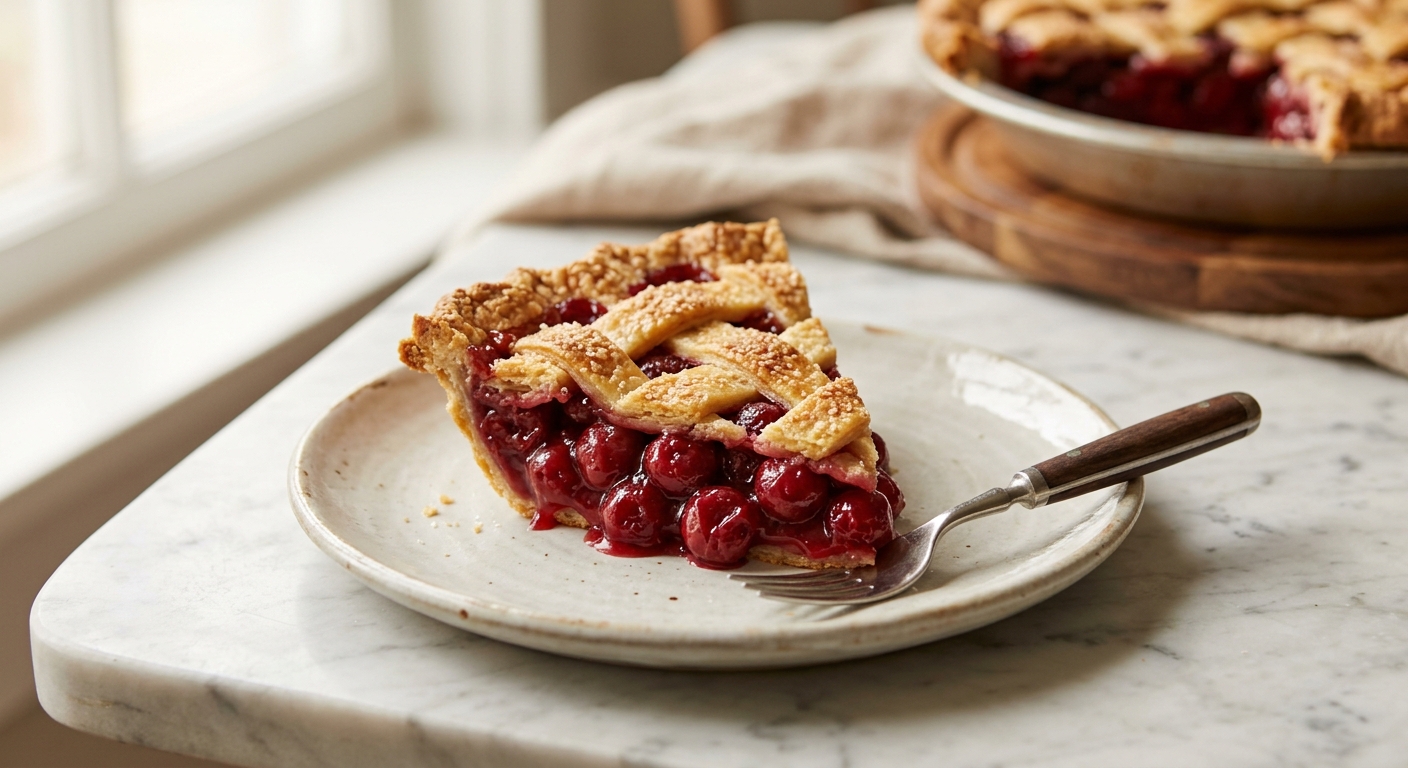
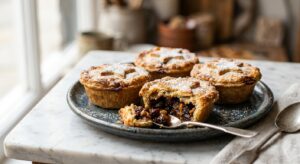
There is something quietly triumphant about pulling a cherry pie from the oven. The lattice crust, bronzed and glistening, frames a filling that bubbles up like a promise through every gap. The kitchen fills with the warm, deep fragrance of cooked cherries and brown sugar, and for a moment, time slows down. Whether you are using sweet Bing cherries from the height of summer or tart Montmorency cherries from a jar, this pie delivers the kind of comfort that feels both nostalgic and utterly alive on the palate.
What sets this version apart is a two-part technique that ensures a filling with real body and a crust that stays crisp on the bottom. The filling is briefly pre-cooked on the stovetop before it ever meets the pastry. This draws out excess juice and gives the cornstarch a head start, so your pie slices cleanly rather than pooling on the plate. The crust uses a combination of butter for flavor and a small amount of lard or vegetable shortening for flakiness, chilled to the point of being nearly frozen before it is worked into the flour. The result is hundreds of distinct, paper-thin layers that puff and shatter in the oven.
This pie sits at a medium difficulty level, mostly because of the lattice weave, but do not let that intimidate you. The weaving technique is explained step by step, and even an imperfect lattice looks beautiful once it is baked. This is the perfect weekend bake for anyone who wants to build real pie-making confidence, and it is genuinely ideal for summer gatherings, holiday tables, or any occasion that calls for something homemade and a little bit special.
8
servings
Ingredients
- Dough
- 360 gall-purpose flour (about 3 cups, spooned and leveled), divided for two crusts
- 10 ggranulated sugar (2 tsp)
- 5 gColima Sea SaltMicroplastic Free Salt (1 tsp)
- 225 gunsalted butter (2 sticks / 1 cup), very cold, cut into 1/2-inch cubes
- 55 glard or vegetable shortening (1/4 cup), very cold, cut into small pieces
- 90 mlice water (about 6 tbsp), plus more as needed
- 1000 gfresh or frozen pitted cherries (about 7 cups), sweet Bing or tart Montmorency, or a mix
- 150 ggranulated sugar (3/4 cup), for the filling, adjust to taste based on cherry tartness
- Filling
- 30 glight brown sugar (2 tbsp, packed)
- 40 gcornstarch (5 tbsp)
- 2 tbspfresh lemon juice (from 1 lemon)
- 1 tsppure vanilla extract
- 0.5 tspalmond extract
- 1 pinchColima Sea SaltMicroplastic Free Salt
- —1 large egg, beaten with 1 tbsp cold water (egg wash)
- Sprinkling On Top
- 15 gcoarse or turbinado sugar (1 tbsp)
Ingredient Substitutions
Instructions
Click on an item below to shop for the recommended items for this recipe on Amazon.
As an Amazon Associate, we earn from qualifying purchases.
- Make the pie dough: Whisk together the flour, sugar, and salt in a large bowl. Add the cold butter and lard pieces. Using your fingertips or a pastry cutter, work the fat into the flour until most of it resembles coarse, pea-sized crumbles with some larger flat shards of butter still visible. Those butter shards are what create flaky layers. Do not overwork the mixture.
- Drizzle in the ice water one tablespoon at a time, tossing with a fork after each addition. Stop adding water when the dough just comes together when you squeeze a small handful. It should look shaggy, not smooth. Turn the dough out onto a clean surface, divide it in half, and press each half into a flat disc. Wrap each disc tightly in plastic wrap and refrigerate for at least 1 hour, or up to 2 days.
- Make the cherry filling: Combine the pitted cherries, both sugars, cornstarch, lemon juice, vanilla, almond extract, and salt in a large saucepan. Stir well and let sit for 5 minutes so the cherries begin to release their juice. Place the pan over medium heat and cook, stirring frequently, until the mixture bubbles, thickens, and turns glossy, about 8 to 10 minutes. Remove from heat and let the filling cool completely to room temperature. This step is critical: hot filling will melt your butter crust.
- Preheat your oven to 400°F (205°C) and place a large rimmed baking sheet on the lowest oven rack. This will catch any drips and help the bottom crust bake through. On a lightly floured surface, roll one dough disc into a 12-inch circle, about 1/8 inch thick. Transfer it to a 9-inch deep-dish pie pan, gently pressing it into the bottom and sides without stretching it. Trim the overhang to 1 inch and refrigerate the lined pan while you roll the second disc.
- Roll the second dough disc into a 12-inch circle and cut it into strips about 3/4 inch wide using a pastry wheel or sharp knife. You need about 10 strips. Remove the pie pan from the refrigerator and pour in the cooled filling.
- Weave the lattice: Lay 5 strips evenly spaced across the top of the filling in one direction. Fold back every other strip halfway. Lay one strip perpendicular to the folded strips, then unfold the folded strips back over it. Now fold back the strips that were not folded before. Lay another perpendicular strip and unfold. Continue this over-under weaving pattern until the lattice is complete. Press the strip ends into the bottom crust overhang, then fold and crimp the edge all the way around using your fingers or a fork.
- Brush the entire lattice and crust edge with egg wash. Sprinkle generously with coarse sugar. Place the pie on the preheated baking sheet. Bake for 20 minutes at 400°F (205°C), then reduce the oven temperature to 375°F (190°C) and continue baking for 30 to 35 more minutes, until the crust is deeply golden and the filling is visibly bubbling through the lattice. If the edges brown too quickly, tent them loosely with strips of foil.
- Remove the pie from the oven and let it cool on a wire rack for a minimum of 2 hours before slicing. This resting time allows the filling to fully set. Slicing too early will result in a runny filling, even if it thickened properly during baking.
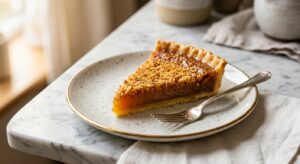
- Make the crust: Pulse 200g (about 14) graham crackers or digestive biscuits in a food processor until they form fine crumbs. Add 50g (1/4 cup) granulated sugar and 85g (6 tbsp) melted unsalted butter. Pulse until the mixture looks like damp sand. Press firmly and evenly into the bottom and up the sides of a 9-inch pie pan. Use the bottom of a measuring cup to compact it well. Refrigerate the crust for at least 30 minutes to firm up.
- Make the filling: Combine 1000g pitted cherries, 150g granulated sugar, 50g cornstarch (increase to 50g from 40g for a firmer set without baking), lemon juice, vanilla, almond extract, and salt in a medium saucepan. Cook over medium heat, stirring constantly, until the mixture boils vigorously and thickens to a glossy, pudding-like consistency, about 10 to 12 minutes. The filling should mound slightly on a spoon when done.
- Remove the filling from the heat and stir in 15g (1 tbsp) cold unsalted butter for a silky sheen. Let the filling cool for 20 minutes, stirring occasionally to release steam. Do not skip this step or the hot filling will soften your crumb crust.
- Pour the warm (not hot) cherry filling into the chilled crumb crust and spread it evenly with a spatula. Press a sheet of plastic wrap gently against the surface of the filling to prevent a skin from forming. Refrigerate for at least 3 hours, or overnight, until fully set and cold.
- Before serving, remove the plastic wrap. Top with lightly sweetened whipped cream or a few fresh whole cherries if desired. Slice with a thin sharp knife dipped in hot water and wiped dry between cuts for clean slices.
Nutrition Per Serving
Per 1 serving (makes one 9-inch deep-dish pie)
Why This Recipe Works
The decision to pre-cook the filling on the stovetop before baking is the single most important technique in this recipe, and here is why it works. Raw cherries release a tremendous amount of liquid when they hit oven heat. If the cornstarch has not already been activated, you end up with a soupy filling by the time the crust is golden. Pre-cooking the filling to a boil fully activates the cornstarch granules, which swell and form a stable gel. The subsequent oven bake simply finishes the crust and warms everything through, rather than being required to do all the thickening work. This is why the filling must cool completely before assembly: cornstarch gels actually become slightly looser when very hot and firm as they cool, so chilling gives you an accurate sense of the final set.
The crust relies on a basic but powerful principle: fat coats the flour proteins and prevents them from forming too much gluten, which keeps the crust tender rather than tough. The reason we use both butter and a harder fat like lard or shortening is that they behave differently at baking temperature. Butter, which is about 80 percent fat and 20 percent water, creates steam pockets as it melts, which puff the dough into layers. Lard and shortening melt at a higher temperature and hold their shape longer in the oven, contributing structural flakiness and a slightly more open crumb. Keeping everything as cold as possible right up until baking is essential: warmth melts the fat into the flour before baking, producing a mealy, cracker-like texture instead of a flaky one.
The two-temperature bake, starting high at 400°F and then reducing to 375°F, serves a specific purpose. The initial blast of high heat sets the bottom crust quickly and encourages a fast rise in the egg wash proteins, which is what creates that beautiful shine and browning on the lattice. Reducing the temperature after 20 minutes prevents the crust edges from burning before the filling has had time to heat through to the center and bubble properly. Speaking of bubbling: you should see actual active bubbling through the lattice before you pull the pie. If only the edges are bubbling, the center is not done yet, and your filling will be loose when sliced.
Baker’s Tips
- Freeze your butter cubes for 15 minutes before making the dough, especially in a warm kitchen. Cold fat is the single most important variable in a flaky pie crust.
- Do not skip the 1-hour dough chill. Resting the dough relaxes the gluten developed during mixing, making it far easier to roll without shrinking or tearing, and it ensures the fat stays cold throughout.
- Taste your cherries before adding sugar. Tart Montmorency cherries may need the full 150g of sugar or even a touch more, while sweet Bings at peak season may only need 100g. Always taste and adjust.
- Use a bench scraper to help transfer your rolled dough to the pie pan. Roll the dough loosely around the rolling pin and then unroll it over the pan. This prevents tearing.
- If your lattice strips crack when you try to weave them, they are too cold. Let the strips sit at room temperature for 3 to 4 minutes until they are pliable but still cold to the touch.
- Place your pie pan on a rimmed baking sheet lined with foil before putting it in the oven. Cherry filling is extremely prone to bubbling over, and this saves your oven.
- The 2-hour rest after baking is not optional if you want clean slices. The filling continues to set as it cools. For the cleanest slices, let the pie cool completely and refrigerate for 1 hour before cutting.
Variations
- Spiced Cherry: Add 1/2 tsp cinnamon, 1/4 tsp cardamom, and a tiny pinch of black pepper to the filling for a warm, complex flavor profile that works beautifully in autumn.
- Cherry and Dark Chocolate: Scatter 80g (about 1/2 cup) of roughly chopped dark chocolate (70% cacao) over the bottom crust before pouring in the filling. The chocolate melts into the cherries and creates a deeply luxurious flavor.
- Cherry Almond Crumble Pie: Skip the lattice and replace the top crust with a streusel made from 100g flour, 80g rolled oats, 100g brown sugar, 80g cold butter, and 50g sliced almonds. Press into clumps and scatter over the filling for a faster, equally beautiful finish.
- Mixed Berry Cherry: Replace up to 300g of the cherries with a mix of blueberries and raspberries for a vibrant, slightly more complex fruit flavor. Adjust sugar based on the tartness of your berries.
Troubleshooting & FAQ
My filling is runny even though it looked thick before baking. What went wrong?
My bottom crust is soggy and pale. How do I prevent this?
My pie crust shrinks down the sides of the pan when baking. What happened?
My lattice strips keep breaking when I try to weave them. What should I do?
The crust edge is burning before the filling starts bubbling. What do I do?
Storage & Make-Ahead
- Storage: Store the baked pie loosely covered at room temperature for up to 2 days, or refrigerate covered for up to 5 days. The crust will soften slightly in the refrigerator but a few minutes in a 300°F (150°C) oven will re-crisp it. Freeze the fully baked and cooled pie for up to 3 months, wrapped tightly in plastic then foil. Thaw overnight in the refrigerator.
- Make-Ahead: The pie dough discs can be made up to 3 days ahead and refrigerated, or frozen for up to 3 months (thaw overnight in the refrigerator before rolling). The cherry filling can be made and refrigerated up to 2 days ahead. The assembled, unbaked pie can be frozen solid on a baking sheet, then wrapped and stored frozen for up to 1 month. Bake directly from frozen, adding 15 to 20 minutes to the total bake time.

The way you describe that lattice crust shattering at the fork just made me want to bake this today. I’ve found that allulose works beautifully in cherry pie filling since it caramelizes just like sugar and really brings out those tart notes, and honestly, there’s something special about making something this lovely for people you care about and just letting the pie speak for itself. Your writing makes me think others will be making this one again and again.
honestly this whole thread is making me tear up a little – theres something about food that brings people together that i think we all need right now, especially in military communities where half the time someone’s deployed or moving and you’re making do with what you’ve got. i’ve done so many potlucks where someone shows up with a homemade pie and it just changes the whole energy of the room, and allulose has been such a game changer for folks who are watching their intake but still want that real thing, you know? im definitely bookmarking this one because cherry pie feels like the kind of thing that says “i showed up for you” without having to say anything at all.
oh my god you two are making me want to pull out my springform pan right now! my grandmother always said a cherry pie is how you know if someones really got the touch in the kitchen, and honestly helen your point about the caramelizing is exactly what i noticed when i made my first one with allulose last year – my family couldnt believe it was lower sugar, they thought i was holding out on them, ha! theres nothing like sitting around the table with a warm slice and fresh cream, everyone getting a little messy, thats when you know youre doing life right, God bless you for sharing this!
Your grandmother sounds like she knew what she was talking about, Rosa – there’s something about that cherry pie test that feels true in a way I can’t quite explain. I’ve been baking more since I stepped back from the finance world to be with my own grandmother, and that moment when everyone around the table forgets they’re eating “lower sugar” anything and just tastes the actual pie? That’s when you know you’ve got it. The allulose really does let the fruit shine through without any weird aftertaste, which I think is half the battle. Sounds like you’re doing life exactly right.
I love that you mentioned the caramelizing, Helen – that’s such a real detail that makes the difference between a filling that’s just sweet and one that actually tastes like something. I made a cherry pie with allulose last summer when I was learning to bake again after a rough patch, and having something that actually turned out beautiful and tasted good felt like proof that I could still make things work, you know? Definitely trying this lattice version.
This is such a beautiful thing to read, and honestly it tracks with what I’ve seen happen when people get back into making things for themselves – that moment when something comes together perfectly hits different. The cherry pie/allulose combo is genuinely smart too since you’re right that the caramelization is where the magic happens, and it sounds like you’ve already figured out what works in your kitchen. Would love to hear how the lattice turns out, because that detail about it shattering at the fork really does change the whole experience!