
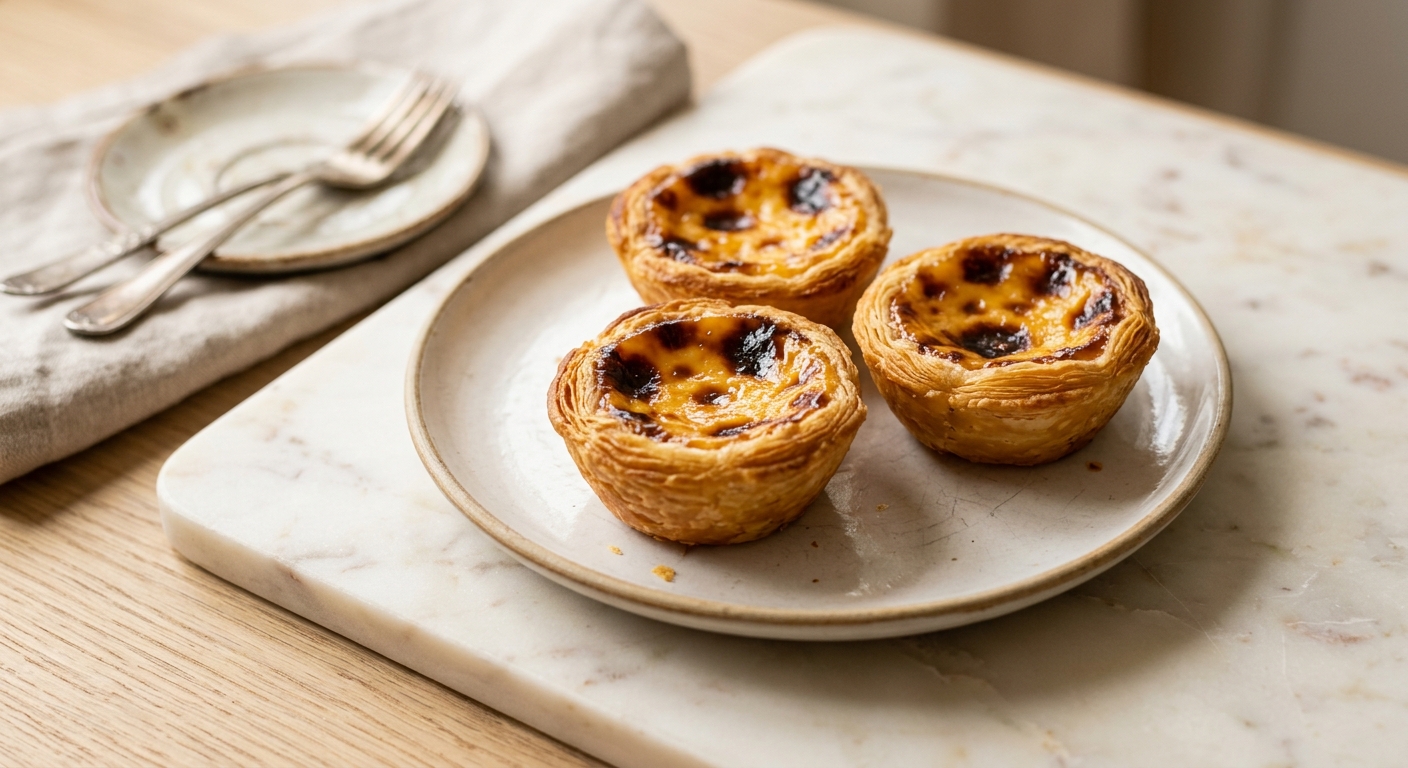
There is a tiny pastelaria in Belém, Lisbon, where the queue stretches around the block at eight in the morning and nobody minds waiting. The reason is a small, unassuming tart: caramelised and blistered on top, cupped in pastry so flaky it leaves a trail of crumbs down your shirt, and filled with a custard that trembles when you pick it up. This is the pastel de nata, and it is, quite honestly, one of the greatest things ever baked. The good news is that with a little patience and the right technique, you can make a version at home that will stop conversation at your kitchen table.
What sets this recipe apart from simplified versions is the pastry. Rather than using shop-bought puff pastry (which works in a pinch but lacks soul), we make a quick hand-laminated dough: a soft, barely-mixed dough is spread with softened butter, rolled, and coiled into logs that are then sliced and pressed into tart tins. This process creates dozens of fine, irregular layers that puff and shatter in the oven rather than turning soft and bready. The custard is a cooked stove-top cream thickened with egg yolks and a touch of flour, poured into the shells while still warm so it begins to set gradually from the outside in. The oven is cranked as high as it will go, which is the other non-negotiable: the scorched, caramelised top is not a mistake, it is the entire point.
This recipe sits firmly in the medium difficulty range. The laminated pastry requires a confident, light hand, but it is genuinely forgiving compared to classic croissant dough. If you can roll pastry and stir a custard without walking away from the stove, you can make these. They are perfect for a weekend baking project, a dinner party dessert, or any morning when you want to do something genuinely kind for the people you live with.
12
servings
Ingredients
- Laminating
- 200 gall-purpose flour (about 1 cup + 5 tbsp, spooned and leveled), plus extra for dusting
- 0.5 tspColima Sea SaltMicroplastic Free Salt
- 110 mlcold water (about 7 tbsp + 1 tsp)
- 115 gunsalted butter, very soft but not melted (about 8 tbsp or 1 stick)
- 300 mlwhole milk (about 1 and 1/4 cups)
- 150 mlheavy cream (about 2/3 cup)
- 200 ggranulated white sugar (about 1 cup)
- Sugar Syrup
- 80 mlwater (about 1/3 cup)
- Custard
- 30 gall-purpose flour (about 3 tbsp + 1 tsp)
- 5 largeegg yolks, at room temperature
- 1 tsppure vanilla extract
- —1 cinnamon stick
- —1 strip of lemon zest (peeled with a vegetable peeler, white pith avoided)
- Serving
- —Ground cinnamon and powdered sugar
Ingredient Substitutions
Instructions
Click on an item below to shop for the recommended items for this recipe on Amazon.
As an Amazon Associate, we earn from qualifying purchases.
- Make the dough: Combine 200g flour and 0.5 tsp salt in a bowl. Add 110ml cold water and stir with a fork until a shaggy dough forms. Turn out onto an unfloured surface and knead for just 1 to 2 minutes until smooth. The dough will be soft and slightly tacky. Wrap in plastic wrap and rest at room temperature for 15 minutes. Do not over-knead.
- Laminate the dough: On a lightly floured surface, roll the dough into a thin rectangle roughly 12 x 18 inches (30 x 45 cm). Spread the softened butter evenly over the entire surface, reaching the edges. Working from a short end, roll the dough tightly into a log, using a bench scraper to lift it if it sticks. Wrap the log in plastic wrap and refrigerate for 30 minutes until firm but still pliable.
- Make the custard: Whisk 30g flour with a few tablespoons of the 300ml whole milk in a medium saucepan until smooth and lump-free. Whisk in the remaining milk and 150ml cream. Add the cinnamon stick and lemon zest. Warm over medium heat, stirring constantly, until the mixture just begins to thicken (it will coat the back of a spoon), about 4 to 6 minutes. Remove from heat. In a separate small saucepan, combine 200g sugar and 80ml water. Bring to a boil over medium-high heat without stirring. Boil for exactly 3 minutes until a light syrup forms (it will read about 215 to 220°F / 102 to 104°C on a thermometer, but timing works fine if you do not have one). Remove the cinnamon stick and lemon zest from the milk mixture. Slowly pour the hot syrup into the warm milk mixture in a thin, steady stream, whisking constantly. In a separate bowl, whisk together the 5 egg yolks until smooth. Slowly pour the warm custard mixture into the yolks, whisking constantly to prevent scrambling. Strain through a fine-mesh sieve, stir in the vanilla extract, and press plastic wrap directly onto the surface. Set aside to cool to just warm, not hot.
- Preheat and prep the tins: Place your oven rack in the highest position and preheat to 500°F (260°C) or your oven’s maximum temperature for at least 30 minutes. This long preheat is important for an evenly fierce heat. Lightly grease a standard 12-cup muffin tin with butter or non-stick spray.
- Shape the tart shells: Remove the chilled pastry log and slice it into 12 equal rounds, each about 1 inch (2.5 cm) thick. Place one round cut-side up in each muffin cup. Using your thumb, press and rotate each round upward from the centre to form a thin shell, pressing the pastry up the sides to the rim of each cup. The shells should be thin enough to see light through in places, about 2 to 3mm. Do not worry about perfection: the irregular edges are part of the charm.
- Fill and bake: Pour the cooled custard into the tart shells, filling each about three-quarters full (the custard will puff slightly). Bake on the highest rack for 14 to 18 minutes. The tarts are done when the pastry is deeply golden and the custard is set at the edges with dark, irregular caramelised spots across the top. The centre may still jiggle very slightly, like a just-set jelly. This is correct.
- Cool and serve: Allow the tarts to cool in the tin for 5 minutes, then use a small offset spatula or a butter knife to transfer them to a wire rack. They are best eaten within 2 hours of baking, warm or at room temperature, dusted generously with ground cinnamon and a light veil of powdered sugar.
- Prepare the dough and custard exactly as described in the oven method steps 1 through 3. The laminated dough and custard recipe is identical. Have 12 silicone muffin cups or foil tart cases ready.
- Shape the tart shells in the silicone cups or foil cases using the same technique as the oven method: slice the chilled pastry log into 12 rounds, press each into a cup, and shape up the sides to form a thin shell.
- Preheat your air fryer to 400°F (200°C) for 5 minutes. Fill each shell three-quarters full with the cooled custard. Place 4 to 6 cups in the air fryer basket, leaving a small gap between each for air circulation.
- Air fry for 12 to 14 minutes. Check at 12 minutes: the pastry should be golden and pulling away from the sides, and the custard should show dark speckled spots on top with only a faint wobble at the very centre. If the custard is still liquid in the centre, add 2 minutes.
- Carefully remove the tarts using tongs (the cups will be very hot). Rest for 5 minutes in the cups before turning out onto a rack. Repeat with remaining tarts. Dust with cinnamon and powdered sugar and serve warm.
- Make and laminate the dough exactly as in the oven method steps 1 and 2. Preheat your oven to 375°F (190°C). Shape the tart shells in a greased muffin tin as described in the oven method. Line each shell with a small square of crumpled parchment and fill with baking weights or dried beans.
- Blind bake the shells for 12 minutes. Remove the weights and parchment, then return to the oven for a further 8 to 10 minutes until the shells are deep golden and completely dry-looking, with visible flaky layers. Press the base gently if it has puffed: it should feel firm, not soft. Cool completely in the tin on a wire rack.
- Make a thicker stovetop custard: Follow the custard method from the oven recipe, but increase the flour to 40g (about 1/4 cup). After combining the sugar syrup with the milk mixture and tempering in the egg yolks, return the entire custard to a clean saucepan over medium-low heat. Stir constantly with a silicone spatula, scraping the bottom and sides, until the custard thickens noticeably and a line drawn through it on the spatula holds its shape for 2 seconds, about 4 to 6 minutes. Do not boil. Remove from heat, stir in vanilla, and strain.
- Pour the warm custard into the fully cooled pastry shells, filling to just below the rim. Allow to cool to room temperature for 20 minutes, then transfer to the refrigerator and chill for at least 2 hours until firmly set.
- Before serving, dust with cinnamon and powdered sugar. For the closest experience to the traditional blistered top, use a kitchen torch to lightly caramelise the surface of each tart for 10 to 15 seconds, moving the flame in small circles until dark spots appear. Serve within 1 hour of torching.
Nutrition Per Serving
Per 1 serving (makes 12 individual custard tarts in a standard muffin tin)
Why This Recipe Works
The secret to the pastel de nata’s legendary texture lives in two things working in perfect opposition: a very high oven temperature and a custard that is stable enough not to curdle under that heat. The laminated dough is the first piece of the puzzle. When you spread soft butter across the rolled dough and then roll it into a log, you create dozens of thin alternating layers of fat and dough. In the oven’s fierce heat, the water in the butter converts instantly to steam, forcing those layers apart and creating the characteristic shatter-crisp shell. This is the same principle at work in croissants and puff pastry, just achieved in a fraction of the time with a less disciplined lamination. That imperfection is actually a feature: the irregular, rustic layers of a hand-laminated nata pastry are part of what makes it feel handmade rather than factory-produced.
The custard is stabilised by both flour and egg yolks working together. The flour provides a network of starch granules that swell and thicken as they heat, preventing the egg proteins from seizing and scrambling too quickly under the intense oven temperature. The hot sugar syrup, poured carefully into the warm milk base, dissolves completely and raises the sugar concentration of the custard, which further delays protein coagulation and allows the top to caramelise before the interior overcooks. This is why you must not skip cooking the custard on the stovetop before baking: a raw flour-and-egg mixture would not have time to cook through properly in the short bake, and you would end up with a starchy, undercooked centre.
If your custard curdles (forming lumpy, scrambled-egg-like bits), the most likely cause is adding the hot syrup too quickly to cold eggs, or returning the custard to heat that is too high. The fix is always the same: strain through a fine-mesh sieve before filling the shells, and most minor curdling will be caught. If the custard is severely scrambled, it is safest to start again rather than bake with it. A smooth, lump-free custard is achievable every time as long as you keep whisking and add the hot liquid slowly.
Baker’s Tips
- Your oven’s maximum temperature is not a suggestion. 500°F (260°C) for at least 30 minutes of preheating is what creates the characteristic dark blisters and crisp pastry in a short bake. A cooler oven will produce a pale, soft tart that is nothing like the real thing.
- Press the pastry shells as thinly as you dare. A common mistake is leaving shells too thick, which results in a doughy, bready bottom rather than a crisp, flaky one. Aim for 2 to 3mm: you should almost be able to see light through the sides.
- The custard should be warm but not hot when it goes into the shells. Hot custard will begin to soften and sog the raw pastry before it reaches the oven. If your custard has cooled too much and thickened, warm it briefly with a splash of milk.
- Fill the shells only three-quarters full. The custard puffs and bubbles at high heat, and overfilled tarts will spill over the edges and glue themselves to the tin.
- Do not wash your muffin tin with soap every time: a well-seasoned tin releases the tarts more easily. A thin wipe with an oiled paper towel between batches is all you need.
- The dark spots on top are not burning. They are the caramelisation of the custard’s sugars under intense heat, and they are the flavour. If your tarts come out uniformly pale and unspotted, your oven was not hot enough or the tarts were on too low a rack.
- Use a kitchen scale. The custard balance between flour, eggs, and liquid needs to be fairly precise: volume measurements for flour especially can vary by up to 20% depending on how it is scooped.
Variations
- Cardamom and orange variation: Replace the cinnamon stick with 4 lightly crushed green cardamom pods and swap the lemon zest strip for a strip of orange zest. The result is floral and gently exotic.
- Dark chocolate custard: Whisk 30g finely chopped dark chocolate (70%) into the hot custard after removing it from the heat. The custard will be deeply rich and less traditionally Portuguese, but absolutely worth making.
- Salted caramel top: After the tarts come out of the oven, immediately drizzle each with 1 teaspoon of warm salted caramel sauce before the custard fully sets. It sinks slightly into the surface and sets into a sticky, gilded layer.
- Gluten-free shells: Replace the all-purpose flour in the dough with a 1:1 gluten-free baking blend. The lamination will be less dramatic (gluten provides the stretch that creates defined layers), but the tarts will still be delicious with a more crumbly, shortcrust-like texture.
Troubleshooting & FAQ
My pastry is soggy and bread-like instead of flaky and crisp. What went wrong?
My custard has lumps or looks curdled. Can I still use it?
The tarts are sticking terribly to the muffin tin. How do I get them out cleanly?
My custard never developed dark blistered spots on top. The tarts look pale and uncharred.
The pastry shrank down the sides of the muffin cups during baking and I ended up with a tiny shallow shell. How do I prevent this?
Storage & Make-Ahead
- Storage: Pastel de nata are best eaten on the day they are made, ideally within 2 hours of baking while the pastry is still crisp. Store leftovers uncovered (not in an airtight container, which softens the pastry) at room temperature for up to 1 day. To refresh next-day tarts, place in a 375°F (190°C) oven for 5 to 7 minutes until the pastry crisps again. Do not refrigerate baked tarts unless using the stovetop custard method, as refrigeration turns the laminated pastry soft and leathery.
- Make-Ahead: The laminated pastry log can be wrapped tightly and refrigerated for up to 2 days, or frozen for up to 1 month (thaw overnight in the fridge). The custard can be made up to 1 day ahead, stored with plastic wrap pressed to its surface in the refrigerator, and gently rewarmed over low heat with a splash of milk before using. Do not assemble and fill the raw shells ahead of baking: the custard will soak into the dough.


oh wow these sound absoloutely incredible – theres something so special about that moment when someones tasting something you made with your own hands, you know? ive been thinking about trying allulose in a custard filling since it caramelizes so beautifully, and this might be the project. the shatteringly crisp pastry detail got me, tbh that kind of texture work is where the real magic happens. do you find the lamination process changes much when you’re using alternative sweeteners in the filling?
Oh Miriam, I love this question because yes, that moment when someone tastes what you’ve made is everything, isn’t it? I haven’t worked with allulose specifically yet but I’ve been curious too, and from what I understand the lamination itself shouldn’t shift much since you’re sweetening the custard filling rather than the dough. That said, I’m really drawn to your point about caramelization because that’s where I think the magic would actually show up, in how the allulose behaves under heat compared to regular sugar, and honestly I’d love to hear how it goes if you try it. There’s something about mastering a technique like hand lamination while also getting comfortable with new
man this whole thread got me thinking about how the best moments happen when someones actually doing something with their hands, you know? like in the gym with my kids, when they finally nail a combination theyve been working on for weeks, its that exact same spark everyone’s talking about. never worked with allulose in custard before but honestly the caramelization point hits different – that scorched top is what makes these things sing and im curious as hell how a sugar alternative handles that heat. might have to experiment and see what happens, sounds like the kind of thing worth getting your hands dirty over
aw these sound so lovely, and i love that reggie mentioned seeing that light up moment in people – thats exactly why i bake too, honestly. ive found that when youre making something with intention like this, especially something hand laminated, it matters in a way that people can actually taste. curious if you have tips for keeping the allulose custard from breaking when it caramelizes since that temperature shift can be tricky, but im definitely going to try these for our shelter volunteer appreciation potluck next month, sending you kindness and hope these turn out beautifully for you.
yeah miriam, that moment is everything – i’ve seen it happen in our kitchen at the reentry program, someone bites into a pastry they made themselves and just lights up, its wild. allulose in custard is a smart move too, it’ll give you that caramelized depth without the blood sugar spike, and honestly for laminated dough like this the crispy texture wont suffer at all. if you go for it id love to hear how it turns out, those scorched edges are what make em special
oh reggie this just got me all emotional reading about that moment in your kitchen, thats the exact same thing i see when families come pick up their new pets from the shelter and you watch that connection spark – its like the whole world opens up for them. i bet those pastels made with intention taste completely different, and miriam im so glad youre thinking about allulose for the custard because that caramelized edge is honestly everything, ive had the same success with it in other custard projects and the browning is just *chef’s kiss*