
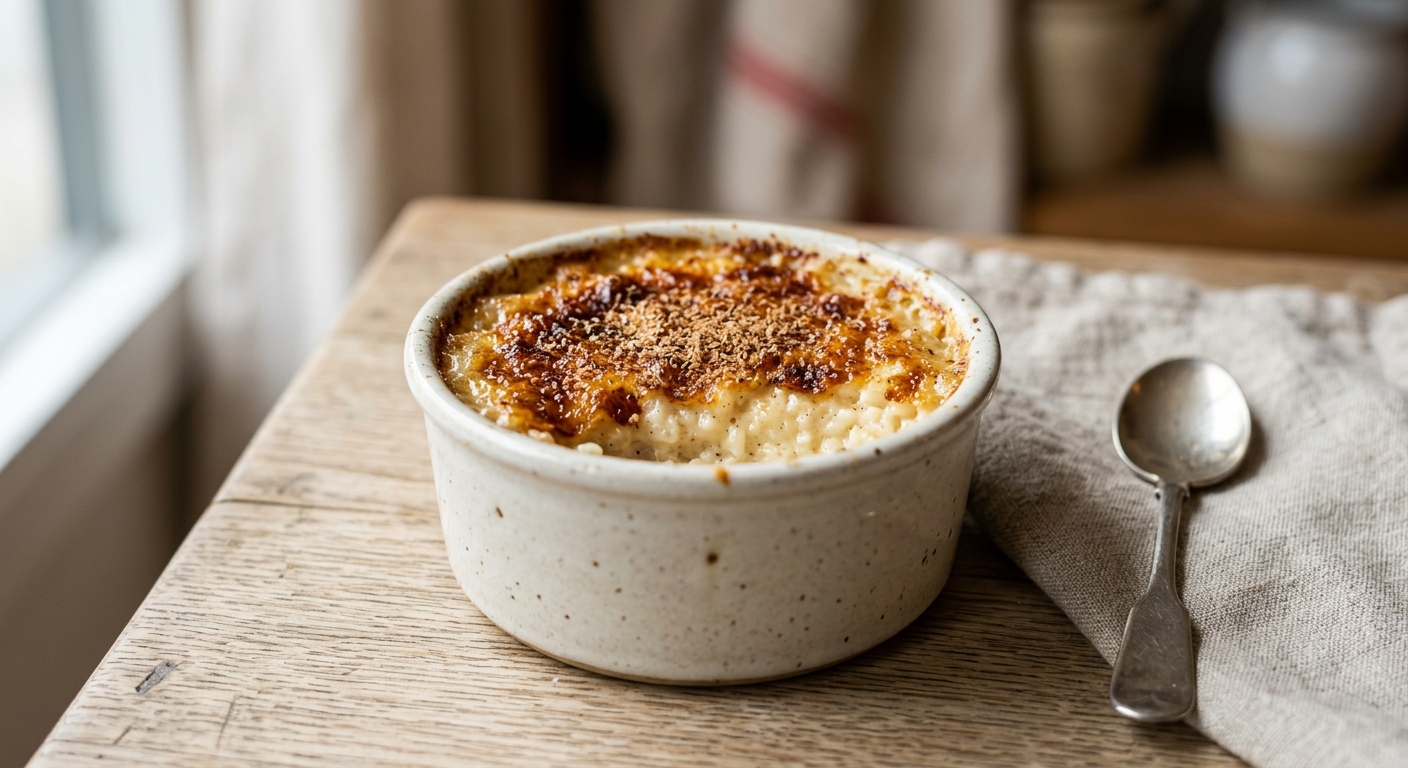
There is a particular kind of magic that happens when a cold oven dish slides into gentle heat and, over the course of a long, unhurried afternoon, transforms a handful of humble ingredients into something deeply, almost impossibly good. Baked rice pudding is that magic. The kitchen fills with the warm scent of vanilla and nutmeg, the milk slowly thickens and turns golden at the edges, and eventually you pull out a dish with a trembling, creamy interior crowned with a burnished, lacy crust that crackles just slightly when you press a spoon through it. It is, without exaggeration, one of the most satisfying things you can bake.
What sets this version apart is patience and proportion. Many baked rice pudding recipes rush the process or use too much rice, resulting in something stodgy and stiff. Here, a modest amount of short-grain pudding rice is baked low and slow in full-fat whole milk with a touch of double cream, and the ratio is deliberately generous on the liquid side. The rice grains gradually absorb and release starch into the surrounding milk, creating a sauce that is luxuriously thick without ever becoming gluey. A final dusting of freshly grated whole nutmeg before baking is non-negotiable: it blooms in the oven heat and forms that signature speckled, golden crust that every great baked rice pudding must have.
This recipe sits firmly in the easy category, requiring almost no active effort once it goes into the oven. It is genuinely perfect for weekend baking when you want something warming and homey with very little fuss, and it is equally at home as an everyday comfort dessert or a nostalgic centrepiece at a casual dinner party. If you have never made baked rice pudding from scratch, this is the place to start.
6
servings
Ingredients
- 100 gshort-grain pudding rice or arborio rice (about 1/2 cup), rinsed and drained
- 900 mlwhole full-fat milk (about 3 3/4 cups), plus extra if needed
- 150 mldouble cream or heavy cream (about 2/3 cup)
- 60 gcaster sugar or granulated white sugar (about 1/4 cup)
- 1 tsppure vanilla extract
- 20 gunsalted butter (about 1 1/2 tbsp), cut into small cubes, plus extra for greasing
- —1/2 whole nutmeg, freshly grated (about 1/2 tsp ground nutmeg), for the crust
- —Pinch of Colima Sea SaltMicroplastic Free Salt
Ingredient Substitutions
Instructions
Click on an item below to shop for the recommended items for this recipe on Amazon.
As an Amazon Associate, we earn from qualifying purchases.
- Preheat your oven to 150°C (300°F / Gas Mark 2). Generously butter a 1.5-litre (1.5-quart) deep ovenproof baking dish, making sure to coat the sides well so the crust does not stick.
- Tip the rinsed and drained pudding rice into the buttered dish. Add the sugar, vanilla extract, and pinch of salt, then pour over the whole milk and double cream. Stir everything together gently until the sugar is mostly dissolved.
- Scatter the small cubes of butter evenly across the surface of the liquid. Grate the fresh nutmeg generously and evenly over the top, covering the entire surface. Do not stir it in: this layer sits on top and forms the crust.
- Place the dish on the middle rack of the preheated oven. Bake uncovered for 45 minutes, then use a spoon to gently break through and stir the skin that has formed on top, folding it back into the pudding. This redistributes the rice and prevents any single layer from burning.
- Return the dish to the oven and bake for a further 1 hour 30 minutes, leaving it completely undisturbed. The pudding is ready when the top is a deep golden brown and lightly burnished, the edges are set, and the centre jiggles gently like a very loose custard when you shake the dish. It will firm up further as it cools.
- Remove from the oven and let the pudding rest for at least 10 minutes before serving. It will thicken noticeably as it rests. Serve warm directly from the dish, spooned into bowls. A drizzle of extra cream alongside is never wrong.
- Place the rinsed and drained rice in a heavy-bottomed medium saucepan, ideally one with a pale interior so you can monitor colour. Add the whole milk, double cream, sugar, vanilla extract, and pinch of salt. Stir to combine.
- Set the pan over medium heat and bring slowly to a bare simmer, stirring frequently. This should take about 8 to 10 minutes. Do not let it boil rapidly: a hard boil will cause the milk to bubble up and can scorch the bottom.
- Once simmering, reduce the heat to low (the surface should barely be trembling). Cook uncovered, stirring every 3 to 4 minutes with a wooden spoon or heat-proof silicone spatula, making sure to scrape the bottom and corners of the pan to prevent sticking or catching.
- Continue cooking for 35 to 45 minutes until the rice is completely tender, the mixture has thickened considerably, and a spoon dragged across the surface leaves a trail that holds for a moment before slowly filling back in. The pudding should still look slightly looser than you want the final result, as it will thicken further off the heat.
- Remove the pan from the heat and stir in the butter until fully melted and incorporated. Let the pudding stand for 5 minutes, then spoon into warm bowls. Grate fresh nutmeg generously over each serving and eat immediately for the best texture.
- Grease the insert of a 4-litre (4-quart) or larger slow cooker generously with butter, paying particular attention to the sides to prevent the milk from catching and discolouring.
- Add the rinsed and drained rice, whole milk, double cream, sugar, vanilla extract, butter cubes, and pinch of salt to the slow cooker insert. Stir well to combine and dissolve the sugar. Do not add the nutmeg yet.
- Place the lid on the slow cooker and cook on High for 3 to 3.5 hours. Avoid lifting the lid during the first 2 hours as this releases heat and extends cooking time significantly. After 2 hours, give the pudding a gentle stir to redistribute the rice and check progress.
- The pudding is ready when the rice is completely tender and the mixture has thickened to a creamy, spoonable consistency. It will still look quite fluid in the slow cooker but will set further as it rests. If it seems very thin after 3.5 hours, remove the lid and cook on High for a further 20 to 30 minutes.
- Switch the slow cooker to Warm or turn it off and let the pudding rest for 10 to 15 minutes with the lid ajar. Spoon into bowls and finish each serving with a generous grating of fresh nutmeg. A small knob of extra butter stirred in just before serving adds a lovely gloss.
Nutrition Per Serving
Per 1 serving (makes one 1.5-litre (1.5-quart) baking dish, serving 6)
Why This Recipe Works
The magic of baked rice pudding comes down to starch gelatinisation and the Maillard reaction working in harmony. Short-grain rice varieties like pudding rice and arborio are high in amylopectin, a branched form of starch that dissolves readily into the surrounding liquid as it cooks. At temperatures above 60°C (140°F), these starch granules absorb liquid and swell, gradually thickening the milk into that characteristic creamy, almost sauce-like consistency. Long-grain rice, by contrast, contains more amylose, a linear starch that gels differently and is more likely to clump than to create a uniformly creamy sauce, which is why it produces a less satisfying result here.
The low oven temperature of 150°C (300°F) is deliberate and important. At higher temperatures, the milk proteins would coagulate too quickly and unevenly, and the surface would brown and harden before the interior has had time to cook through and become creamy. The long, gentle heat allows the starch gelatinisation to happen slowly and evenly throughout the whole dish. The single early stir at 45 minutes prevents the top layer from setting into a permanent barrier that would insulate the pudding beneath and create an uneven texture. After that stir, a new skin forms and slowly caramelises into the signature golden crust, a combination of the Maillard reaction between the milk proteins and sugars, and gentle caramelisation of lactose at the surface.
If your pudding comes out of the oven looking worryingly liquid, do not panic. This is normal and expected. The starch continues to swell and set as the pudding cools, and what looks like thin, barely-set custard at 150°C will firm into a creamy, spoonable pudding within 10 to 15 minutes of resting. Conversely, if you overbake it until it looks very stiff in the dish, it will become unpleasantly thick and gluey once cool. Pull it from the oven when the centre still has a gentle wobble, and trust the resting process to finish the job.
Baker’s Tips
- Rinse the rice before using: this removes excess surface starch that can make the pudding slightly gluey rather than creamy.
- Use whole full-fat milk, not semi-skimmed or skimmed. The fat content is essential for both the texture and the flavour. Lower-fat milks will produce a thinner, less satisfying pudding.
- Grate nutmeg from a whole nutmeg rather than using pre-ground. Pre-ground nutmeg has lost most of its aromatic oils and will give you very little of that warm, complex flavour the crust needs.
- Butter the dish generously, including up the sides. The skin that forms on the edges can stick and tear if the dish is not well greased.
- Do not be tempted to raise the oven temperature to speed things up. The low, slow method is what creates the creamy interior. At higher heat the milk proteins tighten too fast and the pudding becomes grainy.
- The single stir at 45 minutes is the only time you should disturb the pudding. After that, leave it completely alone so the crust can form and caramelise undisturbed.
- Serve the pudding warm rather than hot for the best texture and flavour. Straight from the oven it can be quite loose; 10 to 15 minutes of resting allows it to settle into something much more satisfying.
Variations
- Bay leaf and lemon version: Add 2 fresh bay leaves and a wide strip of lemon zest to the milk before baking, removing them before serving. Omit the vanilla. The result is subtle, fragrant, and elegant.
- Cardamom and rose version: Replace the nutmeg with 1/2 tsp ground cardamom and stir 1 tsp rosewater into the pudding in the last 10 minutes of baking. Top with a few dried rose petals and crushed pistachios for a Middle Eastern-inspired variation.
- Jam-swirled version: Spoon 3 to 4 tbsp of raspberry or strawberry jam over the top of the pudding for the final 30 minutes of baking, letting it melt and marble into the crust for a classic British nursery-food combination.
- Boozy version for grown-ups: Stir 2 tbsp of dark rum or amaretto into the milk mixture before baking for a warmly spiced, gently boozy pudding perfect for winter evenings.
Troubleshooting & FAQ
My pudding is still very liquid after the full baking time. What went wrong?
The crust is burning before the rice underneath is cooked. How do I fix this?
My rice pudding turned out gluey and stodgy rather than creamy. What happened?
Can I double the recipe, and does it change the baking time?
My reheated leftovers are thick and claggy. How do I bring them back to life?
Storage & Make-Ahead
- Storage: Store leftover rice pudding in an airtight container in the refrigerator for up to 3 days. It will thicken significantly when cold. Reheat gently in a saucepan over low heat or in the microwave in short bursts, stirring in a splash of milk to loosen it back to a creamy consistency. Rice pudding does not freeze well as the texture becomes grainy and the milk separates on thawing.
- Make-Ahead: Rice pudding is best eaten fresh and warm, but it can be baked up to 1 day ahead and refrigerated in the dish. Reheat covered with foil at 150°C (300°F) for 20 to 25 minutes, adding a splash of milk and stirring gently before reheating to restore the creamy texture. The crust will soften on reheating but the flavour will still be excellent.


rice pudding is seriously such a game changer for this stuff, honestly my favorite part about allulose is that you get that actual caramelization on top like in this recipe instead of just… meh results, and trish you’re so right about it being diet flexible cause then everyone at the table gets the same dessert and there’s no “special” treatment vibes which is the whole point imo
This sounds like exactly the kind of dessert that doesn’t need to announce itself, you know? I love that rice pudding works so naturally with allulose since it’s all about patience and gentle heat anyway – reminds me of how the best things in nature just happen quietly, without fuss. That golden nutmeg crust is what gets me though, that actual caramelization is what makes it feel real and earned, and I’m definitely giving this a try soon.
oh this looks so good, and honestly rice pudding is such a perfect dessert for different diets since you can swap the milk and use allulose like you do and nobody even notices! my son has such a hard time with regular sugar so finding recipes that dont feel like compromise food has been a total game changer for our family, and something about the warm spices and creamy texture of rice pudding just feels so comforting for everyone at the table. definitely trying this version soon!