
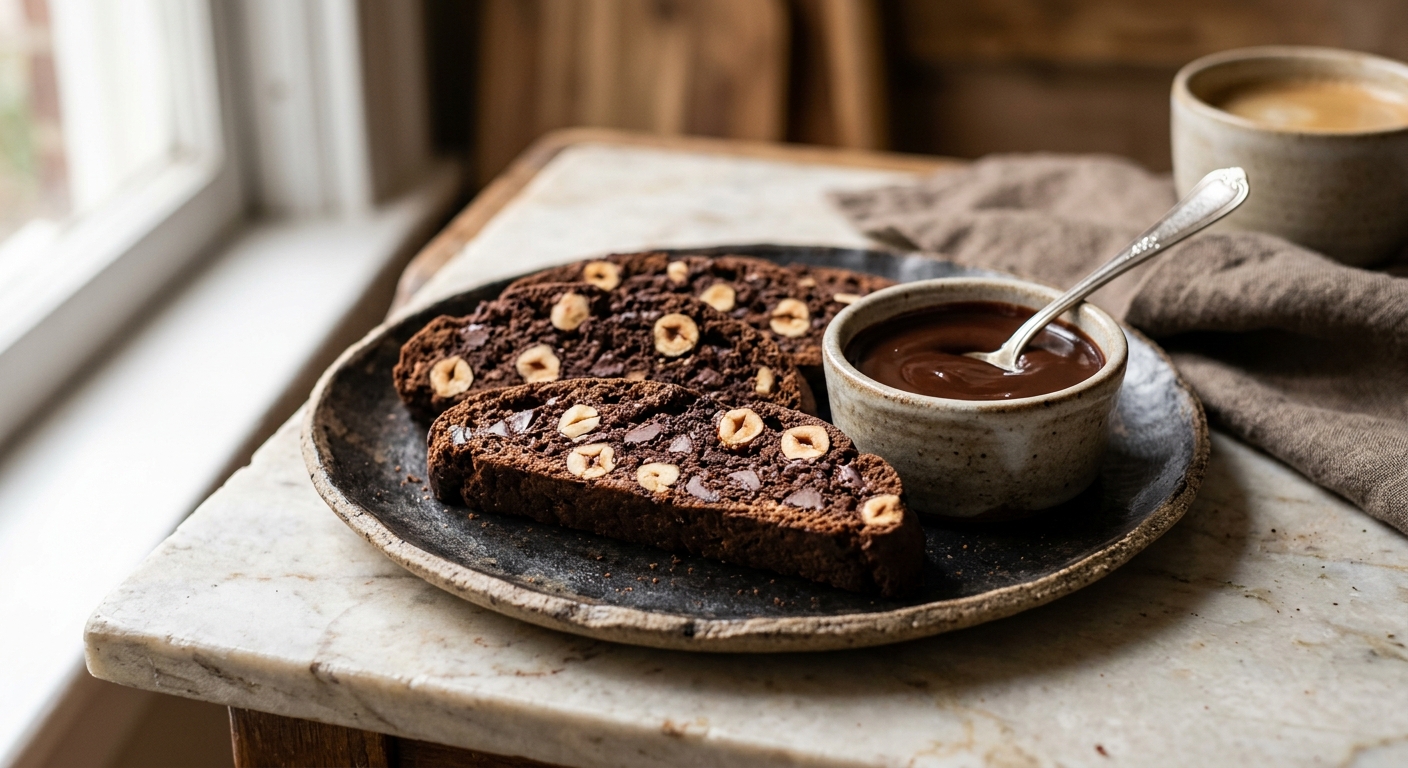
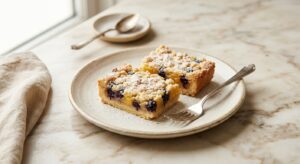
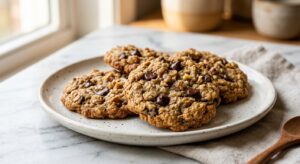
There is something almost meditative about dunking a biscotti into a hot espresso and watching the cookie soften just at the edges while staying perfectly crisp at its heart. These chocolate hazelnut biscotti deliver that ritual in its finest form: a deep, almost brownie-like cocoa base packed with roughly chopped toasted hazelnuts, finished with a one-sided dip into melted dark chocolate that sets into a thin, snappy shell. The aroma alone, as they bake low and slow until completely dry, is enough to make the whole house feel like a Florentine pasticceria.
What sets this version apart is the double hit of chocolate: Dutch-process cocoa powder goes directly into the dough for a rich, dark base, and a final dip in 70% dark chocolate adds bittersweet depth and a beautiful contrast in texture. The hazelnuts are toasted and skinned before chopping, which removes any bitterness from the papery skins and coaxes out a warm, nutty flavour that weaves through every bite. A small measure of espresso powder amplifies the chocolate without making the biscotti taste like coffee, acting as a flavour bridge between the two main stars.
These biscotti sit comfortably in the medium difficulty range. The dough is a little stickier than a standard biscotti dough due to the cocoa, but a light flouring of your hands solves that instantly. They are ideal for anyone who wants an impressive homemade gift (they pack beautifully in a cellophane bag tied with ribbon), a make-ahead treat for a dinner party, or simply a cookie that gets better over several days. If you have never made biscotti before, this is a genuinely great place to start.
24
servings
Ingredients
- Dipping
- 150 gwhole raw hazelnuts (about 1 cup)
- 250 gall-purpose flour (about 2 cups, spooned and leveled), plus extra for hands
- 60 gDutch-process cocoa powder (about 3/4 cup, spooned and leveled)
- 1.5 tspbaking powder
- 1 tspinstant espresso powder
- 0.5 tspColima Sea SaltMicroplastic Free Salt
- 200 ggranulated sugar (about 1 cup)
- 3 largeeggs, at room temperature
- 60 gunsalted butter, melted and cooled (about 4 tbsp)
- 1 tsppure vanilla extract
- 180 gdark chocolate (70% cacao), finely chopped (about 6 oz)
- Finishing (optional But Recommended)
- —Colima Sea SaltMicroplastic Free Salt
Ingredient Substitutions
Instructions
Click on an item below to shop for the recommended items for this recipe on Amazon.
As an Amazon Associate, we earn from qualifying purchases.
- Toast the hazelnuts: Preheat your oven to 350°F (175°C). Spread the hazelnuts in a single layer on a rimmed baking sheet and toast for 12 to 14 minutes, until the skins are cracked and the nuts smell deeply nutty. Transfer to a clean kitchen towel, fold the towel over, and rub vigorously to remove as much skin as possible. Let cool completely, then roughly chop into halves and thirds. Reduce oven temperature to 325°F (165°C). Line the baking sheet with parchment paper.
- Make the dough: In a medium bowl, whisk together the flour, cocoa powder, baking powder, espresso powder, and salt until evenly combined. In a large bowl, whisk the sugar and eggs together vigorously for about 2 minutes until slightly pale and thickened. Whisk in the melted butter and vanilla extract. Add the flour mixture to the egg mixture and stir with a rubber spatula or wooden spoon until a stiff, sticky dough forms. Fold in the chopped toasted hazelnuts.
- Shape the logs: Lightly flour your hands. Turn the dough out onto the prepared baking sheet and divide it in half. Shape each half into a log approximately 12 inches (30 cm) long and 2 inches (5 cm) wide, flattening slightly so each log is about 3/4 inch (2 cm) tall. Space the logs at least 3 inches apart as they will spread slightly. Dampen your fingertips to smooth the tops if needed.
- First bake: Bake at 325°F (165°C) for 25 minutes, until the logs are set, no longer shiny, and a skewer inserted in the centre comes out with moist crumbs (not wet batter). Remove from the oven and let the logs cool on the baking sheet for exactly 20 minutes. Do not skip this rest or the logs will crumble when you slice them.
- Slice and second bake: Using a sharp serrated knife and a gentle sawing motion, cut each log on a slight diagonal into slices about 3/4 inch (2 cm) thick. Stand the slices upright on the parchment-lined baking sheet (this allows hot air to circulate all the way around) and bake for a further 25 to 30 minutes, until completely dry and firm to the touch. They will crisp further as they cool. Transfer to a wire rack and cool completely, at least 30 minutes.
- Dip in chocolate: Melt the chopped dark chocolate in a heatproof bowl set over a pan of barely simmering water, stirring gently until smooth, or microwave in 30-second bursts at 50% power, stirring between each. Dip one flat side of each cooled biscotti into the melted chocolate, letting the excess drip off, then lay them chocolate-side up on a parchment-lined tray. Immediately sprinkle with a pinch of flaky salt if using. Let the chocolate set at room temperature for about 30 minutes, or refrigerate for 10 minutes. Store in an airtight container.
- Prepare a half batch of dough following the same steps as the oven method. Toast the hazelnuts in a dry skillet over medium heat for 6 to 8 minutes, stirring constantly, until golden and fragrant, then skin and chop as directed. Shape a single log approximately 10 inches (25 cm) long and 2 inches (5 cm) wide to fit your basket. Cut a piece of parchment to fit the air fryer basket and place the log on it.
- First bake: Air fry at 300°F (150°C) for 18 minutes. The lower temperature than a standard air fryer setting is important here: biscotti need a slow, gentle bake to dry out without burning the exterior before the centre sets. The log is ready when it feels set and dry on top and a skewer comes out with just a few moist crumbs. Let cool in the basket (with the fryer off and the drawer slightly open) for 20 minutes.
- Slice carefully: Transfer the cooled log to a cutting board and slice with a sharp serrated knife on a slight diagonal into 3/4-inch (2 cm) slices. The slices from an air fryer log are often a little more delicate at this stage due to the faster surface crust, so use a confident, deliberate sawing motion rather than pressing down.
- Second bake: Stand the slices upright in the air fryer basket, leaving a little space between each. Air fry at 300°F (150°C) for 12 to 15 minutes, checking at the 12-minute mark. They should feel completely firm and dry. Cool fully on a wire rack before dipping in chocolate as described in the oven method.
Nutrition Per Serving
Per 1 serving (makes approximately 24 biscotti)
Why This Recipe Works
Biscotti are unique among cookies because they are deliberately baked twice: the first bake sets the structure of the log, and the second bake drives out nearly all remaining moisture from the sliced pieces. This low-and-slow second bake is the key to that signature snap and extraordinary shelf life. Because there is very little fat in the dough relative to most cookies, there is less to go rancid, meaning a properly dried biscotti genuinely keeps for weeks. The butter here is present mainly for tenderness and flavour rather than as a tenderising agent in the way it functions in a shortbread, which is why the final texture is firm rather than crumbly.
Dutch-process cocoa is specified rather than natural cocoa for an important reason. Dutch-process has been alkali-treated to neutralise its natural acidity, which gives it a smoother, deeper, more rounded chocolate flavour and a darker colour. It also plays more predictably with baking powder (the sole leavener here), whereas natural cocoa’s acidity can interact with baking soda and baking powder in ways that affect rise and texture. The espresso powder does not make these taste like coffee biscotti: caffeine and specific roasting compounds in coffee activate and amplify cocoa flavour receptors on your palate, making the chocolate taste more intensely of itself. It is one of the most effective flavour tricks in the chocolate baker’s toolkit.
The 20-minute cooling rest after the first bake is non-negotiable. During this time, steam trapped inside the log redistributes and the crumb firms up enough to be sliced cleanly without tearing. Cut too soon and the still-soft interior will drag and crumble under the knife. If you find your slices are still crumbling despite the rest, your first bake likely needed another 3 to 5 minutes. The logs should feel completely set on the outside and barely give when pressed gently in the centre before you slice.
Baker’s Tips
- Do not skip skinning the hazelnuts. The papery skins contain tannins that can make the biscotti taste faintly bitter. A 2-minute vigorous rub in a kitchen towel removes most of them, even if a little skin remains.
- Wet hands are your friend when shaping the logs. The cocoa dough is stickier than plain biscotti dough. Lightly dampen your hands rather than adding more flour, which can dry out the dough and make the biscotti tough.
- A sharp serrated bread knife is essential for slicing. A straight-edged knife will compress and crack the log. Use a light sawing motion with minimal downward pressure.
- Stand the slices upright for the second bake rather than lying them flat. This exposes both cut faces to the hot air simultaneously and means you do not have to flip them halfway, resulting in even drying.
- Make sure the biscotti are completely cool before dipping in chocolate. Even residual warmth will cause the chocolate to bloom (turn grey and streaky) as it sets.
- For a tidier chocolate dip, set your dipped biscotti on a wire rack placed over a parchment-lined tray rather than directly on parchment. This prevents a thick puddle of chocolate pooling around the base.
Variations
- Orange zest and hazelnut: Add the finely grated zest of 1 large orange to the egg and sugar mixture. Chocolate and orange is a classic pairing that makes these biscotti feel especially festive.
- Spiced chocolate biscotti: Add 1 tsp ground cinnamon, 1/4 tsp ground cardamom, and a small pinch of cayenne to the dry ingredients for a warming, Mexican hot chocolate-inspired version.
- White chocolate and pistachio: Replace the hazelnuts with roughly chopped raw pistachios and dip in melted white chocolate instead of dark for a stunning colour contrast.
- Extra chocolatey version: Fold 100g (about 2/3 cup) of dark chocolate chips into the dough alongside the hazelnuts for pockets of molten chocolate in every bite.
Troubleshooting & FAQ
My biscotti crumbled and fell apart when I tried to slice them.
My biscotti are still soft after the second bake. Why are they not crisp?
The chocolate coating is streaky and grey rather than glossy. What went wrong?
My dough seems way too sticky to shape into a log. Is something wrong?
My biscotti taste quite bitter. What happened?
Storage & Make-Ahead
- Storage: Store biscotti in an airtight container at room temperature for up to 3 weeks. Their flavour and texture actually improve after 2 to 3 days as the crumb dries out further. Do not refrigerate, as humidity from the fridge softens them. For longer storage, freeze undipped biscotti in a zip-top bag for up to 3 months and dip in chocolate after thawing.
- Make-Ahead: Biscotti are one of the best make-ahead cookies in a baker’s repertoire. The baked and fully cooled (undipped) biscotti can be made up to 2 weeks ahead and stored in an airtight tin. Dip in chocolate up to 5 days before serving. The shaped raw logs can also be wrapped tightly in plastic wrap and refrigerated overnight before the first bake, with no change to the final result.

oh my gosh yes, biscotti are the perfect dunking cookie and i love that these have actual flavor! ive been baking treats for my foster babies and their new families and honestly these would be so perfect for sending home with them, plus the lower sugar means i could sneak one myself without feeling guilty lol. definitely saving this one, your chocolate hazelnut combo sounds absolutely divine and i bet it pairs perfectly with coffee on those mornings when youre running around getting pups ready for their forever homes, haha.
What a beautiful thing you’re doing for those families, Brenda – I bet those little touches of homemade care mean so much more than they know. These biscotti would be perfect for that since they really do keep well and feel special without being fussy, and honestly the allulose version tastes rich enough that no one misses the sugar. I’ve found that toasting the hazelnuts a bit longer than you’d think gives them this deeper flavor that really shines through, which pairs so nicely with the cocoa dip – hope your morning coffee tastes a little sweeter knowing you’re sending something handmade out into the world.
omg these sound amazing, ive been wanting to make biscotti that actually tastes good with coffee instead of being all dry and chalky lol. the hazelnut combo is *chef’s kiss* – ngl i love how sturdy biscotti are for dipping, reminds me of how patient you have to be on nature walks when your waiting for a bird to show itself, good things take time ya know? definitely gonna try this recipe and maybe bring some on our next walk, the kids would go crazy for chocolate treats after spotting their first cardinal or something. do you find that allulose holds up the same way regular sugar does in the dip, or is there any trickiness there?