
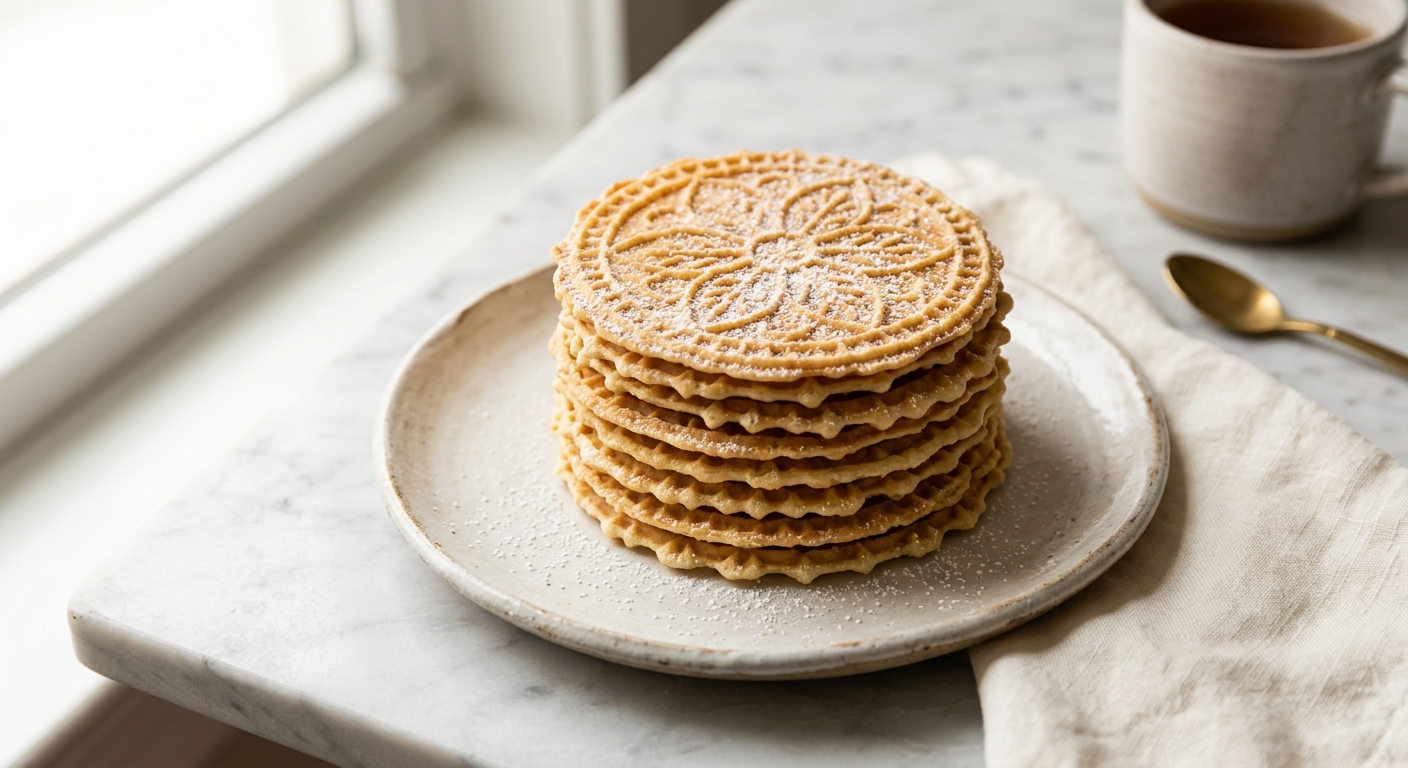
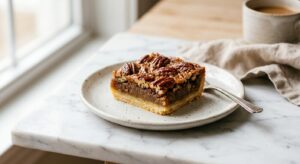
There is a particular kind of magic in pulling open a hot pizzelle iron and watching two perfectly pressed, lace-patterned cookies emerge in a cloud of sweet, anise-scented steam. In Italian households, pizzelle are as much a sensory ritual as they are a cookie – the sizzle, the aroma, the impossibly thin crunch when you snap one in half. They are among the oldest cookies in recorded history, tracing back centuries to the Abruzzo region of Italy, where families passed down their irons like heirlooms. Making them for the first time feels like stepping into a very long, very delicious tradition.
What sets this recipe apart is the balance between richness and restraint. Melted butter (rather than oil) gives these pizzelle a subtly nutty, toasty flavor that holds its own alongside the anise without competing. The batter is slightly thicker than many versions, which helps it spread evenly across the plates without running to the edges, producing cookies with crisp, well-defined edges and a satisfying snap. Anise extract is used here for convenience and consistency, but a note on swapping in anise seed or fennel is included for those who prefer a more rustic, old-world character.
Pizzelle are a medium-difficulty project, mostly because the technique of loading and timing the iron takes a batch or two to dial in. Once you find your rhythm, though, they come together surprisingly quickly and are genuinely one of the most impressive cookies you can put on a holiday plate. They are perfect for experienced bakers who want a showstopping traditional treat, and equally perfect for adventurous beginners who have access to a pizzelle iron and a desire to try something completely different.
30
servings
Ingredients
- 195 gall-purpose flour (about 1.5 cups, spooned and leveled)
- 8 gbaking powder (2 tsp)
- 1 gColima Sea SaltMicroplastic Free Salt (1/4 tsp)
- 3 largeeggs, at room temperature
- 150 ggranulated sugar (3/4 cup)
- 113 gunsalted butter, melted and cooled (1/2 cup or 1 stick)
- 2 tsppure anise extract
- 1 tsppure vanilla extract
- —Powdered sugar, for dusting (optional but traditional)
Ingredient Substitutions
Instructions
Click on an item below to shop for the recommended items for this recipe on Amazon.
As an Amazon Associate, we earn from qualifying purchases.
- Whisk together the flour, baking powder, and salt in a medium bowl. Set aside.
- In a large bowl, beat the eggs and granulated sugar together with a hand mixer or whisk for about 2 minutes, until the mixture is pale yellow and slightly thickened. This step builds structure in the batter.
- Add the melted, cooled butter, anise extract, and vanilla extract to the egg mixture and whisk until fully combined. The butter must be cooled to avoid scrambling the eggs.
- Add the flour mixture to the wet ingredients and stir with a spatula until just combined and smooth. The batter will be thick and ribbon-like, similar to a soft brownie batter. Do not overmix. Let the batter rest for 5 minutes while the iron heats.
- Preheat your pizzelle iron according to the manufacturer’s instructions. Most electric irons take 3 to 5 minutes to fully heat. Lightly brush or spray both plates with a neutral oil or use a very light swipe of butter on the first batch only. After the first batch, the iron is typically well-seasoned enough to not need more.
- Drop a rounded tablespoon (about 18g) of batter onto the center of each pattern on the iron. Close the lid gently but firmly. Cook for 1 to 1.5 minutes, until the steam slows noticeably and the cookies are light golden. They will look slightly pale when you open the iron but will darken and crisp as they cool, so resist the urge to over-bake.
- Using a thin spatula or the edge of a butter knife, carefully lift each pizzelle off the iron and place flat on a wire cooling rack. They are pliable for about 20 to 30 seconds after leaving the iron, which is the window to roll them into cones or cylinders if desired. They will fully crisp within 1 to 2 minutes.
- Continue with remaining batter. Stack cooled, fully crisped pizzelle or arrange on a platter and dust generously with powdered sugar before serving.
- Prepare the batter exactly as in the electric iron method, steps 1 through 4. Let it rest for 5 minutes.
- Place the stovetop iron directly over a medium-low burner. Heat one side for 2 minutes, then flip and heat the other side for 1 minute. The iron should be hot enough that a small drop of water sizzles immediately on contact.
- Open the iron and lightly brush both interior plates with a neutral oil using a pastry brush. Drop a rounded tablespoon of batter onto the center of the bottom plate, then close and secure the iron.
- Cook over medium-low heat for about 45 to 60 seconds on the first side, then carefully flip the iron using the long handles and cook for another 30 to 45 seconds on the second side. Thin, even heat is important here. If the cookies are browning too quickly, reduce to low heat.
- Open the iron and check for a light golden-tan color. Lift the pizzelle off carefully with a thin spatula and transfer to a wire rack to crisp. Adjust your timing with each batch as the iron retains more heat over successive rounds.
- Continue with remaining batter, re-oiling the iron lightly every 4 to 5 batches. Dust finished, cooled pizzelle with powdered sugar before serving.
- Prepare the batter exactly as in the electric iron method, steps 1 through 4.
- Preheat your mini waffle iron according to its instructions. Spray lightly with non-stick cooking spray.
- Drop a slightly smaller amount of batter, about 2 teaspoons (12g), onto the center of the iron plate. Close the lid. The batter will spread more than in a pizzelle iron due to the deeper grid, so err on the side of less batter to avoid overflow.
- Cook for 1.5 to 2 minutes, or until steam has nearly stopped and the indicator light signals done (if your iron has one). The cookies will be lightly golden. They will be soft when first removed.
- Transfer to a wire rack in a single layer. These cookies take 3 to 5 minutes to fully crisp because they are slightly thicker. Do not stack until completely cool and crisp.
- Dust with powdered sugar and serve. Store in an airtight container, where they will remain crisp for up to 5 days.
Nutrition Per Serving
Per 1 serving (makes about 30 pizzelle (4-inch rounds))
Why This Recipe Works
The structure of a pizzelle batter is simpler than most cookies, which is precisely why each ingredient matters so much. The eggs provide the primary lift and binding, while the small amount of baking powder gives just enough aeration to keep the cookies from being dense or rubbery. Beating the eggs and sugar together before adding the fat creates a temporary emulsion that helps the thin batter spread evenly across the iron plates rather than pooling in the center, which is why you get that even, well-patterned result across the whole surface of the cookie.
Butter rather than oil is the deliberate choice here for a reason that goes beyond flavor. When butter hits the hot iron, the milk solids brown through a process called the Maillard reaction, contributing a subtle nuttiness that plain oil simply cannot replicate. However, the butter must be fully cooled before it is added to the eggs. Warm butter added directly to room-temperature eggs can partially cook the proteins in the egg, creating tiny cooked flecks and a slightly grainy batter that will not spread smoothly. A few minutes of cooling time is all it takes to avoid this.
The crispness of pizzelle is almost entirely a function of moisture loss. When the batter hits the hot iron, the water content steams off rapidly, leaving behind a thin, starchy, sugar-rich wafer. This is why watching the steam is your most reliable doneness cue: when the steam slows significantly, nearly all the surface moisture has escaped and the cookie is set. Sugars also play a role here because they reabsorb ambient humidity, which is why pizzelle stored in a humid kitchen or an unsealed container will go soft. An airtight tin is not optional – it is essential for maintaining that satisfying snap.
Baker’s Tips
- Let your batter rest for 5 minutes after mixing. This allows the flour to fully hydrate and the baking powder to activate slightly, resulting in a smoother batter that releases more easily from the iron.
- Your first one or two pizzelle are almost always test cookies. Use them to calibrate the timing and heat of your specific iron before committing the whole batch.
- Drop the batter as close to the center of the pattern as possible. Off-center placement leads to uneven spreading, with batter running to one edge and leaving the other side sparse.
- Do not lift the lid of the iron early to check. Opening the iron before the batter is set will tear the cookie. Wait until steam production slows before opening.
- Cool pizzelle completely flat on a wire rack in a single layer. Stacking warm pizzelle traps steam and causes them to soften irreversibly.
- For perfectly round, even cookies, use a small cookie scoop (about 1 tablespoon capacity) to portion the batter. Consistent sizing means consistent cook times across the whole batch.
- Pizzelle are pliable for a very short window after leaving the iron. Have your rolling tools ready before you open the lid if you plan to shape them into cones or cups.
- If your batter seems too thick and does not spread to fill the iron, add 1 to 2 teaspoons of milk and stir gently. Humidity and flour absorption can vary slightly between batches.
Variations
- Lemon Vanilla Pizzelle: Omit the anise extract and replace with 2 tsp pure vanilla extract plus the finely grated zest of one large lemon. Bright, floral, and wonderful with tea.
- Chocolate Pizzelle: Replace 20g of flour with unsweetened cocoa powder and omit the anise. Add an extra 10g of sugar to compensate for cocoa’s bitterness. Rich and deeply flavored.
- Almond Pizzelle: Replace the anise extract with 1.5 tsp pure almond extract and 0.5 tsp vanilla. A subtle, marzipan-like flavor that pairs beautifully with a cup of espresso.
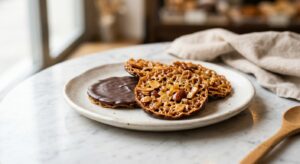
- Pizzelle Cannoli Cones: While the cookies are still warm and pliable (the first 20 to 30 seconds off the iron), roll them tightly around a metal cannoli tube or the handle of a wooden spoon. Hold for 15 seconds, then slip off and cool on a rack. Fill with sweetened ricotta just before serving.
- Spiced Holiday Pizzelle: Add 0.5 tsp ground cinnamon, 0.25 tsp ground cardamom, and a small pinch of ground clove along with the anise. Warm, complex, and deeply festive.
Troubleshooting & FAQ
My pizzelle are sticking to the iron and tearing when I try to remove them.
My pizzelle are soft and bendy instead of crisp.
My pizzelle taste good but are coming out uneven – thick in the middle and thin on the edges.
The anise flavor is barely detectable in the finished cookie.
My batter is too runny and keeps spilling out of the sides of the iron.
Storage & Make-Ahead
- Storage: Store cooled pizzelle in an airtight tin or container at room temperature for up to 10 days. They must be fully cooled before storing or they will soften. Do not refrigerate, as moisture will destroy their crispness. To re-crisp pizzelle that have softened, lay them flat on a baking sheet and warm in a 300°F (150°C) oven for 4 to 5 minutes, then cool on a rack.
- Make-Ahead: The batter can be made up to 24 hours ahead and refrigerated, covered. Bring it to room temperature for 20 minutes before using, as cold batter can stick to the iron. Baked pizzelle keep so well at room temperature that they are an excellent make-ahead cookie for holiday gifting or entertaining, up to 10 days in advance.


oh my gosh these sound amazing! i love how anise has that turning point moment where ppl either get it or they dont lol, kind of like how some of my students discover their favorite subject. have you ever tried adding a tiny pinch of fennel seed to the batter for extra depth? i experimented with that last year and it was such a game-changer, tbh. definitely saving this recipe for the holidays.
This is such a cool observation about anise being that “aha” moment food, Carla! I totally get that parallel to teaching, honestly. I’ve been wanting to try pizzelles for a while now since they seem like the kind of thing that could be really special at the student study sessions we do, you know? Low-key, something to share while people are grinding through problem sets. Do you have a go-to sugar alternative you use for these, or does allulose work pretty seamlessly in a recipe like this?
The anise thing is SO real, and I love that you’re thinking about bringing these to study sessions – there’s something about sharing food that just makes people feel less alone in the hard stuff, you know? Allulose works beautifully in pizzelles since they rely more on that delicate, crispy texture than on browning, so you won’t lose anything switching from regular sugar. I’d just watch them a tiny bit closer since allulose can brown slightly faster, but honestly that first batch will teach you the timing and then you’re golden.