
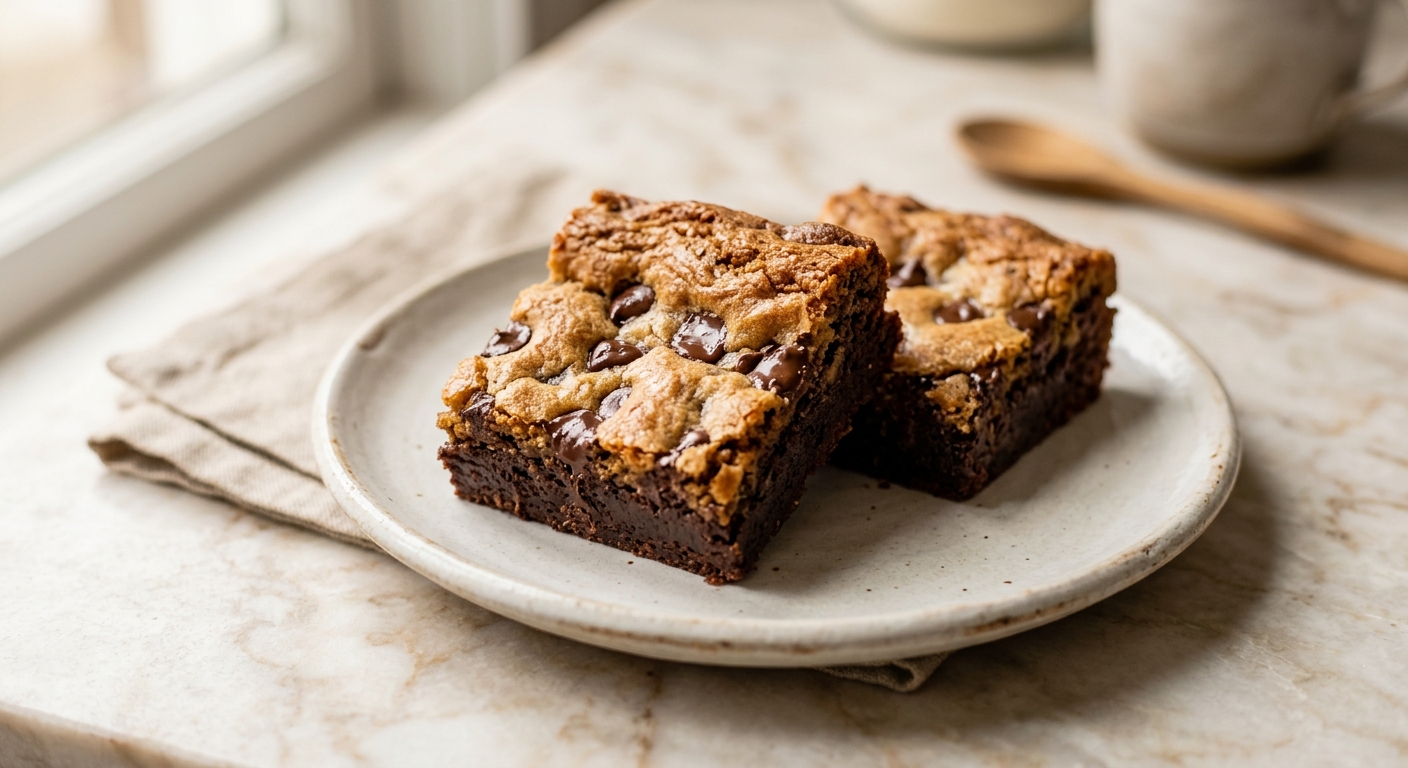
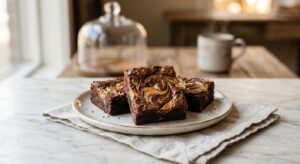
Picture this: the edges are slightly crisp and golden, the top is studded with pools of melted chocolate chips, and when you lift a square from the pan, the underside reveals a dark, glossy, almost truffle-like brownie layer that clings to your fingers just a little. That is a brookie. One pan, two batters, and a result so satisfying that it genuinely stops people mid-conversation when you set it on a table. This is the kind of dessert that earns you a reputation.
What makes this version stand out is the way the two batters are handled separately before coming together. The brownie layer uses melted dark chocolate alongside cocoa powder for an intensely fudgy, almost gooey base, while the cookie dough layer is enriched with brown butter, which adds a nutty, caramel-like depth that plays beautifully against the bitter chocolate beneath. The two layers bake together into something that is more than the sum of its parts, with a natural marbled seam where they meet in the middle of the bar.
The difficulty here is genuinely medium, but only because you are making two separate batters rather than one. Neither batter is complicated on its own, and the whole project comes together in about 25 minutes of hands-on work. This recipe is perfect for bakers who want to impress without spending a whole afternoon in the kitchen, for potlucks and bake sales where you want to bring something unexpected, or honestly, for any Tuesday when you simply cannot choose between brownies and cookies.
16
servings
Ingredients
- —— BROWNIE LAYER —
- 115 gunsalted butter (1/2 cup or 1 stick), cut into pieces
- 170 gdark chocolate (60 to 70% cacao), finely chopped (about 6 oz)
- 200 ggranulated sugar (1 cup)
- 2 largeeggs, at room temperature
- 1 tsppure vanilla extract
- 60 gall-purpose flour (1/2 cup, spooned and leveled)
- 25 gDutch-process cocoa powder (1/4 cup, sifted)
- 0.5 tspColima Sea SaltMicroplastic Free Salt
- —— BROWN BUTTER COOKIE LAYER —
- 170 gunsalted butter (3/4 cup or 1.5 sticks), browned and cooled
- 165 glight brown sugar, packed (3/4 cup)
- 50 ggranulated sugar (1/4 cup)
- 1 largeegg plus 1 egg yolk, at room temperature
- 2 tsppure vanilla extract
- 240 gall-purpose flour (2 cups, spooned and leveled)
- 1 tspbaking soda
- 0.75 tspColima Sea SaltMicroplastic Free Salt
- 300 gsemi-sweet chocolate chips (about 1.75 cups), divided
- —Colima Sea SaltMicroplastic Free Salt, for finishing (optional but recommended)
Ingredient Substitutions
Instructions
Click on an item below to shop for the recommended items for this recipe on Amazon.
As an Amazon Associate, we earn from qualifying purchases.
- Preheat your oven to 350°F (175°C). Grease a 9×13-inch baking pan and line it with parchment paper, leaving a 2-inch overhang on the two long sides to act as handles for lifting the bars out later.
- Make the brownie layer: Combine the chopped dark chocolate and butter in a medium heatproof bowl set over a saucepan of barely simmering water (the bowl should not touch the water). Stir frequently until both are fully melted and smooth, then remove from heat. Let cool for 5 minutes. Whisk in the granulated sugar until combined, then whisk in the eggs one at a time, followed by the vanilla. Switch to a rubber spatula and fold in the flour, cocoa powder, and salt until just combined with no dry streaks visible. Spread the brownie batter evenly into the prepared pan.
- Make the brown butter: In a light-colored saucepan over medium heat, melt the 170g of butter for the cookie layer. Continue cooking, swirling the pan often, until the butter foams, then subsides, and the milk solids at the bottom turn golden-brown and smell nutty and toasty, about 5 to 7 minutes. Pour immediately into a large bowl (scraping in all the browned bits) and let cool for 10 to 15 minutes until it is warm but no longer hot to the touch.
- Make the cookie layer: Whisk the brown sugar and granulated sugar into the cooled brown butter until smooth. Add the whole egg, egg yolk, and vanilla and whisk vigorously for about 60 seconds until the mixture is pale, slightly thickened, and glossy. Add the flour, baking soda, and salt and fold with a rubber spatula until just combined. Fold in about 200g of the chocolate chips, reserving roughly 100g for topping. The dough will be thick.
- Drop large spoonfuls of the cookie dough over the brownie batter in the pan. Using lightly dampened fingertips or an offset spatula, gently spread and press the cookie dough into an even layer, being careful not to disturb the brownie batter underneath. It is okay if a little brownie peeks through in spots. Scatter the reserved chocolate chips evenly over the top and press them in gently. Sprinkle with flaky sea salt if using.
- Bake for 30 to 35 minutes, until the top is deep golden brown, the edges are set, and the center feels just barely firm when pressed lightly. A toothpick inserted into the center should come out with moist, fudgy crumbs (not wet batter). It is better to pull these slightly underdone than overdone as they firm up considerably as they cool.
- Let the brookies cool in the pan on a wire rack for at least 20 minutes before lifting out using the parchment overhang. For the cleanest cuts, cool completely (about 1 hour total) and use a sharp knife wiped clean between each cut. Cut into 16 bars.
- Prepare the brownie and cookie batters following Steps 2 through 4 of the oven method exactly. You will have some batter left over if your air fryer only fits an 8-inch pan; you can bake a second batch or scale the recipe down by one-third.
- Grease an 8-inch square metal or foil pan and line with parchment paper. Spread the brownie batter into the pan in an even layer, using roughly half the total brownie batter (about 280 to 300g) for the 8-inch pan. Then drop and spread the cookie dough layer over the top as described in the oven method. Top with the reserved chocolate chips and flaky salt.
- Preheat your air fryer to 325°F (165°C) for 3 minutes. Place the pan in the air fryer basket. Bake for 22 to 26 minutes, checking at the 20-minute mark. If the top is browning too quickly, lay a small piece of foil loosely over the pan for the remaining time. The brookies are done when the top is deeply golden and the center feels just barely set when pressed.
- Remove from the air fryer and cool in the pan on a wire rack for at least 30 minutes before slicing. Because the air fryer runs hotter and faster, these bars benefit from a longer rest before cutting to allow the fudgy center to fully set.
- Slice into 9 bars and serve. Reheat leftover bars in the air fryer at 300°F (150°C) for 2 to 3 minutes for a just-baked, gooey texture.
- Line a 6-quart oval slow cooker insert with parchment paper, leaving overhang on the sides. Lightly grease the parchment. Do not skip this step as the sugar-rich batter will stick aggressively to an unlined insert.
- Prepare the brownie batter and cookie dough following Steps 2 through 4 of the oven method. Spread the brownie batter into the lined slow cooker insert in an even layer. Drop spoonfuls of cookie dough over the top and press gently into an even layer. Scatter the reserved chocolate chips over the surface.
- Place a double layer of paper towels or a clean folded kitchen towel under the slow cooker lid before closing it. This absorbs the condensation that would otherwise drip onto the surface and create soggy patches. Cook on High for 2 hours to 2 hours 30 minutes.
- Begin checking at the 2-hour mark. The brookies are done when the edges are fully set and pulling away from the sides, the top looks matte rather than shiny and wet, and the center jiggles only very slightly when the insert is gently shaken. A toothpick inserted in the center should come out with moist, sticky crumbs.
- Turn off the slow cooker, remove the lid, and let cool in the insert for 30 to 40 minutes. The center will continue to firm up significantly as it cools. Lift out using the parchment overhang, transfer to a cutting board, and cut into bars. Serve warm for maximum fudginess, or cool completely for cleaner slices.
Nutrition Per Serving
Per 1 serving (makes one 9×13-inch pan, cut into 16 bars)
Why This Recipe Works
The biggest challenge with a two-layer bar is getting both layers to finish baking at the same time, since brownie batter and cookie dough have different structures and moisture levels. The solution here is deliberate: the brownie layer uses very little flour (just 60g), which keeps it fudgy and slow to fully set, while the cookie layer contains enough flour and a full teaspoon of baking soda to give it lift and structure. They effectively meet in the middle during baking, with the brownie still soft and yielding while the cookie layer is golden and just set. The result is a natural gradient of texture from top to bottom rather than two distinct, competing layers.
Brown butter is not just a flavor choice in the cookie layer; it is a structural one too. Browning butter drives off water through evaporation (fresh butter is about 18 to 20% water), which means less water in the dough and therefore less steam in the oven. Less steam means the cookie layer spreads less and holds its shape better over the brownie, giving you that defined, beautiful top layer. The Maillard reaction that creates the brown color and nutty flavor in the butter also contributes to a more complex, deeper flavor that balances the intensely chocolatey brownie beneath it without competing with it.
Using Dutch-process cocoa alongside melted dark chocolate in the brownie layer is a deliberate double-hit of chocolate flavor. Dutch-process cocoa has been treated with an alkali to neutralize its natural acidity, giving it a darker color and a smoother, more rounded flavor with less bitterness. Melted dark chocolate adds fat and cocoa butter, contributing to that glossy, dense, truffle-like texture. If your brookies come out cakey rather than fudgy, the most likely culprits are overbaking, over-mixing the brownie batter after adding the flour (which develops gluten and incorporates air), or using a pan that is too small, which increases the depth and requires longer baking time.
Baker’s Tips
- Bring your eggs to room temperature before starting. Cold eggs can cause the melted chocolate mixture to seize or the batter to look broken. A quick fix: place eggs in a bowl of warm water for 5 to 10 minutes.
- Do not over-mix the brownie batter once you add the flour and cocoa. Fold gently with a rubber spatula until just combined. Over-mixing develops gluten and incorporates air, which makes brownies cakey instead of fudgy.
- Use a light-colored saucepan when browning butter so you can clearly see the milk solids changing color. In a dark pan, it is very easy to burn the butter before you notice the color change.
- Chill the pan for 10 minutes in the freezer after spreading the brownie layer if your kitchen is warm. This firms up the brownie batter slightly and makes it much easier to spread the thick cookie dough over the top without the two batters smearing together.
- For the cleanest, bakery-style cuts, cool the bars completely, then refrigerate for 30 minutes before slicing. Use a sharp chef’s knife and wipe it clean with a warm damp cloth between each cut.
- Reserve at least 100g of chocolate chips to press into the top of the cookie layer rather than mixing them all in. Chips baked on top stay visible, create pools of melted chocolate on the surface, and make the bars look far more impressive.
- The flaky sea salt on top is optional but genuinely transformative. Salt suppresses bitterness and amplifies sweetness, making the chocolate taste more intensely chocolatey rather than just sweet. Use a light hand and focus on pinching and scattering rather than pouring.
Variations
- Peanut Butter Swirl: Drop 4 tablespoons of creamy peanut butter over the brownie batter before adding the cookie dough layer, then use a skewer to swirl it in. The peanut butter creates rich ribbons throughout the brownie layer.
- Mint Chocolate: Add 1/2 tsp pure peppermint extract to the brownie batter and substitute mint chocolate chips for half the semi-sweet chips in the cookie layer.
- Salted Caramel Center: Drizzle 80g of thick salted caramel sauce over the brownie layer before adding the cookie dough. It sinks into the brownie as it bakes for a gooey caramel seam in every bite.
- Espresso Brownie Layer: Dissolve 1.5 tsp of instant espresso powder in the melted chocolate-butter mixture before adding the sugar. This deepens the chocolate flavor without tasting overtly of coffee.
- Walnut or Pecan Brookies: Fold 100g (about 1 cup) of roughly chopped toasted walnuts or pecans into the cookie dough along with the chocolate chips for added crunch and richness.
Troubleshooting & FAQ
My cookie layer sank into the brownie batter and the two layers mixed together. What went wrong?
The top (cookie layer) is golden brown but the center still seems underbaked and jiggly. Should I keep baking?
My brownie layer came out cakey and dry rather than fudgy. What happened?
My bars fell apart completely when I tried to slice them. How do I prevent this?
The top of my brookies looks pale and underdone even after 35 minutes. What should I do?
Storage & Make-Ahead
- Storage: Store cut bars in an airtight container at room temperature for up to 4 days, placing parchment paper between layers to prevent sticking. Refrigerate for up to 1 week (bring to room temperature or warm briefly before serving for best texture). Freeze individually wrapped bars for up to 3 months; thaw at room temperature for 1 hour or microwave from frozen for 30 to 40 seconds.
- Make-Ahead: Both batters can be made up to 24 hours ahead. Store the brownie batter covered in the refrigerator and bring to room temperature for 20 minutes before spreading (it will firm up when cold). The cookie dough can be refrigerated overnight; it will need to sit at room temperature for 15 minutes to become spreadable again. Fully baked and cooled bars can be frozen for up to 3 months.

oh my goodness these look absolutely divine, and honestly this is such a smart answer to that impossible choice we all face. i made something similar last month for our choir’s bake sale and let me tell you, watching peoples faces light up when they realized it was both at once – that’s the kind of harmony you cant fake. cant wait to try your version with the allulose, i bet that fudgy bottom layer stays so rich and satisfying without all the sugar crash at the end.
yo these brookies are gonna be perfect for my boxing gym’s fundraiser next month, my kids are gonna lose it when they see these at the bake sale. ive been looking for something that hits that sweet spot between impressive and actually doable, and this two layer thing is genius. gonna make a batch this weekend and get some of the older kids involved in the baking part too, theyre always asking what else they can do besides train and honestly any chance to keep them busy doing something good is worth it.
okay these sound absolutely incredible and i love that you solved the ultimate dessert dilemma haha. i’ve been baking more lately, mostly because i needed something to do with my hands that felt productive, and honestly there’s something so grounding about layering flavors like this. the fact that you can use allulose to keep them fudgy and chewy without all the sugar is such a game changer, especially because i’m way more likely to actually enjoy these without feeling like i crashed an hour later. definitely saving this one to make for my running club’s potluck next month – there’s something special about sharing homemade treats with people who get why community matters, you know?