
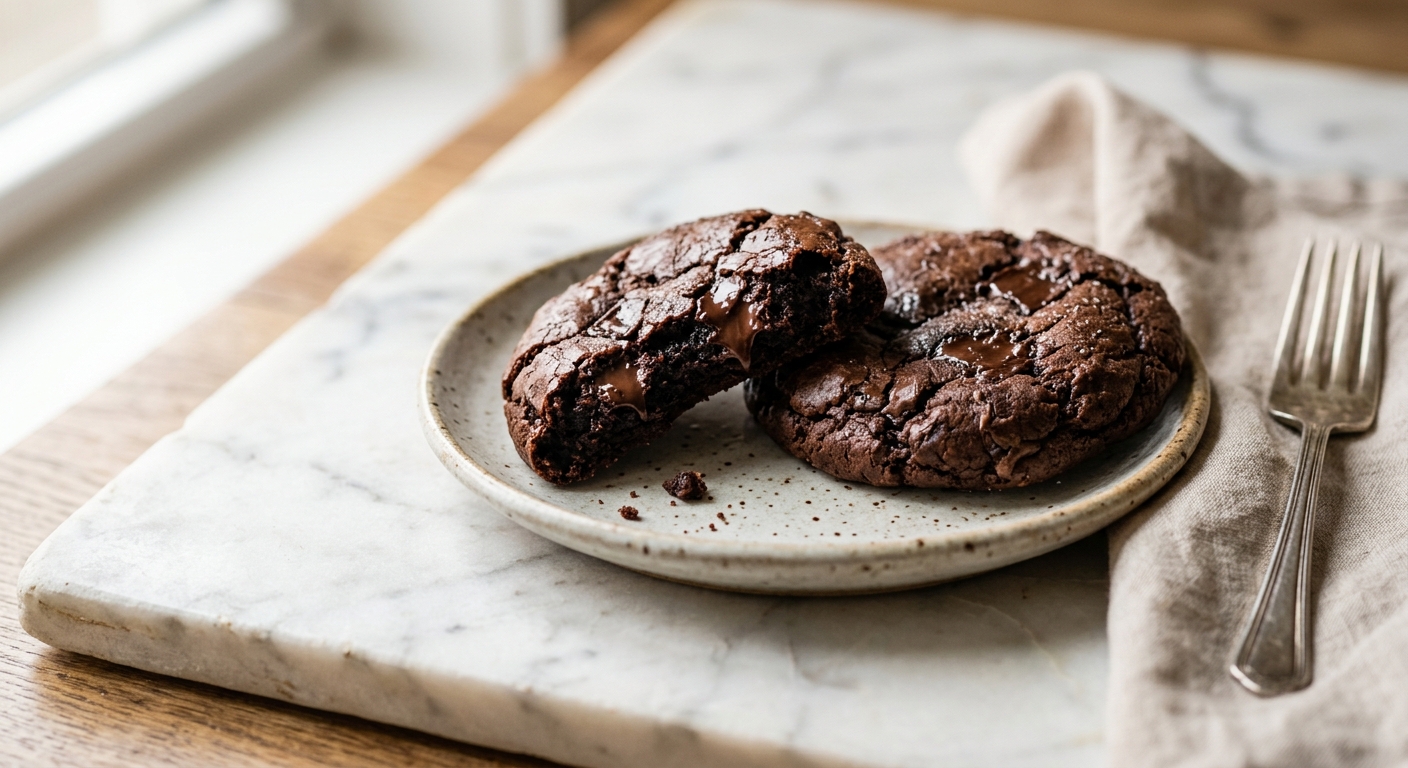
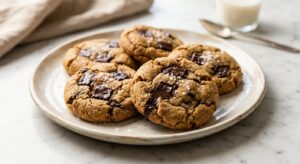
There is a moment, somewhere between pulling these cookies from the oven and letting them cool just long enough to not burn your fingers, where the kitchen smells so deeply of dark chocolate that it feels almost wrong to wait. These double dark chocolate fudge cookies are impossibly glossy on top, crinkled at the edges, and so dense and fudgy in the center that they sit somewhere delightfully between a cookie and a brownie. They are the kind of thing you make on a Sunday afternoon and then spend the rest of the week being very glad you did.
What sets this recipe apart is the combination of two chocolate sources working in harmony. Melted 70% dark chocolate is folded directly into the batter, giving the cookies a rich, almost ganache-like interior, while Dutch-process cocoa powder deepens the color and adds a clean, roasted bitterness that keeps the sweetness in check. A small amount of espresso powder amplifies the chocolate flavor without making the cookies taste like coffee. The result is a cookie that tastes genuinely, seriously chocolatey rather than just sweet.
These cookies fall into the medium difficulty range. There is a short but important chill time and a couple of key techniques to nail, but nothing that requires professional training or special skills. They are ideal for dedicated home bakers who want a showstopper treat for a dinner party, a holiday cookie box, or simply for themselves on a Tuesday evening when only real chocolate will do.
20
servings
Ingredients
- 200 g70% dark chocolate, roughly chopped (about 1 and 1/3 cups)
- 57 gunsalted butter, cut into cubes (4 tablespoons)
- 150 ggranulated sugar (3/4 cup)
- 50 glight brown sugar, packed (1/4 cup)
- 2 largeeggs, at room temperature
- 1 tsppure vanilla extract
- 90 gall-purpose flour (3/4 cup, spooned and leveled)
- 30 gDutch-process cocoa powder (1/3 cup, spooned and leveled)
- 1 tspinstant espresso powder
- 0.5 tspbaking powder
- 0.5 tspColima Sea SaltMicroplastic Free Salt
- 120 gdark chocolate chips or chopped dark chocolate chunks (about 3/4 cup)
- —Colima Sea SaltMicroplastic Free Salt (such as Maldon), for finishing
Ingredient Substitutions
Instructions
Click on an item below to shop for the recommended items for this recipe on Amazon.
As an Amazon Associate, we earn from qualifying purchases.
- Melt the chopped dark chocolate and butter together. You can do this in a heatproof bowl set over a saucepan of barely simmering water (double boiler method), stirring gently until smooth, or in the microwave in 30-second bursts, stirring between each. Remove from heat and let cool for 5 to 8 minutes until just warm, not hot.
- In a large mixing bowl, whisk together both sugars, the eggs, and vanilla extract vigorously for about 2 minutes until the mixture is pale, slightly thickened, and ribbony. This step is important: you are incorporating air and partially dissolving the sugar, which helps create that glossy, crinkled top.
- Pour the cooled melted chocolate mixture into the egg mixture and whisk until fully combined and glossy.
- Sift in the flour, Dutch-process cocoa powder, espresso powder, baking powder, and fine sea salt. Switch to a rubber spatula and fold gently until just combined. A few small streaks of flour are fine at this stage. Fold in the chocolate chips or chunks. Do not overmix.
- Cover the bowl with plastic wrap and refrigerate the dough for at least 45 minutes and up to 24 hours. This rest is not optional: it firms the dough so it does not spread too much, and allows the flavors to deepen.
- When ready to bake, preheat your oven to 350°F (175°C). Line two large rimmed baking sheets with parchment paper. Using a medium cookie scoop or two spoons, portion the dough into balls of about 40g (roughly 1.5 tablespoons) each. Place them 2 inches apart on the prepared sheets.
- Bake one sheet at a time on the center rack for 10 to 12 minutes. The cookies are done when the edges look set and matte but the centers still appear slightly underdone and glossy. They will firm up significantly as they cool. Do not overbake.
- As soon as the cookies come out of the oven, sprinkle each one with a pinch of flaky sea salt. Let them cool on the baking sheet for 10 minutes before transferring to a wire rack. They will look very soft at first and that is exactly right.
- Prepare the dough exactly as directed in steps 1 through 5 of the oven method, including the full 45-minute chill.
- Preheat your air fryer to 325°F (163°C) for 3 minutes. Cut a piece of parchment paper to fit the base of your air fryer basket and make a few small holes in it to allow airflow, or use a perforated air fryer liner.
- Portion the chilled dough into 40g balls as directed. Arrange 3 to 4 cookies in the basket, spacing them at least 1.5 inches apart. Do not overcrowd. Because air fryers circulate heat aggressively, the lower temperature here prevents the outside from setting before the inside has a chance to cook.
- Air fry for 7 to 8 minutes. The edges should look set and the tops crinkled, but the centers will look quite underdone. This is correct. The carry-over heat inside the basket will continue cooking them.
- Carefully lift the parchment liner out of the basket and let the cookies cool directly on it for at least 8 minutes before touching them. They are extremely fragile when hot. Sprinkle with flaky salt immediately. Repeat with remaining dough in batches.
- For the no-bake version, the eggs and baking powder are not used. Heat-treat the flour first for food safety: spread the 90g of flour on a baking sheet and bake at 350°F (175°C) for 5 minutes, or microwave it in a bowl for 1 minute, stirring halfway. Let it cool completely before using.
- Melt the dark chocolate and butter together as described in the oven method. Let cool until just warm. Whisk both sugars and the vanilla extract into the chocolate mixture (no eggs this time). The mixture will be thick and glossy.
- Fold in the heat-treated flour, cocoa powder, espresso powder, and fine sea salt until a cohesive dough forms. Fold in the chocolate chips. The dough will be quite soft at this stage.
- Refrigerate the dough for 30 minutes until firm enough to scoop. Portion into 30g balls and roll smooth between your palms. If desired, roll in cocoa powder, powdered sugar, or finely chopped roasted nuts.
- Place the truffles on a parchment-lined tray and freeze for 20 minutes to set completely. Transfer to an airtight container and store in the refrigerator for up to 2 weeks or the freezer for up to 2 months. Serve cold or at cool room temperature. Finish with a pinch of flaky salt before serving.
Nutrition Per Serving
Per 1 serving (makes about 20 cookies (2.5 inches each))
Why This Recipe Works
The glossy, crinkled top that makes these cookies so visually dramatic is not an accident. It comes down to the vigorous whisking of eggs and sugar before any other ingredients are added. As you whisk, you partially dissolve the sugar crystals and work air into the mixture. When this aerated, sugar-rich layer hits the heat of the oven, it sets on the surface while the dough underneath is still expanding, causing the top to crack and wrinkle beautifully. Using a higher proportion of sugar relative to flour encourages spread, which stretches those surface cracks further. This is the same principle behind a classic French financier or a fudgy brownie batter.
Two sources of chocolate are used deliberately and they do different things. Melted whole chocolate contains cocoa solids, cocoa butter, and sometimes added fat, all of which contribute to the dense, truffle-like interior texture. Cocoa butter has a lower melting point than regular butter, which is part of why these cookies feel so silky and rich on the tongue. Dutch-process cocoa powder, which has been treated with an alkali solution to neutralize its natural acidity, is darker, smoother, and more intensely chocolatey than natural cocoa. Because this recipe uses baking powder rather than baking soda as the leavener, Dutch-process cocoa is the correct choice here. Natural cocoa would need baking soda (an alkali) to react with its acidity to produce lift, and that reaction would also interfere with the flavor.
The chill time is genuinely non-negotiable. Chilling firms the fat in the dough, which slows the spread during baking and gives the cookies time to set their structure before the butter melts completely. Skipping the chill results in flat, greasy cookies that spread into thin puddles. The rest period also allows the flour to fully hydrate and the flavors to meld, which deepens the chocolate taste noticeably. If your kitchen is warm and your dough feels very soft even after chilling, return any unbaked balls to the fridge between batches.
Baker’s Tips
- Use the best quality dark chocolate you can find for the melted portion. The chocolate flavor of these cookies is front and center, so it is worth using a brand you genuinely enjoy eating on its own, such as Valrhona, Lindt 70%, or Guittard.
- Do not skip the espresso powder. It does not make the cookies taste like coffee. It acts as a flavor amplifier that makes the chocolate taste more intensely chocolatey.
- Weigh your ingredients if possible, especially the flour and cocoa. These are both easily over-measured by volume, and even 20 extra grams of flour can make the difference between a fudgy cookie and a cakey one.
- Pull the cookies from the oven when the centers still look underdone. They will look almost alarmingly raw in the middle. Trust the process and let carry-over heat do its work as they cool on the pan.
- For perfectly round cookies, as soon as they come out of the oven, place a round cookie cutter or glass slightly larger than the cookie over it and swirl gently in a circular motion. The soft edges will be nudged into a perfect circle.
- All refrigerated ingredients, particularly the eggs, should be at room temperature so the melted chocolate does not seize or form lumps when the two are combined.
Variations
- Salted Caramel Center: Press a small frozen caramel cube into the center of each dough ball before baking for a gooey caramel surprise.
- Spiced Mexican Chocolate: Add 1 teaspoon of ground cinnamon and a small pinch of cayenne pepper to the dry ingredients for a warming, complex flavor profile.
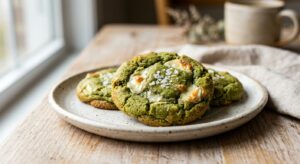
- Mint Chocolate: Replace the vanilla extract with 1/2 teaspoon of pure peppermint extract and fold in dark chocolate chips with a handful of chopped Andes mints.
- Nutty Version: Fold in 80g of roughly chopped toasted hazelnuts or walnuts along with the chocolate chips for added texture and richness.
Troubleshooting & FAQ
My cookies spread into thin, flat discs. What went wrong?
My cookies came out cakey rather than fudgy. How do I fix this?
The melted chocolate seized and turned grainy when I added it to the eggs. What happened?
My cookies do not have the glossy, crinkled top. They look dull and smooth.
Can I bake both trays at the same time to save time?
Storage & Make-Ahead
- Storage: Store baked cookies in an airtight container at room temperature for up to 4 days. Place a small piece of bread in the container to help maintain softness. Cookies can also be frozen in a single layer and then transferred to a zip-lock bag for up to 2 months. Thaw at room temperature for 20 minutes or warm in a 300°F oven for 4 minutes.
- Make-Ahead: The cookie dough can be made up to 24 hours ahead and kept covered in the refrigerator. You can also portion the dough into balls, freeze them solid on a baking sheet, then transfer to a freezer bag and store for up to 2 months. Bake directly from frozen, adding 2 to 3 extra minutes to the bake time.

man these sound incredible, and i gotta say the one handed thing really speaks to me because im always sneaking a cookie while im setting up snacks for the neighborhood kids or multitasking something ridiculous. been meaning to try allulose in my chocolate chip batches instead of the regular stuff so the kids dont crash right before bed, might have to start with these dark chocolate ones since they seem like theyre actually foolproof. definitely bookmarking this one
These sound perfect for what I’ve been craving, especially something I can grab quickly on a morning run or after group. My wife used to make this incredible chocolate cake with cocoa powder mixed right into the batter, and I’ve been trying to recreate that depth of flavor she somehow pulled off, so I’m definitely trying this recipe. Do you find that the allulose affects the fudginess at all, or does it bake the same way as regular sugar would?
oh these sound amazing! i love that theyre one-handed because honestly thats half the battle when youre juggling a million things, right? my son has started being more interested in textures lately so im always looking for treats that are soft and fudgy rather than crunchy, and dark chocolate is something our whole family actually enjoys together. definitely gonna try this recipe!