
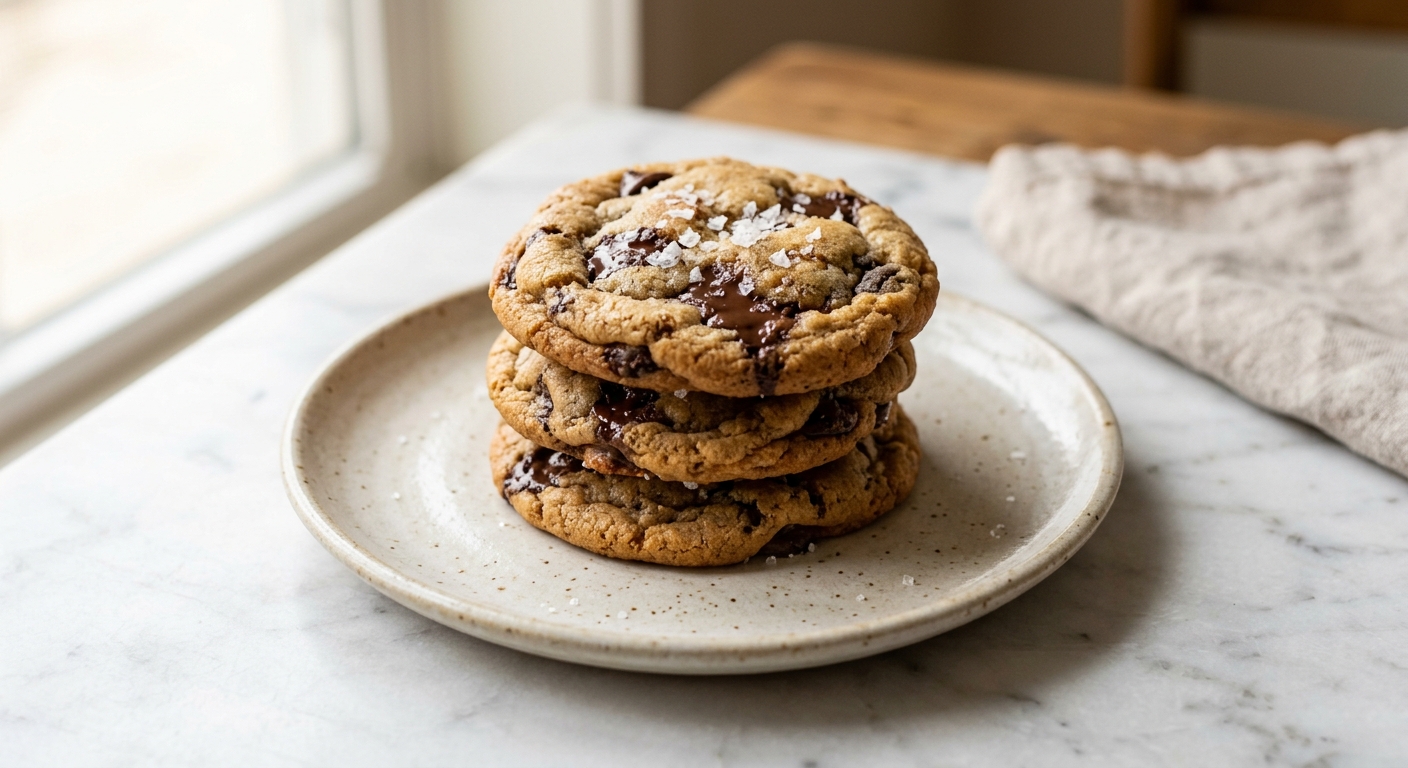
There is a moment, about halfway through browning butter on the stovetop, when your kitchen fills with the most extraordinary smell: toasty, nutty, almost caramel-like, somewhere between a French bakery and a warm hazelnut praline. That is the Maillard reaction at work, and it is the single greatest upgrade you can make to a chocolate chip cookie. These cookies are everything a great chocolate chip cookie should be: crisp and golden at the edges, soft and fudgy in the center, absolutely loaded with chocolate, and finished with a pinch of flaky sea salt that makes every bite sing.
What sets this version apart is a combination of three deliberate choices. First, the brown butter is chilled just enough to resolidify before creaming, so you get both the nutty depth of browned milk solids and the aeration you need for structure. Second, a full 24-hour rest in the refrigerator allows the flour to fully hydrate, the sugars to draw in moisture, and the flavors to deepen into something richer and more complex than any same-day cookie can achieve. Third, a higher ratio of brown sugar to white sugar keeps the centers soft and adds a gentle molasses note that pairs beautifully with dark chocolate. These are not shortcuts, they are the reasons these cookies are unforgettable.
This recipe sits comfortably at a medium difficulty level. You do not need a stand mixer, though one helps. You do need patience for the butter and the chill time. This is the perfect weekend bake: start the dough on a Saturday afternoon, and by Sunday morning you are pulling warm cookies out of the oven. Perfect for the home baker who wants to graduate from the back-of-the-bag recipe to something genuinely special.
20
servings
Ingredients
- 225 gunsalted butter (1 cup / 2 sticks), cut into pieces
- 240 gall-purpose flour (about 2 cups, spooned and leveled)
- 1 tspbaking soda
- 1 tspColima Sea SaltMicroplastic Free Salt
- 200 gdark brown sugar, packed (about 1 cup)
- 100 ggranulated white sugar (about 1/2 cup)
- 2 largeeggs, at room temperature
- 1 largeegg yolk, at room temperature
- 2 tsppure vanilla extract
- 300 gdark chocolate chips or chopped dark chocolate (60 to 70% cacao, about 1 3/4 cups)
- —Colima Sea SaltMicroplastic Free Salt (such as Maldon), for topping
Ingredient Substitutions
Instructions
Click on an item below to shop for the recommended items for this recipe on Amazon.
As an Amazon Associate, we earn from qualifying purchases.
- Brown the butter: melt the butter in a light-colored saucepan over medium heat, stirring frequently. It will foam, then subside, then begin to turn golden and smell nutty. Watch carefully, as it can go from perfect to burnt quickly. Once the milk solids at the bottom are a deep amber color, immediately pour the butter (including all the browned bits) into the bowl of a stand mixer or a large mixing bowl. Let it cool at room temperature for 15 minutes, then refrigerate for 20 to 30 minutes until it is firm but not solid, about the consistency of softened butter.
- Whisk together the flour, baking soda, and fine sea salt in a medium bowl. Set aside.
- Beat the cooled brown butter with the dark brown sugar and granulated sugar on medium-high speed for 2 to 3 minutes until the mixture is lighter in color and slightly fluffy. Add the eggs and egg yolk one at a time, beating well after each addition. Add the vanilla extract and beat for another 30 seconds. Scrape down the bowl.
- Add the flour mixture all at once and mix on low speed just until no dry streaks remain. Do not overmix. Fold in the chocolate chips or chopped chocolate with a rubber spatula.
- Cover the bowl tightly with plastic wrap and refrigerate for a minimum of 24 hours and up to 72 hours. This step is not optional if you want the best possible flavor and texture.
- When ready to bake, preheat your oven to 375°F (190°C). Line two baking sheets with parchment paper. Using a large cookie scoop or two spoons, portion the dough into balls of about 60g (roughly 3 tablespoons) each. Place them at least 3 inches apart on the prepared sheets. Press a few extra chocolate pieces on top of each dough ball if you like, then sprinkle generously with flaky sea salt.
- Bake one sheet at a time on the center rack for 11 to 13 minutes, until the edges are set and golden but the centers still look slightly underdone and glossy. They will firm up as they cool. Remove from the oven and immediately bang the baking sheet firmly on the counter two or three times to create those beautiful crinkled edges. Cool on the baking sheet for 5 minutes before transferring to a wire rack.
- Prepare the brown butter dough exactly as described in the oven method through step 5, including the full 24-hour chill.
- Cut a piece of parchment paper to fit the basket of your air fryer, leaving space around the edges for air circulation. Do not skip the parchment, as the chocolate will stick badly to the basket.
- Preheat the air fryer to 350°F (175°C) for 3 minutes. Scoop dough balls of about 60g each and place 2 to 3 in the basket at a time, spacing them at least 2 inches apart. Press extra chocolate pieces on top and sprinkle with flaky sea salt.
- Air fry for 7 to 9 minutes, checking at 7 minutes. The edges should look set and lightly golden, and the centers should still appear slightly underdone. They will continue to set as they cool.
- Carefully slide the parchment with the cookies onto a wire rack and let them cool for at least 5 minutes before eating. The cookies will be very soft straight out of the air fryer and need that time to set properly.
- Prepare the full brown butter dough through the 24-hour refrigerator chill as described in the oven method.
- Scoop the chilled dough into balls of about 60g each. Place them on a parchment-lined baking sheet and press extra chocolate pieces on top, but do not add the sea salt yet.
- Freeze the dough balls uncovered for 1 to 2 hours until solid, then transfer to a zip-lock freezer bag or airtight container. Label with the date and baking instructions. Frozen dough balls keep for up to 3 months.
- To bake from frozen: preheat your oven to 375°F (190°C). Place frozen dough balls on a parchment-lined baking sheet, spacing them at least 3 inches apart. Sprinkle generously with flaky sea salt. There is no need to thaw.
- Bake for 13 to 15 minutes, until the edges are set and golden and the centers look just barely underdone. Bang the pan on the counter when it comes out of the oven, then cool on the pan for 5 minutes before transferring to a rack.
Nutrition Per Serving
Per 1 serving (makes about 20 large cookies)
Why This Recipe Works
Browning butter does far more than add flavor. When butter is cooked past melting point, the water evaporates, and the milk solids undergo the Maillard reaction, the same chemical process that browns bread and sears meat. This creates hundreds of new flavor compounds, including noisette (hazelnut-like) notes from pyrazines and a deep caramel quality from lactones. By chilling the browned butter back to a softened consistency before creaming, we preserve all those solids in the dough rather than losing them, and we regain the ability to aerate the fat with sugar, which helps create a slightly lifted, structured cookie rather than a flat, greasy one.
The 24-hour chill is about more than convenience. During refrigeration, the flour slowly absorbs the liquid in the dough (from eggs and the small amount of water left in the butter), which reduces spread in the oven and concentrates flavor as free water decreases. Resting also allows enzymatic activity to begin breaking down some starch into smaller sugars, contributing to deeper browning and a more complex, toffee-like sweetness. This is why a rested cookie tastes noticeably richer than one baked immediately.
The higher ratio of brown sugar to white is a deliberate textural and flavor choice. Brown sugar is hygroscopic, meaning it attracts and holds moisture, which keeps the centers soft and chewy even days after baking. The molasses in brown sugar also lowers the setting temperature of the cookie, allowing the edges to caramelize and crisp before the center fully sets, which is exactly how you get that perfect contrast between a crisp edge and a fudgy middle. If your cookies are spreading too much, the most likely culprits are butter that was too warm when creamed, dough that was not chilled long enough, or a baking sheet that was still warm from a previous batch.
Baker’s Tips
- Use a light-colored saucepan when browning the butter so you can clearly see the color of the milk solids. Dark pans make it very easy to accidentally burn the butter before you notice.
- Do not skip scraping every last browned bit from the pan into the bowl. Those dark specks are concentrated flavor and are exactly what you want in the dough.
- For bakery-style cookies, press a few extra chocolate chips or chopped pieces onto the tops of the dough balls just before baking. This ensures visible, photogenic pools of chocolate on the finished cookie.
- Bang the baking sheet firmly on the counter the moment it comes out of the oven. This deflates any puffiness and creates the beautiful crinkled, rippled surface that signals a perfectly chewy cookie.
- Always bake one sheet at a time on the center rack for the most even heat. Rotating two sheets halfway through leads to uneven results.
- Pull the cookies out when the centers still look glossy and underdone. Residual heat will finish them on the pan, and an underbaked-looking cookie becomes a perfectly fudgy cookie once cool.
Variations
- Brown Butter Espresso Cookies: Add 2 tsp of instant espresso powder to the butter while it is still warm. The coffee deepens the chocolate flavor without making the cookies taste like coffee.
- Tahini Swirl: Replace 30g of the butter with 30g of well-stirred tahini, added after browning. The sesame adds a subtle nuttiness that is extraordinary with dark chocolate and sea salt.
- Walnut and Dark Chocolate: Fold in 100g of roughly chopped toasted walnuts along with the chocolate for crunch and extra richness.
- Milk Chocolate and Miso: Swap the dark chocolate for milk chocolate chips and add 1 tbsp of white miso paste to the butter mixture when creaming. The miso enhances the butterscotch notes of the brown butter beautifully.
Troubleshooting & FAQ
My cookies spread into thin, greasy puddles. What went wrong?
My cookies came out cakey and puffy rather than chewy. How do I fix this?
The centers of my cookies are raw even after the recommended bake time. What happened?
My brown butter smells bitter and the milk solids look black rather than amber. Is it ruined?
Can I skip the 24-hour chill and bake the cookies right away?
Storage & Make-Ahead
- Storage: Store baked cookies in an airtight container at room temperature for up to 5 days. A slice of sandwich bread in the container helps keep them soft. Freeze baked cookies for up to 2 months and reheat in a 300°F (150°C) oven for 5 minutes to refresh.
- Make-Ahead: The dough must rest for at least 24 hours and can be refrigerated for up to 72 hours before baking. Portioned dough balls can be frozen (without sea salt topping) for up to 3 months and baked straight from frozen with 2 to 3 extra minutes of bake time.


Oh, brown butter is magic, isn’t it? I’ve found the same thing happens with brown butter in simple shortbread, especially if you let it cool slightly before mixing so those toasted notes really shine through. The nuttiness pairs so beautifully with chocolate and salt, like how autumn leaves hold both warmth and something almost mineral underneath. Your kids will probably love helping with this one, and honestly watching someone taste their first brown butter cookie is a reminder of why we bake in the first place.
these look incredible, man. been trying to find desserts my kids dont feel like theyre missing out on and this might be it. the brown butter thing is gonna change the game for me – ive done it for brownies but never thought to do it for cookies. definitely trying this weekend, appreciate you breaking down how to nail the timing on that sea salt sprinkle too.
yo this is awesome, brown butter really does open up a whole new world once you start seeing it everywhere in the kitchen. the timing on that salt sprinkle is key, i learned that lesson the hard way when i first started baking, salt dissolves too early and you lose that punch but sprinkle it right before the oven and it stays crispy and bright. your kids are gonna love these, theres something about that combo of nutty and salty and chocolate that just works, and honestly knowing theyre getting a treat thats not loaded with sugar hits different too.