
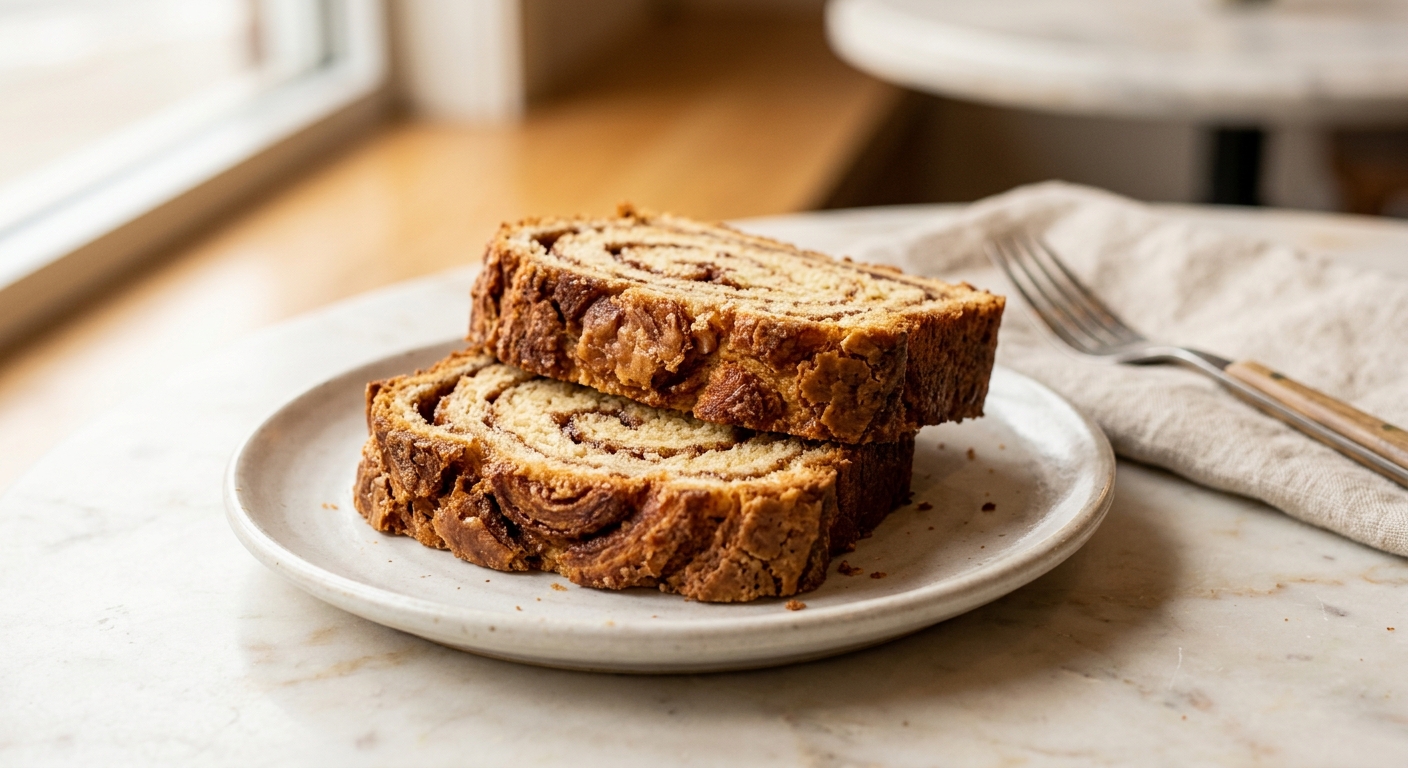
There is a particular kind of morning magic that happens when a loaf of cinnamon swirl bread comes out of the oven. The kitchen fills with the warm perfume of toasted cinnamon and caramelizing sugar, the crust crackles faintly as it cools on the rack, and every single person within a twenty-foot radius suddenly remembers they are hungry. This is that loaf. It is soft and feathery inside with a swirl of spiced brown sugar running through every slice, and outside, a shattery butter crust that shatters like the top of a perfect croissant when you press it gently with your thumb.
What sets this recipe apart is a two-part technique borrowed from enriched Viennoiserie baking. First, the dough is made with a touch of tangzhong, a small portion of flour cooked with milk into a paste before being added to the main dough. This gelatinizes the starches and lets the bread hold onto moisture for days, giving you that pillowy, bakery-soft crumb without any artificial softeners. Second, the loaf is brushed generously with melted butter in the final five minutes of baking, not before, which lets the crust brown and set fully before the butter soaks in and crisps up into something genuinely extraordinary.
This is a medium-difficulty bake that is very much within reach for any home baker who has made yeast bread before, and is a wonderful second project for someone who has just gotten comfortable with basic sandwich loaves. The dough is forgiving, the shaping is simple once you see it, and the results are dramatic enough to bring to a weekend brunch and genuinely impress people. Plan for about three hours from start to finish, most of which is hands-off rising time.
12
servings
Ingredients
- Filling (about 1 Tbsp)
- 25 gall-purpose flour for tangzhong (about 3 tbsp)
- 120 mlwhole milk for tangzhong (about 1/2 cup)
- 360 gbread flour (about 3 cups, spooned and leveled), plus extra for dusting
- 7 ginstant yeast (1 packet or 2 1/4 tsp)
- 50 ggranulated sugar (about 1/4 cup)
- 1 tspColima Sea SaltMicroplastic Free Salt
- 120 mlwhole milk, warmed to 110°F (43°C) (about 1/2 cup)
- 1 largeegg, room temperature
- 57 gunsalted butter, softened to room temperature (about 4 tbsp or 1/2 stick)
- 100 glight brown sugar, packed (about 1/2 cup)
- 2 tbspground cinnamon
- —Pinch of Colima Sea SaltMicroplastic Free Salt for the filling
- 14 gunsalted butter, very soft but not melted
- Butter Crust Finish (about 2 Tbsp)
- 28 gunsalted butter, melted
Ingredient Substitutions
Instructions
Click on an item below to shop for the recommended items for this recipe on Amazon.
As an Amazon Associate, we earn from qualifying purchases.
- Make the tangzhong: In a small saucepan, whisk together 25g all-purpose flour and 120ml whole milk until smooth. Set over medium-low heat and cook, whisking constantly, for 3 to 4 minutes until the mixture thickens to the consistency of loose mashed potatoes and leaves trails when you drag a spoon through it. Scrape into a large bowl or the bowl of a stand mixer and let cool to room temperature, about 15 minutes.
- Make the dough: Add the warmed milk, egg, granulated sugar, instant yeast, and salt to the cooled tangzhong. Whisk to combine. Add the bread flour all at once. Using a dough hook on a stand mixer, mix on low for 2 minutes until a shaggy dough forms, then increase to medium and knead for 5 minutes. With the mixer running, add the softened butter one tablespoon at a time, waiting for each piece to fully incorporate before adding the next. Once all the butter is in, continue kneading on medium-high for 6 to 8 more minutes until the dough is smooth, elastic, and pulls away cleanly from the sides of the bowl. It will be slightly tacky but should not stick aggressively to your hands. If kneading by hand, this will take about 12 to 15 minutes total.
- First rise: Shape the dough into a ball, place in a lightly oiled bowl, and cover tightly with plastic wrap or a damp kitchen towel. Let rise at room temperature until doubled in size, about 1 hour to 1 hour 15 minutes. If your kitchen is cool, place the covered bowl in an oven with just the light turned on.
- Make the filling: In a small bowl, stir together the brown sugar, cinnamon, and pinch of salt until evenly combined. Set aside.
- Shape the loaf: Grease a 9×5-inch loaf pan generously with butter or nonstick spray. Punch down the risen dough and turn it out onto a very lightly floured surface. Using a rolling pin, roll into a rectangle roughly 9 inches wide and 16 inches long, with the 9-inch edge closest to you. Spread the 14g of soft butter across the entire surface in a thin, even layer all the way to the edges. Sprinkle the cinnamon sugar filling evenly over the butter, pressing it in gently with your palm so it adheres. Starting from the short edge nearest to you, roll the dough up tightly into a log, pinching the seam firmly to seal. Place seam-side down in the prepared pan.
- Second rise: Cover the pan loosely with plastic wrap or a clean kitchen towel. Let rise until the dough crowns about 1 inch above the rim of the pan, about 45 minutes to 1 hour. Do not rush this rise. While the dough rises, preheat your oven to 350°F (175°C) with a rack in the center position.
- Bake: Bake for 30 to 35 minutes until the top is deep golden brown and a digital thermometer inserted into the center reads 190°F to 195°F (88°C to 90°C). At the 30-minute mark, if the top is browning too quickly, tent loosely with a piece of aluminum foil.
- Butter crust finish: In the last 5 minutes of baking, brush the top of the loaf generously with the 28g of melted butter. Return to the oven and bake for the remaining 5 minutes. This step creates the signature shattery, lacquered crust. Remove from the oven and let cool in the pan for 10 minutes before turning out onto a wire rack to cool for at least 20 minutes before slicing.
- Prepare the tangzhong, dough, and filling, and complete both rises exactly as described in the oven method through Step 6. Grease a 7×3-inch loaf pan (or the largest pan that fits your air fryer with at least 1 inch of clearance on all sides) and shape the loaf as directed in Step 5, scaling the log to fit the shorter pan.
- Preheat your air fryer to 325°F (163°C) for 5 minutes. Place the shaped, fully risen loaf pan into the air fryer basket. If your air fryer runs particularly hot on top, loosely lay a small piece of foil over the surface of the loaf for the first 15 minutes to prevent the top crust from burning before the center is cooked through.
- Air fry for 25 to 28 minutes, removing the foil shield (if using) after the first 15 minutes, until the top is deep golden brown. Check doneness with a digital thermometer: the center should read 190°F to 195°F (88°C to 90°C). Every air fryer runs differently, so begin checking at 22 minutes.
- Butter crust finish: Brush the top generously with the 28g melted butter and air fry for a final 3 to 4 minutes until the crust is lacquered and shattery. Watch closely during this step as the butter can go from golden to burnt quickly in the concentrated heat of an air fryer.
- Remove the pan carefully using tongs or oven mitts (the basket will be hot). Let cool in the pan for 10 minutes, then turn out onto a wire rack and cool for at least 20 minutes before slicing.
- Prepare the tangzhong, dough, and filling, and complete the first rise exactly as described in the oven method through Step 4.
- Line a 6-quart oval slow cooker with a sheet of parchment paper that comes up the sides like a sling (this makes removal easy and prevents sticking). Lightly grease the parchment. Shape the loaf as described in oven Step 5, but form a slightly shorter, fatter log to fit the oval shape of the cooker. Place the shaped loaf seam-side down on the parchment.
- Second rise: Cover the slow cooker with its lid and let the dough rise for 30 to 45 minutes until noticeably puffed. The warmth from the insert will gently speed the proof.
- Cook on High for 2 to 2 hours 30 minutes. Place two layers of paper towels or a clean folded kitchen towel under the lid to absorb condensation and prevent water from dripping onto the loaf and making the top gummy. The bread is done when a digital thermometer inserted into the center reads 190°F to 195°F (88°C to 90°C).
- Broiler finish for color and crust: Preheat your broiler to High. Carefully lift the loaf out of the slow cooker using the parchment sling and place on a foil-lined baking sheet. Brush the top generously with the 28g of melted butter. Broil 6 inches from the element for 3 to 5 minutes, watching constantly, until the top is deep golden brown and shattery. This step is quick and the loaf can go from perfect to burnt in under a minute, so do not walk away.
- Transfer to a wire rack and cool for at least 25 minutes before slicing. The interior will be slightly more moist than the oven version, which some people find even more irresistible.
Nutrition Per Serving
Per 1 serving (makes one 9×5-inch loaf, about 12 slices)
Why This Recipe Works
The tangzhong technique is the quiet hero of this recipe. When you cook a small amount of flour and milk together before adding it to the dough, you trigger a process called starch gelatinization. The starch granules in the flour absorb the hot liquid, swell, and form a gel that binds water far more tightly than raw flour can. When this paste is incorporated into the main dough, those gelatinized starches hold onto moisture throughout mixing, rising, baking, and, critically, the days after baking. This is why a tangzhong loaf stays soft and pillowy for three days when a standard enriched dough might start to stale by day two. The same principle is used in Japanese milk bread, Hokkaido-style rolls, and many East Asian bakery breads.
The inclusion of butter in the dough acts as a tenderizer. Fat coats some of the gluten strands and interrupts the continuous protein network, producing a finer, more tender crumb than a lean dough would give you. This is also why the butter is added after the initial gluten network has developed during the first phase of kneading. If you added the fat too early, it would coat the proteins before they could link together properly, resulting in a weak, poorly structured dough that tears during shaping. Adding it in stages, piece by piece, allows the gluten to develop first, then tenderize gradually.
The butter crust finish works because of the Maillard reaction and fat-accelerated browning. Butter contains milk solids (proteins and lactose) that brown rapidly at high heat. By brushing the loaf in the final five minutes, you apply those browning agents to a surface that is already hot and structurally set, which means they caramelize quickly without the loaf over-browning overall. The fat also gets drawn into the surface of the crust, which then crisps rather than staying soft as it cools. If the loaf comes out and the crust softens after resting, it simply means the butter was applied too early or the loaf needed a few more minutes in the oven to drive out surface moisture before the butter went on.
Baker’s Tips
- Bring the egg and butter to room temperature before starting. Cold butter will not incorporate smoothly into the dough and may cause it to look broken or greasy.
- When rolling out the dough, aim for an even thickness throughout. Uneven rolling creates thick spots in the spiral that may stay doughy or cause the swirl to unravel during baking.
- Press the cinnamon sugar filling firmly into the buttered dough before rolling. This helps it adhere and reduces the gap between the swirl and the surrounding crumb that is the most common complaint with cinnamon swirl bread.
- Do not skip pinching the seam. A loose seam will open during baking, causing the filling to leak out and pool at the bottom of the pan where it burns and makes the loaf difficult to unmold.
- Use a digital thermometer to check doneness. Cinnamon swirl bread browns quickly on the outside because of the sugar in the dough, so visual cues alone can be misleading. An internal temperature of 190°F to 195°F (88°C to 90°C) is reliable and foolproof.
- Let the loaf cool for at least 20 minutes before slicing. Slicing too early tears the soft crumb and the filling can drag and smear. The wait is difficult but worth it.
- For the cleanest slices, use a sharp serrated bread knife and a gentle sawing motion rather than pressing down.
Variations
- Cardamom and orange version: Replace 1 tablespoon of the cinnamon with 1 teaspoon ground cardamom and add the zest of one large orange to the filling. Stir 1 teaspoon of vanilla extract into the dough with the milk.
- Cream cheese swirl: Spread a thin layer of softened cream cheese (about 60g) over the dough before adding the cinnamon sugar filling for a tangy, slightly cheesecake-flavored swirl.
- Raisin and walnut version: Scatter 80g of raisins and 60g of finely chopped toasted walnuts over the cinnamon sugar filling before rolling up. Press them in gently so they stay put.
- Brown butter variation: Brown the 57g of butter for the dough before softening. To do this, melt it in a light-colored pan over medium heat until it smells nutty and the milk solids turn golden, then cool to room temperature until solid again before adding to the dough. The nutty depth it adds to the bread is remarkable.
Troubleshooting & FAQ
My cinnamon swirl has a big gap between the filling and the bread. What went wrong?
The bread is deeply browned on the outside but still raw or gummy in the middle. What happened?
My dough never got smooth during kneading and feels greasy or falls apart. What went wrong?
The bread did not rise much. Why?
My loaf stuck in the pan and tore when I tried to unmold it. How do I prevent this?
Storage & Make-Ahead
- Storage: Store the cooled loaf wrapped tightly in plastic wrap or in an airtight container at room temperature for up to 3 days. For longer storage, slice the loaf, separate slices with small pieces of parchment, and freeze in a zip-top bag for up to 2 months. Toast individual slices straight from frozen.
- Make-Ahead: The dough can be made through Step 3 (first rise), then punched down, shaped, placed in the greased loaf pan, covered tightly with plastic wrap, and refrigerated overnight for up to 16 hours. The next morning, remove from the refrigerator and let the shaped loaf come to room temperature and complete its second rise, about 1 hour 30 minutes to 2 hours, before baking as directed. The baked loaf can also be made up to 1 day ahead and kept wrapped at room temperature.


oh this is such a good idea for your regulars, Larry – i’ve seen so many kids light up when they realize they can actually have something warm and sweet that wont mess with their blood sugar, and cinnamon swirl bread is the kind of thing that feels special, you know? the smell alone does half the work, and honestly if you nail that buttery crust part your folks are gonna keep coming back just for that.
oh my gosh you two are making me tear up over here, this is exactly what its all about! i remember my grandson couldn’t have regular sugar and i felt so bad til i started baking with allulose, and now when he comes over the smell of cinnamon bread brings the whole family running – Larry your customers are gonna feel so loved when they bite into something warm and buttery like this, thats what real hospitality tastes like, god bless you for thinking of them!
man this sounds perfect, ive been looking for something my regulars would actually enjoy since a lot of them cant do regular sugar and a cinnamon swirl bread with allulose sounds like exactly what theyre craving. gonna give this a shot this weekend, that shattery butter crust detail has me sold honestly.