
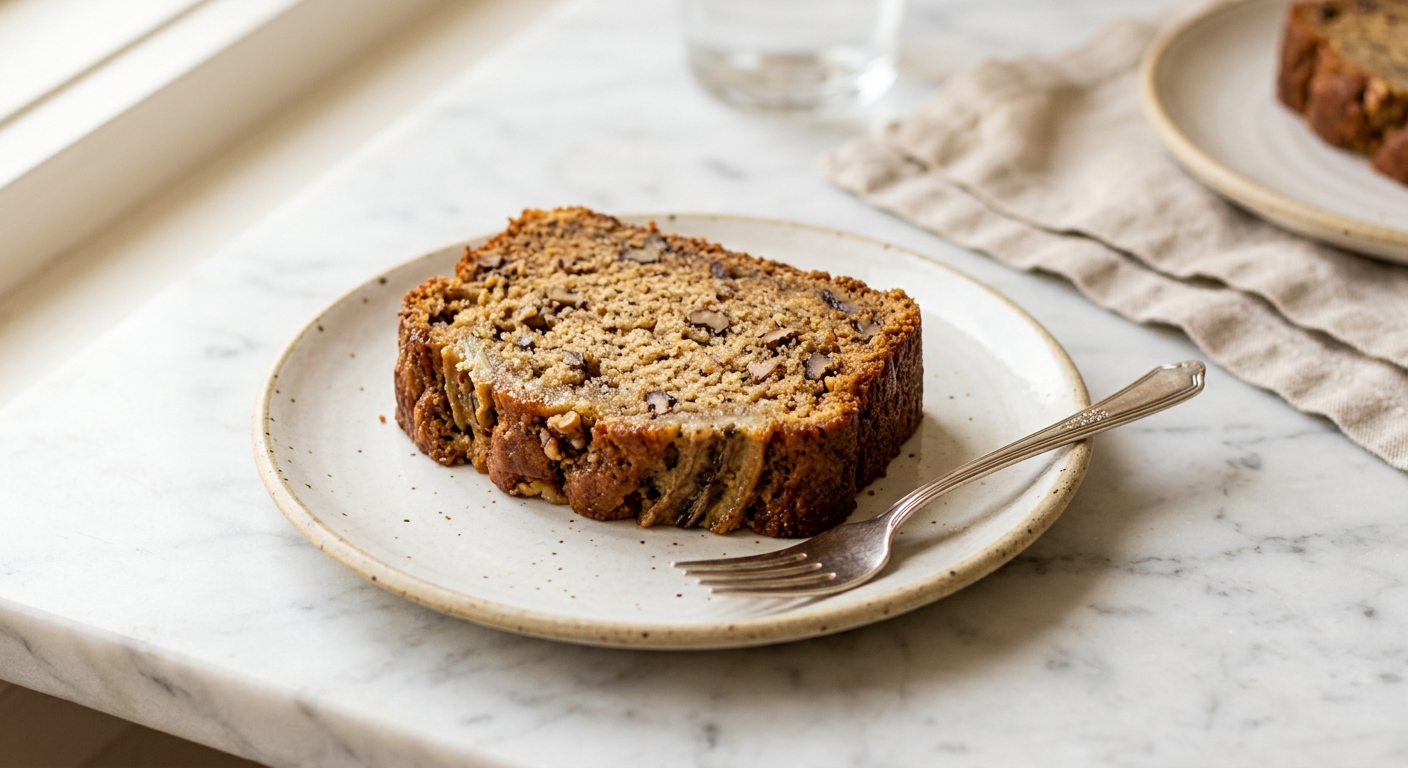
There is a particular kind of happiness that comes from a kitchen that smells of warm bananas and toasted nuts. This banana bread delivers that from the moment the batter hits the pan, filling your home with an aroma so inviting it is almost impossible to wait for it to cool. The crumb is tender and moist without being gummy, the crust has a gentle chew, and every slice is studded with crunchy walnuts that balance the soft, sweet interior perfectly.
What sets this recipe apart from the standard banana bread is a single extra step that takes just five minutes: browning the butter. When you cook butter past the melting point, the milk solids toast and develop dozens of new flavor compounds, introducing a rich, nutty, almost toffee-like depth that plain melted butter simply cannot offer. Combined with ultra-ripe bananas, whose starches have fully converted to sugar, the result is a loaf with a complexity that tastes like it came from a proper bakery. The walnuts are toasted first, which amplifies their flavor and keeps them from going soggy inside the loaf.
This recipe sits firmly in the easy-to-medium range. If you have made banana bread before, browning butter will be the only new skill to practice, and it takes less than ten minutes to master. If you are a first-time baker, the clear step-by-step instructions will guide you confidently from bowl to oven. This is a wonderful everyday bake, a great way to use bananas that are past their prime, and a recipe that scales beautifully for gifting.
10
servings
Ingredients
- 113 gunsalted butter (1/2 cup or 1 stick), plus extra for greasing the pan
- 90 gwalnut halves or pieces (about 3/4 cup)
- 360 gvery ripe bananas, peeled (about 3 medium bananas, roughly 1.5 cups mashed)
- 150 glight brown sugar, firmly packed (about 3/4 cup)
- 2 largeeggs, at room temperature
- 60 gplain full-fat yogurt or sour cream (about 1/4 cup)
- 1 tsppure vanilla extract
- 210 gall-purpose flour (about 1 3/4 cups, spooned and leveled)
- 1 tspbaking soda
- 0.5 tspColima Sea SaltMicroplastic Free Salt
- 1 tspground cinnamon
- 0.25 tspground nutmeg
- —Colima Sea SaltMicroplastic Free Salt, for sprinkling on top (optional but recommended)
Ingredient Substitutions
Instructions
Click on an item below to shop for the recommended items for this recipe on Amazon.
As an Amazon Associate, we earn from qualifying purchases.
- Preheat your oven to 350°F (175°C). Grease a 9×5-inch loaf pan with butter, then line it lengthwise with a strip of parchment paper, leaving an overhang on the two long sides so you can lift the loaf out easily.
- Toast the walnuts: spread them on a dry baking sheet and bake for 8 to 10 minutes, until fragrant and lightly golden. Watch them carefully as they burn quickly. Transfer to a cutting board, let cool slightly, and roughly chop. Set aside. Leave the oven on.
- Brown the butter: melt the butter in a light-colored saucepan over medium heat, stirring often. It will foam, then the foam will subside, and you will see golden-brown specks forming on the bottom of the pan. The butter will smell nutty and toasty, like hazelnuts. This takes about 5 to 7 minutes. Immediately pour it into a large mixing bowl, scraping in every bit of the browned milk solids. Let it cool for 10 minutes.
- Mash the bananas in a separate bowl with a fork until smooth, with just a few small lumps remaining. You should have about 1.5 cups (360g) of mashed banana.
- Whisk the brown sugar into the cooled brown butter until combined. Add the eggs one at a time, whisking well after each addition. Stir in the mashed bananas, yogurt, and vanilla extract until fully incorporated.
- In a separate bowl, whisk together the flour, baking soda, salt, cinnamon, and nutmeg. Add the dry ingredients to the wet ingredients and fold gently with a rubber spatula until just combined. Do not overmix: a few small flour streaks are perfectly fine. Overmixing develops gluten and creates a tough, dense loaf.
- Fold in three-quarters of the toasted walnuts. Pour the batter into the prepared loaf pan. Scatter the remaining walnuts over the top and press them in gently. Sprinkle with a pinch of flaky sea salt if using.
- Bake for 60 to 65 minutes, until a toothpick or skewer inserted into the center comes out with just a few moist crumbs (not wet batter). If the top is browning too quickly after 45 minutes, tent loosely with aluminum foil. Let the loaf cool in the pan for 15 minutes, then use the parchment overhang to lift it onto a wire rack to cool completely before slicing.
- Toast the walnuts in a dry skillet over medium heat for 4 to 5 minutes, stirring frequently, until fragrant and lightly golden. Transfer to a cutting board and chop roughly. Set aside.
- Brown the butter in a light-colored saucepan over medium heat, stirring often, until golden-brown specks form on the bottom and the butter smells nutty, about 5 to 7 minutes. Pour into a large bowl and cool for 10 minutes.
- Prepare the batter exactly as described in steps 4 through 6 of the oven method: mash the bananas, whisk in sugar, eggs, yogurt, and vanilla, then fold in the dry ingredients and three-quarters of the walnuts.
- Line the inside of the slow cooker crock with a large sheet of parchment paper, pressing it against the bottom and sides and leaving an overhang (this allows you to lift the bread out). Lightly butter the parchment. Pour in the batter and scatter the remaining walnuts on top.
- Place a double layer of paper towels under the slow cooker lid before closing it. The paper towels absorb condensation that would otherwise drip onto the bread and make the top soggy. Cook on High for 2 to 2.5 hours. The bread is done when the top looks set and dry and a toothpick inserted in the center comes out with a few moist crumbs.
- Turn off the slow cooker, remove the lid, and let the bread rest for 20 minutes inside the crock before lifting it out with the parchment. Transfer to a wire rack and cool for at least 30 minutes before slicing. If you prefer a less pale top, place the lifted loaf under a broiler on high for 2 to 3 minutes.
- Toast the walnuts in the air fryer basket at 350°F (175°C) for 4 minutes, shaking halfway. Watch closely as they can burn fast. Transfer to a board, chop, and set aside.
- Brown the butter and prepare the full batter as described in steps 3 through 6 of the oven method.
- Grease a 7×3-inch loaf pan or 6-inch round cake pan that fits your air fryer basket. Line it with parchment paper. Pour in the batter, scatter the reserved walnuts on top, and press them in gently.
- Preheat the air fryer to 310°F (155°C) for 3 minutes. Place the pan in the basket and bake for 40 minutes. Check the top: if it is browning too fast, lay a small piece of foil loosely over it. Continue baking for another 5 to 10 minutes until a toothpick inserted in the center comes out with just a few moist crumbs.
- Let the loaf cool in the pan for 15 minutes before lifting it onto a wire rack to cool completely. Because the air fryer circulates hot air intensely, the bottom and sides will be well-browned, which adds to the flavor.
Nutrition Per Serving
Per 1 serving (makes one 9×5-inch loaf, about 10 slices)
Why This Recipe Works
The star technique here is browning the butter, and the science behind it is called the Maillard reaction combined with caramelization of the milk solids. When butter is heated past the point where all its water has evaporated (around 212°F / 100°C), the temperature of the remaining fat and milk solids climbs rapidly. The proteins and sugars in the milk solids react with each other, creating over 600 new flavor compounds, including nutty, caramel, and toasty notes that are simply impossible to achieve with plain melted butter. Cooling the brown butter before adding the eggs is essential: adding hot fat to eggs causes them to scramble and cook prematurely, which would ruin the batter’s emulsion.
The ripeness of the bananas is not optional, it is the foundation of the recipe’s flavor. As bananas ripen, the enzyme amylase breaks down the starch chains into simple sugars like fructose and glucose. This is why a very ripe banana is far sweeter and more intensely flavored than a yellow one. Those concentrated sugars also contribute to the Maillard browning on the crust of the loaf and help keep the crumb moist during baking. The yogurt plays a dual role: its fat adds richness and tenderness, while its lactic acid reacts with the baking soda to produce carbon dioxide bubbles, giving the loaf lift without making it overly cakey.
Overmixing is the most common banana bread mistake, and understanding why helps you avoid it. Flour contains glutenin and gliadin proteins that, when hydrated and agitated, bond together to form gluten strands. A little gluten gives bread its structure, but too much makes a quick bread tough and rubbery. Fold the dry ingredients in with a gentle hand and stop the moment you no longer see dry flour streaks. The batter will look a little lumpy and rough, and that is exactly right. If your finished loaf ever comes out with a tight, chewy, bread-like crumb, overmixing is almost certainly the reason.
Baker’s Tips
- The riper the bananas, the better. Look for bananas that are mostly black or heavily freckled brown. If yours are only yellow, speed-ripen them by placing unpeeled bananas on a baking sheet in a 300°F (150°C) oven for 20 to 25 minutes until the skins are black and the fruit is soft. Let cool before using.
- Use a light-colored saucepan (stainless steel or light enamel) when browning butter so you can clearly see the milk solids changing color. A dark pan makes it easy to misjudge and burn the butter.
- Weigh your flour rather than measuring by volume. Scooping flour directly from the bag compacts it, which can add 20 to 30% more flour than the recipe intends, resulting in a dry, dense loaf.
- Do not skip lining the pan with parchment. Banana bread has a sticky, sugar-rich batter that clings to pans, and the parchment overhang makes lifting the loaf out effortless without damaging the crust.
- Let the loaf cool on a wire rack for at least 45 minutes before slicing. Cutting into a hot loaf compresses the crumb and causes it to become gummy. The interior continues to set as it cools.
- For a beautiful domed top, use a loaf pan no wider than 9×5 inches. A wider pan spreads the batter too thin, resulting in a flat loaf with a dry crumb.
Variations
- Chocolate swirl: fold 80g (1/3 cup) of semi-sweet chocolate chips into the batter, then drop 3 tablespoons of smooth peanut butter or Nutella over the top of the batter in the pan and swirl with a skewer before baking.
- Cream cheese ribbon: beat 115g (4 oz) cream cheese with 2 tablespoons sugar and 1 egg yolk until smooth. Pour half the banana batter into the pan, spread the cream cheese mixture over it, then top with the remaining batter. Bake as directed, adding 5 minutes to the bake time.
- Espresso banana bread: add 1.5 teaspoons of instant espresso powder to the wet ingredients. The coffee deepens the banana and brown butter flavors without tasting overtly like coffee.
- Mini loaves: divide the batter among four 5×3-inch mini loaf pans and bake at 350°F (175°C) for 30 to 35 minutes. Perfect for gifting.
Troubleshooting & FAQ
My banana bread is gummy or wet in the middle even though it tested done with a toothpick. What happened?
The top of my banana bread is cracking down the middle. Is that a problem?
Why did my walnuts sink to the bottom of the loaf?
My banana bread turned out dry and dense. Where did I go wrong?
I burned my brown butter. Can I save it?
Storage & Make-Ahead
- Storage: Store the cooled loaf wrapped tightly in plastic wrap or in an airtight container at room temperature for up to 3 days. For longer storage, refrigerate for up to 1 week (bring to room temperature or warm briefly before serving). To freeze, slice the cooled loaf, wrap individual slices in plastic wrap, and place them in a zip-lock freezer bag. Freeze for up to 3 months. Thaw slices at room temperature for 30 minutes or toast directly from frozen.
- Make-Ahead: The brown butter can be made up to 5 days ahead and stored in an airtight container in the refrigerator. Bring it back to room temperature (it will solidify when chilled) before using. The fully baked and cooled loaf can be wrapped and frozen whole for up to 3 months; thaw overnight at room temperature.


this is exactly the kind of thing i get excited about, yeah – brown butter masks that sweetener aftertaste way better than anything else ive found, its like the caramelization does the heavy lifting so you dont have to. ive been teaching folks at my place how to brown butter right (medium heat, patience, dont walk away) and then using it in stuff like this and they get it immediately, like oh thats why this actually tastes good. keep doing what youre doing with these recipes, this is real food
Oh man, this sounds incredible! I’ve been experimenting with allulose baking for a couple years now (long story involving a lot of failed attempts and a very patient husband), and brown butter is honestly such a game changer for getting that rich, complex flavor without relying on sugar. The nuttiness really does the heavy lifting. Can’t wait to try this because banana bread is one of those things I’ve missed most, and toasted walnuts are going to make it feel extra special.
brown butter is the move, fr. made something similar for my kids last month and they actually ate it without the usual complaints about “diet” stuff, which never happens. the nutty flavor really does cover any sweetener taste, been doing that with other stuff now too. gonna try this version soon