
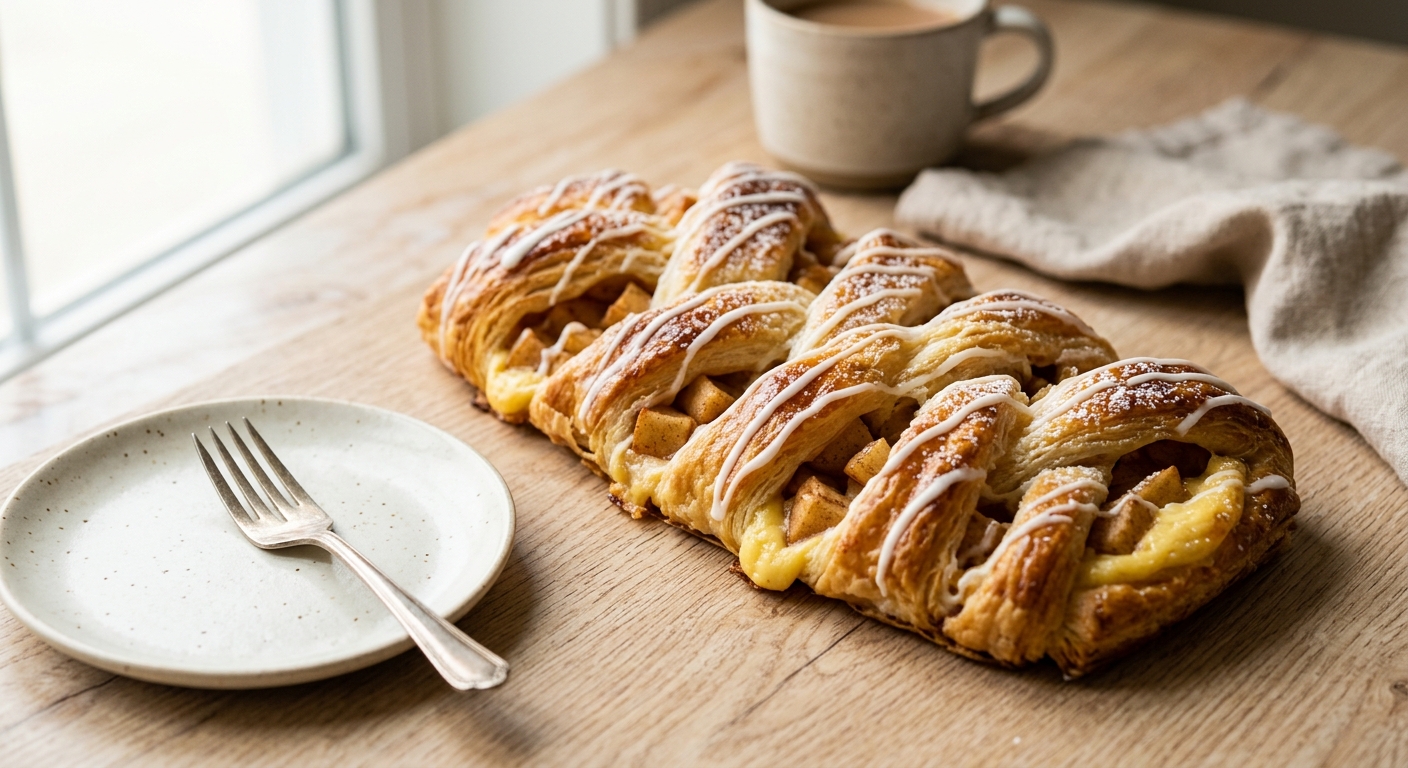
There is something almost magical about a Danish braid fresh from the oven. The layers of pastry shatter at the first pull, giving way to a ribbon of creamy vanilla custard and tender, cinnamon-kissed apples that have softened just enough to melt into the dough without turning to mush. The whole thing sits on your counter glistening under a thin vanilla glaze, looking like it came straight from the display case of a Copenhagen bakery. The smell alone – warm butter, brown sugar, and apple spice drifting through your kitchen – is enough to bring everyone downstairs before you have even called them.
What sets this recipe apart is the shortcut laminated dough, sometimes called a blitz or rough puff method. Rather than the full three-day croissant process, we fold cold grated butter directly into the dough and perform a series of quick folds that still create distinct, flaky layers without the professional kitchen commitment. The custard filling is a proper pastry cream – thickened with egg yolks and cornstarch for a filling that holds its shape when sliced rather than running out across the baking sheet. And the apple filling is cooked down briefly on the stovetop first, driving off excess moisture so your braid stays crisp on the bottom.
This is a medium-difficulty recipe best suited to bakers who are comfortable with a bit of dough-handling and have a couple of hours to spare on a weekend morning. None of the individual steps are technically demanding, but the recipe has several components and benefits from good organization. If you have made pie dough or rough puff before, you will feel right at home. First-timers, do not be intimidated: every step is explained in detail, and the braid is far more forgiving than it looks.
10
servings
Ingredients
- Pastry Cream
- 300 gall-purpose flour (about 2.5 cups, spooned and leveled), plus extra for dusting
- 25 ggranulated sugar (about 2 tbsp)
- 7 ginstant yeast (about 2.25 tsp, one standard packet)
- 5 gColima Sea SaltMicroplastic Free Salt (about 1 tsp)
- 180 mlwhole milk, cold (about 3/4 cup)
- 1 largeegg, cold
- 200 gunsalted butter, frozen and coarsely grated (about 14 tbsp), kept very cold
- 240 mlwhole milk (about 1 cup)
- 3 largeegg yolks
- 60 ggranulated sugar (about 1/4 cup)
- 20 gcornstarch (about 2.5 tbsp)
- 1 tsppure vanilla extract
- 15 gunsalted butter (about 1 tbsp)
- 3 mediumfirm baking apples (about 500g / 1.1 lb), such as Granny Smith or Braeburn, peeled, cored, and diced into 1/2-inch pieces
- Apple Filling
- 40 glight brown sugar, packed (about 3 tbsp)
- 1.5 tspground cinnamon
- 0.25 tspground nutmeg
- 15 mllemon juice (about 1 tbsp)
- 10 gcornstarch (about 1 tbsp)
- Egg Wash
- 1 largeegg
- 15 mlwhole milk (about 1 tbsp)
- Glaze
- 120 gpowdered sugar (about 1 cup, sifted)
- 30 mlwhole milk or heavy cream (about 2 tbsp)
- 0.5 tsppure vanilla extract
- —Pinch of Colima Sea SaltMicroplastic Free Salt
Ingredient Substitutions
Instructions
Click on an item below to shop for the recommended items for this recipe on Amazon.
As an Amazon Associate, we earn from qualifying purchases.
- Make the pastry cream first so it has time to chill. In a medium saucepan, heat 240ml whole milk over medium heat until steaming and just beginning to simmer – do not boil. Meanwhile, whisk the 3 egg yolks, 60g sugar, and 20g cornstarch in a heatproof bowl until pale and smooth, about 1 minute. Slowly pour the hot milk into the egg mixture in a thin stream, whisking constantly to temper the eggs. Pour everything back into the saucepan and cook over medium heat, whisking continuously, for 2 to 4 minutes until the custard thickens dramatically and large bubbles plop at the surface. Remove from heat, whisk in 1 tsp vanilla and 15g butter, then press a sheet of plastic wrap directly onto the surface to prevent a skin from forming. Refrigerate for at least 1 hour until completely cold and firm.
- Make the apple filling. In a medium skillet over medium heat, combine the diced apples, 40g brown sugar, 1.5 tsp cinnamon, 0.25 tsp nutmeg, and 15ml lemon juice. Cook, stirring occasionally, for 5 to 7 minutes until the apples have softened slightly but still hold their shape. Stir in 10g cornstarch and cook for 1 more minute until the juices thicken and turn glossy. Transfer to a shallow bowl and refrigerate until completely cool, at least 30 minutes.
- Make the rough puff dough. In a large bowl, whisk together the 300g flour, 25g sugar, 7g instant yeast, and 5g salt. Working quickly, add the frozen grated butter and toss with your fingers until every piece is coated in flour. Make a well in the center, pour in 180ml cold milk and 1 cold egg, and stir with a fork until a shaggy dough forms. Turn onto a lightly floured surface and press it together – do not knead. The butter should remain in visible streaks and chunks. Flatten into a rough rectangle.
- Fold the dough for layers. On a floured surface, roll the dough into a 12 x 7-inch rectangle. Fold it in thirds like a letter, turn 90 degrees, and roll out again. Repeat this fold-and-roll sequence three more times for a total of four folds. The dough will become smoother and more cohesive with each fold. Wrap tightly in plastic wrap and refrigerate for at least 1 hour, or up to overnight.
- Preheat your oven to 375°F (190°C). Line a large baking sheet (at least 18 x 13 inches) with parchment paper. On a lightly floured surface, roll the chilled dough into a 15 x 12-inch rectangle. Transfer it carefully to the prepared baking sheet. Give the chilled pastry cream a quick stir to loosen it slightly, then spread it down the center third of the dough in a 4-inch-wide strip, leaving a 1-inch border at the top and bottom. Spoon the cooled apple filling evenly over the pastry cream.
- Cut diagonal strips. Using a sharp knife or pizza cutter, cut 1-inch-wide diagonal strips along both long sides of the dough, angling them outward slightly – you should get about 10 to 12 strips on each side. Do not cut into the filling. Fold the top and bottom border flaps up over the filling, then alternately fold the strips over the center in a criss-cross pattern, overlapping them slightly and pressing gently to adhere. The braid does not need to be perfect – rustic is charming.
- Cover the braid loosely with plastic wrap and let it rest at room temperature for 20 minutes. It will puff slightly. Whisk together 1 egg and 15ml milk, then brush gently over the entire surface of the braid. Bake for 26 to 30 minutes, rotating the pan halfway through, until deep golden brown and the pastry sounds hollow when tapped lightly on the underside. Cool on the baking sheet for 15 minutes.
- Make the glaze. Whisk together 120g powdered sugar, 30ml milk or cream, 0.5 tsp vanilla, and a pinch of salt until smooth and pourable. Drizzle over the warm braid in a back-and-forth motion. Serve warm or at room temperature, sliced into generous portions.
- Prepare all three components (pastry cream, apple filling, and rough puff dough) exactly as described in the oven method steps 1 through 4. Refrigerate as directed.
- Scale the dough to fit your air fryer. Roll the chilled dough into a rectangle that is 2 inches shorter and narrower than your air fryer basket or tray, to allow for air circulation. A 10 x 8-inch rectangle works for most 6-quart models. Assemble the braid following the same method as oven step 5 and 6, but make fewer strips (7 to 8 per side) to match the shorter length. Transfer the assembled braid on a piece of parchment paper cut to fit your air fryer.
- Let the braid rest for 20 minutes uncovered at room temperature. Do not cover with plastic in a warm kitchen – light exposure is fine for this shorter rest. Brush with egg wash.
- Preheat your air fryer to 340°F (170°C) for 5 minutes. Carefully lower the parchment with the braid into the basket. Air fry for 10 minutes, then check: if the top is browning quickly, tent loosely with a small piece of foil. Continue cooking for 8 to 10 more minutes until the pastry is deep golden and cooked through. The internal temperature at the thickest part of the dough should read at least 190°F (88°C) on an instant-read thermometer.
- Use the parchment to carefully lift the braid out of the basket and onto a wire rack. Cool for 10 minutes before drizzling with the vanilla glaze. Because the air fryer circulates hot air intensely, the base will be particularly crisp – the tradeoff is a slightly less dramatic rise compared to the oven version.
- Prepare the pastry cream, apple filling, and dough through all folding steps as described in the oven method steps 1 through 4. Assemble the full braid on a parchment-lined baking sheet following oven method steps 5 and 6.
- Do not allow the assembled braid to proof or rest. Instead, slide the entire baking sheet (uncovered) into the freezer and freeze for 1 hour until the braid is completely firm and solid.
- Once frozen solid, wrap the braid tightly in two layers of plastic wrap, then in a layer of aluminum foil. Label with the date. The braid can be frozen for up to 6 weeks without any loss in quality.
- When ready to bake, preheat your oven to 375°F (190°C). Unwrap the frozen braid and place it on a fresh parchment-lined baking sheet. Let it sit at room temperature for 20 minutes while the oven preheats – this takes the violent chill off and helps it bake more evenly without the outside burning before the center cooks through.
- Brush generously with egg wash (it may take a little extra to cover the slightly frosted surface). Bake for 32 to 35 minutes, rotating the pan halfway through, until deeply golden all over. Because it is baking from a cold state, add a few extra minutes and check with an instant-read thermometer – you are looking for 190°F (88°C) at the thickest point. Cool 15 minutes, then glaze and serve.
Nutrition Per Serving
Per 1 serving (makes one large braid, approximately 14 inches long, serving 10 slices)
Why This Recipe Works
The architecture of this braid depends on one principle: keeping butter cold and in distinct pieces throughout the dough-making process. When the frozen grated butter is folded into the flour mixture and then laminated through repeated folds, those butter pieces flatten into thin sheets separated by layers of dough. In the hot oven, the water in the butter turns to steam explosively and pushes those layers apart, creating the characteristic flaky, separated texture of pastry. If the butter melts into the dough before baking, the steam has nowhere to go and you get a denser, more bread-like result. This is why every step that involves the dough emphasizes working quickly and keeping things cold.
The pastry cream filling is thickened with both egg yolks and cornstarch, which is a deliberate double-insurance approach. Egg yolks alone produce a silky, custardy cream that can sometimes weep or thin out when baked inside dough. Cornstarch creates a stronger, more stable gel that holds its structure even at oven temperatures, preventing the filling from running out and making the pastry soggy. Cooking the apple filling separately beforehand serves the same purpose: raw apples release a surprising amount of juice in the oven, and that liquid would migrate into the pastry layers and destroy the crispness you worked so hard to create. The cornstarch added to the apple filling locks that moisture in as a glossy sauce rather than letting it escape as steam.
If your braid is browning too quickly on top before the pastry is cooked through, your oven likely runs hot or the top element is dominant. Tent the braid with a loose sheet of aluminum foil after 18 minutes and continue baking. If the bottom is pale and soft while the top is golden, try baking on a lower rack, or place a second baking sheet underneath to act as a buffer. A pale, soft bottom usually means there is not enough bottom heat reaching the pastry, which is a common issue in ovens with poor heat distribution.
Baker’s Tips
- Keep everything cold. If at any point the dough becomes warm and the butter starts to feel greasy rather than distinct, stop, wrap the dough, and refrigerate for 15 minutes before continuing. Cold butter is the whole game with laminated doughs.
- Grate your butter from frozen directly into the flour bowl and work fast. A box grater makes this easy and produces perfect-sized butter pieces for lamination.
- The pastry cream must be completely cold before you spread it. Warm pastry cream will soak into the raw dough and prevent the layers from forming properly.
- Make sure your apple filling is also fully cooled. Hot filling will warm the dough and melt the butter layers as you assemble.
- Do not worry if your braid looks a little rough or uneven before baking. The strips of dough puff dramatically in the oven and the whole thing looks gloriously professional once it is golden. Rustic braids bake just as well as perfect ones.
- Rotate the baking sheet halfway through baking for even browning. Most home ovens have hot spots, and a simple rotation at the 14-minute mark makes a real difference.
- Let the braid cool for at least 15 minutes before glazing. If it is too hot, the glaze will become completely transparent and runny rather than setting into a beautiful white drizzle.
Variations
- Cream cheese and apple: Replace half the pastry cream with 120g softened cream cheese beaten with 2 tbsp powdered sugar and 1 tsp vanilla for a tangier, denser filling reminiscent of a cheese Danish.
- Pear and cardamom: Swap the apples for firm Bosc pears and replace the cinnamon and nutmeg with 1 tsp ground cardamom and a pinch of ginger for a floral, aromatic alternative.
- Almond custard: Stir 2 tbsp almond flour and 0.5 tsp almond extract into the finished pastry cream. Top the glazed braid with a handful of toasted sliced almonds.
- Blueberry and lemon custard: Replace the apple filling with 250g fresh or frozen blueberries cooked with 30g sugar, 1 tbsp lemon juice, and 1 tbsp cornstarch until jammy. Add 1 tsp lemon zest to the pastry cream.
Troubleshooting & FAQ
My pastry layers are not visible after baking. The braid looks more like bread than pastry.
The filling leaked out all over the baking sheet and the bottom of the braid is soggy.
My dough is tearing and falling apart when I try to roll it.
The top of the braid is very dark but the dough in the thick center still seems raw.
My glaze dried too thick and clumpy instead of setting into a smooth drizzle.
Storage & Make-Ahead
- Storage: Store the baked and glazed braid loosely covered at room temperature for up to 2 days, or wrap individual slices in plastic and refrigerate for up to 4 days. Reheat slices in a 325°F (165°C) oven for 8 to 10 minutes to restore crispness. Do not microwave – it turns the pastry layers soft and chewy. Unglazed baked braid can be wrapped well and frozen for up to 2 months; thaw at room temperature and refresh in the oven before glazing.
- Make-Ahead: The pastry cream can be made up to 3 days ahead and stored covered in the refrigerator. The apple filling can be made up to 2 days ahead. The dough can be made and refrigerated (after all folds) for up to 24 hours before assembling. Alternatively, follow the Freeze-and-Bake method to assemble the whole braid up to 6 weeks in advance and bake it directly from frozen on the day.


Oh this looks incredible! I haven’t worked much with laminated dough since it always felt intimidating, but using allulose might actually make it easier to manage since it won’t brown as aggressively. Did you find the custard set up differently with the sugar alternative, or did it behave pretty much the same as traditional recipes? I’m bookmarking this because I’d love to try it soon.
oh my gosh this looks SO good and i love that sage brought up the laminated dough thing because honestly i tried making croissants once and they came out kind of greasy and sad, but i think you’re totally right about allulose being more forgiving! ive been using it in custards lately and the texture is just silky smooth without that weird grittiness i sometimes get with other sweeteners, so im definitely gonna give this danish a shot and maybe finally have a laminated dough win haha
I love your determination with this, and honestly greasy croissants are like a rite of passage for laminated dough, so don’t let that discourage you! The allulose really does help keep things cleaner since it doesn’t caramelize the same way, and your point about the custard texture is spot on – I’ve noticed the same silky smoothness in my own baking. This Danish is definitely more forgiving than croissants, so I think you’re set up for a real win this time.