
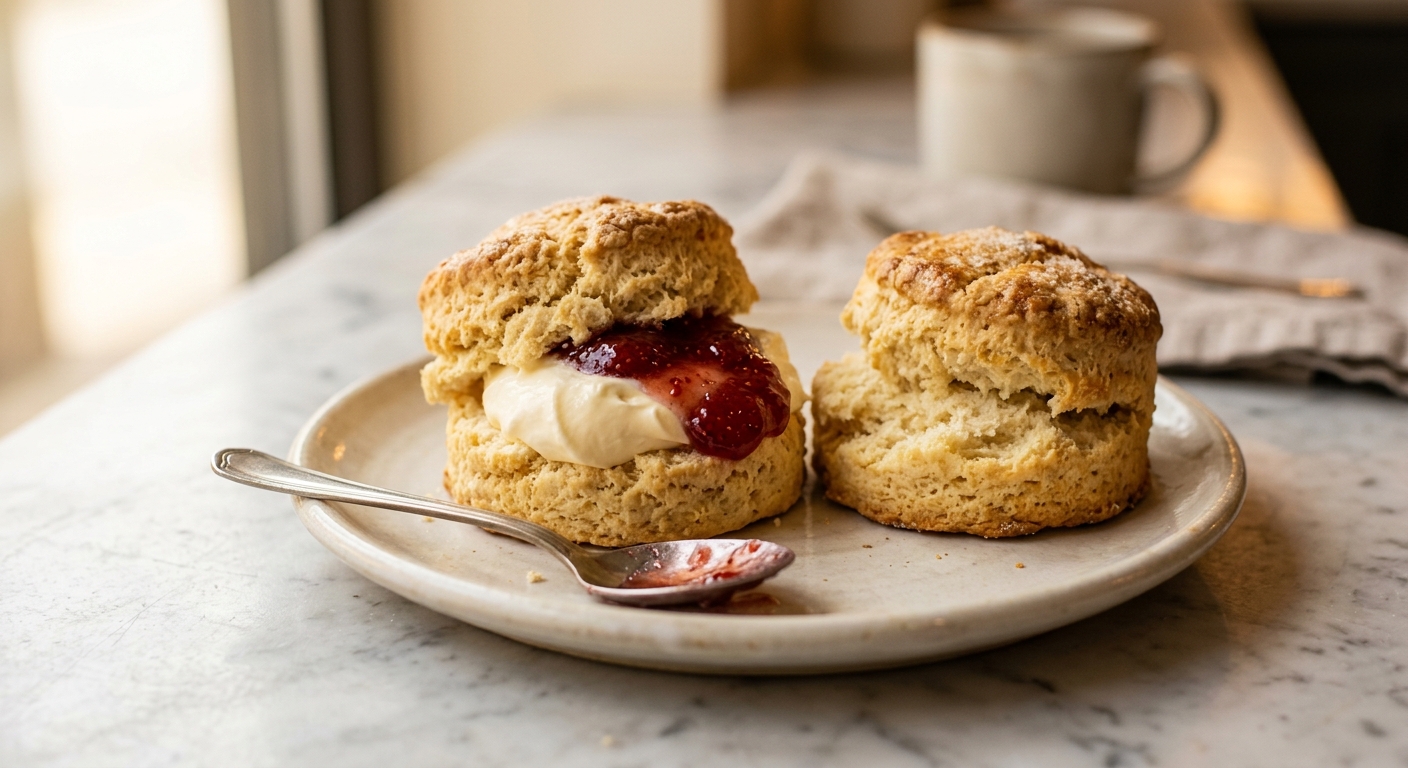
There is something quietly magical about a freshly baked scone. The moment it comes out of the oven, still steaming, with a golden crown and those irresistible craggy sides just waiting to be pulled apart, it feels like a small celebration. Spread with a generous spoonful of clotted cream and a streak of good jam, and you have one of the most satisfying things a home kitchen can produce. These buttermilk scones are exactly that: classic, honest, and deeply delicious.
What sets this recipe apart is the combination of cold butter worked in by hand and the gentle acidity of buttermilk, which together create a scone that rises tall with distinct, flaky layers rather than crumbling into a dense brick. The buttermilk does double duty here: its acidity reacts with the baking soda to give an extra lift, and its slight tang keeps the crumb moist and tender. The technique is intentionally minimal because overworking the dough is the single biggest mistake in scone-making, and this recipe is designed to guide you away from it.
Difficulty-wise, scones sit comfortably in the easy-to-medium range. They come together in about 15 minutes of active work and bake quickly, making them perfect for weekend mornings, afternoon tea, or any time you want to impress someone without spending all day in the kitchen. If you have never made scones before, this is an ideal starting point. If you have made them before and found them disappointing, this recipe will change your mind.
8
servings
Ingredients
- 300 gall-purpose flour (about 2 1/3 cups, spooned and leveled), plus extra for dusting
- 2 tspbaking powder
- 0.5 tspbaking soda (bicarbonate of soda)
- 2 tbspcaster sugar or granulated sugar (25g)
- 0.5 tspColima Sea SaltMicroplastic Free Salt
- 85 gunsalted butter, very cold, cut into 1cm cubes (6 tbsp)
- 200 mlcold buttermilk (scant 1 cup), plus 1 to 2 tbsp extra if needed
- 1 largeegg yolk, for egg wash
- 1 tbspwhole milk, for egg wash
- —Clotted cream and good-quality jam, to serve
Ingredient Substitutions
Instructions
Click on an item below to shop for the recommended items for this recipe on Amazon.
As an Amazon Associate, we earn from qualifying purchases.
- Preheat your oven to 425°F (220°C) with a rack in the upper third. Line a large baking sheet with parchment paper. Place it in the oven while it preheats – a hot baking sheet gives the scones an immediate burst of bottom heat that helps them rise tall.
- In a large bowl, whisk together the flour, baking powder, baking soda, sugar, and salt. Add the cold cubed butter. Using your fingertips, rub the butter into the flour with quick, light movements, lifting and rubbing, until the mixture resembles rough, uneven breadcrumbs with some pea-sized pieces of butter still visible. Those butter chunks are what create flaky layers. Work quickly so the butter stays cold.
- Make a well in the center of the flour mixture. Pour in 200ml of cold buttermilk all at once. Using a fork or your hand shaped like a claw, stir from the outside in just until the dough comes together into a rough, shaggy mass. Do not overwork it. If the dough feels very dry and crumbly with floury patches, add the extra buttermilk one tablespoon at a time. The dough should be sticky and a little rough – that is correct.
- Turn the dough out onto a lightly floured surface. With floured hands, gently pat and fold the dough over itself 3 to 4 times (this is a light lamination that encourages layers), then pat it into a circle about 3cm (1.25 inches) thick. Resist the urge to roll it thinner – height is your goal.
- Using a sharp 6cm (2.5-inch) round cutter, press straight down through the dough without twisting. Twisting seals the edges and prevents the scones from rising. Place cut scones on the hot baking sheet. Gather the scraps, gently pat together once, and cut out remaining scones. You will get 8 scones total.
- Mix the egg yolk and milk together and brush lightly over the tops of the scones, avoiding the sides (egg wash on the sides glues the layers shut and blocks the rise). Bake for 14 to 16 minutes until deep golden on top and a light tap on the base sounds hollow. Transfer to a wire rack and allow to cool for at least 10 minutes before serving – the interior sets as they cool.
- Prepare the scone dough exactly as in the oven method through Step 5, cutting out your scones. Line the air fryer basket with a round of parchment paper cut to fit (this prevents sticking and makes it easier to lift delicate scones out). Do not crowd the basket – leave at least 2.5cm (1 inch) between scones. Work in batches of 3 to 4.
- Preheat your air fryer to 375°F (190°C) for 3 minutes. While it preheats, brush the tops of the scones with the egg wash, keeping it off the sides.
- Place the scones in the basket in a single layer. Air fry for 10 to 12 minutes, checking at the 10-minute mark. The tops should be deep golden and the scones should feel set when gently pressed. If your air fryer runs hot, check at 9 minutes. Do not open the basket in the first 8 minutes or the rise will deflate.
- Remove with tongs or a wide spatula and transfer to a wire rack. Allow to cool for 5 to 10 minutes before splitting. Repeat with remaining scones, noting that later batches may cook 1 minute faster as the air fryer is already at full heat.
- Serve with clotted cream and jam. Air fryer scones are best eaten the day they are made, as the crust softens more quickly than oven-baked versions.
- Prepare the full scone dough and cut out all 8 scones as described in the oven method through Step 5. Do not egg wash them yet.
- Arrange the cut scones on a parchment-lined baking sheet so they are not touching. Place the sheet in the freezer uncovered for 2 hours, or until the scones are frozen solid. Once solid, transfer them to a zip-top freezer bag or airtight container with parchment between layers. They keep beautifully for up to 3 months.
- When ready to bake, do not thaw. Preheat your oven to 425°F (220°C) and place your lined baking sheet in the oven to heat up as it warms. Remove the frozen scones from the freezer.
- Mix the egg wash and brush it over the tops of the frozen scones immediately before baking. Place them on the hot baking sheet straight from frozen.
- Bake for 18 to 20 minutes, 3 to 4 minutes longer than the fresh version, until the tops are deeply golden and the bases sound hollow when tapped. The extra time accounts for the frozen core. Check from 17 minutes onward. Cool on a wire rack for 10 minutes before serving.
Nutrition Per Serving
Per 1 serving (makes 8 large round scones)
Why This Recipe Works
The flakiness and rise in a great scone comes down to two things working in harmony: cold fat and the right leavening balance. When cold butter is rubbed into flour, it creates uneven pockets of fat coated in flour. In the heat of the oven, the water inside those butter pieces turns to steam, physically pushing the dough apart and creating distinct, separable layers. This is exactly the same mechanism at work in croissants and pie crust. Warm butter, by contrast, blends smoothly into the flour and produces a cakey, uniform crumb with no flakiness at all. This is why the recipe emphasizes cold butter and a quick, light hand.
The leavening here is a combination of baking powder and baking soda, and both are doing specific jobs. Baking powder provides the main lift and starts working as soon as it hits moisture, then again when heat is applied (this is why it is called double-acting). The baking soda is there specifically to react with the acidity of the buttermilk in an immediate, vigorous reaction that produces carbon dioxide bubbles right as the dough is mixed, giving the scones extra rise and a slightly more open crumb. Using only baking powder would still work, but the scones would be slightly flatter and less tender. The acid in buttermilk also slightly weakens the gluten strands, contributing to a more tender bite.
One of the most common failures with scones is a dense, bread-like texture. This almost always comes from overmixing. When flour is hydrated and agitated, gluten strands form and tighten, making the dough tough and elastic. Scones need just enough mixing to bring the dough together into a shaggy mass. A few floury streaks are perfectly fine and will hydrate as the dough rests. Similarly, patting and folding instead of kneading keeps gluten development low while still building a little structure for those flaky layers.
Baker’s Tips
- Keep everything cold. Before you start, place your mixing bowl in the refrigerator for 10 minutes. Cold hands, cold bowl, cold butter, cold buttermilk – cold is your best friend in scone-making.
- Do not twist the cutter. Press straight down and lift straight up. Twisting compresses the edges and prevents the scones from opening upward as they bake, which is what gives them their characteristic split and rise.
- Measure flour by weight if you can. Scooping flour directly from the bag can pack in up to 30% more flour than intended, which produces dry, dense scones. Spoon it into your measuring cup and level off, or better yet, use a kitchen scale.
- Brush egg wash on the tops only, not the sides. Egg wash on the sides acts like a seal and prevents the scones from rising freely at the edges. Use a light touch.
- A hot baking sheet makes a real difference. Putting the scones onto a preheated sheet gives an immediate blast of bottom heat that encourages a rapid, tall rise right from the moment they hit the oven.
- Do not skip the resting time after baking. The internal crumb is still setting as the scones cool. Cutting into one immediately will give you a gummy interior even if the outside looks perfect. Ten minutes is all it takes.
Variations
- Fruit scones: Fold in 80g (about 1/2 cup) of plump sultanas or dried currants along with the buttermilk for a classic fruit scone. Soak the dried fruit in warm tea for 10 minutes first for extra plumpness.
- Cheese and chive scones: Omit the sugar and fold in 80g (about 2/3 cup) of sharp cheddar, finely grated, and 2 tablespoons of fresh chives into the flour before adding the butter. Top with extra cheese before baking.
- Lemon and poppy seed scones: Add the finely grated zest of 1 large lemon and 1 tablespoon of poppy seeds to the dry ingredients. Brush with lemon glaze (60g icing sugar + 1 to 2 tsp lemon juice) instead of serving with jam.
- Whole wheat scones: Replace half the all-purpose flour (150g) with whole wheat flour for a nuttier, more rustic scone. Add 1 extra tablespoon of buttermilk as whole wheat absorbs more liquid.
Troubleshooting & FAQ
My scones came out flat and did not rise much. What went wrong?
My scones spread outward instead of rising upward. Why did that happen?
The inside of my scones is doughy or gummy, even though the outside looks golden.
My scones are dry and crumbly rather than tender. What did I do wrong?
Can I make the dough in advance and keep it in the fridge overnight?
Storage & Make-Ahead
- Storage: Scones are best eaten the day they are baked, ideally within 2 to 3 hours of coming out of the oven. Store cooled leftovers in an airtight container at room temperature for up to 2 days. Refresh in a 350°F (175°C) oven for 5 minutes to revive the crust. Do not refrigerate, as it dries them out.
- Make-Ahead: The dry ingredients can be whisked together and stored in an airtight container up to a week ahead. Cut, unbaked scones freeze beautifully for up to 3 months – see the Freeze and Bake method above for full instructions. Do not make and store unbaked wet dough, as the leaveners will lose their potency.


Love seeing how a quick win in the kitchen builds confidence, Phil – that’s exactly how people start believing they can do hard things in other parts of life too. I’m definitely trying these with my Saturday morning group, they’ll appreciate that you can have something genuinely good without the sugar crash afterward. The buttermilk is probably doing serious work on that tender crumb.
these look incredible and i love that theyre quick, that matters when youre teaching a bunch of people in a kitchen who need to see that good food doesnt have to take all day. been making scones for years and my trick is keeping everything cold til the last second, same principle as good pastry really, its all about not overworking it. might try these with allulose next time since my residents are watching their sugar and nailing that crumb structure seems like youve got the technique down.
man these are exactly what i need, my M makes these way too sweet with the store bought stuff so im gonna try this allulose version this weekend. quick bakes are huge in my world too, phil – between soccer practice carpool and getting snacks ready for the block party next month i cant be spending half the day in the kitchen. love that philosophy that good food doesnt take forever, thats what gets my neighbors actually showing up and spending time together instead of everyone being glued to screens.