
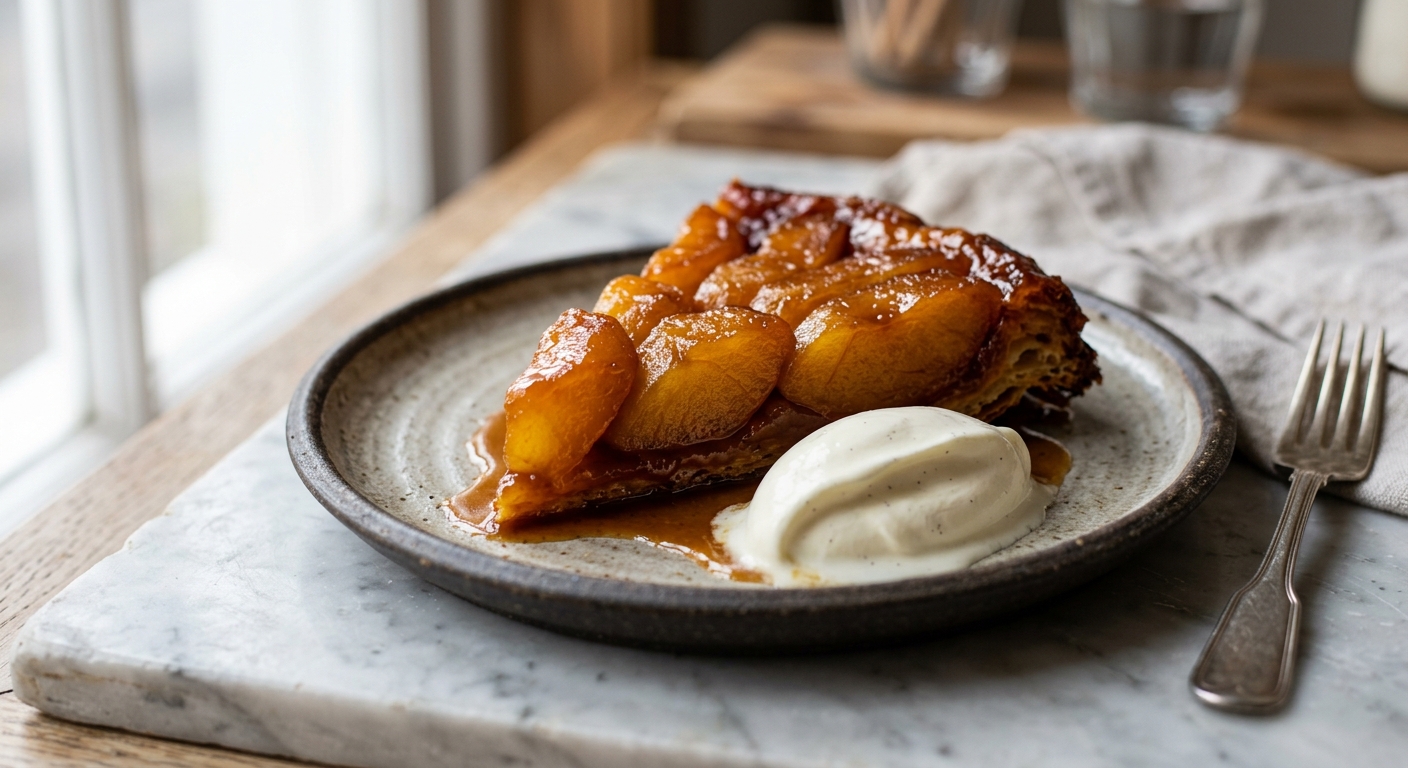
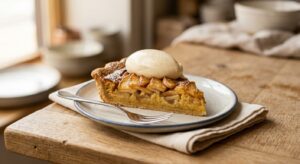
There is a moment, just after you flip a tarte tatin onto its serving plate and lift the pan away, that feels genuinely magical. A cascade of glossy, amber-lacquered apples settles onto a golden pastry base, sending ribbons of caramel curling over the edges. The kitchen smells like a French farmhouse in October. It is one of the most theatrical desserts in the pastry world, and the best part is that it is built almost entirely on pantry staples and a single cast-iron skillet.
What sets this version apart is the dry caramel method. Rather than dissolving sugar in water and waiting for it to colour, you melt the sugar directly in the pan, building a deeper, more complex caramel that edges toward bittersweet before the butter and apples go in. The apples are then cooked down until most of their moisture has driven off, which means the finished tart is never watery and the caramel stays thick and fudgy rather than pooling on the plate. A cold, lightly sweetened crème fraîche is served alongside, its gentle acidity cutting through the richness in exactly the right way.
This recipe sits firmly in the medium difficulty range. You need to be comfortable making caramel without flinching, but there are no complex techniques beyond that. It is a wonderful weekend bake for confident home cooks and an excellent dinner-party centrepiece because it can be made ahead and rewarmed beautifully. If you have never attempted a tarte tatin before, read through the tips and troubleshooting sections first. Once you have made it once, you will want to make it every autumn.
8
servings
Ingredients
- 200 gall-purpose flour (about 1 2/3 cups, spooned and leveled)
- 1 tbspcaster sugar or granulated sugar
- 0.5 tspColima Sea SaltMicroplastic Free Salt
- 150 gunsalted butter, cold and cubed (about 10 tbsp), divided: 115g (8 tbsp) for pastry, 35g (2.5 tbsp) for caramel
- 60 mlice water (about 4 tbsp), plus more as needed
- 200 gcaster sugar or granulated sugar (about 1 cup) for the caramel
- 1.4 kgfirm baking apples such as Granny Smith, Braeburn, or Honeycrisp (about 6 to 7 medium apples), peeled, cored, and quartered
- 1 tsppure vanilla extract
- 0.5 tspground cinnamon
- —Pinch of Colima Sea SaltMicroplastic Free Salt for the caramel
- 240 gfull-fat crème fraîche (about 1 cup) for serving
- 1 tbspicing sugar (powdered sugar) for the crème fraîche
- 0.5 tsppure vanilla extract for the crème fraîche
Ingredient Substitutions
Instructions
Click on an item below to shop for the recommended items for this recipe on Amazon.
As an Amazon Associate, we earn from qualifying purchases.
- Make the pastry: Combine 200g flour, 1 tbsp sugar, and 0.5 tsp salt in a large bowl. Add 115g cold cubed butter and work it in with your fingertips or a pastry cutter until the mixture resembles coarse breadcrumbs with some pea-sized butter pieces remaining. Drizzle in ice water one tablespoon at a time, tossing with a fork after each addition, until the dough just comes together when pressed. It should not be wet or sticky. Press into a flat disc, wrap in cling film, and refrigerate for at least 30 minutes.
- Prepare the apples: Peel, core, and quarter the apples. If the quarters are very large, you can halve them again. Pat them dry with paper towels. This step matters because excess surface moisture will steam the caramel and cause it to seize.
- Make the dry caramel: Place a 10-inch (25cm) oven-safe skillet, preferably cast iron, over medium heat. Sprinkle about one-third of the 200g caster sugar in an even layer over the base of the pan. When the edges begin to melt and turn amber, add another third of the sugar. Continue swirling (not stirring) the pan gently until the sugar is fully melted and a deep amber colour, around 350°F to 375°F (175°C to 190°C) on a thermometer. It should smell rich and nutty, not burned.
- Build the tart base: Remove the pan from the heat and immediately add 35g cold cubed butter and a pinch of salt, swirling carefully as it will bubble vigorously. Add the vanilla extract. Working quickly, arrange the apple quarters tightly in the caramel, standing them on their edges in concentric circles, curved side down. Pack them in snugly because they will shrink as they cook. Sprinkle the cinnamon over the top.
- Cook the apples on the stovetop: Return the pan to medium heat and cook for 15 to 20 minutes until the apples are just tender when pierced with a knife tip and the caramel has thickened around them. The apples will release liquid at first; keep cooking until most of it has reduced back into a glossy, thick caramel. Preheat your oven to 400°F (200°C) during this time.
- Roll and top with pastry: Remove the dough from the refrigerator. On a lightly floured surface, roll it into a circle about 12 inches (30cm) in diameter and roughly 3mm thick. Drape it over the rolling pin and lay it over the skillet. Tuck the edges down around the apples inside the rim of the pan, like tucking in a blanket. Prick the pastry a few times with a fork to allow steam to escape.
- Bake: Transfer the skillet to the oven and bake for 30 to 35 minutes until the pastry is deep golden brown and crisp. It should sound hollow when tapped. Let the tart rest in the pan for exactly 10 minutes, no longer, or the caramel will harden and the tart will stick.
- Flip and serve: Place a large, flat serving plate (with a lip to catch caramel) face-down over the skillet. In one confident motion, invert the skillet and plate together. Hold them firmly and flip. Lift the skillet away slowly. If any apple pieces stick to the pan, simply lift them out and press them back into place. Serve warm with sweetened crème fraîche (stir 1 tbsp icing sugar and 0.5 tsp vanilla into the crème fraîche) on the side.
- Prepare the caramel and apples as described in Steps 2 through 5 of the Oven method, using a 10-inch skillet with a well-fitting lid. Ensure the caramel is thick and glossy before proceeding.
- Cut a circle of store-bought all-butter puff pastry (thawed if frozen) to fit the diameter of your skillet, approximately 10 inches (25cm). Using a fork, dock the pastry all over. Chill in the refrigerator for 10 minutes while the apples finish cooking.
- Lay the puff pastry circle directly on top of the cooked apple mixture in the pan, tucking the edges down inside the rim as best you can. It does not need to be perfect. Place the lid firmly on the skillet.
- Cook over the lowest possible heat for 25 to 30 minutes. The pastry will puff, steam, and cook through. Check at 25 minutes by lifting the lid carefully away from you to avoid steam burns. The pastry should feel set and dry on top, and the underside will be pale gold rather than dark brown.
- Remove the lid and increase the heat to medium for 3 to 5 minutes to drive off any remaining moisture and help the caramel firm up slightly. Listen for a gentle sizzling from the caramel. Rest in the pan for 8 minutes, then flip onto a serving plate as described in Step 8 of the Oven method. Serve immediately with crème fraîche.
- Make the pastry and chill as described in Step 1 of the Oven method, using half the quantities for a 6-inch tart. You can also use a 5-inch round of store-bought shortcrust or puff pastry.
- Make the caramel and cook the apples on the stovetop in a small saucepan, not the air fryer pan. Use half the caramel and apple quantities. Transfer the caramel to a 6-inch or 7-inch round metal cake pan that fits your air fryer basket. Arrange the cooked apple quarters tightly in the caramel.
- Roll the chilled pastry into a circle just larger than your pan. Lay it over the apples and tuck the edges down inside. Prick well with a fork.
- Preheat the air fryer to 375°F (190°C) for 3 minutes. Place the pan in the basket and air-fry for 22 to 25 minutes, checking at 20 minutes. The pastry should be a rich golden brown. If the pastry is browning too quickly, lay a small piece of foil loosely over the top for the last 5 minutes.
- Allow to rest in the pan for 8 minutes. Run a thin knife around the edge of the pan to loosen. Flip onto a small serving plate and serve immediately with a generous spoonful of crème fraîche.
Nutrition Per Serving
Per 1 serving (makes one 10-inch tarte tatin, serving 8)
Why This Recipe Works
The dry caramel method, where sugar is melted without any added water, produces a more intensely flavoured result because there is no dissolved water to slow the Maillard reaction and caramelization. When you add water to sugar first, you have to wait for all that water to evaporate before browning can begin, which means more time at moderate temperature and a flatter flavour. Dry caramel goes from white to amber faster and builds deeper, slightly bitter notes that balance the sweetness of the apples. The trade-off is that it requires more attention, since there is no buffer against burning, but once you have made it a few times it becomes intuitive.
Cooking the apples on the stovetop before they go into the oven solves one of the most common tarte tatin problems: a watery, pale caramel. Apples contain a large amount of water, and if they go into the oven raw or barely softened, that moisture releases into the caramel during baking, diluting and lightening it. By driving off most of that moisture on the stovetop first, you ensure the caramel stays thick and glossy and the finished tart flips cleanly. Choosing firm apple varieties like Granny Smith or Braeburn also helps enormously: they hold their shape under heat and their higher acidity counterbalances the very sweet caramel.
The pastry is kept cold throughout the process for one critical reason: fat temperature. When butter in pastry dough is cold and solid, it creates distinct layers of fat and flour. In the oven, the butter melts and releases steam, pushing those layers apart and creating flakiness. If the butter warms up and starts to blend into the flour before baking, you lose those distinct layers and end up with something closer to a crumbly cookie than a shattering tart shell. This is why the 30-minute refrigerator rest is non-negotiable, and why working quickly with cold hands matters. If at any point your kitchen is warm and the dough feels soft or greasy, simply return it to the refrigerator for 10 minutes before continuing.
Baker’s Tips
- Choose apples that are genuinely firm. Softer varieties like Golden Delicious or Fuji will turn to mush during the stovetop cooking stage. Granny Smith is the safest choice for a beginner.
- Pat the peeled apple quarters thoroughly dry with paper towels before they go into the caramel. Surface moisture is the enemy of a smooth caramel and will cause violent sputtering.
- Have a large, lipped serving plate ready beside the stove before you begin the flip. A plate with no lip will let caramel run off the edge onto your counter.
- Do not walk away from dry caramel. It goes from perfect to burned in under 30 seconds once it reaches the right colour. Stay at the stove and swirl the pan, never stir with a spoon.
- The 10-minute rest before flipping is important, but do not exceed 15 minutes. The caramel needs to be warm enough to release cleanly from the pan but firm enough to hold the tart together. Set a timer.
- If you are nervous about flipping, practice the motion with an empty skillet and a plate before the real thing. Confidence and speed are your friends here.
- A well-seasoned cast-iron skillet gives you the best caramel because it retains and distributes heat evenly. A stainless steel skillet works too. Avoid non-stick pans as they are not typically safe at caramel temperatures.
Variations
- Salted caramel version: Increase the butter in the caramel to 50g and add 0.5 tsp flaky sea salt (such as Maldon) along with the vanilla. The contrast with the sweet apples is remarkable.
- Calvados apple tarte tatin: Add 2 tbsp Calvados or brandy to the caramel along with the butter, standing back as it will flame briefly if your pan is very hot. It adds a gorgeous complexity.
- Pear and cardamom variation: Substitute the apples with firm Bosc pears and replace the cinnamon with 0.5 tsp ground cardamom. Reduce the stovetop cooking time by about 5 minutes.
- Honey and thyme: Swap 50g of the caramel sugar for 2 tbsp of good runny honey (add it after the butter) and scatter 4 fresh thyme sprigs over the apples before topping with pastry. Remove the thyme before serving.
Troubleshooting & FAQ
My caramel crystallized and turned grainy instead of smooth. What happened?
The tart stuck to the pan and would not flip out cleanly. How do I prevent this?
My finished tart was watery and the caramel was pale and thin. What went wrong?
My caramel burned and tastes bitter. Can I rescue it?
My pastry was soggy on the bottom (which is the top before flipping). What can I do?
Storage & Make-Ahead
- Storage: Cover the cooled tarte tatin loosely with foil and store at room temperature for up to 2 days, or refrigerate for up to 4 days. Reheat individual slices in a 325°F (160°C) oven for 8 to 10 minutes, or briefly in a dry skillet over low heat to re-crisp the pastry. The crème fraîche keeps refrigerated in an airtight container for up to 5 days.
- Make-Ahead: The shortcrust pastry can be made up to 3 days ahead and kept refrigerated, or frozen for up to 2 months. The entire assembled tart can be baked up to 8 hours ahead, kept at room temperature in the pan (do not flip it yet), then gently rewarmed in a 300°F (150°C) oven for 12 minutes before flipping and serving. This is actually the recommended approach for dinner parties.


Oh man, this sounds incredible. I’ve made a few tarte tatins over the years for church potlucks and community dinners, and you’re so right about that caramel part taking some nerve, but the payoff is absolutely worth it. I’m really curious how the allulose caramelizes compared to regular sugar – does it get that deep amber color the same way? That tangy crème fraîche is the perfect touch to cut through all that sweetness, and I’m thinking this would be perfect for our dessert nights where folks are watching their sugar intake but don’t want to sacrifice that restaurant-quality experience.
I love that you’re bringing this to community dinners, Eli, there’s something really grounded about feeding people real food that matters. With allulose, you’ll get that same deep amber color, though it caramelizes a touch faster so you want to watch it closely near the end, kind of like how light changes differently depending on the season. The tangy crème fraîche is honestly the thing that makes it feel less like a compromise and more like what it actually is, a simple recipe done well, and I think your guests will feel that difference.
Elena, that means a lot, and you’ve really nailed something I think about a lot with the food we share at the church, that it shouldn’t feel like we’re making do with less, just making something thoughtfully. I’ll definitely keep an eye on that caramel with the allulose, appreciate the tip about it moving faster. There’s something about a tarte tatin that just feels like you put care into it, you know, and adding that tangy crème fraîche on top sounds like the perfect way to show people this isn’t about skimping but about doing it right.
This is exactly the kind of dessert that teaches you something valuable, you know? I tried making tarte tatin last year with allulose and was nervous about the caramel phase, but the sweetness actually helped me relax into it because I didn’t have to worry about burning regular sugar quite as badly. Your point about needing patience and bravery hits different when you’re feeding people you care about, like those church potlucks Eli mentioned. Can’t wait to try this version with the crème fraîche balance.
ok yes, this is such a good point about allulose taking some of the pressure off during the caramel stage because honestly thats where i see people psych themselves out the most. i love that you connected it to cooking for people you care about because thats real, like theres something about knowing youre feeding your community that makes you want to nail it, and having a more forgiving sugar alternative actually lets you focus on getting that deep caramel flavor instead of white knuckling it the whole time. the crème fraîche balance is gonna be *chef’s kiss* with allulose too because it wont be cloying.