
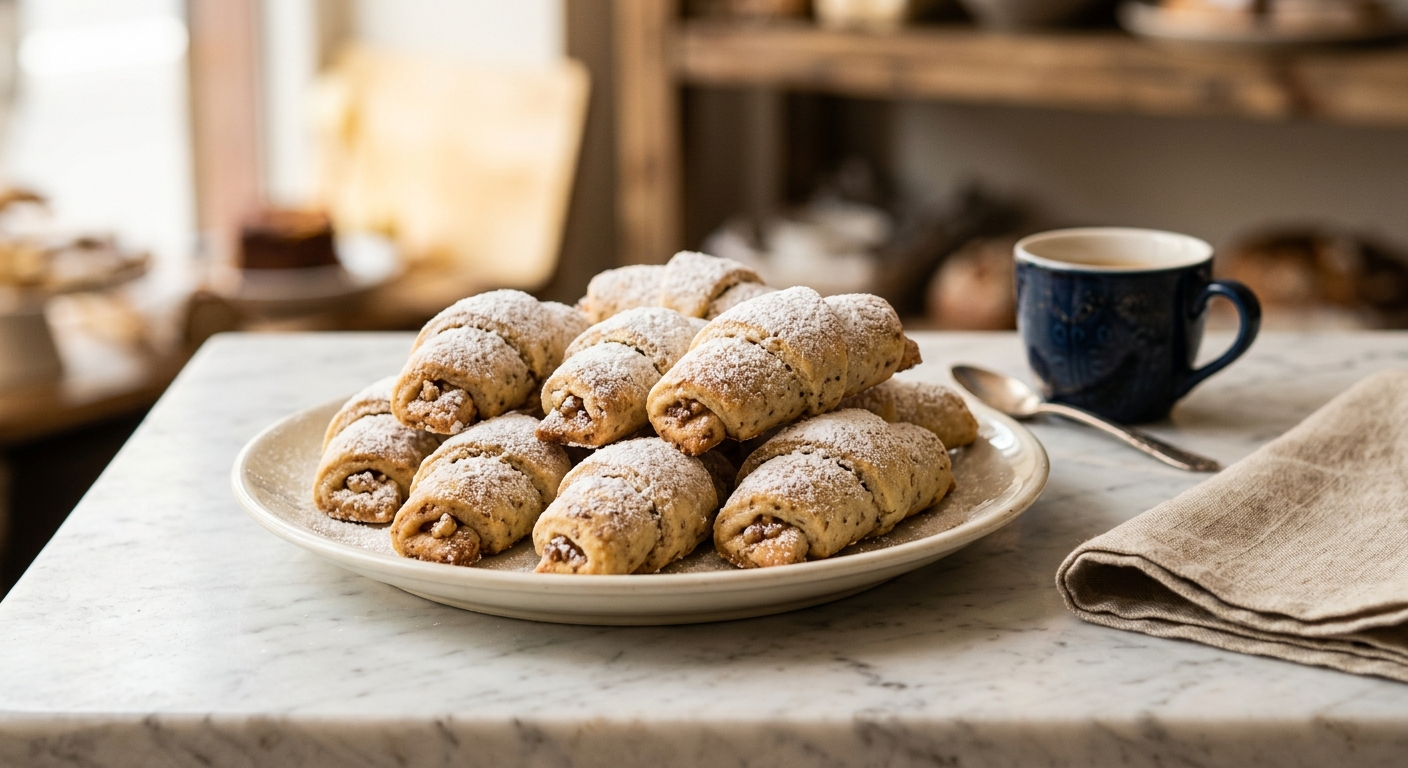
There is a particular kind of magic that happens in kitchens around the holidays in Hungary, and it smells like warm walnuts, vanilla, and powdered sugar. Kifli – delicate, crescent-shaped cookies with a buttery, crumbly dough wrapped around a fragrant walnut filling – are a beloved fixture on every Hungarian Christmas plate. They shatter gently against your teeth before giving way to a dense, lightly sweetened nut filling that is somehow both rustic and refined. One is never enough, which is fortunate, because this recipe makes plenty.
What sets this version apart is the use of a sour cream pastry dough. The acidity in the sour cream tenderizes the gluten strands, giving the finished cookie an almost shortbread-like crumb that holds together just enough to be elegant but practically dissolves the moment it hits your tongue. The walnut filling is kept intentionally simple, with just enough sugar and a whisper of cinnamon and vanilla to let the toasted walnuts shine. Rolling the warm cookies in powdered sugar twice, once right out of the oven and again after cooling, creates that iconic snowy coating that clings to every curve.
These cookies sit firmly in the easy-to-medium range of difficulty. The dough comes together without a mixer and only needs a short chill, and the rolling and shaping is a satisfying, meditative process that is perfect for baking alongside a child or a friend. They are an ideal holiday project, a wonderful gift tucked into a tin, and equally at home on a weekday afternoon with a cup of tea. If you have never made kifli before, this is the recipe that will make it a new tradition.
36
servings
Ingredients
- Filling
- 300 gall-purpose flour (about 2.5 cups, spooned and leveled), plus extra for dusting
- 0.25 tspColima Sea SaltMicroplastic Free Salt
- 225 gcold unsalted butter (2 sticks or 1 cup), cut into 1/2-inch cubes
- 120 gfull-fat sour cream (about 1/2 cup)
- 1 tsppure vanilla extract
- 200 gwalnut halves or pieces (about 2 cups), toasted
- 100 ggranulated sugar (about 1/2 cup)
- 1 tspground cinnamon
- 1 tsppure vanilla extract
- Coating
- 30 mlwhole milk (about 2 tablespoons), as needed to bind filling
- 150 gpowdered sugar (about 1.25 cups), sifted
- Filling
- —Pinch of Colima Sea SaltMicroplastic Free Salt
Ingredient Substitutions
Instructions
Click on an item below to shop for the recommended items for this recipe on Amazon.
As an Amazon Associate, we earn from qualifying purchases.
- Make the dough: In a large bowl, whisk together the flour and salt. Add the cold cubed butter and, using your fingertips or a pastry cutter, work it into the flour until the mixture resembles coarse crumbs with some pea-sized butter pieces remaining. Do not overwork it. Stir in the sour cream and 1 teaspoon vanilla extract until the dough just comes together. It will look shaggy at first – keep pressing it gently. Divide into two equal discs, wrap in plastic wrap, and refrigerate for at least 1 hour or up to overnight.
- Make the walnut filling: While the dough chills, pulse the toasted walnuts and granulated sugar in a food processor until the mixture looks like coarse, damp sand. Some slightly larger pieces are fine and add texture. Transfer to a bowl and stir in the cinnamon, the second teaspoon of vanilla, and the pinch of salt. Add milk one teaspoon at a time just until the mixture holds together when pressed between your fingers. It should not be wet. Set aside.
- Preheat your oven to 350°F (175°C). Line two large baking sheets with parchment paper.
- Shape the kifli: Lightly flour your work surface. Working with one disc of dough at a time (keep the other refrigerated), roll it into a roughly 12-inch circle, about 3mm (just under 1/8 inch) thick. Use a sharp knife or pizza cutter to divide the circle into 18 even wedges, like a pizza. Place about 1 teaspoon of walnut filling near the wide base of each wedge, keeping it slightly away from the edges. Starting at the wide end, roll each wedge up toward the point, then gently curve the ends inward to form a crescent shape. Place on the prepared baking sheet with the tip tucked underneath so they do not unroll during baking.
- Bake for 18 to 22 minutes, until the bottoms are lightly golden and the tops are just barely beginning to color. They will look pale – that is correct. Overbaked kifli lose their tender texture.
- While the cookies are still warm (about 3 to 4 minutes out of the oven), gently roll them in the sifted powdered sugar to coat completely. Set on a cooling rack and let them cool fully. Once completely cool, roll them in powdered sugar a second time for a thick, snowy finish. Repeat with the second disc of dough.
- Prepare the dough and walnut filling exactly as described in the oven method steps 1 and 2. Chill the dough for at least 1 hour.
- Preheat your air fryer to 325°F (163°C) for 3 minutes. Cut a piece of parchment paper to fit the air fryer basket, leaving space around the edges for airflow. Do not skip the parchment – the cookies are delicate and will stick to the basket.
- Shape the kifli following oven method step 4. Place 6 to 8 crescents in a single layer in the air fryer basket with at least 1 inch of space between them. Do not overcrowd. Keep unshapen dough refrigerated between batches.
- Air fry at 325°F (163°C) for 9 to 11 minutes, until the bottoms are lightly golden. Check at the 9-minute mark – air fryers vary in power and the cookies can go from pale to overbaked quickly. The tops will remain fairly pale, which is normal and desirable.
- Carefully remove the cookies and let them rest for 3 minutes. While still warm, gently roll them in sifted powdered sugar. Cool completely on a rack, then dust with a second coat of powdered sugar. Continue with remaining batches.
- Prepare the dough and filling as directed. After chilling, shape all the kifli according to oven method step 4.
- Arrange the shaped, unbaked crescents on a parchment-lined baking sheet in a single layer, not touching. Place the entire tray in the freezer for 1 to 2 hours until the cookies are frozen solid.
- Transfer the frozen crescents to a zip-top freezer bag or airtight container, separating layers with parchment paper. Label with the date. They will keep for up to 2 months.
- When ready to bake, preheat your oven to 350°F (175°C). Arrange the frozen kifli on a parchment-lined baking sheet. Do not thaw them first – baking from frozen is key to keeping their shape.
- Bake for 22 to 26 minutes from frozen, until the bottoms are lightly golden. Add 4 to 5 minutes to the standard bake time to account for the frozen dough. While still warm, roll in sifted powdered sugar, cool completely, and coat a second time.
Nutrition Per Serving
Per 1 serving (makes about 36 crescent cookies)
Why This Recipe Works
The secret to kifli’s extraordinary tenderness lies entirely in the fat and acid balance of the dough. Cold butter, worked quickly into the flour, creates a laminated, flaky-adjacent structure by coating the flour particles and forming small pockets of fat that steam and separate during baking. But what keeps kifli distinctly melt-in-the-mouth rather than flaky like a croissant is the sour cream. The lactic acid in sour cream inhibits gluten development, meaning the protein strands in the flour cannot link up into long, chewy networks. The result is a dough that is easy to roll, holds its shape in the oven, and then shatters into tender crumbs the moment you bite into it. This is why keeping the dough cold throughout is so important – warm butter melts fully into the flour rather than staying in distinct pieces, and you lose that all-important layered structure.
Toasting the walnuts before making the filling is a non-negotiable step, not just for flavor but for texture. Raw walnuts release moisture as they bake, which can make the filling dense or cause the dough to become soggy from the inside. Toasting drives off that moisture and also triggers the Maillard reaction in the nut oils, deepening the flavor from raw and slightly bitter to complex and nutty. The small amount of milk in the filling acts as a binder, helping the ground walnut mixture hold together as you roll it inside the dough without crumbling out.
Rolling the kifli in powdered sugar while they are still warm is a technique with a real purpose. The surface of a warm cookie has just enough moisture and heat to partially melt the powdered sugar, creating a very thin, barely-there glaze that acts as an anchor. The second coating applied once the cookies are cool adheres to this anchor layer, resulting in a thick, even, non-patchy coating that does not fall off when you pick up the cookie. If you skip the warm coat and only apply sugar when cool, the coating tends to be uneven and dusty.
Baker’s Tips
- Keep the dough cold at every stage. If it becomes soft and sticky while you are shaping, slide the tray of shaped cookies into the freezer for 10 minutes before baking. Cold dough holds its crescent shape far better in the oven.
- Use a kitchen scale to weigh your ingredients, especially the flour. Too much flour makes the dough stiff and hard to roll, and the finished cookies will be dry rather than tender.
- Toast the walnuts yourself rather than buying pre-toasted. Spread them on a dry baking sheet and toast at 350°F (175°C) for 8 to 10 minutes, shaking once, until golden and fragrant. Let them cool completely before processing.
- Do not roll the dough too thin. Less than 3mm and the dough is difficult to work with and may tear. Thicker cookies are more forgiving to shape and have a more satisfying texture.
- Tuck the tip of each crescent underneath the cookie before baking. This small detail prevents the tip from springing up and unrolling, and gives the cookie a neater appearance.
- Sift the powdered sugar before rolling the cookies. Lumpy sugar coating is the most common visual issue with kifli and is entirely preventable.
- If your filling seems too dry and crumbly, add milk half a teaspoon at a time. If it seems too wet and sticky, add a tablespoon of ground walnuts or almond flour to absorb the excess moisture.
Variations
- Apricot jam filling: Replace the walnut filling with 1/2 cup thick apricot jam (look for a low-sugar variety so it does not run). Place a scant teaspoon at the base of each wedge before rolling.
- Poppy seed kifli: Substitute the walnuts with 200g ground poppy seeds. Mix with 80g sugar, 30ml warm milk, 1 tsp lemon zest, and 1/2 tsp vanilla. A beloved Hungarian variation called mákos kifli.
- Chocolate walnut filling: Add 30g finely grated dark chocolate to the walnut filling mixture for a richer, more indulgent cookie that is especially popular with children.
- Lemon-almond version: Replace the walnuts with toasted blanched almonds, reduce cinnamon to 1/4 tsp, and add 1 tsp fresh lemon zest and 1/2 tsp almond extract to the filling.
Troubleshooting & FAQ
My dough is too sticky to roll and keeps tearing. What went wrong?
My kifli unrolled or spread flat during baking. How do I prevent this?
The powdered sugar coating is patchy and keeps falling off. What am I doing wrong?
My walnut filling keeps falling out when I eat the cookie. How can I fix this?
My cookies taste bland. Can I add more flavor to the filling?
Storage & Make-Ahead
- Storage: Store kifli in a single layer (or with parchment between layers) in an airtight tin or container at room temperature for up to 5 days. Avoid refrigerating them as the cold air dries them out. For longer storage, freeze fully baked and cooled cookies (before the second powdered sugar coating) for up to 2 months. Thaw at room temperature and dust with fresh powdered sugar before serving.
- Make-Ahead: The dough can be made up to 2 days ahead and kept wrapped in the refrigerator. The walnut filling can be made up to 3 days ahead and stored in an airtight container at room temperature. Fully shaped unbaked kifli can be frozen for up to 2 months and baked directly from frozen (see Freeze and Bake Later method). Baked kifli actually improve slightly on day two as the filling settles into the dough.


Oh, these sound lovely. I’ve been experimenting with allulose in my holiday baking this year and I’m really curious how it performs in something like this, where the texture is so delicate. There’s something about the ritual of making kifli, that patient hand work you mentioned, that feels like it belongs in a quiet kitchen on a cold afternoon. Have you found allulose holds up well in the walnut filling, or do you adjust the ratio at all? I’d love to try this version.
There’s something sacred about that patient work with your hands, isn’t there? I love that Terrence and you are both exploring allulose with such intention, because that’s exactly what growing good food or baking something real requires: showing up, experimenting, learning what works in your own kitchen. The walnut paste filling reminds me of how we layer depth into everything, whether it’s soil or sweets, and I’m genuinely curious how the allulose plays with that delicate texture you mentioned, Elena. If you end up making these, I’d love to hear what you discover.
oh man elena these are gonna be so good with allulose, my oldest got really into helping me make cookies last year and we did a bunch of experiments with different sweeteners and honestly allulose was the winner for stuff like this where you need that tender crumbly texture. the walnut paste filling is so forgiving too, we’ve made these with my neighbors a couple times for our block party dessert table and the kids go crazy for them, theres something really special about that ritual you mentioned, def gonna try this version out soon!