
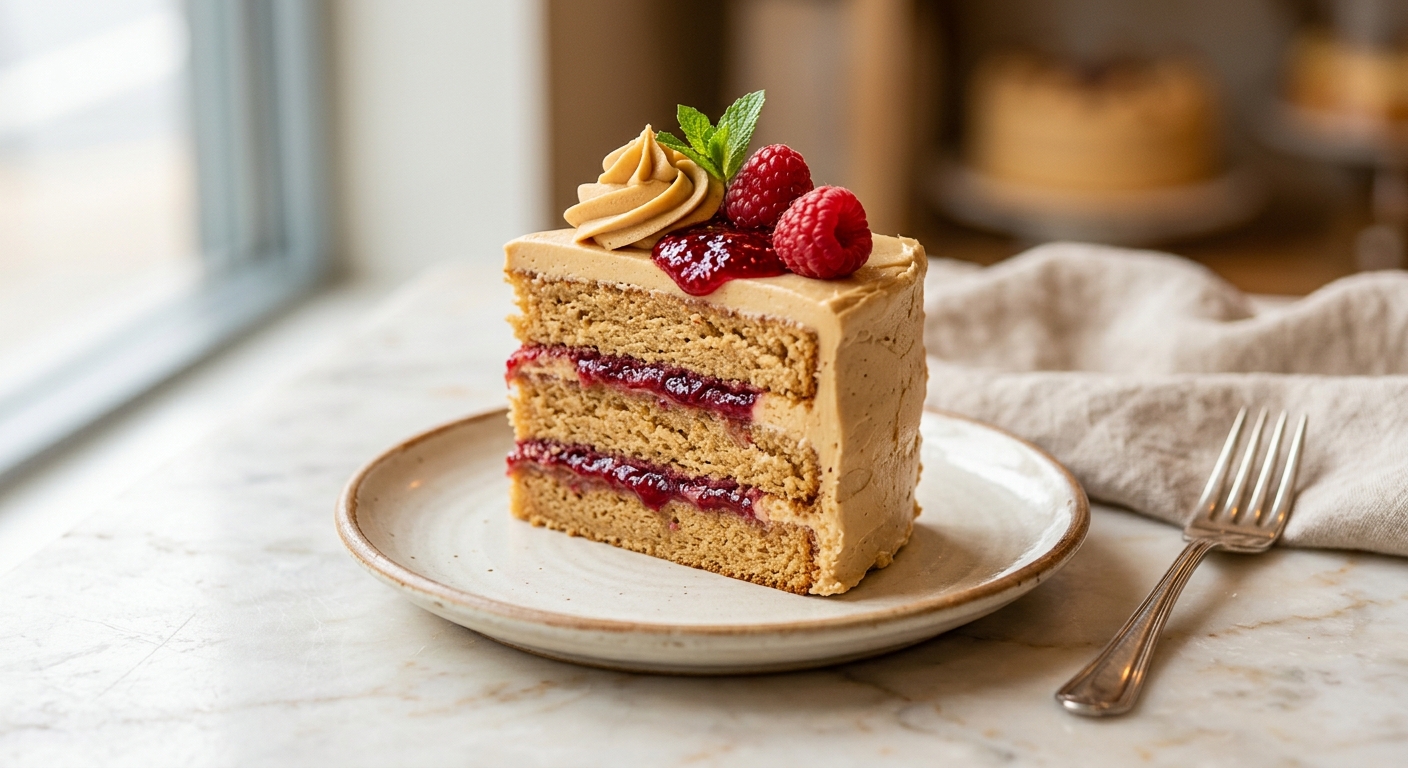
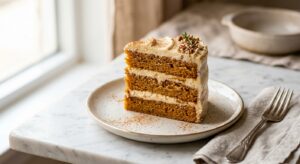
There is something almost magical about the combination of peanut butter and jelly. It lives in our memory as something humble and everyday, folded into wax paper and tucked into a lunchbox. But take those same flavors and layer them into a tall, elegant cake and something wonderful happens. The peanut butter sponge is rich and nutty without being heavy, the raspberry jam bursts with a bright tartness that cuts right through the sweetness, and the whipped peanut butter frosting pulls it all together in the most satisfying way. This is comfort food dressed up for a celebration.
What sets this cake apart is the technique used for the sponge layers. By creaming the peanut butter with the butter before adding sugar, you build a deeper, more complex peanut flavor into the crumb itself rather than relying only on the frosting to carry it. A touch of brown sugar alongside the white sugar adds a subtle molasses warmth that pairs beautifully with the jam. The frosting is whipped for several minutes longer than you might expect, which gives it an almost mousse-like lightness so it never feels heavy or cloying on the palate.
This cake sits confidently in the medium difficulty range. If you have made a layer cake before, this will feel very familiar. If this is your first time, the steps are clearly laid out and forgiving. It is a perfect weekend bake for birthdays, summer gatherings, or honestly any Tuesday when you need something truly delicious waiting on the counter.
12
servings
Ingredients
- Frosting (1 Cup Or 2 Sticks)
- 300 gall-purpose flour (about 2.5 cups, spooned and leveled)
- 2 tspbaking powder
- 0.5 tspbaking soda
- 0.75 tspColima Sea SaltMicroplastic Free Salt
- 115 gunsalted butter, at room temperature (1/2 cup or 1 stick)
- 200 gsmooth peanut butter, commercial style such as Jif or Skippy (not natural)
- 200 ggranulated white sugar (1 cup)
- 100 gpacked light brown sugar (1/2 cup)
- 3 largeeggs, at room temperature
- 2 tsppure vanilla extract
- 240 mlwhole milk, at room temperature (1 cup)
- 120 mlsour cream, at room temperature (1/2 cup)
- 300 graspberry jam, smooth or seedless preferred (about 1 cup)
- 225 gunsalted butter, at room temperature
- Frosting (1.25 Cups)
- 300 gsmooth peanut butter, commercial style
- Frosting (about 4 Cups)
- 480 gpowdered sugar, sifted
- Frosting (1/3 Cup)
- 80 mlheavy cream
- Frosting
- 1 tsppure vanilla extract
- —Pinch of Colima Sea SaltMicroplastic Free Salt
- Garnish (optional)
- 60 groasted salted peanuts, roughly chopped, for garnish (optional, about 1/2 cup)
- 2 tbspraspberry jam, warmed and loosely drizzled
Ingredient Substitutions
Instructions
Click on an item below to shop for the recommended items for this recipe on Amazon.
As an Amazon Associate, we earn from qualifying purchases.
- Preheat your oven to 350°F (175°C). Grease three 8-inch round cake pans, line the bottoms with parchment paper circles, then grease the parchment and dust each pan lightly with flour, tapping out any excess.
- In a medium bowl, whisk together the flour, baking powder, baking soda, and salt. Set aside. In a small bowl or measuring jug, whisk together the whole milk and sour cream until smooth. Set aside.
- In the bowl of a stand mixer fitted with the paddle attachment, beat the room-temperature butter and peanut butter together on medium speed for 2 full minutes until the mixture is pale and very smooth. Add the granulated sugar and brown sugar and continue beating for another 3 minutes, scraping down the sides of the bowl as needed, until the mixture is light and fluffy.
- Add the eggs one at a time, beating for 30 seconds after each addition. Scrape the bowl well. Add the vanilla extract and beat briefly to combine.
- With the mixer on low speed, add the flour mixture in three additions, alternating with the milk and sour cream mixture in two additions. Begin and end with the flour. Mix only until just combined after each addition. A few small streaks of flour are fine. Finish folding by hand with a spatula to avoid overmixing.
- Divide the batter evenly among the three prepared pans. A kitchen scale makes this easy. Smooth the tops gently with an offset spatula. Bake for 28 to 32 minutes, until the tops are golden, the edges pull slightly from the pan, and a toothpick inserted in the center comes out with just a few moist crumbs.
- Let the cakes cool in their pans on a wire rack for 15 minutes, then run a thin knife around the edges and turn them out onto the rack. Peel off the parchment and allow the layers to cool completely, at least 1 hour, before assembling.
- To make the frosting, beat the room-temperature butter and peanut butter together in a stand mixer on medium-high speed for 3 full minutes until very light and creamy. Add the sifted powdered sugar one cup at a time, beating on low after each addition. Add the vanilla, a pinch of salt, and the heavy cream. Increase speed to medium-high and beat for an additional 3 minutes until the frosting is noticeably lighter, fluffy, and spreadable. If it seems too thick, add cream one teaspoon at a time.
- To assemble, place one cake layer on a serving plate or cake board. Spread half of the raspberry jam in an even layer, leaving a 1/4-inch border around the edge. Pipe or spoon a ring of peanut butter frosting around the edge of the jam to act as a dam and keep the jam from squeezing out. Place the second cake layer on top, press very gently, and repeat with the remaining jam and another frosting dam. Place the final cake layer on top, bottom-side up for a flat surface. Apply a thin crumb coat of frosting all over the cake, then refrigerate for 20 minutes. Finish with a generous layer of frosting on the top and sides. Garnish with chopped roasted peanuts and a drizzle of warmed raspberry jam if desired.
- Preheat your oven to 350°F (175°C). Grease a 9×13-inch metal baking pan and line with parchment paper, leaving an overhang on the long sides for easy lifting.
- Prepare the cake batter exactly as described in the oven method, steps 2 through 5. Pour all of the batter into the prepared pan and spread it level with an offset spatula.
- Spoon the raspberry jam over the top of the batter in small dollops spaced across the entire surface. Use a butter knife or skewer to swirl the jam gently into the top of the batter, creating a marbled look. Do not mix it in completely.
- Bake for 30 to 35 minutes, until the cake is set across the whole surface, the edges are pulling from the pan, and a toothpick inserted in the center comes out with just a few moist crumbs. Allow to cool completely in the pan on a wire rack.
- Prepare the peanut butter frosting as directed in step 8 of the oven method. Spread the frosting generously over the top of the cooled cake in thick swoops. Scatter chopped roasted peanuts over the top and drizzle with an additional tablespoon of warmed jam for a beautiful finish. Slice directly from the pan.
- Preheat your oven to 350°F (175°C). Line two standard 12-cup muffin pans with paper liners.
- Prepare the cake batter exactly as described in the oven method, steps 2 through 5. Fill each cupcake liner two-thirds full with batter. Do not overfill.
- Bake for 18 to 22 minutes, until the tops are domed and golden and a toothpick inserted in the center comes out clean or with a couple of moist crumbs. Do not open the oven before 18 minutes. Let the cupcakes cool in the pan for 5 minutes, then transfer to a wire rack and cool completely.
- Once cooled, use a small paring knife or a cupcake corer to cut a shallow cone from the center of each cupcake, about 3/4 inch deep. Fill each cavity with approximately 1 teaspoon of raspberry jam. Replace the top of the cut-out piece over the jam, pressing it down gently so the surface is flat.
- Prepare the peanut butter frosting as directed in the oven method. Transfer to a piping bag fitted with a large star tip and pipe a swirl of frosting on each cupcake. Finish with a small dollop of jam on top and a sprinkle of chopped salted peanuts.
Nutrition Per Serving
Per 1 serving (makes one 8-inch three-layer cake)
Why This Recipe Works
Commercial peanut butter, such as Jif or Skippy, is specifically called for here because it contains stabilizers that keep the oils from separating. This matters enormously in both the cake and the frosting. Natural peanut butter is mostly oil and ground peanuts with nothing to hold them together, which can make the batter greasy and the frosting unstable or grainy at room temperature. The stabilized variety behaves more like a fat with consistent texture, giving you a reliable result every time.
The combination of whole milk and sour cream in the batter is doing important work. The fat in the sour cream adds richness and tenderness to the crumb by coating the gluten strands before they fully develop, while the mild acidity in the sour cream reacts with the baking soda to produce a fine, even rise. This dual-leavening approach, using both baking powder for a steady lift and baking soda to neutralize the acidity and add browning, is why the layers bake up tall and golden without doming too aggressively in the center.
The frosting dam technique during assembly is the single most important tip for a clean, professional-looking slice. Raspberry jam is fluid enough under pressure to push outward and split your layers apart if it has nothing to hold it in. By piping a ring of the thick peanut butter frosting around the perimeter of each jam layer before stacking, you create a physical barrier that keeps the jam exactly where you want it. If your cake is leaning or the layers are sliding during assembly, chill the crumb-coated cake for at least 20 minutes before applying the final coat of frosting. Cold cake is much more forgiving to work with.
Baker’s Tips
- Room temperature ingredients are non-negotiable here. Cold eggs or cold milk added to the creamed butter and peanut butter will cause the mixture to curdle or look curdled, which affects the final texture. Take everything out of the refrigerator at least 45 minutes before you start.
- Use a kitchen scale to divide batter evenly among the three pans. Equal layers mean even baking times and a cake that sits level without trimming.
- Do not use natural or drippy peanut butter in this recipe. The separated oil will make the batter greasy and the frosting soft and unstable. Stick with commercial creamy peanut butter for best results.
- If your jam is thick and stiff, warm it gently in a small saucepan or in the microwave for 10 to 15 seconds and stir until just fluid. It will spread much more easily and evenly without tearing the cake layer.
- For the cleanest cake slices, dip your knife in hot water and wipe it dry between each cut. The warmth glides through the frosting without dragging.
- The frosting pipe dam is your best friend for a neat assembly. Fit a piping bag with a plain round tip and pipe a thick ring of frosting just inside the edge of each cake layer before spooning in the jam. This prevents the jam from squeezing out the sides when the next layer is pressed on top.
Variations
- Strawberry and honey version: Swap the raspberry jam for strawberry jam and add 2 tablespoons of honey to the cake batter along with the sugars for a floral sweetness.
- Chocolate PB&J: Replace 30g of flour with Dutch-process cocoa powder and add 1 teaspoon of espresso powder to the dry ingredients for a chocolate-peanut butter base with the jam filling.
- Spicy peanut butter: Add 1/4 teaspoon of cayenne pepper to the frosting for a subtle heat that plays beautifully against the sweet jam.
- Pretzel crunch topping: Scatter crushed salted pretzels over the frosted cake just before serving for a salty, crunchy finish that takes this over the top.
Troubleshooting & FAQ
My cake layers domed in the center and are uneven. How do I fix this?
My peanut butter frosting is too stiff and difficult to spread. What went wrong?
The jam is oozing out from between my cake layers. How do I prevent this?
My cake has a dense, gummy texture. What happened?
Can I make this as a two-layer cake instead of three layers?
Storage & Make-Ahead
- Storage: Store the assembled cake under a cake dome or wrapped loosely at room temperature for up to 2 days, or refrigerate for up to 5 days. Bring slices to room temperature for 20 to 30 minutes before serving for the best texture. Individual slices can be frozen, well wrapped, for up to 2 months.
- Make-Ahead: The cake layers can be baked, cooled completely, wrapped tightly in plastic wrap, and stored at room temperature for up to 2 days, or frozen for up to 3 months. Thaw overnight in the refrigerator before assembling. The peanut butter frosting can be made up to 3 days ahead, stored in an airtight container in the refrigerator, and re-whipped with a mixer for 1 to 2 minutes before using. The fully assembled cake can be made one day ahead and refrigerated.
This sounds absolutely incredible! I’m always looking for ways to make desserts that actually work for people trying to cut back on sugar, and a PB&J cake with allulose feels like such a natural fit for that nostalgic comfort food vibe. I tried baking a peanut butter layer cake last month and kept running into this problem where the crumb got dense, but I’m wondering if you found that working with allulose changed the texture at all compared to regular sugar? Would love to know if there are any adjustments you made to keep it fluffy!
Man, this is such a beautiful idea! I’ve been baking more with allulose lately for our church potlucks, and something about bringing back those PB&J flavors without the sugar crash just hits different, you know? I’m definitely trying this one – feels like the kind of cake that could get even the pickiest eaters excited about something a little different.
This is such a beautiful recipe, and I love what you said about bringing back those nostalgic flavors without the crash, Eli. There’s something really special about recreating the comforting things we loved, especially when we can do it in a way that feels good in our bodies. I’ve found that allulose works beautifully in peanut butter frosting because it keeps that silky texture without any weird aftertaste, so I have a feeling this is going to be a winner for your potlucks.