

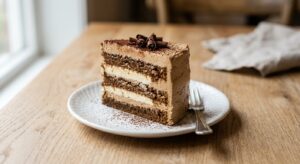
There is a moment at every birthday party, potluck, or celebration dinner when someone walks in carrying a cake and the entire room goes quiet. This is that cake. Tall, dramatic, and dusted in crushed Oreo crumbs with dark chocolate layers peeking through every slice, the Cookies and Cream Cake is everything a celebration dessert should be. Each forkful delivers soft, deeply chocolatey cake, a ribbon of cream-filled crunch, and a buttercream so smooth and cookie-laden it practically tastes like a grown-up Oreo Blizzard.
What sets this version apart is a two-part Oreo strategy. Crushed cookies are folded directly into the cake batter, where they soften slightly during baking and become part of the crumb itself, adding little bursts of chocolate cookie flavor in every bite. The buttercream, meanwhile, gets a full cup of finely processed Oreos blended right in, giving it that distinctive cookies-and-cream flavor without turning the frosting gritty or heavy. The secret here is processing the cookies to a near-powder so they melt seamlessly into the buttercream, keeping every swirl silky and pipeable.
This recipe sits comfortably in the medium difficulty range. If you have made a layered cake before, you will feel right at home. If this is your first layer cake, take your time with the frosting steps, read through the tips section, and you will be just fine. This cake is perfect for birthdays, celebrations, or any weekend when you want to make something that will genuinely impress the people you love.
14
servings
Ingredients
- Cake Batter)
- 300 gall-purpose flour (about 2 1/2 cups, spooned and leveled)
- 60 gDutch-process cocoa powder (about 3/4 cup)
- 2 tspbaking powder
- 1 tspbaking soda
- 0.75 tspColima Sea SaltMicroplastic Free Salt
- 300 ggranulated sugar (about 1 1/2 cups)
- 100 glight brown sugar, packed (about 1/2 cup)
- 240 mlAvocado Oil100% Pure Avocado Oil such as vegetable or canola (about 1 cup)
- 3 largeeggs, at room temperature
- 240 mlbuttermilk, at room temperature (about 1 cup)
- 240 mlhot strong brewed coffee or hot water (about 1 cup)
- 2 tsppure vanilla extract
- 200 gOreo cookies, roughly crushed (about 17 cookies
- Buttercream)
- 340 gunsalted butter, at room temperature (about 1 1/2 cups or 3 sticks
- 170 gfull-fat cream cheese, at room temperature (about 3/4 cup
- 600 gpowdered sugar, sifted (about 5 cups
- 240 gOreo cookies, finely processed to a near-powder (about 20 cookies
- Buttercream
- 3 tbspheavy cream or whole milk, plus more as needed
- 1 tsppure vanilla extract
- —Pinch of Colima Sea SaltMicroplastic Free Salt
- Decoration
- 8 wholeOreo cookies, halved or left whole
Ingredient Substitutions
Instructions
Click on an item below to shop for the recommended items for this recipe on Amazon.
As an Amazon Associate, we earn from qualifying purchases.
- Preheat your oven to 350°F (175°C). Grease three 9-inch round cake pans, line the bottoms with parchment paper circles, then grease the parchment and dust lightly with cocoa powder. Set aside.
- In a large bowl, whisk together the flour, cocoa powder, baking powder, baking soda, and salt until evenly combined. Set aside.
- In a second large bowl or the bowl of a stand mixer, whisk the granulated sugar, brown sugar, and oil together until combined. Add the eggs one at a time, whisking well after each addition. Mix in the vanilla extract. The mixture should look glossy and slightly thickened.
- Add the dry ingredients to the wet ingredients in three additions, alternating with the buttermilk in two additions (dry, wet, dry, wet, dry), stirring gently with a spatula after each addition until just combined. Do not overmix. Slowly pour in the hot coffee or hot water and stir until the batter is smooth and uniform. It will be quite thin – that is correct.
- Fold in the roughly crushed Oreos (the 200g portion) gently with a spatula. Divide the batter evenly among the three prepared pans. Each pan should hold roughly 550 to 560g of batter if you want to weigh for precision.
- Bake for 28 to 32 minutes, or until a toothpick inserted in the center comes out with just a few moist crumbs. Begin checking at 26 minutes as oven temperatures vary. If baking two pans at a time, rotate them front-to-back halfway through. Remove from the oven and let the cakes cool in their pans on a wire rack for 15 minutes, then turn out, peel away the parchment, and cool completely on the rack, at least 1 hour.
- While the cakes cool, make the Oreo buttercream. In a food processor, blitz the 240g of Oreos until they become a fine, sandy powder with no visible chunks. Set aside. In the bowl of a stand mixer fitted with the paddle attachment (or in a large bowl with a hand mixer), beat the room-temperature butter and cream cheese on medium-high speed for 3 to 4 minutes until very light and fluffy. Scrape down the sides of the bowl.
- Reduce mixer speed to low and add the sifted powdered sugar in three additions, mixing until each addition is incorporated before adding the next. Add the pinch of salt and vanilla extract. Once all the sugar is in, increase speed to medium and beat for 2 minutes. Add the Oreo powder and beat on low until fully combined, then increase to medium and beat for 1 more minute. Add heavy cream one tablespoon at a time until the buttercream reaches a smooth, spreadable but sturdy consistency. It should hold a peak and spread without tearing.
- To assemble: Place one completely cooled cake layer on a cake board or serving plate. Spread a generous layer of Oreo buttercream (about 3/4 cup) evenly across the top with an offset spatula. Place the second layer on top and repeat. Add the third layer and press very gently. Apply a thin crumb coat of buttercream over the entire outside of the cake and refrigerate for 20 minutes to set. Apply the final, thicker layer of buttercream, smoothing the sides and top with the offset spatula or a bench scraper. Decorate with whole or halved Oreo cookies pressed around the top edge. Refrigerate for at least 30 minutes before slicing to help the layers set cleanly.
- Prepare the same cake batter following steps 2 through 5 of the oven method. Because this yields more batter than you may need for one or two sessions, you can refrigerate leftover batter for up to 24 hours or bake in batches.
- Grease a 6-inch round cake pan or a 4-inch springform pan that fits inside your air fryer basket. Line the bottom with a parchment circle and grease the parchment. Fill the pan no more than two-thirds full to allow for rise.
- Preheat the air fryer to 320°F (160°C) for 3 minutes. Place the filled pan in the basket. Because air fryers circulate heat intensely, the lower temperature here prevents the outside from setting too fast while the center stays raw. Bake for 22 to 25 minutes, checking at 20 minutes. The cake is done when a toothpick inserted in the center comes out with just a few moist crumbs and the top springs back lightly when pressed. If the top is browning too quickly before the center is set, lay a small piece of aluminum foil loosely over the top for the last 5 minutes.
- Allow the cake to cool in the pan inside the (turned off) air fryer for 5 minutes, then transfer to a wire rack and cool completely, about 45 minutes. Repeat for remaining batter in batches.
- Once cooled, slice each mini cake horizontally into two thin layers using a serrated knife for a layered look, or leave whole and frost the top generously. Prepare the Oreo buttercream as described in steps 7 and 8 of the oven method (you will likely have leftover frosting, which keeps refrigerated for up to 5 days). Frost and decorate as desired, topping each with a halved Oreo cookie.
- Prepare the cake batter following steps 2 through 5 of the oven method, folding in the crushed Oreos last. You will use roughly half the batter for a single-layer slow cooker cake – refrigerate the remainder for up to 24 hours to bake later, or double-line the slow cooker and make a larger single layer.
- Cut a piece of parchment paper to fit the bottom of your slow cooker insert, with the paper coming up the sides slightly to act as a sling for easy removal. Grease the parchment and the exposed sides of the insert thoroughly with butter or nonstick spray.
- Pour the batter into the prepared slow cooker insert and spread it into an even layer. Place a double layer of paper towels directly under the lid of the slow cooker before closing – this absorbs condensation and prevents water droplets from dripping onto the cake surface, which would create wet, gummy spots.
- Cook on High for 2 hours to 2 hours 30 minutes. Do not lift the lid during the first 90 minutes. Check at 2 hours: the cake is done when the edges are set, the center looks matte (not glossy or wet), and a toothpick inserted in the center comes out with just a few moist crumbs. Slow cookers vary in power, so check every 15 minutes after the 2-hour mark if needed.
- Turn off the slow cooker and leave the lid ajar for 15 minutes to allow the cake to firm up slightly. Then carefully lift the cake out using the parchment sling and transfer it to a wire rack to cool completely, at least 1 hour. Once fully cooled, frost the top generously with Oreo buttercream (prepare as described in steps 7 and 8 of the oven method) and decorate with Oreo halves. Slice directly from the rack or transfer to a serving board.
Nutrition Per Serving
Per 1 serving (makes one 9-inch three-layer cake)
Why This Recipe Works
Oil-based chocolate cakes are notoriously more moist than their butter-based counterparts, and the science is straightforward: oil is 100% fat, while butter is roughly 80% fat and 20% water. That extra water in butter evaporates during baking and can tighten the gluten structure, making the crumb firmer. Oil stays liquid at room temperature, which means the cake stays soft and tender for days after baking, not just fresh out of the oven. The addition of both buttermilk and hot coffee serves two purposes. Buttermilk is slightly acidic, and that acid reacts with the baking soda to create lift and tenderize the gluten. The hot coffee intensifies the cocoa flavor dramatically without making the cake taste like coffee, because heat blooms the aromatic compounds in cocoa powder the same way it blooms spices in a pan.
The two-sugar approach (granulated plus brown sugar) is intentional. Granulated sugar dissolves cleanly and contributes structure, while brown sugar is hygroscopic, meaning it attracts and holds moisture from the environment. Together, they create a crumb that is both stable enough to stack and tender enough to feel almost impossibly soft. When the crushed Oreos are folded in, the cookie wafers soften as they absorb moisture from the surrounding batter during baking, becoming fully integrated into the crumb rather than staying crunchy or sandy.
For the buttercream, processing the Oreos to a fine powder is the key technical step. Larger cookie pieces contain air pockets and fat from the cream filling that can make buttercream grainy or cause it to split. When ground to a powder, the cookie essentially becomes a flavored dry ingredient that disperses evenly throughout the fat. The cream cheese plays a structural role as well, adding just enough acidity and body to balance the sweetness of five cups of powdered sugar without the frosting tasting one-dimensional. If your buttercream ever looks curdled or broken, the cause is almost always that the butter and cream cheese were at different temperatures. The fix: gently warm the bowl over a pot of hot water for 30 seconds, then beat again.
Baker’s Tips
- Bring all refrigerated ingredients (eggs, buttermilk, butter, cream cheese) to room temperature at least 1 hour before you begin. Cold eggs can cause the oil-based batter to separate, and cold cream cheese will leave lumps in the buttercream.
- Weigh your batter when dividing it among three pans. Equal weights mean equal baking times and layers that stack perfectly without any lopsided trimming.
- Do not skip the crumb coat. That first thin layer of buttercream seals in all the loose cake crumbs so your final coat looks clean and professional. Even 20 minutes in the fridge makes a dramatic difference.
- Process the buttercream Oreos (the 240g portion) until you genuinely cannot see any chunks. Scrape down the food processor bowl once and process again. A fine, sandy powder is what you want. Any larger pieces will create a grainy texture in the finished frosting.
- Hot coffee is the best liquid for blooming cocoa powder, but if you are serving this to children or prefer to avoid caffeine, hot water works perfectly. The cake will still taste deeply chocolatey.
- Level your cake layers with a long serrated knife before assembling if they have domed during baking. A flat, even layer grips the buttercream better and means your finished cake will stand tall without sliding.
- To get clean, dramatic slices, refrigerate the fully assembled and frosted cake for at least 1 hour before cutting. Use a sharp knife run under hot water and wiped clean between each slice.
Variations
- Double chocolate version: Replace 30g of the all-purpose flour with an additional 30g of black cocoa powder for intensely dark, Oreo-flavored cake layers that look almost black when sliced.
- Mint Oreo version: Use Mint Oreos in place of regular Oreos throughout, and add 1/2 teaspoon peppermint extract to the buttercream for a mint chocolate chip effect.
- Cookies and cream cupcakes: Divide the batter into 24 lined muffin tins, filling each two-thirds full. Bake at 350°F (175°C) for 18 to 20 minutes. Press a whole mini Oreo into the bottom of each liner before adding batter for a hidden cookie surprise. Frost with the same Oreo buttercream.
- Vanilla layer version: Replace the cocoa powder with an equal weight of all-purpose flour and increase vanilla to 1 tablespoon for a pale, vanilla-forward cake that showcases the dark Oreo pieces even more dramatically in each slice.
Troubleshooting & FAQ
My cake layers came out dense and gummy in the center. What went wrong?
My Oreo buttercream looks grainy and slightly curdled. How do I fix it?
Why did my cake layers turn out lopsided or with a big dome?
My cake layers stuck to the pans and broke when I tried to remove them.
The Oreo pieces in my cake batter sank to the bottom during baking. How do I prevent this?
Storage & Make-Ahead
- Storage: Store the frosted cake covered at room temperature for up to 1 day, or refrigerate in an airtight container or under a cake dome for up to 5 days. Bring slices to room temperature for 20 to 30 minutes before serving for the best texture. Unfrosted cake layers can be frozen, individually wrapped tightly in plastic wrap and then foil, for up to 3 months. Thaw overnight at room temperature still wrapped.
- Make-Ahead: The cake layers can be baked up to 2 days ahead, wrapped tightly in plastic wrap, and stored at room temperature, or frozen for up to 3 months. The Oreo buttercream can be made up to 4 days in advance and stored in an airtight container in the refrigerator. Before using, bring it fully to room temperature and re-beat with a mixer for 2 to 3 minutes until fluffy and smooth again.
oh honey this is EXACTLY what you need to try, i made something similar last month for my granddaughter’s birthday and let me tell you the whole family went crazy for it, nobody even knew it was made with allulose til i told them! the buttercream is where the magic happens so dont skimp on that part, and trust me your blood sugar will thank you while your taste buds think youre in heaven, start with this one and youll be baking up a storm, god bless you for taking care of yourself like this!
oh this is so great to hear! honestly theres something really special about when someone finds that dessert thats both good for their body and their soul, you know? i work with a lot of students navigating health stuff and the ones who find actual solutions they *enjoy* instead of just white knuckling through deprivation, thats when real change sticks. rosa you’re totally right that the buttercream is key – i’d add that getting the ratio right between the allulose and butter makes all the difference in texture, so maybe start by testing a small batch first? that way theres zero pressure and you get to dial it in for your taste tbh
man this looks incredible, ive always struggled with traditional desserts messing with my blood sugar but ive been meaning to try baking with allulose and this might be the one to finally get me started. the oreo buttercream detail has me sold honestly, theres something about making something feel indulgent but actually taking care of yourself that just hits different. do you find the texture comes out as good with the sugar alternative or does it need any tweaking?