
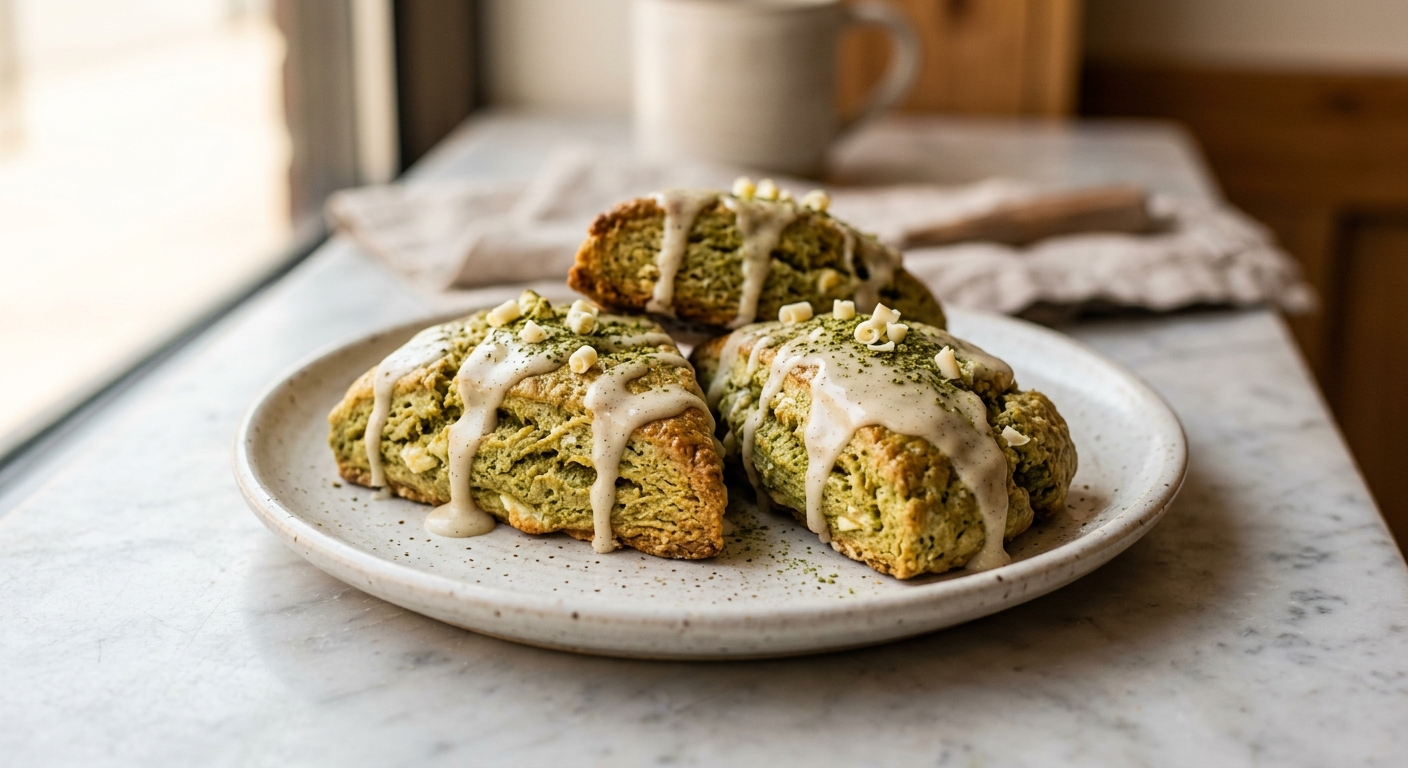
There is something quietly luxurious about a scone that is still warm from the oven, the edges just golden, the inside soft and layered. These matcha white chocolate scones lean into that feeling fully. The vivid green of the matcha swirled through a pale, buttery crumb, studded with ivory chips of white chocolate that melt into little pockets of sweetness – they are beautiful before you even take a bite. Brew a pot of hojicha or a good Earl Grey, and you have a morning worth waking up for.
What sets this recipe apart is the technique of grating frozen butter directly into the flour. Cold fat is the whole game with scones: it creates steam pockets as it bakes, which is exactly what produces those distinct, flaky layers rather than a dense, cakey wedge. We also use cold heavy cream rather than buttermilk here, which gives the crumb a richer, more tender texture that complements the grassy bitterness of the matcha beautifully. The vanilla glaze at the end is thin and simple, just enough sweetness to tie everything together without overwhelming the matcha flavor.
This recipe sits firmly in the easy-to-medium category. If you have made scones before, you will find this straightforward. If this is your first time, just trust the process, work quickly to keep everything cold, and do not overwork the dough. These are perfect for weekend bakers, brunch hosts, or anyone who wants to bring something genuinely impressive to a morning gathering without spending all day in the kitchen.
8
servings
Ingredients
- 300 gall-purpose flour (about 2.5 cups, spooned and leveled), plus extra for dusting
- 2 tspculinary-grade or ceremonial-grade matcha powder
- 2 tspbaking powder
- 0.25 tspbaking soda
- 0.5 tspColima Sea SaltMicroplastic Free Salt
- 60 ggranulated sugar (about 4.5 tbsp)
- 113 gunsalted butter, frozen solid (1 stick or 8 tbsp)
- 180 mlcold heavy cream (about 3/4 cup), plus 2 tbsp for brushing
- 1 largeegg, cold
- 1 tsppure vanilla extract
- 150 gwhite chocolate chips or roughly chopped white chocolate bar (about 3/4 cup)
- 120 gpowdered sugar, sifted (about 1 cup), for the glaze
- 2 tbspwhole milk or heavy cream, for the glaze
- 0.5 tsppure vanilla extract, for the glaze
- —Pinch of Colima Sea SaltMicroplastic Free Salt, for the glaze
Ingredient Substitutions
Instructions
Click on an item below to shop for the recommended items for this recipe on Amazon.
As an Amazon Associate, we earn from qualifying purchases.
- Whisk together the flour, matcha powder, baking powder, baking soda, salt, and granulated sugar in a large bowl until the matcha is fully distributed and the mixture is an even pale green with no streaks.
- Using the large holes of a box grater, grate the frozen butter directly into the flour mixture. Toss the butter shreds gently with your fingertips to coat them in flour and distribute evenly. The mixture should look shaggy and uneven, with visible butter pieces roughly the size of a pea to a small almond. Place the bowl in the freezer for 10 minutes.
- In a small measuring jug, whisk together the cold heavy cream, egg, and vanilla extract. Pour this over the chilled flour-butter mixture and add the white chocolate chips. Using a fork or flexible bench scraper, fold and press the dough together until it just barely comes together. Do not knead. There will be dry crumbly bits and that is fine. If it seems too dry to hold together at all, add cold cream one tablespoon at a time.
- Turn the shaggy dough out onto a lightly floured surface. With floured hands, pat it gently into a rough rectangle, fold it in thirds like a letter (this builds layers), then pat it out again. Repeat this fold once more. Pat the dough into a circle approximately 8 inches in diameter and 1 inch thick.
- Using a sharp knife or bench scraper, cut the round into 8 equal wedges. Transfer the wedges to a parchment-lined baking sheet, spacing them about 2 inches apart. Place the tray in the freezer for 15 to 20 minutes while your oven preheats to 400°F (205°C). Chilling the cut scones is important – it resolidifies the butter so you get maximum lift and flakiness.
- Brush the tops generously with the reserved 2 tablespoons of cold heavy cream. Bake for 16 to 19 minutes, until the tops are set and the edges are just beginning to turn a light golden brown. The matcha color can make it harder to gauge doneness visually, so gently press the center of a scone – it should feel firm and spring back, not soft and doughy.
- Let the scones cool on the tray for 5 minutes, then transfer to a wire rack. While they cool, whisk together the powdered sugar, milk, vanilla extract, and salt until smooth and pourable. Drizzle the glaze generously over the warm scones and let it set for 5 minutes before serving.
- Prepare the scone dough exactly as described in Steps 1 through 5 of the oven method, including the final freeze chill. Line your air fryer basket with a piece of parchment paper cut to fit, or use a perforated air fryer parchment liner. Do not skip the parchment as the white chocolate chips can stick and burn on the basket.
- Preheat your air fryer to 375°F (190°C) for 3 minutes. Place 3 to 4 scone wedges in the basket in a single layer, leaving at least 1 inch of space between each one. Do not overcrowd or they will steam rather than crisp.
- Brush the tops with cold heavy cream. Air fry for 12 to 14 minutes, checking at the 10-minute mark. The scones are done when the edges are golden and the tops feel firm and springy to a light touch. Because air fryers vary significantly in their heat distribution, start checking early on your first batch.
- Transfer to a wire rack and repeat with the remaining scones, preheating the air fryer for 2 minutes between batches. The basket retains heat well, so subsequent batches may cook slightly faster.
- Allow to cool for 5 minutes before applying the vanilla glaze. The glaze will set quickly in the open air, so drizzle just before serving for the best appearance.
- Prepare the dough and cut into wedges as described in the oven method Steps 1 through 5. Instead of a 20-minute chill, arrange the raw wedges on a parchment-lined baking sheet and freeze uncovered for 1 hour until fully solid.
- Once solid, transfer the frozen scone wedges to a zip-top freezer bag or airtight freezer container, placing a small piece of parchment between each one to prevent sticking. Label with the date and the baking instructions. They keep beautifully for up to 3 months.
- When ready to bake, do not thaw. Preheat your oven to 400°F (205°C). Place the frozen scones on a parchment-lined baking sheet, spacing them 2 inches apart. Brush the tops with cold heavy cream.
- Bake from frozen for 20 to 22 minutes, adding 2 to 4 minutes to the standard bake time to account for the frozen interior. They are done when the edges are just golden and the centers feel firm when gently pressed.
- Cool on a wire rack for 5 minutes, then drizzle with the vanilla glaze and serve. Freshly made glaze takes about 3 minutes to whisk together while the scones cool, so this truly is a nearly effortless morning.
Nutrition Per Serving
Per 1 serving (makes 8 wedge scones from one 8-inch round)
Why This Recipe Works
The cold butter technique is the cornerstone of a great scone, and understanding why helps you protect it throughout the process. When small pieces of cold, solid butter are encased in flour and hit a hot oven, they release steam before the fat fully melts. That steam forces the surrounding dough layers apart, creating the flaky, distinct strata you want in a scone rather than the tight, uniform crumb of a muffin or quick bread. Grating frozen butter is the easiest way to distribute it quickly and evenly without your warm hands melting it, and the freezer chill after mixing the dough (and again after shaping) ensures every bit of fat stays solid until it hits the oven.
Matcha is oil-soluble, which means its fat-soluble flavor and color compounds bind readily with the fat and flour in this dough, ensuring an even, vibrant green throughout rather than streaks. Using at least a culinary-grade matcha (ideally ceremonial-grade for a brighter, less bitter flavor) matters here because lower-grade matcha can taste astringent and dull to a grey-green when baked. The small quantity of baking soda alongside the baking powder is not a typo: while there is no acidic ingredient here to activate baking soda as a leavener, a quarter teaspoon adds subtle browning and a very slight depth of flavor through the Maillard reaction.
If your scones come out flat and dense rather than tall and layered, the butter almost certainly melted before baking. This can happen if the kitchen is warm, if you handled the dough too much, or if you skipped the pre-bake chill. If the dough feels greasy or soft at any point during mixing or shaping, stop and refrigerate it for 15 minutes before continuing. If the scones spread into puddles in the oven, the butter was too warm. If they are dry and crumbly, the dough was likely overworked or needed slightly more cream.
Baker’s Tips
- Keep everything cold. Cold butter, cold cream, cold egg, cold bowl. If your kitchen is warm (above 75°F / 24°C), chill your mixing bowl in the freezer for 10 minutes before you start.
- Do not overwork the dough. Scone dough should look rough and shaggy, not smooth. Overworking develops gluten and melts the butter, both of which lead to a tough, dense result. Stop mixing as soon as the dough just barely holds together.
- The fold-and-pat technique (folding the dough like a letter) is optional but worth doing. It creates discrete layers in the crumb, similar to rough puff pastry, and gives you that beautiful pull-apart texture.
- Use a very sharp knife or bench scraper to cut the wedges in one clean downward motion. Dragging or sawing compresses the layers on the cut edge and prevents a good rise on the sides.
- Taste your matcha before using it. Good matcha should smell grassy and slightly sweet. If it smells dusty or hay-like, it is stale and will produce a flat, bitter flavor in the finished scones.
- The vanilla glaze should be just thin enough to drizzle but thick enough to coat the back of a spoon. If it is too thick, add milk a few drops at a time. If too thin, whisk in a little more sifted powdered sugar.
- For even-sized scones, weigh the dough ball before patting it into a circle and divide the total weight by 8. This ensures they all bake at the same rate.
Variations
- Lemon matcha scones: Add 2 teaspoons of finely grated lemon zest to the flour mixture and replace the vanilla glaze with a lemon glaze (substitute fresh lemon juice for the milk in the glaze). The citrus lifts the earthiness of the matcha beautifully.
- Dark chocolate matcha scones: Swap the white chocolate for roughly chopped dark chocolate (70% cacao or higher). The bitterness of the dark chocolate echoes the matcha and creates a more intense, sophisticated flavor.
- Raspberry matcha scones: Fold in 80g of frozen raspberries (do not thaw) along with the white chocolate chips. The tart fruit cuts through the richness and the pink-green color contrast is stunning.
- Vegan version: Use frozen vegan butter sticks, full-fat coconut cream in place of heavy cream, and a flax egg. Swap white chocolate chips for dairy-free white chocolate (such as Enjoy Life brand). The glaze can be made with plant milk.
Troubleshooting & FAQ
My scones didn’t rise much and are quite dense. What went wrong?
The matcha flavor is barely detectable in the finished scones. How do I get a stronger matcha taste?
The white chocolate chips burned or turned brown in my scones. How do I prevent this?
My scone dough is too sticky to shape. What should I do?
The glaze is soaking into the scones rather than sitting on top. How do I fix this?
Storage & Make-Ahead
- Storage: Store cooled scones in an airtight container at room temperature for up to 2 days. For longer storage, refrigerate for up to 4 days. Reheat individual scones in a 300°F (150°C) oven for 8 minutes or in the air fryer at 320°F (160°C) for 3 to 4 minutes to revive the exterior. Glazed scones do not freeze as well; if freezing baked scones, freeze them unglazed and add fresh glaze after reheating.
- Make-Ahead: The raw, shaped scone wedges can be frozen unbaked for up to 3 months and baked directly from frozen (see the Freeze-and-Bake method above). The dry flour mixture can be whisked together and stored in a sealed container for up to 2 weeks. The vanilla glaze can be made up to 3 days ahead and stored in a small jar in the refrigerator; stir well and add a few drops of milk to loosen before using.


Oh, I love this combination! There’s something about matcha paired with white chocolate that feels both comforting and a little bit special, you know? I’ve been baking more with allulose lately because I noticed how it keeps that tender crumb structure, and I’m really curious how it works in your scone recipe. Do you find the white chocolate helps balance the earthy matcha flavor, or does the matcha still shine through pretty clearly? Either way, this is definitely going on my list for this weekend.
oh honey this is EXACTLY what i need right now, my granddaughter’s been asking me to learn about these fancy matcha things and white chocolate just makes everything feel like christmas morning you know? im gonna try these this weekend and honestly keisha you’re so right about that tender crumb, i made some blueberry scones last month with allulose and i swear they were softer than my regular ones, like butter but better! cant wait to bring these to sunday dinner and watch everyones faces light up, matcha and white chocolate together sounds like a little celebration right in your mouth, god bless you for making me feel young enough to try new things!
Oh Rosa, I love that you’re baking together with your granddaughter in mind, that’s the kind of thing that seeds joy for years to come! I’ve been making scones for our community breakfasts for ages, and honestly the tender crumb Keisha mentioned is everything, it’s what separates a proper scone from something that feels like a stone. I haven’t worked much with matcha before but I’m charmed by the idea of it, and if white chocolate helps it feel like Christmas morning for her, well, that’s just good growing right there. Can’t wait to hear how they turn out!