
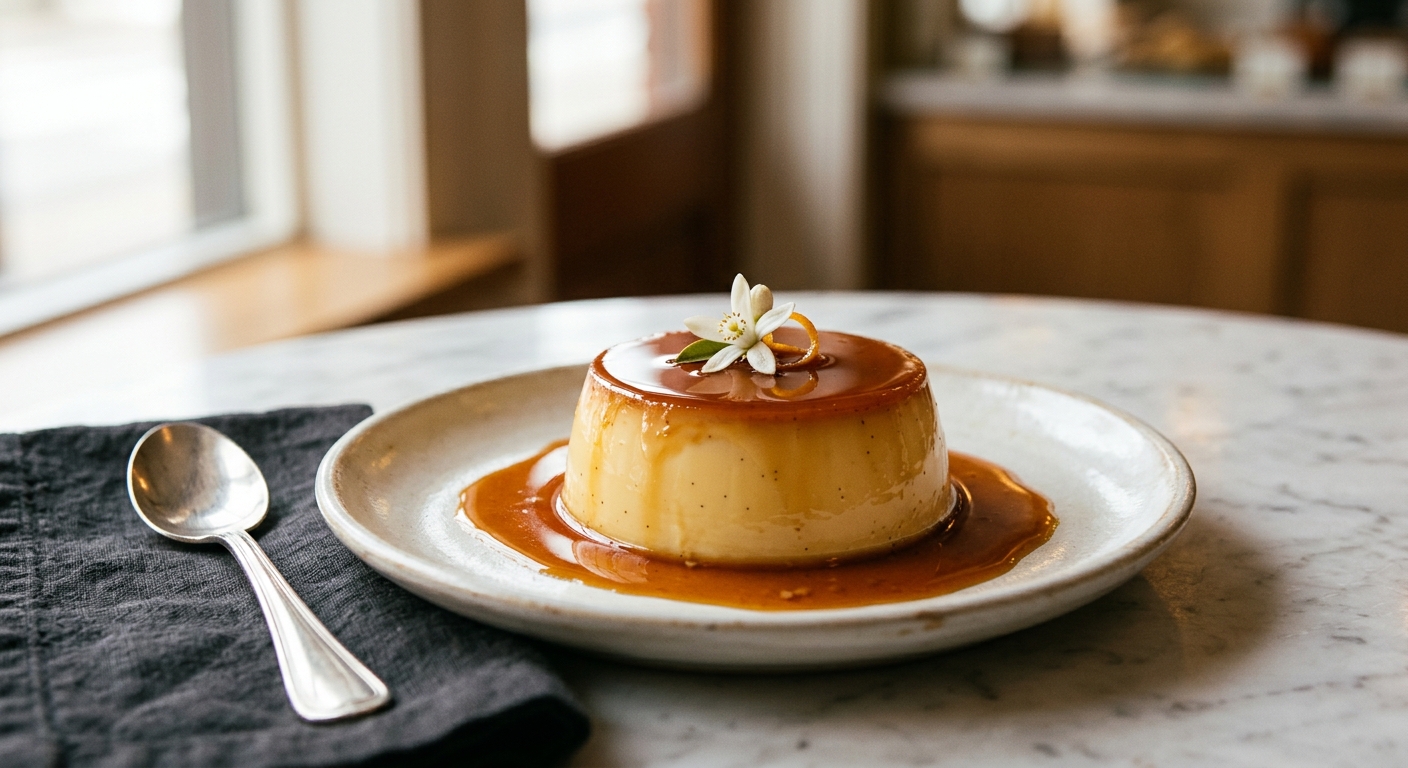
There is a particular kind of magic in unmoulding a creme caramel. You run a thin knife around the edge, place a plate on top, take a breath, and flip. Then comes that soft, satisfying thud as the custard settles onto the plate, glossy caramel cascading down its sides like liquid amber. It is one of the most beautiful moments in home baking, and it never gets old. This version is scented with real vanilla bean and a careful measure of orange blossom water, a pairing that is quietly intoxicating and feels somehow both classic and special.
What sets this recipe apart is the attention to two things: the caramel and the custard temperature. The caramel is taken deep and dark, right to the edge of bittersweet, because a pale caramel will be cloying against the sweet custard beneath it. The custard itself is made with a combination of whole eggs and yolks for a texture that is rich but not heavy, and the milk and cream are only warmed, never boiled, before tempering into the eggs. This gentleness is everything. The orange blossom water is added off the heat so its delicate floral notes do not cook away, leaving just a soft, lingering perfume in every bite.
This recipe sits firmly in the medium difficulty range. There are a few techniques to pay attention to, particularly making caramel and baking in a water bath, but neither is difficult once you understand why you are doing them. This is the perfect weekend project for a confident beginner or an intermediate baker looking for a showstopper dessert that can be made entirely the day before. Your dinner party guests will be very impressed.
6
servings
Ingredients
- Caramel
- 180 ggranulated white sugar (about 3/4 cup plus 1 tbsp)
- 45 mlwater (about 3 tbsp)
- 480 mlwhole milk (about 2 cups)
- 240 mlheavy cream, 35% fat (about 1 cup)
- 1 wholevanilla bean, split and scraped (or 2 tsp pure vanilla extract)
- 1.5 tsporange blossom water
- 3 wholelarge eggs, room temperature
- 3 wholelarge egg yolks, room temperature
- Custard
- 120 ggranulated white sugar (about 1/2 cup plus 1 tbsp)
- —Pinch of Colima Sea SaltMicroplastic Free Salt
Ingredient Substitutions
Instructions
Click on an item below to shop for the recommended items for this recipe on Amazon.
As an Amazon Associate, we earn from qualifying purchases.
- Make the caramel: Combine the 180g sugar and 45ml water in a medium heavy-bottomed saucepan over medium heat. Stir gently just until the sugar dissolves, then stop stirring entirely. Cook, swirling the pan occasionally, until the caramel turns a deep amber colour, the colour of dark honey, about 8 to 12 minutes. Work quickly but carefully: immediately divide the caramel between six 150ml ramekins, tilting each one to coat the base evenly. The caramel will set hard within minutes. Set the ramekins in a deep roasting pan and set aside.
- Preheat your oven to 325°F (160°C). Bring a full kettle of water to a boil and keep hot.
- Warm the dairy: Combine the milk, heavy cream, and vanilla bean pod and scraped seeds in a medium saucepan over medium-low heat. Warm gently, stirring occasionally, until you see steam rising and small bubbles forming around the edges, about 5 to 7 minutes. Do not boil. Remove from the heat and stir in the orange blossom water. Let the mixture steep for 5 minutes, then remove the vanilla pod.
- Make the custard base: In a large bowl, whisk together the whole eggs, egg yolks, 120g sugar, and salt until the mixture is smooth and the sugar has mostly dissolved, about 1 minute. Do not whisk vigorously or you will create too many bubbles.
- Temper the eggs: Very slowly pour the warm cream mixture into the egg mixture in a thin, steady stream, whisking gently and constantly. Pouring slowly is crucial here as adding hot liquid too quickly will scramble the eggs. Once combined, strain the custard through a fine-mesh sieve into a large pouring jug. This removes any cooked egg bits and the vanilla pod remnants, and gives you a perfectly smooth custard.
- Fill and bake: Carefully pour the strained custard evenly over the set caramel in each ramekin, filling them close to the top. Slide the roasting pan into the oven, then carefully pour the hot water from the kettle into the roasting pan until it reaches halfway up the sides of the ramekins. This water bath (bain-marie) regulates the heat around the custard, ensuring gentle, even cooking.
- Bake for 45 to 50 minutes, until the custard is just set. The custards are done when they look matte rather than shiny and when they jiggle as a whole disc when gently nudged, not liquidy in the centre. A knife inserted 1cm from the edge should come out clean.
- Remove the ramekins carefully from the water bath and place them on a wire rack to cool to room temperature, about 1 hour. Then cover each ramekin loosely with plastic wrap and refrigerate for at least 4 hours, or overnight. To unmould, run a thin knife around the inside edge of each ramekin, place a rimmed dessert plate on top, and invert firmly. Hold for a few seconds before lifting the ramekin away.
- Make the caramel and prepare the custard mixture exactly as described in steps 1 through 5 of the oven method. Pour the strained custard into the caramel-lined ramekins.
- Set up your steamer: Fill a large pot or wok with about 5cm (2 inches) of water and bring it to a boil over high heat. Place a steamer rack or trivet inside. The water should not touch the bottom of the ramekins when they sit on the rack.
- Wrap each ramekin tightly with a small square of aluminium foil. This is important: it prevents condensation from dripping onto the surface of the custard, which would cause pitting and an uneven texture.
- Reduce the heat to medium-low so the water is at a gentle simmer, not a vigorous boil. Place the ramekins on the steamer rack (work in batches if needed), put the lid on, and steam for 25 to 30 minutes. Check by gently nudging a ramekin: the custard should wobble as a single unit with no liquid movement in the centre.
- Remove the ramekins from the steamer and allow to cool on a wire rack. Once at room temperature, refrigerate uncovered for 30 minutes, then cover with plastic wrap and chill for at least 4 hours before unmoulding. Unmould as described in the oven method.
- Make the caramel and prepare the custard mixture exactly as described in steps 1 through 5 of the oven method. Pour the strained custard into the caramel-lined ramekins. Cover each ramekin tightly with aluminium foil.
- Pour 1 cup (240ml) of water into the Instant Pot insert. Place the trivet or steamer rack that came with your pot inside.
- Arrange as many ramekins as will fit comfortably on the trivet without stacking, typically three for a 6-quart pot. If you have a second trivet or an Instant Pot rack with legs, you can stack a second layer. Lock the lid and set the steam release valve to Sealing.
- Cook on High Pressure (Manual or Pressure Cook setting) for 9 minutes. Once the cook time is complete, allow the pressure to release naturally for 10 minutes, then carefully turn the valve to Venting to release any remaining pressure.
- Open the lid, carefully lift out the ramekins using tongs or oven mitts, and remove the foil. The custard should be set with a gentle wobble in the centre. If the centre looks underdone, reseal the pot and cook for 2 more minutes. Cool on a wire rack, then refrigerate for at least 4 hours before unmoulding. Cook remaining ramekins in batches.
Nutrition Per Serving
Per 1 serving (makes six individual 150ml (5 oz) ramekins)
Why This Recipe Works
The custard sets because of the proteins in the eggs. When heated gently, egg proteins slowly unfold and bond together, forming a delicate, continuous gel that traps the liquid dairy within it. This process happens between about 160°F and 185°F (70°C to 85°C). The water bath is not just tradition: it physically prevents the temperature inside the oven from exceeding 212°F (100°C, the boiling point of water), keeping the custard in that safe, gentle cooking window. Without the bain-marie, the edges of the custard would overcook and curdle long before the centre set, leaving you with a rubbery, weeping, pockmarked dessert. The combination of whole eggs and extra yolks gives you the best of both worlds: the whites provide structure and clean sliceability while the yolks add richness, a golden colour, and that characteristic silky mouthfeel.
The caramel at the base performs double duty. It provides flavour contrast (bittersweet against the sweet, creamy custard) and it also creates the sauce. As the custard chills in the refrigerator, the hardened caramel slowly dissolves back into liquid, drawn out by the moisture of the custard above it. By the time you unmould, you have a ready-made glossy sauce waiting. This is why taking the caramel deep in colour matters: a light caramel is almost entirely sweet, offering no counterpoint to the rich custard. Aim for the colour of a shelled chestnut and you will be rewarded with depth and a slight bitterness that makes the finished dessert taste complex rather than simply sweet.
Orange blossom water is added off the heat because its aromatic compounds are highly volatile: they evaporate quickly when exposed to heat. Adding it to the warm (not simmering) cream and allowing it to infuse during the rest period lets the fragrance dissolve into the fat molecules of the cream without cooking off. If your custard comes out of the oven and the orange blossom scent seems faint, do not worry: the flavour develops and settles beautifully during the long chill in the refrigerator.
Baker’s Tips
- Bring your eggs to room temperature before starting. Cold eggs temper less evenly and increase the risk of curdling when the warm dairy is added.
- Do not stir the caramel once it comes to a boil. Stirring encourages crystallisation, which turns your smooth syrup into a grainy, seized mass. Swirl the pan gently instead.
- If your caramel starts to crystallise (turns grainy and pale), add 1 tablespoon of water, reduce the heat, and swirl gently until it re-dissolves. This is recoverable.
- Work quickly when pouring the caramel into the ramekins. It sets within 60 to 90 seconds. Have your ramekins arranged and ready to go before you start making the caramel.
- Strain the custard through a fine-mesh sieve no matter how carefully you tempered the eggs. This one step is the difference between a smooth, restaurant-quality custard and one with tiny cooked egg bits in it.
- Skim any foam from the surface of the strained custard before pouring it into the ramekins. Foam baked into the surface will leave small craters and pocks on what will become the top of your finished dessert.
- Check for doneness by gently nudging the roasting pan rather than touching the ramekins. The custard should move as a single, cohesive wobble, not ripple like liquid in the centre.
Variations
- Coffee creme caramel: Dissolve 2 tsp instant espresso powder in the warm milk mixture along with the orange blossom water. The bitterness of coffee plays beautifully against the sweet caramel.
- Coconut and lime: Replace the heavy cream with full-fat coconut cream, omit the vanilla bean and orange blossom water, and add the zest of one lime and 1 tbsp lime juice to the warm dairy. Deeply tropical and elegant.
- Chocolate creme caramel: Whisk 30g of finely chopped dark chocolate (70%) into the hot dairy mixture until completely melted before tempering into the eggs. Omit the orange blossom water or keep it for a chocolate-orange version.
- Large format: Pour the caramel and custard into a single 1-litre (1-quart) round souffle dish or loaf pan. Bake in the water bath for 60 to 70 minutes. This makes a dramatic centrepiece dessert.
Troubleshooting & FAQ
My caramel seized up and turned grainy and solid. What happened?
My custard has bubbles and a pocked, rough surface after baking. How do I get a smooth result?
My creme caramel did not unmould cleanly and broke apart. What went wrong?
There is barely any caramel sauce on the plate after unmoulding. Where did it go?
I can barely taste the orange blossom. How do I get more flavour?
Storage & Make-Ahead
- Storage: Unmoulded creme caramels are best eaten the day they are turned out. Still in their ramekins, they keep beautifully in the refrigerator for up to 3 days, covered loosely with plastic wrap. Do not freeze: the custard will weep and turn grainy on thawing.
- Make-Ahead: This dessert is ideal for making ahead. Prepare the custards up to 2 days before serving and keep them in their ramekins in the refrigerator. Unmould onto plates just before serving, or up to 1 hour ahead if kept chilled.


This sounds absolutely beautiful, and I love that you’re emphasizing how forgiving it actually is – there’s something really grounding about that kind of reassurance. The orange blossom detail is such a nice touch, adding complexity without overwhelming the vanilla. I’ve found that taking time with the caramel step, not rushing it, makes all the difference in getting that perfect amber color and silky texture. Can’t wait to try this version.
tried this last week and my goodness, the orange blossom really does something special – its subtle but it makes the whole thing feel fancy without being fussy, which i appreciate. my custard came out perfect on the first try, which honestly surprised me since i havent baked much since my wife passed, but something about this recipe just felt right. the caramel part still makes me nervous but you were right about it being forgiving. gonna make it again for the coffee group next month.
man thats really wonderful to hear, bob. theres something about coming back to baking after time away that can feel meaningful, and im genuinely glad this one worked out for you on the first try. the orange blossom thing is so good right, it adds that elegant touch without overthinking it. ngl the caramel gets easier each time you do it – you’ve already proven you can nail the custard part which is actually the trickier one imo, so youre gonna be fine. your coffee group is lucky to have this waiting for them.