
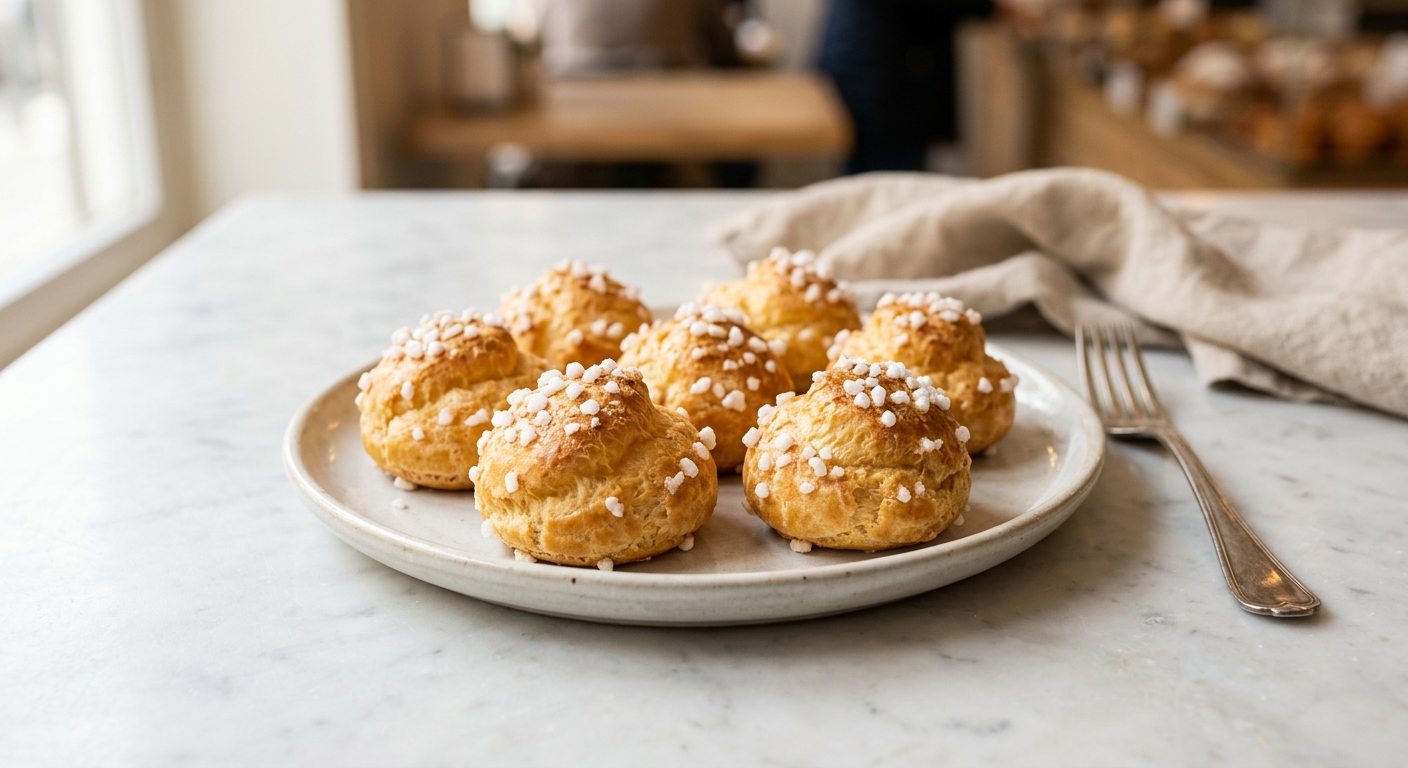
There is something almost magical about chouquettes. You pipe small mounds of golden dough onto a baking sheet, slide them into a hot oven, and watch them puff into hollow, crisp-shelled little clouds. They smell of warm butter and toasted pastry, and when you bite through that thin, crackly crust into the soft, eggy interior, you understand exactly why Parisian boulangeries sell them by the paper bag on weekday mornings. They are humble, they are unpretentious, and they are completely irresistible.
What sets this recipe apart is a careful attention to the choux paste itself. The dough, called pâte à choux, relies on a very specific technique: cooking the flour briefly in hot butter-water to gelatinize the starches before beating in the eggs. Getting the egg quantity exactly right is the single most important step. Too little, and the shells will be dense and doughy; too much, and they will collapse. This recipe gives you clear visual and tactile cues at every stage so you always know when the dough is just right. A generous coating of Belgian pearl sugar before baking gives each puff a satisfying crunch and a delicate sweetness that needs absolutely nothing else alongside it.
Chouquettes sit firmly in the easy-to-medium range for home bakers. If you have never made choux pastry before, do not be intimidated. The ingredient list is short, the technique is learnable in one bake, and the rewards are enormous. This recipe is perfect for beginners who want to build a foundational French pastry skill, and equally satisfying for experienced bakers who simply love a classic done well.
40
servings
Ingredients
- Egg Wash
- 240 mlwater (1 cup)
- 85 gunsalted butter, cut into small cubes (6 tablespoons)
- 1 tspgranulated sugar
- 0.5 tspColima Sea SaltMicroplastic Free Salt
- 130 gall-purpose flour (about 1 cup, spooned and leveled)
- 4 largeeggs, at room temperature
- 1 largeegg yolk, at room temperature
- Egg Wash)
- 15 mlwhole milk (1 tablespoon
- 120 gBelgian pearl sugar (about 3/4 cup), such as Lars’ Own or Trader Joe’s brand
Ingredient Substitutions
Instructions
Click on an item below to shop for the recommended items for this recipe on Amazon.
As an Amazon Associate, we earn from qualifying purchases.
- Preheat your oven to 400°F (205°C) with a rack in the center position. Line two large baking sheets with parchment paper. Fit a large piping bag with a plain round tip (about 12mm or 1/2 inch in diameter).
- In a medium heavy-bottomed saucepan, combine the water, butter, granulated sugar, and salt over medium heat. Stir occasionally until the butter is fully melted, then increase the heat to medium-high and bring the mixture to a full rolling boil. The moment it boils, remove the pan from the heat.
- Add all of the flour at once and stir vigorously with a wooden spoon or silicone spatula until no dry flour remains and the dough forms a smooth ball that pulls cleanly away from the sides of the pan. Return the pan to medium heat and continue stirring for 1 to 2 minutes, pressing the dough against the bottom of the pan, until a thin film forms on the pan bottom and the dough looks slightly matte. This step dries the paste and is essential for a crisp shell.
- Transfer the dough to the bowl of a stand mixer fitted with the paddle attachment (or use a large bowl and a hand mixer). Beat on medium speed for 1 to 2 minutes to release steam and cool the dough slightly. It should still be warm but not hot enough to cook the eggs.
- Beat in the 4 whole eggs one at a time, allowing each egg to fully incorporate before adding the next. After all eggs are in, check the consistency: lift the spatula and let the dough fall. It should fall in a slow, thick ribbon and hold a soft V-shape at the tip. If it is too stiff, beat in a fifth egg lightly beaten, adding it tablespoon by tablespoon until the right consistency is reached.
- Transfer the dough to the prepared piping bag. Pipe mounds about 3 cm (1.25 inches) in diameter onto the lined baking sheets, spacing them at least 4 cm (1.5 inches) apart. Hold the piping bag straight down and apply even pressure, then release and flick your wrist to stop. You should get about 40 mounds.
- In a small bowl, whisk together the egg yolk and milk. Brush each mound lightly with egg wash, smoothing down any peaks with the brush. Immediately sprinkle a generous amount of pearl sugar over each puff, pressing gently so it adheres.
- Bake one sheet at a time for 22 to 25 minutes, until the chouquettes are deep golden brown all over and feel light and hollow when lifted. Do not open the oven during the first 18 minutes or the puffs may deflate. Once done, turn off the oven, prop the door open a few centimeters with a wooden spoon, and let the chouquettes rest in the cooling oven for 5 minutes to set their shells. Transfer to a wire rack and eat warm or at room temperature.
- Make the choux paste exactly as described in steps 2 through 5 of the oven method. Prepare the egg wash and have the pearl sugar ready. Cut a piece of parchment paper to fit your air fryer basket, trimming away any edges that would block airflow.
- Preheat the air fryer to 375°F (190°C) for 3 minutes. Pipe mounds about 2.5 cm (1 inch) in diameter onto the parchment, spacing them at least 4 cm (1.5 inches) apart. Work in batches of 10 to 12 puffs, depending on the size of your basket. Do not crowd them as the airflow needs to circulate freely.
- Brush each mound carefully with egg wash and press pearl sugar firmly onto the top and sides of each puff. The sugar needs to adhere well since air circulation can dislodge loose pieces.
- Slide the parchment with the puffs into the basket. Cook at 375°F (190°C) for 14 to 16 minutes, without opening the air fryer for the first 12 minutes. The chouquettes are done when they are deep golden brown and feel light when gently nudged. If your air fryer runs hot, check at 12 minutes.
- Remove from the air fryer and allow to cool on a wire rack for 5 minutes before eating. The shells will continue to crisp as they cool. Repeat with remaining dough, re-preheating the air fryer for 1 minute between batches.
Nutrition Per Serving
Per 1 serving (makes about 40 small chouquettes)
Why This Recipe Works
Choux pastry is a steam-leavened dough, which means it relies entirely on water vapor rather than chemical leaveners like baking powder. When the high-moisture dough hits the hot oven, the water inside the batter turns to steam rapidly, expanding and pushing the dough outward into a hollow shell. The eggs, which contain a significant amount of water themselves, contribute additional steam as well as the proteins and lecithin needed to set the structure and give the shell its glossy, crisp exterior. This is why the egg count is so critical: each egg adds moisture, fat, and protein in a precise ratio. Too few eggs and the dough is too stiff to puff properly; too many and it is too wet to hold its shape.
The step of cooking the flour in the hot liquid on the stovetop, called the panade, is where the magic begins. The heat causes the starch granules in the flour to absorb water and swell in a process called gelatinization. This creates a thick, stable paste that can hold a large quantity of eggs without becoming a loose batter. Drying the paste on the heat for an extra minute or two removes excess surface moisture and allows the flour starches to fully hydrate, which results in a crisper, more stable shell after baking. Skipping this step is one of the most common reasons homemade choux turns out soggy.
The pearl sugar stays crunchy because its large, dense crystals have a very low surface-area-to-volume ratio. Unlike fine sugar, which dissolves almost instantly in the presence of moisture and heat, pearl sugar crystals are compressed tightly enough that only their outermost layer caramelizes during baking while the interior stays solid and crunchy. If your pearl sugar is disappearing into the dough during baking, check that your oven is hot enough. A lower temperature means the dough takes longer to set, giving the sugar more time to melt in. Always bake at a full 400°F (205°C) for best results.
Baker’s Tips
- Use room temperature eggs. Cold eggs can cause the warm dough to seize slightly and make incorporation uneven. If you forgot to take them out ahead of time, place them in a bowl of warm (not hot) water for 5 minutes.
- The dough consistency check is the most important moment in the recipe. After adding all 4 eggs, lift a spatula full of dough and let it drop slowly. It should fall in a thick, slow ribbon that holds a soft downward V or inverted triangle at the tip. If it snaps off in a thick clump, it needs more egg. If it pours off in a runny stream, it has too much egg and unfortunately cannot be fixed.
- Pipe at a 90-degree angle, straight down. Holding the bag at an angle causes lopsided puffs that bake unevenly. Keep the tip close to the parchment, about 5mm above the surface, and apply steady, even pressure.
- Wet your fingertip with water and gently press down any pointed peaks left by the piping bag before brushing with egg wash. Peaks will over-brown and can burn before the body of the puff is fully cooked.
- Never open the oven in the first 18 minutes. The shells are still setting and a rush of cold air will cause them to deflate. Use the oven light to check on them instead.
- Bake one tray at a time in the center of the oven for the most even heat distribution. If you need to bake both trays simultaneously, rotate them top-to-bottom and front-to-back at the 15-minute mark.
- Eat them warm. Chouquettes are at their absolute peak 15 to 30 minutes out of the oven, when the shell is still crisp and the interior is soft and steamy.
Variations
- Vanilla chouquettes: Split a vanilla bean and scrape the seeds into the water before heating. The floral, creamy flavor pairs beautifully with the pearl sugar crunch.
- Chocolate pearl sugar chouquettes: Reduce the flour by 10g and add 15g (2 tablespoons) of Dutch-process cocoa powder, sifted in with the flour. Top with the standard pearl sugar for a bittersweet contrast.
- Filled chouquettes (choux à la crème): Skip the pearl sugar and pipe the baked, cooled shells full of lightly sweetened whipped cream or vanilla pastry cream through a small hole in the base.
- Orange blossom chouquettes: Add 1 teaspoon of orange blossom water to the dough along with the eggs. The floral aroma is subtle and distinctly Moroccan-French in character.
Troubleshooting & FAQ
My chouquettes deflated or collapsed as soon as I took them out of the oven. What happened?
My dough was too stiff and the chouquettes came out dense and didn’t puff much. What went wrong?
The pearl sugar melted into the chouquettes during baking and they came out sticky on top. What can I do?
My piped mounds spread out flat on the tray instead of holding their round shape. What is wrong?
My chouquettes have a hollow center that is wet or gummy inside. Is that normal?
Storage & Make-Ahead
- Storage: Chouquettes are best eaten the day they are baked, ideally within a few hours. Store leftovers uncovered at room temperature for up to 1 day. Avoid airtight containers as they trap moisture and soften the shells. To refresh day-old chouquettes, place them in a 350°F (175°C) oven for 4 to 5 minutes. They do not freeze well once baked, as the pearl sugar becomes sticky and the shells lose their crispness.
- Make-Ahead: The choux paste can be made up to 2 days ahead and stored in a piping bag (tip sealed with a rubber band) in the refrigerator. Let it come to room temperature for 20 minutes before piping. Alternatively, pipe the mounds onto parchment-lined sheets, add the egg wash and pearl sugar, and freeze unbaked on the trays. Once solid, transfer to a freezer bag and store for up to 1 month. Bake directly from frozen at 400°F (205°C) for 26 to 30 minutes with no thawing needed.


dude these look amazing, my kids would demolish a whole batch of these in like 10 minutes flat. been wanting to try making choux at home since it always seems so intimidating but you made it sound actually doable so im gonna give it a shot this weekend. quick question though – do you think allulose would work as a sub for regular sugar on top or would the pearl sugar thing not work the same way?
These look fantastic, and I totally get why your kids would go for them in a flash. I’ve found that having something homemade and a little special to share, even just with yourself or a few people, changes the whole experience of eating it. Choux really isn’t as scary as it seems once you get the rhythm down, kind of like running a good pace – it’s all about finding the right tempo and trusting the process. Definitely give it a go, your kitchen will smell incredible.
Man, this is exactly the kind of thing I’ve been wanting to try making with the kids from our after-school program – something that feels a little fancy but actually comes together without too much fuss. I love what you said, Paul, about how homemade and special changes the whole thing, because that’s what we see happen when kids get to make something with their own hands instead of just eating it. Would love to hear if anyone’s had success swapping in allulose for the pearl sugar or if that’s a no-go!