
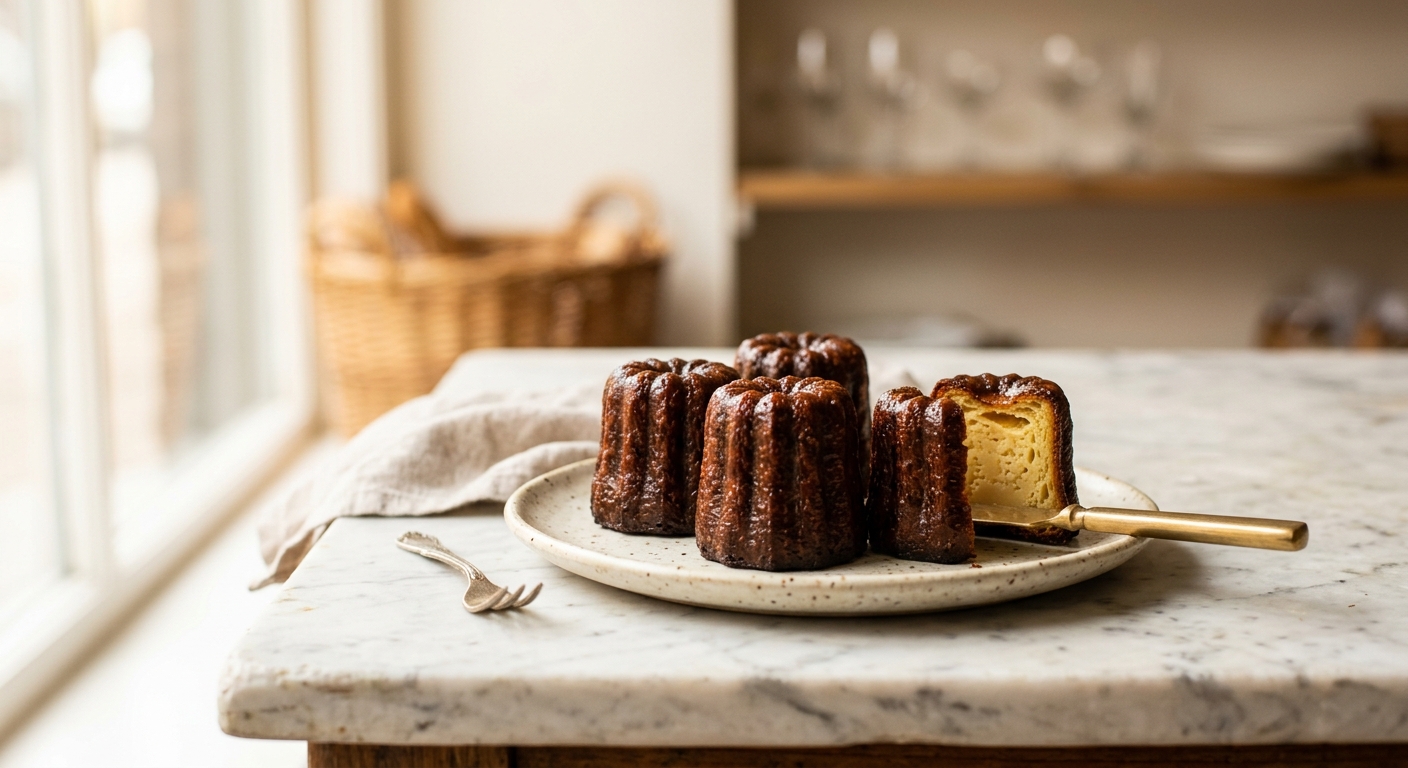
There is a moment, about forty minutes into baking, when your kitchen fills with a smell so intoxicating it is almost unfair. Caramelizing beeswax and butter, vanilla warmed through hot milk, rum turning sweet and smoky in the oven heat. These are canelés, the iconic fluted pastries from Bordeaux, France, and that smell is your first hint that something genuinely extraordinary is happening. They emerge from the oven looking like small bronze monuments, their exteriors almost shatteringly crisp and deeply burnished, their interiors trembling and custard-soft. Eaten within an hour of baking, they are among the most seductive things you can pull from an oven.
What sets this recipe apart is a commitment to two things that make all the difference: a long, cold rest for the batter and a proper beeswax and butter coating for the molds. Resting the batter for at least 24 hours, and ideally 48, allows the gluten to fully relax and the flour to hydrate completely, giving you that silky, dense interior rather than a cakey crumb. The beeswax coating, while requiring a small investment, is the true key to the glossy, crackling shell that defines an authentic canelé. It creates a barrier that conducts heat intensely and evenly, encouraging the deep Maillard browning that makes these so addictive. If you cannot source beeswax, a workaround is included, though the crust will be slightly less spectacular.
Canelés sit firmly in the medium-to-hard difficulty range, not because the technique is complicated, but because they reward patience and attention to detail. The batter itself takes about fifteen minutes to make. The challenge is in the waiting, the mold preparation, and learning to read the color during baking. This recipe is perfect for the curious, experienced home baker who wants to expand their French pastry repertoire, and for anyone who has ever eaten a canelé at a good patisserie and desperately wanted to recreate that experience at home.
12
servings
Ingredients
- 500 mlwhole milk (about 2 cups)
- 25 gunsalted butter (about 2 tbsp), cut into cubes
- 1 wholevanilla bean, split and seeds scraped (or 2 tsp pure vanilla extract as a substitute)
- 200 gpowdered (icing) sugar, sifted (about 1 and 2/3 cups)
- 100 gall-purpose flour (about 3/4 cup plus 1 tbsp, spooned and leveled)
- 2 largeeggs, at room temperature
- 2 largeegg yolks, at room temperature
- 3 tbspdark rum (45ml), such as Rhum Agricole or Diplomatico
- —Pinch of Colima Sea SaltMicroplastic Free Salt
- 50 gfood-grade beeswax pellets (about 3 tbsp) for mold coating
- 30 gunsalted butter (about 2 tbsp), for mold coating, melted together with beeswax
Ingredient Substitutions
Instructions
Click on an item below to shop for the recommended items for this recipe on Amazon.
As an Amazon Associate, we earn from qualifying purchases.
- Make the batter (Day 1 or 2 days before baking): Heat the milk, 25g butter, and the vanilla bean with its seeds in a small saucepan over medium heat until it just reaches a simmer. Remove from heat and let steep for 15 minutes. Remove the vanilla pod. The milk should be warm (around 140°F / 60°C) when you proceed.
- In a large bowl, whisk together the sifted powdered sugar, flour, and salt. Make a well in the center and add the whole eggs and egg yolks. Whisk from the center outward until a thick, smooth paste forms. Slowly pour in the warm vanilla milk in a thin, steady stream, whisking constantly to prevent the eggs from cooking. Whisk until completely smooth. Stir in the rum. The batter will be very thin, similar to crepe batter.
- Strain the batter through a fine-mesh sieve into a large measuring jug or pitcher with a pour spout. Press plastic wrap directly onto the surface of the batter to prevent a skin forming. Refrigerate for a minimum of 24 hours and up to 48 hours. Do not skip this step.
- Prepare the molds (1 hour before baking): Combine 50g beeswax and 30g butter in a small saucepan over low heat and melt together, stirring until smooth. Using a pastry brush, coat the inside of each canelé mold generously and evenly with the warm beeswax mixture, ensuring you cover the fluted edges. Place the coated molds upside-down on a wire rack set over a baking sheet and put them in the freezer for 15 minutes until the coating is completely solid and white. Remove and let them sit at room temperature for 5 minutes before filling.
- Preheat your oven to 450°F (230°C) with a heavy baking sheet or oven stone on the center rack. Remove the batter from the fridge and stir it gently. Do not whisk vigorously or you will incorporate air bubbles. Let it sit on the counter for 15 minutes to take the chill off.
- Place the prepared molds on the preheated baking sheet. Pour the batter into each mold, filling to about 5mm (just under 1/4 inch) below the rim to allow for rise and then settling.
- Bake at 450°F (230°C) for 10 minutes. Without opening the oven, reduce the temperature to 375°F (190°C) and continue baking for 45 to 50 minutes. The canelés are done when the exterior is a deep mahogany brown, almost appearing too dark. Pale canelés will have a raw, gummy interior. Err toward darker rather than paler.
- Remove the molds from the oven and immediately unmold the canelés onto a wire rack by inverting the mold firmly. They should release cleanly if the wax coating was thorough. If one sticks, give it a firm tap on the counter. Let cool for at least 10 to 15 minutes before eating. The interior needs this time to set from custardy-liquid to custardy-firm. They are best eaten within 2 hours of baking.
- Prepare your batter following Steps 1 through 3 of the oven method. The 24 to 48 hour cold rest is equally important here.
- Prepare silicone canelé molds by brushing the insides with the melted beeswax and butter mixture (or clarified butter if preferred). Place the coated molds in the freezer for 10 to 15 minutes until the coating is solid. Note: do not use standard copper or tin molds in an air fryer.
- Preheat the air fryer to 375°F (190°C) for 5 minutes. Remove the batter from the refrigerator, stir gently, and allow it to rest on the counter for 15 minutes. Fill the silicone molds to 5mm below the rim.
- Place the filled molds in the air fryer basket in a single layer, leaving at least 1 inch of space between them for air circulation. Do not overcrowd. Bake at 375°F (190°C) for 28 to 32 minutes. Check at 28 minutes. The tops should be a deep, even amber to dark mahogany brown.
- Remove the basket from the air fryer and unmold the canelés immediately onto a wire rack. Silicone molds release easily when peeled away gently from the sides. Allow to cool for 10 to 15 minutes before eating. If baking multiple batches, re-coat molds with beeswax mixture and refreeze before refilling.
Nutrition Per Serving
Per 1 serving (makes 12 standard canelés (using 55mm copper or silicone molds))
Why This Recipe Works
The two-stage temperature baking is the engineering heart of a great canelé. Starting at high heat (450°F / 230°C) immediately shocks the exterior of the batter against the hot mold, beginning the caramelization of the sugars and the Maillard reaction between the proteins and sugars in the milk and eggs. This creates the rigid, darkened shell in the first critical minutes. Dropping the temperature to 375°F (190°C) then allows the interior to cook through slowly and gently, like a baked custard, without overcooking what has already crisped. The result is two entirely different textures in one small pastry, achieved purely through heat management.
The long batter rest is not optional; it is transformative. Freshly made batter contains air bubbles from mixing and has gluten strands that are still tight and elastic from hydration. Resting for 24 to 48 hours allows gluten relaxation (meaning the batter flows smoothly into the mold and contracts less during baking) and complete hydration of the starch granules in the flour. Fully hydrated starch gelatinizes more evenly and completely during baking, which is what gives the interior that characteristic dense, slightly gelatinous, custardy chew that distinguishes a canelé from any other pastry. Using powdered sugar rather than granulated sugar also contributes to this texture: the cornstarch present in most powdered sugar adds a slight tenderness and helps stabilize the custard structure.
Beeswax is not a gimmick. It has a much higher melting point than butter alone (around 145°F / 63°C versus 90°F / 32°C for butter) and creates an extremely thin, hard, heat-conductive layer between the batter and the metal mold. This layer conducts intense heat directly to the batter surface without burning or sticking, enabling that glassy, lacquered exterior. Butter alone tends to burn at the temperatures required and can cause sticking. If your canelés are sticking, the most likely cause is an insufficiently thick or uneven wax coating, particularly in the deep grooves of the flutes.
Baker’s Tips
- Use a kitchen scale for this recipe. The flour and sugar measurements are critical, and volume measurements are too imprecise for a custard batter this sensitive.
- When pouring the batter, use a pitcher with a spout rather than a ladle to fill the narrow molds cleanly and avoid overflow.
- Do not open the oven door during the first 20 minutes of baking. The initial high heat is creating the crust structure, and a temperature drop at this stage can cause the canelés to collapse inward.
- Darker is better. First-time bakers almost always pull canelés too early. A properly baked canelé looks alarmingly dark, very close to burnt. Trust the color and time.
- If your canelés have a raw, gummy ring inside when you cut them open, they were underbaked. Increase your bake time by 5 minutes next time, or check that your oven temperature is accurate with an oven thermometer.
- Stir the batter very gently just before filling the molds. Vigorous stirring introduces bubbles that create an uneven interior texture.
- If using copper molds, a dedicated set kept only for canelés and never washed with soap (just wiped clean) will build up a seasoning over time that improves release with each use.
Variations
- Orange and Cardamom: Replace the rum with Grand Marnier or Cointreau, substitute the vanilla bean with 1/2 tsp freshly ground cardamom, and add the zest of one orange to the milk while steeping.
- Espresso and Dark Rum: Add 1 tbsp instant espresso powder to the warm milk along with the vanilla, keeping the rum. The coffee deepens the caramel notes of the crust beautifully.
- Chocolate: Reduce flour to 85g and add 15g of high-quality Dutch-process cocoa powder sifted in with the dry ingredients. Replace rum with dark rum or coffee liqueur.
- Non-alcoholic Rose Water: Replace the rum with 2 tbsp rose water and 1 tbsp water. The floral fragrance is unexpected and lovely.
Troubleshooting & FAQ
My canelés stuck to the molds and tore when I unmolded them. What went wrong?
The outside of my canelés looks great but the inside is gummy and undercooked. What happened?
My canelés deflated or collapsed as they cooled. Is that normal?
My batter has lots of lumps or the eggs scrambled when I added the hot milk. Can I save it?
Can I use silicone molds instead of copper? Will the results be very different?
Storage & Make-Ahead
- Storage: Canelés are best eaten within 2 hours of baking when the crust is at its crispest. Store leftovers uncovered (not in an airtight container, which will steam the crust soft) at room temperature for up to 24 hours. To refresh, place them back in a 375°F (190°C) oven or air fryer for 5 to 7 minutes to re-crisp the exterior. They are still delicious on day two, just less crisp.
- Make-Ahead: The batter is entirely make-ahead and actually requires it: prepare it 24 to 48 hours in advance and store it covered in the refrigerator. The beeswax mold coating can be done the night before baking, with the coated molds stored in the freezer. Do not bake the canelés ahead of time as they do not keep well once baked.


oh vince this just made my heart so full – your grandma sounds like she really understood the magic of small things, you know? i have this same feeling about canelés, theyre like little time capsules of someone elses joy. ive been wanting to try making these with allulose since i tend to avoid too much sugar, and honestly the fact that you can get that deep caramelization without all the regular stuff is so exciting to me. there’s something about learning to bake the foods people we love cherished that feels like recieving a real gift, tbh.
My grandmother used to talk about canelés like they were these precious little gifts, and I finally understand what she meant after trying a proper one. The way you describe that contrast between the caramelized crust and the custardy center has me wanting to attempt these, though I’m a bit intimidated by the molds and technique. Do you find allulose works well here without affecting that signature lacquered exterior, or does it need any adjustments to the caramelization process?
ok this thread is making me tear up a little tbh. theres something about how certain foods become these vessels for memory and connection, and canelés seem like they’re on a whole other level with that. i had a student last year whose grandmother taught her to bake before she passed, and now baking is how she processes grief, you know? i bet your grandma would be so moved knowing you’re seeking out that experience she treasured. the rum and vanilla combo in this recipe sounds like it would hit different when you’re tasting it with that kind of history behind it – like you’re honoring something, not just eating a pastry.