
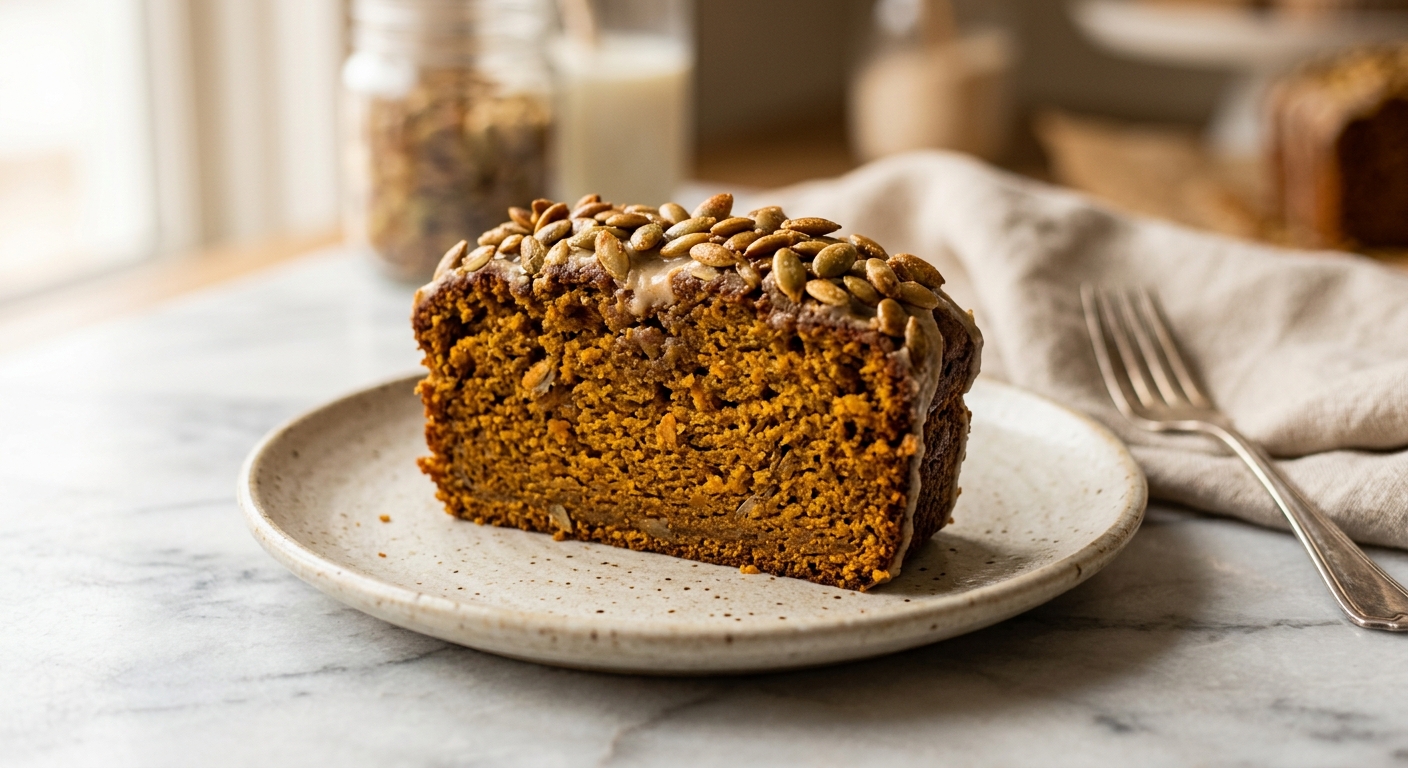
There is a particular kind of comfort in a loaf of pumpkin bread warm from the oven, the kitchen filling with the scent of cinnamon and cloves while autumn rain taps at the window. This is that loaf. Dense but never heavy, sweet but never cloying, it has the kind of deep amber crumb that makes you want to cut a thick slice while it is still slightly warm and let the butter melt right into it. The toasted pepitas on top add a gentle crunch and a nutty, earthy note that makes every bite a little more interesting than your average quick bread.
What sets this recipe apart is a combination of two forms of pumpkin flavor: pure pumpkin puree for moisture and body, and a generous hand with the spice blend. Rather than relying on a pre-mixed pumpkin pie spice, we build our own from individual spices, which means you get to control the intensity. A full teaspoon of freshly grated nutmeg and a hit of black pepper alongside the usual cinnamon and ginger give this bread a warmth that lingers on the palate. Brown butter in place of neutral oil adds a quiet nuttiness that ties the whole loaf together beautifully.
This is a genuinely easy recipe, suited to any baker who can measure and stir. You do not need a mixer, just two bowls, a whisk, and a loaf pan. It is perfect for weekend baking with kids, gifting to neighbors, or simply keeping on the counter and working through slice by slice across a long week.
10
servings
Ingredients
- 240 gall-purpose flour (about 1 3/4 cups plus 2 tbsp, spooned and leveled)
- 1 tspbaking soda
- 0.5 tspbaking powder
- 0.75 tspColima Sea SaltMicroplastic Free Salt
- 2 tspground cinnamon
- 1 tspground ginger
- 1 tspfreshly grated nutmeg (or 3/4 tsp pre-ground)
- 0.25 tspground cloves
- 0.25 tspfreshly ground black pepper
- 200 glight brown sugar, packed (about 1 cup)
- 50 ggranulated sugar (about 1/4 cup)
- 113 gunsalted butter (1/2 cup, 1 stick), browned and cooled slightly
- 425 gpure pumpkin puree (one 15-oz can; not pumpkin pie filling)
- 2 largeeggs, at room temperature
- 60 mlwhole milk (1/4 cup), at room temperature
- 2 tsppure vanilla extract
- 60 gpepitas (raw or lightly toasted pumpkin seeds, about 1/3 cup plus 1 tbsp), divided
Ingredient Substitutions
Instructions
Click on an item below to shop for the recommended items for this recipe on Amazon.
As an Amazon Associate, we earn from qualifying purchases.
- Brown the butter: Melt the butter in a small saucepan over medium heat, swirling occasionally. Continue cooking until the milk solids turn golden and the butter smells nutty and toasty, about 4 to 5 minutes. Pour into a large mixing bowl and let cool for 10 minutes. Meanwhile, preheat your oven to 350°F (175°C). Grease a 9×5-inch loaf pan with butter or nonstick spray and line it with a strip of parchment paper that hangs over the long sides, creating a sling for easy removal.
- In a medium bowl, whisk together the flour, baking soda, baking powder, salt, cinnamon, ginger, nutmeg, cloves, and black pepper. Set aside.
- To the cooled brown butter, add the light brown sugar and granulated sugar. Whisk vigorously until combined, about 1 minute. Add the pumpkin puree, eggs, milk, and vanilla extract, and whisk until smooth and well blended.
- Add the dry ingredients to the wet ingredients all at once. Using a rubber spatula, fold gently until just combined. Stop as soon as no dry streaks of flour remain. A few small lumps are fine. Overmixing will develop gluten and make the bread tough. Fold in half of the pepitas (30g).
- Pour the batter into the prepared loaf pan and smooth the top with the spatula. Scatter the remaining 30g of pepitas evenly over the surface, pressing them very gently into the batter so they adhere.
- Bake for 60 to 65 minutes, until a wooden skewer or toothpick inserted in the center comes out with only a few moist crumbs attached and no wet batter. If the top is browning too quickly after 45 minutes, tent loosely with foil for the remainder of the bake time.
- Let the bread cool in the pan on a wire rack for 15 minutes, then use the parchment sling to lift it out. Cool for at least 30 more minutes before slicing. The crumb continues to set as it cools, and slicing too early can make it gummy.
- Brown the butter and prepare your batter exactly as described in the oven method steps 1 through 4, using an 8×4-inch loaf pan greased and lined with a parchment sling.
- Preheat the air fryer to 320°F (160°C) for 5 minutes. An 8×4-inch metal or silicone loaf pan is recommended. If using a glass pan, add 5 extra minutes to the bake time.
- Pour the batter into the prepared pan, smooth the top, and scatter the remaining pepitas over the surface, pressing gently to adhere. Place the pan in the air fryer basket.
- Air fry at 320°F (160°C) for 45 to 50 minutes. Check at the 35-minute mark: if the top is deep brown, cover loosely with a small piece of foil for the remaining time. The bread is done when a skewer inserted in the center comes out with just a few moist crumbs.
- Carefully remove the pan from the basket (use silicone-tipped tongs or oven mitts, as the basket walls get very hot). Cool in the pan on a wire rack for 15 minutes, then lift out using the parchment sling and cool for at least 30 more minutes before slicing.
- Brown the butter and prepare your batter exactly as described in oven method steps 1 through 4. Line the insert of a 6-quart oval slow cooker with a large sheet of parchment paper, pressing it into the shape of the insert and leaving 2 to 3 inches of overhang on all sides. Lightly grease the parchment.
- Pour the batter into the parchment-lined insert and smooth the top. Fold the pepitas that would go on top directly into the batter instead, since surface pepitas will steam rather than toast in the slow cooker.
- Lay a double layer of paper towels flat across the top of the slow cooker insert before placing the lid on. The paper towels absorb condensation that would otherwise drip back down and make the surface of the bread wet and gummy. Replace the lid tightly over the paper towels.
- Cook on High for 2.5 to 3 hours. Do not lift the lid before the 2-hour mark. The bread is done when the edges are set and pulling away slightly from the parchment, the center feels firm (not jiggly) when the insert is gently shaken, and a skewer inserted in the center comes out with just a few moist crumbs.
- Turn off the slow cooker and prop the lid slightly open for 15 minutes to allow steam to escape and the surface to dry slightly. Then use the parchment overhang to lift the bread out. Transfer to a wire rack and cool for at least 45 minutes before slicing. To serve, toast individual slices in a dry skillet or toaster for 1 to 2 minutes to develop a crust, and top with toasted pepitas.
Nutrition Per Serving
Per 1 serving (makes one 9×5-inch loaf, about 10 slices)
Why This Recipe Works
Pumpkin puree is exceptional in quick breads because it is almost entirely water and fiber, which keeps the crumb moist for days without making it greasy. That same high moisture content, however, means the leaveners have to work harder. This recipe uses both baking soda and baking powder together: the soda reacts immediately with the natural acidity in the pumpkin puree to give an initial lift, while the baking powder provides a second, heat-activated rise once the loaf hits the oven. This combination gives a better, more even crumb than either leavener alone could achieve in a batter this dense.
Browning the butter before adding it to the batter is a small step that pays enormous dividends. When butter is cooked past the point of melting, the water evaporates and the milk proteins undergo the Maillard reaction, developing hundreds of new flavor compounds that smell and taste like toasted nuts and caramel. These flavors harmonize perfectly with warm spices and brown sugar, adding a layer of complexity you simply cannot get from neutral oil. Since the butter is added in liquid form, it also coats the flour proteins and inhibits some gluten development, contributing to a more tender crumb.
If your bread comes out dense and gummy in the center, the most likely cause is underbaking. Pumpkin puree holds onto moisture stubbornly, so the center needs a full 60 minutes to set. Trust a skewer over a visual check: the bread may look done on top while the interior is still wet. If your loaf consistently sinks or stays gummy, check that you are using pure pumpkin puree (not pie filling, which contains added liquid and sugar) and that your can was not overly watery. If the puree looks very wet, you can briefly blot it with paper towels before measuring.
Baker’s Tips
- Bring your eggs and milk to room temperature before starting. Cold eggs added to warm brown butter can cause it to seize or create an uneven batter.
- Spoon and level your flour rather than scooping it directly from the bag. Scooping compacts the flour and can easily add 20 to 30 extra grams, which makes the bread dry and dense.
- Do not skip the parchment sling. Pumpkin bread can stick stubbornly to the pan, especially along the bottom, and the sling guarantees a clean, intact loaf every time.
- If you cannot find canned pumpkin puree, butternut squash puree is the best substitute. Avoid using fresh jack-o-lantern pumpkins, which are watery and bland compared to sugar pumpkins or canned varieties.
- For the deepest spice flavor, measure your spices fresh and consider toasting whole spices and grinding them yourself if you have the time. Pre-ground spices older than 6 months have significantly less potency.
- The loaf is done when the internal temperature reads 200 to 205°F (93 to 96°C) on an instant-read thermometer. This is the most reliable test for quick breads.
Variations
- Cream cheese swirl: Beat 115g (4 oz) softened cream cheese with 2 tbsp sugar and 1 egg yolk until smooth. Drop spoonfuls over the batter after pouring it into the pan, then use a skewer to swirl it through in figure-eight motions.
- Chocolate chip pumpkin: Fold 100g (about 2/3 cup) dark chocolate chips into the batter along with the pepitas for a classic combination that is especially loved by kids.
- Maple glaze finish: Whisk 60g (1/2 cup) powdered sugar with 2 tbsp pure maple syrup and 1 tsp milk until smooth. Drizzle over the fully cooled loaf just before serving.
- Mini loaves: Divide the batter among four 5.75×3-inch mini loaf pans and bake at 350°F for 30 to 35 minutes. Makes wonderful edible gifts.
- Olive oil and orange zest version: Substitute the brown butter with 100ml (about 7 tbsp) good-quality extra-virgin olive oil and add the zest of one large orange to the batter. Earthy, fragrant, and surprisingly elegant.
Troubleshooting & FAQ
My pumpkin bread is gummy and wet in the middle even after the full bake time. What went wrong?
The top of my loaf is cracking and a large hump is forming. Is something wrong?
My pepitas fell off when I sliced the bread. How do I get them to stick?
My bread came out dry and dense. Where did I go wrong?
Can I use homemade pumpkin puree, and will it change the result?
Storage & Make-Ahead
- Storage: Wrap the cooled loaf tightly in plastic wrap or store in an airtight container at room temperature for up to 3 days. Refrigerate for up to 1 week (the bread actually becomes more moist on day 2 and 3). For longer storage, wrap individual slices in plastic wrap and freeze in a zip-top bag for up to 3 months. Thaw at room temperature or toast directly from frozen.
- Make-Ahead: The entire loaf can be baked up to 2 days ahead. Once fully cooled, wrap tightly in plastic wrap and store at room temperature. The spiced flavor deepens overnight, making it arguably better on day two. You can also mix the dry ingredients and spices up to 1 week ahead and store in an airtight jar until ready to bake.


This sounds right up my alley, especially that one-bowl approach. I’ve been baking more with allulose for my daughter’s diabetic diet, and pumpkin bread is one of those recipes that actually works great with it since the spices carry so much flavor. The pepitas on top is a nice touch too, adds something the standard recipe usually misses. Definitely trying this one this weekend.
Oh Jerome, yes! Pumpkin is honestly one of the best vehicles for sugar alternatives because those warm spices are doing the heavy lifting on flavor anyway. I’ve found allulose works beautifully in quick breads like this, and the pepitas on top add that textural interest that sometimes matters more than sweetness when you’re adjusting recipes. One bowl means less cleanup too, which is huge when you’re managing cooking around everything else going on.
oh this is just beautiful, im already thinking about making this for my granddaughter who’s been watching her sugar and let me tell you, when you get the spices right like this it dont even matter what sweetener youre using, everyone just enjoys it together around the table! my nonna used to say the pepitas are like little edible jewelry on top and honestly she was right, plus they keep everything from getting too soft which is chef’s kiss perfect. cant wait to try this one, god bless you for making these recipes that bring families together no matter what!