
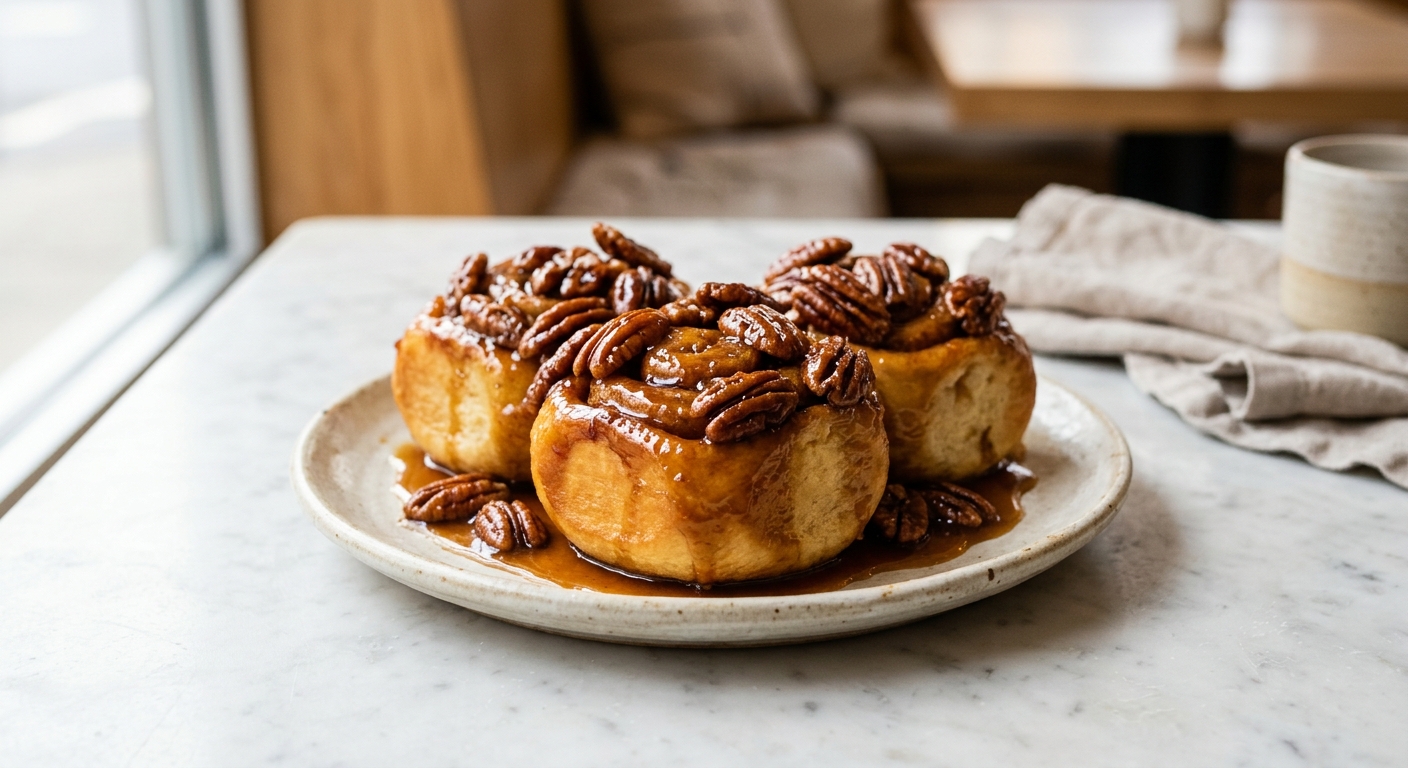
There is a particular kind of morning magic that happens when a tray of sticky pecan buns comes out of the oven. The caramel is bubbling up around the edges, the kitchen smells like toasted nuts and brown sugar and warm spice, and for a moment everything feels genuinely right with the world. These buns have that effect. Each one is a soft, enriched dough spiral filled with cinnamon butter, nestled on top of a thick pool of brown sugar caramel and a generous layer of toasted pecans. When you flip the pan, that caramel flows down over every bun in glossy, amber ribbons. It is the kind of bake you make on a slow Saturday morning and remember for years.
What sets this recipe apart is the caramel base. Rather than a simple butter and brown sugar mixture, this one is cooked briefly on the stovetop with heavy cream and a whisper of molasses to deepen the flavor before it ever meets the dough. That extra step transforms the topping from cloyingly sweet to something genuinely complex, with a faint bitterness and a richness that balances the soft, yeasted buns beautifully. The dough itself is an enriched brioche-style dough made with both butter and a touch of sour cream, which keeps it tender and moist for days longer than a standard recipe.
This recipe sits firmly in the medium difficulty category. The dough requires a stand mixer and an overnight cold rise (which is almost entirely hands-off and dramatically improves the flavor), and the caramel needs a watchful eye for about five minutes on the stove. It is absolutely achievable for a confident beginner with patience, and it is the kind of recipe that experienced bakers will want to return to again and again. It is perfect for weekend brunches, holiday mornings, or any occasion that deserves something truly special.
12
servings
Ingredients
- Filling
- 480 gbread flour (about 4 cups, spooned and leveled), plus extra for dusting
- 7 ginstant yeast (1 packet or 2.25 tsp)
- 50 ggranulated sugar (about 1/4 cup)
- 1.5 tspColima Sea SaltMicroplastic Free Salt
- 240 mlwhole milk, warmed to 110°F (43°C) (about 1 cup)
- 2 largeeggs, at room temperature
- 60 gfull-fat sour cream, at room temperature (about 1/4 cup)
- 85 gunsalted butter, softened to room temperature (6 tbsp), cut into cubes
- 115 gunsalted butter, softened (8 tbsp or 1 stick)
- 150 gdark brown sugar, packed (about 3/4 cup)
- 2 tspground cinnamon
- 0.5 tspground cardamom
- —Pinch of Colima Sea SaltMicroplastic Free Salt
- Caramel
- 170 gunsalted butter (12 tbsp or 1.5 sticks)
- 200 gdark brown sugar, packed (about 1 cup)
- 120 mlheavy cream (about 1/2 cup)
- 1 tbspunsulfured molasses
- 1 tsppure vanilla extract
- 0.5 tspColima Sea SaltMicroplastic Free Salt
- 200 graw pecan halves (about 2 cups), toasted
Ingredient Substitutions
Instructions
Click on an item below to shop for the recommended items for this recipe on Amazon.
As an Amazon Associate, we earn from qualifying purchases.
- Make the dough: In the bowl of a stand mixer fitted with the dough hook, whisk together the bread flour, instant yeast, granulated sugar, and salt. Add the warm milk (110°F/43°C), eggs, and sour cream. Mix on low speed for 2 minutes until a shaggy dough forms, then increase to medium and mix for 4 minutes.
- Add the butter for the dough: With the mixer running on medium-low, add the softened butter one cube at a time, waiting about 20 seconds between each addition. Once all butter is incorporated, increase to medium-high and knead for 6 to 8 minutes until the dough is smooth, elastic, and pulls cleanly from the sides of the bowl. It will be soft and slightly tacky but should not stick aggressively to your fingers.
- First rise and cold proof: Lightly oil a large bowl, place the dough inside, and cover tightly with plastic wrap. Let it rise at room temperature for 1 hour until slightly puffed, then transfer to the refrigerator and chill overnight (8 to 12 hours). Cold-proofing the dough develops flavor and makes it much easier to roll.
- Make the caramel base: The next morning, combine the butter, dark brown sugar, heavy cream, molasses, and salt in a medium saucepan over medium heat. Stir constantly until the butter melts, then let the mixture come to a gentle boil without stirring for 2 minutes. Remove from heat and stir in the vanilla extract. The caramel should be glossy and slightly thickened. Pour it evenly into a greased 9×13-inch baking pan and scatter the toasted pecan halves in a single layer on top. Set aside.
- Make the filling: Beat together the softened butter, dark brown sugar, cinnamon, cardamom, and pinch of salt with a fork or spatula until a smooth, spreadable paste forms. Set aside.
- Roll and fill the dough: Remove the cold dough from the refrigerator. On a lightly floured surface, roll it out into a roughly 18×12-inch rectangle with the long edge facing you. Spread the cinnamon butter filling evenly all the way to the edges. Starting from the long edge closest to you, roll the dough tightly into a log, pinching the seam gently to seal. Use a sharp knife or unflavored dental floss to cut the log into 12 even pieces, each about 1.5 inches thick.
- Arrange and second rise: Place the buns cut-side up over the caramel and pecans in the baking pan, spacing them evenly with a little room to expand. Cover loosely with plastic wrap or a damp kitchen towel and let them rise at room temperature for 60 to 90 minutes, until they look puffy and are touching each other. They should spring back slowly when gently poked.
- Bake and flip: Preheat your oven to 350°F (175°C). Remove the plastic wrap and bake for 30 to 35 minutes until the buns are deep golden brown and an instant-read thermometer inserted into the center of a middle bun reads 190°F (88°C). The caramel will be actively bubbling around the edges. Let the pan cool on a wire rack for exactly 5 minutes, no longer. Then place a large rimmed baking sheet or serving platter over the top of the pan and, with oven mitts firmly on, flip the whole thing in one confident motion. Leave the pan in place for 30 seconds to let all the caramel run down, then lift it off. Serve warm.
- Prepare the dough exactly as in steps 1 through 3 of the oven method, including the overnight cold proof. This step is identical regardless of cooking method.
- Make the caramel: Prepare the brown sugar caramel sauce exactly as described in the oven method. Line the insert of a 6-quart oval slow cooker with a single large sheet of parchment paper (leaving overhang on the sides to help lift the buns out). Pour the caramel into the bottom and scatter the toasted pecans on top.
- Roll, fill, and cut the dough as described in the oven method, but cut the log into 8 to 9 even pieces. Arrange the buns cut-side up over the caramel layer in the slow cooker. They will fit snugly. Cover and let them rise at room temperature for 45 to 60 minutes until visibly puffed. Because the slow cooker is a warm environment, they may rise faster than expected.
- Cook on High: Place a double layer of paper towels or a clean kitchen towel under the slow cooker lid before closing. This absorbs the condensation that would otherwise drip back onto the buns and make the tops soggy. Cook on High for 2 to 2.5 hours. The buns are done when the center bun reads 190°F (88°C) on an instant-read thermometer and the edges are set and not wet.
- Optional quick broil: If you want some color on the tops, carefully lift the parchment sling to transfer the buns (caramel-side still down) onto a foil-lined baking sheet. Place under a broiler set to High for 2 to 3 minutes, watching constantly, until lightly golden. Then flip onto a serving platter as described in the oven method. Serve immediately.
- Prepare the dough, caramel, and filling, and assemble the buns fully as described in steps 1 through 6 of the oven method. Arrange the cut buns over the caramel and pecans in a 9×13-inch baking pan lined with a parchment sling for easy removal.
- Do not let the buns rise. Instead, cover the pan tightly with two layers of plastic wrap followed by a layer of aluminum foil. Freeze the assembled, un-risen buns for up to 4 weeks.
- The night before you want to serve them: Transfer the covered pan directly from the freezer to the refrigerator. Let the buns thaw slowly and rise overnight in the refrigerator, about 8 to 12 hours. By morning they should look puffy and crowded in the pan.
- Remove the pan from the refrigerator 30 minutes before baking. Preheat the oven to 350°F (175°C). Remove all wrapping and bake for 35 to 40 minutes (slightly longer than the standard method to account for the cold start) until deep golden brown and the internal temperature of a center bun reads 190°F (88°C).
- Rest for exactly 5 minutes on a wire rack, then flip confidently onto a large rimmed platter or baking sheet. Allow the caramel to flow down for 30 seconds, lift the pan, and serve warm.
Nutrition Per Serving
Per 1 serving (makes 12 large sticky buns in one 9×13-inch pan)
Why This Recipe Works
The enriched dough in this recipe relies on fat from three sources: butter, eggs, and sour cream. Each plays a slightly different role. Butter coats the gluten strands and makes the crumb tender and rich. Eggs provide structure and emulsification, helping the fat and liquid bind into a cohesive, silky dough. The sour cream adds both fat and acidity, and that acidity slightly weakens the gluten network, which is exactly what you want in a sticky bun. A slightly more relaxed gluten structure means the buns stay soft rather than chewy as they cool. The cold overnight proof is not just a convenience, it is a flavor decision. Slower, colder fermentation allows yeast to produce more complex organic acids and esters, compounds that translate directly into a deeper, more nuanced flavor compared to a quick same-day rise.
The caramel base is built on dark brown sugar rather than granulated sugar, which means it comes pre-loaded with molasses. Adding more molasses deepens that bittersweet complexity and shifts the caramel away from simple sweetness toward something with real character. Cooking the butter, sugar, and cream together before baking serves two purposes: it ensures the sugar is fully dissolved so the caramel does not turn grainy in the oven, and it gives the caramel a head start on the Maillard reaction, developing color and flavor before it even hits the heat. When the buns bake, the caramel continues to cook and reduce slightly around the edges, concentrating in flavor. This is why the 5-minute wait before flipping is so important: the caramel needs just enough time to firm slightly so it clings to the buns rather than pooling entirely on the platter. Too long and it will set and stick to the pan. Flip at 5 minutes and it behaves perfectly.
Using bread flour rather than all-purpose flour gives these buns a slightly stronger gluten network that can hold up to the extended cold fermentation and the enriching butter without becoming dense. The protein content of bread flour (typically 12 to 13%) creates enough structure to support all that fat and still produce a bun with visible layers and a satisfying pull. If you find your dough feels very sticky during the butter incorporation stage, resist adding extra flour. That stickiness is normal and will resolve as the gluten develops through continued kneading. Patience here is rewarded with a noticeably better texture in the final bun.
Baker’s Tips
- Toast your pecans before using them. Spread them on a dry baking sheet and toast at 350°F (175°C) for 7 to 9 minutes, shaking once, until fragrant and a shade darker. Toasting deepens their flavor dramatically and prevents them from tasting flat against the rich caramel.
- Use dental floss to cut the buns instead of a knife. Slide an 18-inch piece of unflavored floss under the log, cross the ends over the top, and pull tight. It cuts cleanly through soft dough without compressing the spirals the way a knife tends to.
- The caramel should be poured warm and fluid into the pan. If it has cooled and thickened, gently rewarm it over low heat with a splash of cream before pouring.
- Do not skip lining the pan with a parchment sling if using the freezer or slow cooker methods. For the standard oven method, greasing the pan well is sufficient since you flip the buns while warm.
- Make sure your butter for the dough is genuinely soft, not melted. If you press a finger into it, it should leave an indent easily without resistance. Melted butter makes the dough greasy and the gluten will not develop properly.
- The 5-minute rest before flipping is not negotiable. Set a timer. Too short and the caramel runs off entirely. Too long (more than 8 to 10 minutes) and the caramel sets and the buns will tear when you try to lift the pan.
- If your buns seem to rise slowly during the second proof, place the covered pan in a cold oven with just the oven light on. The gentle warmth (around 80°F/27°C) creates an ideal proofing environment.
Variations
- Orange Cardamom Pecan Buns: Add the zest of one large orange to both the dough and the filling, and increase the cardamom in the filling to 1 tsp. Add 1 tsp orange extract to the caramel instead of vanilla.
- Maple Walnut Variation: Replace the molasses in the caramel with 2 tbsp pure maple syrup and swap the pecans for toasted walnuts. Add 1/4 tsp maple extract to the filling.
- Chocolate Pecan Buns: Add 30g (1/4 cup) unsweetened cocoa powder to the filling and scatter 100g (3/4 cup) roughly chopped dark chocolate over the pecans in the caramel base before adding the buns.
- Mini Sticky Buns: Use two 9-inch round pans instead of one 9×13-inch pan. Cut the log into 18 pieces and divide them between the two pans. Reduce baking time to 22 to 26 minutes. Perfect for gifting.
Troubleshooting & FAQ
My dough is extremely sticky and soft during kneading. Should I add more flour?
My caramel hardened in the pan and I cannot flip the buns without them tearing. What happened?
The buns did not rise much during the second proof. Are they ruined?
The filling leaked out and pooled at the bottom of the pan during baking. Is that normal?
My buns look golden on top but the center buns are still doughy inside. What went wrong?
Storage & Make-Ahead
- Storage: Store buns in an airtight container or covered tightly with foil at room temperature for up to 2 days. To refresh, microwave individual buns for 20 to 30 seconds or warm the whole pan, covered with foil, at 300°F (150°C) for 10 to 12 minutes. Refrigerate for up to 5 days and warm before serving. Baked buns freeze well for up to 2 months, individually wrapped in plastic wrap and stored in a zip-lock freezer bag.
- Make-Ahead: The dough can be made up to 48 hours ahead and kept cold-proofing in the refrigerator. The caramel can be made 3 days ahead, stored in a jar in the refrigerator, and gently rewarmed before pouring into the pan. For the most convenient approach, use the Freezer Method above to assemble buns up to 4 weeks in advance.
man these look incredible, i actually baked some cinnamon rolls for one of my regulars last year who missed the bakery kind from her neighborhood and watching her face light up when she bit into one made my whole week. gonna give these a shot with the allulose and see if that caramel sets up right, my guess is itll be even better than the regular stuff honestly
oh larry thats so beautiful, bringing that kind of joy to someone is what its all about! i make sticky buns for my granddaughter every time she visits and let me tell you, the way her whole face changes when she pulls one apart and that caramel just drips everywhere, its like Christmas morning every single time, no sugar alternatives needed to make memories like that but im telling you these low sugar ones are gonna be perfect for when shes gotta watch her intake, God bless people like you who still care about making things from scratch
These sound absolutely wonderful, and what Larry and Rosa are saying really resonates with me. There’s something about baking for someone that matters to you, that turns the whole thing into more than just food. I started baking more after my wife passed, honestly partly because I needed something with my hands during the hard days, and I’ve found myself bringing treats to the running group I started. Those pecan buns sound like exactly the kind of thing that would disappear fast at our Saturday morning meetups, and I love that you’re using allulose so folks watching their sugar intake can actually enjoy them without worry.