
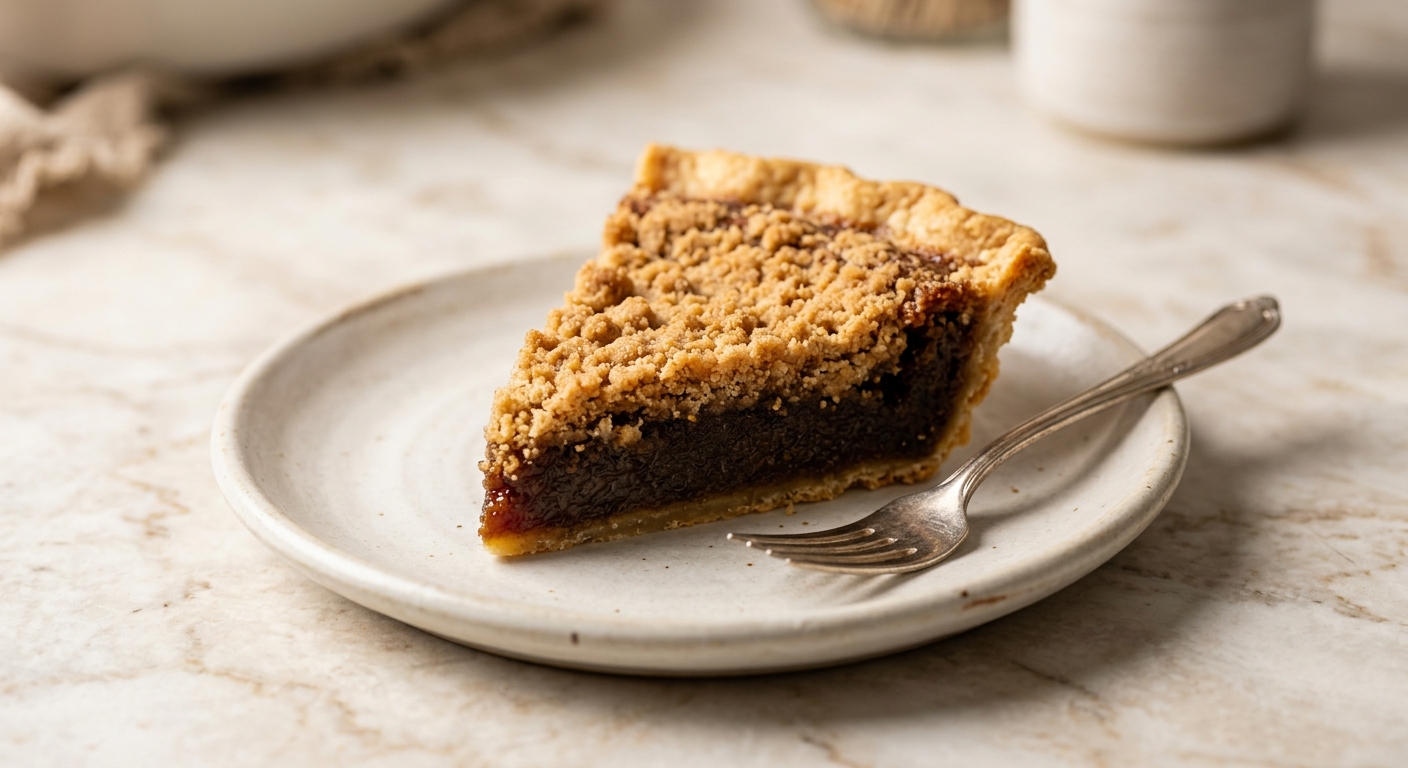
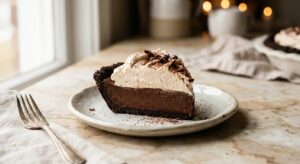
There is something quietly magnificent about shoofly pie. It does not announce itself with layers of ganache or architectural decoration. It simply sits there in its fluted crust, dark and fragrant, smelling of warm molasses and brown sugar and something faintly spiced, and it makes you want to sit down with a cup of strong coffee and stay awhile. Legend has it the pie got its name because its sweet filling attracted flies that had to be shooed away while it cooled on the windowsill. Whether or not that is true, one taste explains why it was worth the trouble.
What sets this version apart is the layered technique of alternating the molasses mixture with the crumb topping before baking, rather than simply dumping one on top of the other. This creates distinct textural zones inside the finished pie: a soft, almost custardy molasses bottom that is dense and deeply flavored, a middle layer where the crumb and filling have baked together into something fudgy and complex, and a top that bakes up dry and crumbly, like the best streusel you have ever had. A touch of apple cider vinegar in the filling brightens the molasses and keeps the sweetness from feeling heavy. A pinch of cinnamon and ginger in the crumb ties everything together with warmth.
This is a medium-difficulty pie, well within reach of any home baker who has made a pie crust before. If you are using store-bought crust, it is genuinely easy. It is the perfect weekend bake for anyone who loves old-fashioned American baking, wants something different to bring to a holiday table, or simply needs a reason to keep a bottle of unsulfured molasses in their pantry.
8
servings
Ingredients
- 1 unbaked 9-inch single pie crust (homemade or store-bought), chilled
- 240 gall-purpose flour (about 2 cups, spooned and leveled) – for crumb topping
- 165 gpacked dark brown sugar (about 3/4 cup) – for crumb topping
- 1 tspground cinnamon – for crumb topping
- 0.5 tspground ginger – for crumb topping
- 0.25 tspColima Sea SaltMicroplastic Free Salt – for crumb topping
- 113 gcold unsalted butter, cut into 1/2-inch cubes (about 1/2 cup or 1 stick) – for crumb topping
- 240 mlboiling water (about 1 cup) – for molasses filling
- 1 tspbaking soda – for molasses filling
- 240 mlunsulfured molasses (about 3/4 cup plus 2 tbsp, or one standard Grandma’s Original bottle) – for molasses filling
- 1 tspapple cider vinegar – for molasses filling
- 0.5 tsppure vanilla extract – for molasses filling
- 1 large egg, lightly beaten, at room temperature – for molasses filling
- —Pinch of Colima Sea SaltMicroplastic Free Salt – for molasses filling
Ingredient Substitutions
Instructions
Click on an item below to shop for the recommended items for this recipe on Amazon.
As an Amazon Associate, we earn from qualifying purchases.
- Preheat your oven to 350°F (175°C). Place a rimmed baking sheet on the lower oven rack while it preheats. This will catch any drips and also help the bottom crust bake through, preventing a soggy base.
- Fit your chilled pie crust into a 9-inch pie plate, crimp the edges as desired, and refrigerate while you prepare the filling and crumb. Keeping the crust cold prevents shrinkage.
- Make the crumb topping: In a large bowl, whisk together the flour, dark brown sugar, cinnamon, ginger, and salt. Add the cold butter cubes and use your fingertips to rub the butter into the dry ingredients until the mixture resembles coarse, clumpy sand with some pea-sized pieces remaining. Do not overwork it. Set aside.
- Make the molasses filling: In a large heatproof bowl or large measuring cup, combine the boiling water and baking soda, stirring until dissolved. The mixture will foam up, which is normal. Stir in the molasses, apple cider vinegar, vanilla, and pinch of salt. Let the mixture cool for about 5 minutes until it is warm but not hot, then whisk in the beaten egg. Adding the egg too soon while the mixture is boiling hot will scramble it.
- Layer the pie: Scatter about one-third of the crumb mixture evenly over the bottom of the chilled pie crust. Carefully pour half of the molasses filling over the crumbs. Scatter another third of the crumbs over the filling, then pour on the remaining molasses mixture. Finish with the remaining crumbs spread evenly over the top.
- Place the pie on the preheated baking sheet and bake for 38 to 42 minutes, until the crumb topping is set and dry to the touch and the edges are firm. The very center may still have a very slight jiggle, like a set custard, and that is correct. It will firm up as it cools.
- Transfer the pie to a wire cooling rack and let it cool for at least 1 hour before slicing. The filling needs time to fully set. Cutting into it too early will result in a runny slice. Serve at room temperature or slightly warm, with a dollop of whipped cream or a scoop of vanilla ice cream.
- Fit your chilled pie crust into a 7-inch or 8-inch metal or oven-safe ceramic pie plate that fits inside your air fryer basket with at least half an inch of clearance on all sides. Crimp the edges and refrigerate while you prepare the components. Do not use a glass pie dish in an air fryer, as the rapid circulating heat can cause thermal shock.
- Prepare the crumb topping and molasses filling exactly as described in steps 3 and 4 of the oven method. Allow the filling to cool until just warm before adding the egg.
- Layer the pie in the same alternating fashion: one-third of crumbs, half the molasses filling, another third of crumbs, the remaining filling, and the final layer of crumbs on top.
- Preheat the air fryer to 325°F (160°C) for 3 minutes. Carefully lower the pie plate into the basket. If your air fryer does not reach 325°F, use the closest lower setting available. Bake for 28 to 32 minutes. Check at 25 minutes: if the crumb top is deep golden brown and the edges are bubbling gently, begin checking for doneness. Tent loosely with a small square of foil if the top is browning too fast before the center sets.
- The pie is done when the crumb topping is set and dry, the edges are firm, and the center has only a faint wobble. Remove carefully using silicone-tipped tongs or oven mitts, and cool on a wire rack for at least 1 hour before slicing. The bottom crust will be noticeably crisper than the oven version, which many people love.
- Make or buy a 9-inch pre-baked graham cracker crust. For homemade: combine 200g (1.5 cups) graham cracker crumbs, 50g (1/4 cup) brown sugar, 1 tsp cinnamon, and 85g (6 tbsp) melted butter. Press firmly into a 9-inch pie plate and refrigerate for at least 30 minutes until firm.
- Make the brown sugar crumble topping for garnish: In a small skillet over medium-low heat, melt 30g (2 tbsp) unsalted butter. Add 60g (1/4 cup) brown sugar, 40g (1/3 cup) all-purpose flour, 1/2 tsp cinnamon, and a pinch of salt. Stir constantly for 3 to 4 minutes until the mixture turns golden and dry and smells toasty. Spread on a parchment-lined plate and let cool completely. It will crisp as it cools.
- Make the molasses pudding filling: In a medium saucepan, whisk together 180ml (3/4 cup) unsulfured molasses, 400ml (one 14-oz can) sweetened condensed milk, 240ml (1 cup) whole milk, 30g (3 tbsp) cornstarch, 1/4 tsp cinnamon, 1/4 tsp ginger, and a pinch of salt until smooth. Cook over medium heat, whisking constantly, for 7 to 9 minutes until the mixture thickens noticeably and begins to bubble. Remove from heat, stir in 1 tsp vanilla extract and 28g (2 tbsp) unsalted butter until melted and smooth.
- Pour the hot filling directly into the chilled graham cracker crust, smoothing the top with a spatula. Press a sheet of plastic wrap directly onto the surface of the filling to prevent a skin from forming. Refrigerate for at least 4 hours, or overnight for best results.
- Before serving, remove the plastic wrap and scatter the cooled brown sugar crumble over the top of the pie. Slice with a clean knife and serve cold or at cool room temperature. Leftovers keep refrigerated for up to 4 days.
Nutrition Per Serving
Per 1 serving (makes one 9-inch single-crust pie)
Why This Recipe Works
The baking soda in this recipe is not there for lift. It is dissolved in boiling water and combined with acidic molasses and a touch of vinegar to create a chemical reaction that tempers the intensity of the molasses, making it taste rounder and less sharp. This is the same principle behind adding a pinch of baking soda to tomato sauce to reduce acidity. The foaming you see when baking soda hits hot water is carbon dioxide being released, and that aeration carries through slightly into the filling, contributing to its uniquely soft, almost spongy texture at the bottom of the baked pie.
The layering technique in this recipe is deliberate and worth understanding. The alternating crumb and liquid layers allow the crumbs to partially dissolve into the filling during baking, which creates those distinct zones of texture: a jammy, dense bottom, a fudgy middle, and a dry, streusel-like top. If you simply pour the filling in and top with all the crumbs at once (the wet-bottom method), the crumbs float on top and you get a sharp two-layer contrast instead. Neither approach is wrong; they just produce different pies with different pleasures.
Cold butter rubbed by hand into the crumb mixture is essential for proper texture. When cold butter hits the heat of the oven, the water inside it turns to steam and creates small pockets of flakiness within the crumb. If your butter is too warm and fully incorporates into the flour, the crumb bakes up sandy and dusty rather than clumpy and toasty. If your kitchen is warm, chill the crumb mixture in the refrigerator for 10 minutes before layering. A soggy bottom crust is the most common complaint with this pie, and it is easily avoided by preheating a baking sheet on the lower oven rack: the burst of direct heat from below helps set the crust quickly before the filling saturates it.
Baker’s Tips
- Use unsulfured molasses, such as Grandma’s Original or Brer Rabbit, for the best flavor. Sulfured molasses has a sharp chemical note that is noticeable in a filling this simple. Blackstrap molasses can be used for a more intense, slightly bitter pie but is not traditional.
- Let the molasses mixture cool to warm (not hot) before adding the beaten egg. If the mixture is still very hot, the egg will cook on contact and you will have sweet scrambled egg in your filling.
- The crumb should look like wet sand at its finest and like small pebbles at its chunkiest when properly mixed. Some large chunks are desirable. They bake into the best little caramelized clusters.
- Do not skip chilling the pie crust while you prepare the filling and crumb. A cold crust holds its shape better during baking and resists shrinking away from the edges of the pan.
- Resist the urge to overbake. Shoofly pie is meant to have a slightly soft, yielding center. If the entire surface is completely firm in the oven, it will be rubbery once cooled. The wobble test is your friend: the edges should be set and the very center should quiver like a soft-set custard.
- This pie slices most cleanly when fully cooled to room temperature or even slightly chilled. The molasses filling firms considerably as it cools, making neat slices much easier to achieve.
Variations
- Wet-bottom shoofly pie: Skip the layering technique and simply pour all the molasses filling into the crust first, then scatter all the crumb on top. This produces a clean separation with a wet, almost jelly-like molasses layer on the bottom and a dry crumb cap on top. It is the traditional Pennsylvania Dutch style.
- Spiced shoofly pie: Add 1/4 tsp ground cloves and 1/4 tsp freshly grated nutmeg to the crumb mixture for a more complex, holiday-leaning spice profile.
- Coffee shoofly pie: Replace the boiling water in the filling with an equal amount of very strong hot brewed coffee. The coffee amplifies the bittersweet depth of the molasses without tasting distinctly like coffee.
- Mini shoofly pies: Divide the crust, filling, and crumb among 12 standard muffin tin cups lined with strips of parchment for easy removal. Bake at 350°F (175°C) for 18 to 22 minutes. Perfect for parties and bake sales.
Troubleshooting & FAQ
My pie filling is still liquid or runny after baking. What went wrong?
My bottom crust is soggy. How do I prevent this?
My crumb topping sank into the filling and disappeared. What happened?
The pie tastes overwhelmingly bitter. Did I do something wrong?
My pie crust shrank badly during baking and the edges slid down. How do I stop this?
Storage & Make-Ahead
- Storage: Store the baked pie loosely covered at room temperature for up to 2 days, or refrigerate for up to 5 days. Bring to room temperature or warm individual slices briefly before serving. The pie can be frozen whole or in slices, well wrapped, for up to 2 months. Thaw overnight in the refrigerator.
- Make-Ahead: The crumb topping can be made up to 3 days ahead and stored in an airtight container in the refrigerator, or frozen for up to 1 month. The pie crust can be fitted into the pan, crimped, and refrigerated unbaked up to 2 days ahead. The fully baked pie actually improves overnight as the filling firms and the flavors deepen, making it an ideal make-ahead dessert for holidays and gatherings.


Oh, this sounds absolutely lovely. There’s something so grounding about recipes that have that kind of history and heart behind them, and I love that you describe it as tasting like genuine care – that’s such a beautiful way to put it. I’d be really curious to know if allulose works well in the filling itself or if you’d recommend keeping that molasses component traditional? Either way, I’m bookmarking this one.
man this is such a great question because honestly the molasses is where all the magic happens, its the whole soul of the pie, so id keep that part totally traditional and just swap the allulose into the crumb topping instead, works perfectly there and gives you that texture without messing with the deep molasses flavor that makes people go “wow who made this”. my kids L and M still talk about the shoofly i made last winter and theyre not even dessert kids, thats the power of the real deal molasses filling coming through. definitely let us know how it turns out!
You’ve really nailed it here, Terrence. That molasses filling is like the root system of the whole thing, and you don’t mess with what’s already thriving, you know? I love your instinct to keep it traditional there and let the allulose do its work in the crumb topping, where it can shine without competing. Your kids remembering that pie from winter tells you everything, that’s the kind of dessert that plants itself in people’s hearts.
Oh, I’m so glad you shared this one! I made something similar last fall for our community garden potluck, and you’re right about that genuine care piece. There’s something about molasses and brown sugar that just feels like love in a pie, if that makes sense. I’ve found that the crumb topping is where you can really let your hands do the work, getting those buttery bits just right, and that tactile part of baking reminds me so much of the patience gardening teaches you.
This reminds me of how my grandmother in Ghana would make this palm sugar cake for special occasions, and honestly the feeling is the same, you know? That sense of “I spent time thinking about you while making this.” I’m excited to try this with allulose because molasses-forward desserts need that deep richness, and I’m curious if the crumb topping holds that same buttery texture. It’s the kind of recipe that makes you realize sometimes the most meaningful food doesn’t need to be complicated, just intentional.