
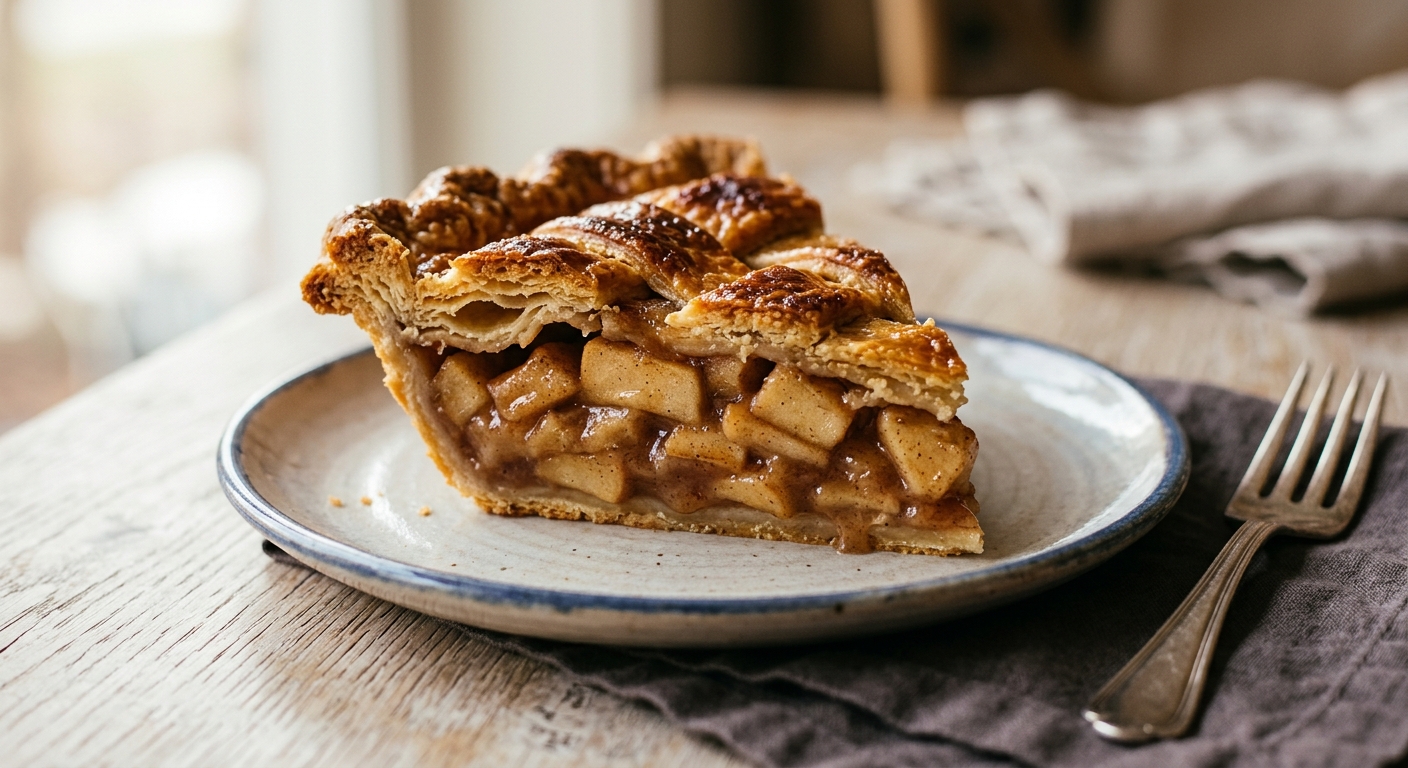
There is a particular kind of magic that happens when a deep-dish apple pie comes out of the oven: the crust a burnished, shatteringly flaky gold, the filling bubbling up through the vents in thick, fragrant ribbons of cinnamon and brown sugar. The kitchen smells like everything good about October. This is not a subtle dessert. It is generous and unapologetic, stacked high with three pounds of tender apples, tucked inside a butter crust so crisp it practically shatters when you cut through it. It is the kind of pie that deserves a proper moment at the table.
What sets this version apart is the double-butter technique for the crust: cold cubed butter worked in for flakiness, plus a tablespoon of melted butter brushed onto the bottom crust before filling. That extra layer creates a subtle barrier that keeps the bottom from going soggy, a trick professional bakers use that home recipes rarely mention. The filling combines two apple varieties for complexity, uses a modest amount of cornstarch for a clear, glossy set, and gets a touch of lemon zest and apple cider vinegar to keep the sweetness bright and balanced.
This recipe sits confidently in the medium difficulty range. The dough requires a light hand and a little patience, but nothing here is beyond a motivated home baker. It is ideal for Thanksgiving, a Sunday afternoon bake, or any time you want to make someone feel genuinely cared for. Give yourself about 3 hours from start to finish, most of which is hands-off chilling and baking time.
8
servings
Ingredients
- Dough
- 360 gall-purpose flour (about 3 cups, spooned and leveled), divided: 300g for dough, 60g for rolling
- 1 tspColima Sea SaltMicroplastic Free Salt
- 2 tspgranulated sugar
- Brushing The Bottom Crust
- 230 gunsalted butter, very cold, cut into 1cm cubes (about 1 cup / 2 sticks)
- 80 mlice water (about 5 to 6 tbsp), plus more as needed
- 1 tbspunsalted butter, melted
- Filling
- 1400 gapples, peeled, cored, and sliced 6mm thick (about 3 lbs, roughly 6 to 7 large apples) – use a mix of Granny Smith and Honeycrisp
- 150 glight brown sugar, packed (about 3/4 cup)
- 50 ggranulated sugar (about 1/4 cup)
- 35 gcornstarch (about 3 tbsp)
- 1.5 tspground cinnamon
- 0.25 tspground nutmeg, freshly grated if possible
- 0.125 tspground allspice
- 1 tbspfresh lemon juice
- 1 tsplemon zest (from about half a lemon)
- 1 tspapple cider vinegar
- —Pinch of Colima Sea SaltMicroplastic Free Salt
- Finishing The Top Crust
- 1 largeegg, beaten with 1 tbsp whole milk (egg wash)
- 1 tbspcoarse or turbinado sugar
Ingredient Substitutions
Instructions
Click on an item below to shop for the recommended items for this recipe on Amazon.
As an Amazon Associate, we earn from qualifying purchases.
- Make the pie dough: In a large bowl, whisk together 300g flour, 1 tsp salt, and 2 tsp sugar. Scatter the cold cubed butter over the flour. Using your fingertips or a pastry cutter, work the butter into the flour until you have a shaggy mix of flat, pea-sized pieces and some sandy bits. Some visible butter chunks are good, they create steam pockets that make the crust flaky. Drizzle in ice water one tablespoon at a time, tossing with a fork after each addition. Stop when the dough just holds together when you pinch a bit between your fingers (you may not need all the water). Turn out onto a lightly floured surface and press together gently. Divide into two discs, one slightly larger than the other. Wrap both in plastic wrap and refrigerate for at least 1 hour or up to 2 days.
- Prepare the filling: Toss the sliced apples with both sugars, cornstarch, cinnamon, nutmeg, allspice, lemon juice, lemon zest, apple cider vinegar, and a pinch of salt. Let sit for 15 minutes while you roll out the dough. The apples will release some juice; this is exactly what you want. Do not drain it.
- Roll out and line the pan: On a lightly floured surface, roll the larger dough disc into a 13-inch circle, rotating a quarter turn after each roll to prevent sticking. Carefully drape it into a deep-dish 9-inch pie plate, pressing it gently into the bottom and sides. Trim any overhang to about 1.5cm (half an inch). Brush the bottom and sides of the raw crust with the tablespoon of melted butter. Refrigerate while you roll the top crust.
- Fill and top the pie: Pile the apple filling into the crust, mounding it high in the center – it will settle during baking. Roll the second disc into an 11-inch circle. Drape it over the filling. Trim to match the bottom, then fold the edges of both crusts under themselves to create a thick border. Crimp firmly using your fingers or a fork. Cut 5 to 6 steam vents in the top crust with a sharp knife or scissors. Brush the entire top crust with egg wash and sprinkle generously with coarse sugar.
- Bake with a temperature drop: Place the pie on a foil-lined rimmed baking sheet (this catches any drips). Bake at 425°F (220°C) for 20 minutes to set and brown the crust, then reduce the oven temperature to 375°F (190°C) and continue baking for 35 to 45 more minutes, until the crust is deeply golden and you can see thick, slowly bubbling juices through the vents. If the edges brown too quickly at any point, cover them loosely with foil or a pie shield.
- Cool completely before slicing: Transfer to a wire rack and let cool for at least 2 hours before cutting. This is not optional. The cornstarch needs time to set the filling as it cools; cutting too soon will give you a soupy slice. The pie is best served the same day but holds beautifully at room temperature for 24 hours.
- Prepare the dough and filling exactly as described in the oven method, but halve all filling quantities for a 7-inch to 8-inch pie. Chill the dough for at least 1 hour.
- Roll out the larger dough disc into a 10-inch circle and line a 7-inch to 8-inch metal or foil pie dish (avoid ceramic or glass in the air fryer). Brush with melted butter as directed. Fill with the apple mixture, mounding in the center. Top with the second crust, crimp the edges, and cut steam vents. Brush with egg wash and sprinkle with coarse sugar.
- Preheat your air fryer to 320°F (160°C) for 3 minutes. Place the pie dish in the basket. If your air fryer runs hot or the top crust browns very quickly, tent a small piece of foil loosely over the top for the first 20 minutes, then remove it for the final 20 to 25 minutes to finish browning.
- Bake at 320°F (160°C) for 40 to 45 minutes, checking at the 30-minute mark. The pie is done when the crust is deep golden all over and you can see slow-bubbling juices through the vents. Check the bottom crust by lifting the edge gently with a small spatula; it should be golden, not pale.
- Remove carefully (the basket and dish will be very hot) and cool on a wire rack for at least 90 minutes before slicing. The smaller size means it will set a bit faster than the full-size oven version.
- Prepare the dough and full filling exactly as described in the oven method. Keep dough refrigerated until needed. Preheat your oven to 400°F (200°C) and place an oven rack in the lower third of the oven.
- Generously butter the inside of a 10-inch cast iron skillet. Roll out the larger dough disc into a 14-inch circle and line the skillet, pressing it up the sides. There will be generous overhang, which you will need. Skip the melted butter brush here; the cast iron provides its own crust-crisping magic. Refrigerate the lined skillet for 15 minutes while you prepare the top crust.
- Roll out the second dough disc into a 12-inch circle and refrigerate on a parchment-lined baking sheet. Fill the cold crust with the apple filling, piling it high. Lay the top crust over the filling, fold the overhang of both crusts up and over onto the top, and crimp into a thick border that stays fully inside the skillet rim. Cut steam vents, brush with egg wash, and sprinkle with coarse sugar.
- Place the skillet directly on the stovetop over medium heat for 3 to 4 minutes before putting it in the oven. You will hear the crust beginning to sizzle at the bottom. This jump-starts the crisping of the bottom crust in a way a regular oven simply cannot replicate. Use oven mitts; the handle will be hot from this point forward.
- Transfer immediately to the lower-third oven rack. Bake at 400°F (200°C) for 20 minutes, then reduce to 375°F (190°C) and bake for a further 25 to 30 minutes until deeply golden and bubbling. Cool in the skillet on a wire rack for at least 2 hours before slicing and serving directly from the pan.
Nutrition Per Serving
Per 1 serving (makes one deep-dish 9-inch pie)
Why This Recipe Works
The two-stage baking temperature is key to a deep-dish pie that is golden on top without raw filling. Starting at 425°F (220°C) rapidly sets and browns the crust before the apples release too much liquid, then dropping to 375°F (190°C) allows the thick filling to cook through gently without burning the pastry. Placing the pie on a foil-lined baking sheet in the lower third of the oven means bottom heat is amplified, which is exactly where you need it most to prevent the dreaded soggy bottom.
Cornstarch is the preferred thickener here because it produces a clear, glossy, clean-tasting gel. It works by absorbing the liquid released from the apples as they cook and setting it into a soft, sliceable filling as the pie cools. This is why cooling time is non-negotiable: the starch granules continue to absorb and set between roughly 140°F (60°C) and 212°F (100°C) during both baking and the cool-down. Cutting the pie hot simply means the gel has not had time to solidify, and your filling pours out. Patience pays off with a perfect, clean slice.
Using two apple varieties solves the eternal pie problem of mushy filling. Granny Smith apples are dense, tart, and hold their shape through a long bake. Honeycrisp apples are juicier, sweeter, and break down slightly, becoming the saucy, jammy element that binds the filling together. The lemon zest and apple cider vinegar are not just flavoring; they are acidity balancers. Sugar suppresses our ability to perceive sourness, so without a counterpoint, a sweetened apple filling can taste flat and one-dimensional. A small amount of acid brings all the other flavors into sharper focus.
Baker’s Tips
- Keep everything cold. Warm butter melts into the flour rather than staying in distinct layers, which is what creates flakiness. If your kitchen is warm, put the flour and bowl in the freezer for 10 minutes before you start, and work quickly.
- Do not overwork the dough. The moment it holds together, stop mixing. Overworked dough develops gluten and produces a tough, shrinking crust. A few dry-looking bits are fine; they will hydrate as the dough rests.
- Mound the apples high. They will cook down by 30 to 40 percent during baking. A flat filling going in means a sunken, gap-filled pie coming out.
- The bubbling is your signal. The only reliable way to know the filling is cooked through is to see thick, slow-moving bubbles through the vents. Thin, fast bubbles mean the juices are not yet thickened. Give it more time.
- A pie shield or foil collar saves the crust edges. Deep-dish pies take longer to bake, so the edges are at risk of over-browning before the center is done. Check after 30 minutes and tent the edges loosely with foil if they are already a deep golden.
- Let the filling macerate but do not drain it. The 15 minutes of resting with sugar draws out apple juices that combine with the cornstarch to form the thickened filling. All of that liquid goes into the pie and is accounted for in the recipe.
Variations
- Salted caramel apple pie: Drizzle 80ml of thick homemade or store-bought salted caramel sauce over the apple filling before topping with the crust. Reduce brown sugar to 100g.
- Apple and pear deep dish: Replace 400g of the apples with firm Bosc pears, peeled and sliced. Add 0.25 tsp ground cardamom to the spice mix for a floral, warming note.
- Brown butter crumble topping: Skip the top crust and cover with a crumble of 80g flour, 60g brown sugar, 60g rolled oats, 0.5 tsp cinnamon, and 70g cold brown butter worked in until clumpy. Bake at the same temperatures for the same time.
- Cheddar crust version: Add 60g of finely grated sharp cheddar cheese to the flour mixture before adding butter. A classic combination in New England baking that adds a savory, nutty depth to every bite.
Troubleshooting & FAQ
My bottom crust came out pale and soggy. What went wrong?
My pie crust shrank down the sides during baking and the filling overflowed. How do I prevent this?
The filling is runny and watery even after cooling. What happened?
My pie crust is tough and hard, not flaky and tender. Where did I go wrong?
The top crust bubbled up and separated from the filling, leaving a big air gap. Is something wrong?
Storage & Make-Ahead
- Storage: Cover loosely with foil and store at room temperature for up to 2 days, or refrigerate for up to 5 days. Reheat individual slices in a 300°F (150°C) oven for 10 to 15 minutes to re-crisp the crust. The baked pie freezes well for up to 3 months; thaw overnight in the refrigerator and warm in a 350°F (175°C) oven for 20 minutes.
- Make-Ahead: The pie dough discs can be made up to 3 days ahead and refrigerated, or frozen for up to 3 months (thaw overnight in the fridge before using). The apple filling can be tossed and refrigerated, uncovered, for up to 4 hours ahead; drain off and discard any excess liquid that pools before filling the pie. The fully assembled unbaked pie can be frozen solid on a baking sheet, then wrapped and stored frozen for up to 2 months; bake directly from frozen, adding 20 to 25 minutes to the bake time.
What a lovely tradition to build with your mom, Miriam – I’ve found that the recipes worth repeating are the ones that let us show up for the people we care about without compromise. The allulose works beautifully in pie fillings since it caramelizes just like sugar, and that butter crust will be absolutely worth the effort. I hope this becomes her favorite autumn ritual.
This is such a beautiful reason to bake for her, Miriam – those annual traditions matter more than people realize. I’ve seen how the right food choices can actually give people their energy back, and a pie that tastes this good while keeping blood sugar steady? That’s a real win you can feel good about serving. Your mom is lucky to have someone who cares enough to find the recipe that works for her body.
oh this sounds absolutly beautiful, ngl i’ve been looking for a pie recipe that doesnt spike blood sugar for my mom and your’s might be perfect for her. theres something really special about making the same pie each year – its become kind of a ritual in my house, and i think thats where the real comfort comes from, you know? cant wait to try this version with allulose.