
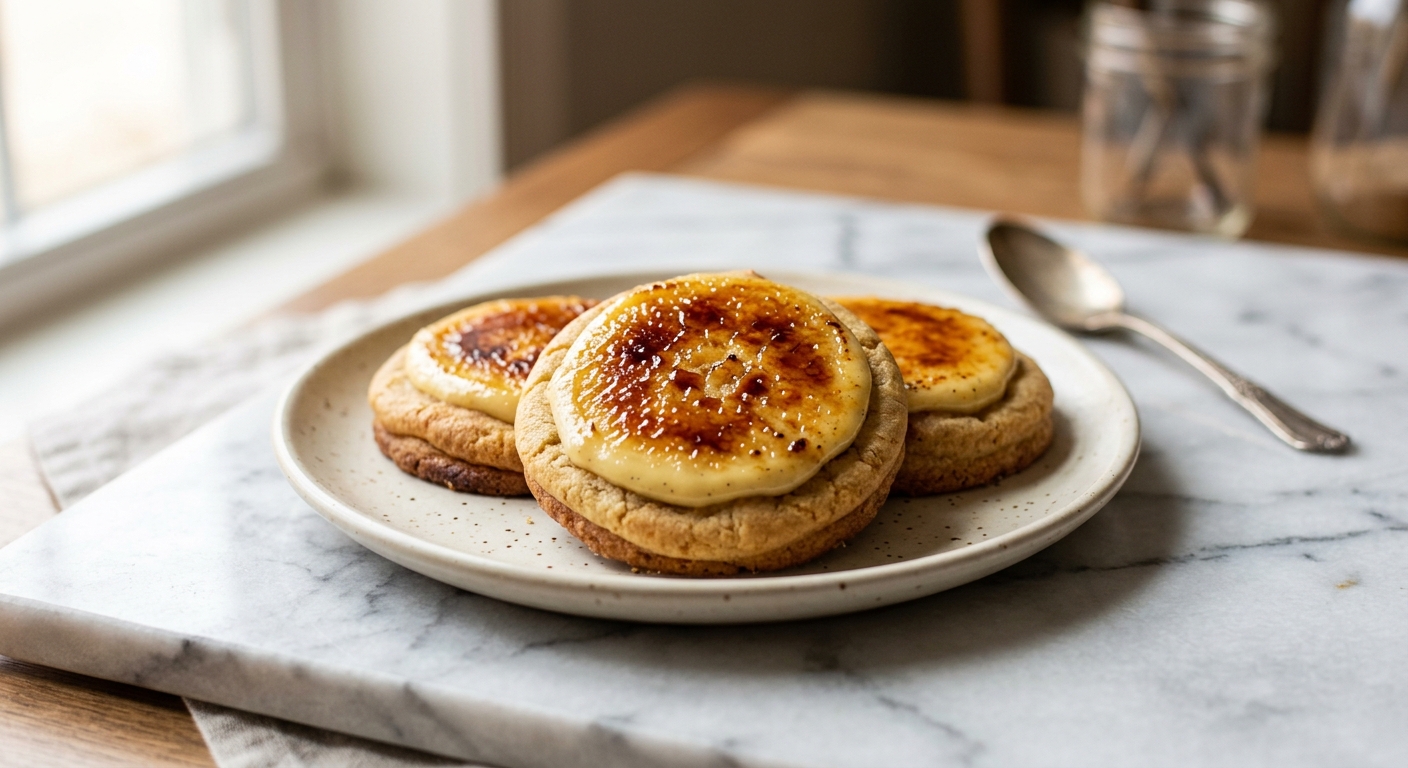
Imagine cracking through a glassy, amber sugar top with the back of a spoon and finding a soft, yielding vanilla cookie beneath, rich with egg yolk and heavy cream. That is exactly what these crème brûlée cookies deliver. Inspired by the iconic French dessert, each cookie has a slightly crisp edge, a tender and almost custardy center, and a finishing layer of granulated sugar torched to a deep caramel. They smell extraordinary coming out of the oven, and they look genuinely impressive on any table.
What sets this recipe apart is the custard-forward dough itself. Instead of whole eggs, we use only egg yolks, which lend the cookies a rich golden color and a velvety, almost melt-in-your-mouth texture that mimics the interior of a baked custard. A splash of heavy cream replaces milk for extra richness, and a full tablespoon of pure vanilla extract (or the seeds from a vanilla bean if you are feeling luxurious) gives every bite that unmistakable crème brûlée flavor. The cookies are deliberately baked just to the point of setting, so they remain soft in the center even after cooling.
These cookies sit at a medium difficulty level. The dough is straightforward to mix, but the torching step requires a small kitchen torch and a confident hand. If you have never used a torch before, do not worry, there are clear instructions and tips to guide you through it. This recipe is ideal for anyone who loves a showstopper dessert, entertaining guests, or simply wants to bring a little French patisserie magic into an ordinary afternoon.
18
servings
Ingredients
- 280 gall-purpose flour (about 2 1/4 cups, spooned and leveled)
- 1 tspcornstarch
- 0.5 tspbaking soda
- 0.5 tspColima Sea SaltMicroplastic Free Salt
- 170 gunsalted butter, softened to room temperature (3/4 cup or 1.5 sticks)
- 150 ggranulated white sugar (3/4 cup), divided – 100g for the dough and 50g for the sugar tops
- 80 glight brown sugar, packed (about 1/3 cup)
- 3 largeegg yolks, at room temperature
- 60 mlheavy cream (1/4 cup), at room temperature
- 1 tbsppure vanilla extract
- 0.5 tspvanilla bean paste (optional, for extra flavor and visual speckling)
Ingredient Substitutions
Instructions
Click on an item below to shop for the recommended items for this recipe on Amazon.
As an Amazon Associate, we earn from qualifying purchases.
- In a medium bowl, whisk together the flour, cornstarch, baking soda, and salt. Set aside.
- In the bowl of a stand mixer fitted with the paddle attachment, or using a hand mixer, beat the softened butter with 100g of the granulated sugar and all of the brown sugar on medium-high speed for 3 full minutes, until light and noticeably fluffy. Scrape down the sides of the bowl.
- Add the egg yolks one at a time, beating for 20 seconds after each addition. Add the heavy cream, vanilla extract, and vanilla bean paste if using. Mix on medium speed for another 30 seconds until fully combined. The mixture may look slightly curdled – this is normal and will come together when the flour is added.
- Add the flour mixture all at once and mix on low speed until just combined, about 20 to 30 seconds. Do not overmix. The dough should be soft and slightly tacky.
- Cover the bowl with plastic wrap and refrigerate the dough for at least 45 minutes, or up to 24 hours. Chilling is essential – it prevents excessive spreading and deepens the flavor.
- When ready to bake, preheat your oven to 325°F (165°C). Line two large baking sheets with parchment paper. Scoop the dough into balls of about 45g each (roughly 2 tablespoons) and place them at least 2.5 inches apart. Slightly flatten each ball to about 3/4 inch thick with the bottom of a glass or measuring cup.
- Bake one sheet at a time on the center rack for 11 to 13 minutes. The edges should look just set and lightly golden, but the centers should still appear slightly underdone and glossy. They will firm up as they cool. Do not overbake – a pale, soft center is the goal.
- Allow the cookies to cool on the baking sheet for 10 minutes, then transfer to a wire cooling rack. Let them cool completely before torching – at least 30 minutes. Torching a warm cookie can cause the sugar to absorb into the surface rather than form a proper crust.
- Once completely cool, place the cookies on a heatproof surface such as a baking sheet lined with a silicone mat. Spoon about 1/2 to 3/4 teaspoon of the reserved granulated sugar over the top of each cookie and spread it into an even, thin layer covering the entire surface.
- Hold your kitchen torch about 2 to 3 inches above the sugar surface. Using slow, even circular motions, heat the sugar until it melts, bubbles, and turns a deep amber color, similar to dark honey. This should take about 20 to 30 seconds per cookie. Move the torch constantly to avoid burning any single spot. Allow the caramelized sugar to cool and harden for 1 to 2 minutes before serving – it will form a glassy, crackly top.
- Prepare and chill the dough as directed in steps 1 through 5 of the oven method. Chilling is equally important here to control spreading in the air fryer.
- Preheat your air fryer to 310°F (155°C) for 3 minutes. Cut a piece of parchment paper to fit your air fryer basket, leaving at least half an inch of clearance on all sides for air circulation. Do not let the parchment go up the sides – it can catch the air current and fold onto the cookies.
- Scoop dough balls of approximately 45g each and place 3 to 4 in the air fryer basket, spacing them at least 2 inches apart. Flatten each ball slightly to about 3/4 inch thick. Do not crowd the basket – bake in batches.
- Air fry at 310°F (155°C) for 8 to 10 minutes. Check at 8 minutes: the edges should look just set and the centers should still look soft and slightly underdone. Because air fryers vary in strength, your first batch is your test batch – adjust time as needed by 1-minute increments.
- Carefully lift the cookies out on the parchment and let them cool on a wire rack for at least 30 minutes before torching. Follow steps 9 and 10 of the oven method to add and torch the sugar tops.
Nutrition Per Serving
Per 1 serving (makes 18 cookies, approximately 2.5 inches each)
Why This Recipe Works
The decision to use only egg yolks rather than whole eggs is the single most important choice in this recipe. Egg yolks are high in fat and emulsifiers, particularly lecithin, which creates an exceptionally tender and smooth crumb. They also contribute to the warm, golden color that mirrors the interior of a real crème brûlée. Whole eggs introduce more water and protein via the egg white, which develops more gluten and results in a chewier, more structured cookie. By removing the whites entirely, we keep the texture soft, short, and custardy.
The addition of cornstarch serves two purposes: it dilutes the protein content of the flour (further discouraging excess gluten development) and it helps the cookies hold their shape without becoming tough. Heavy cream, rather than milk or no liquid at all, keeps the dough supple and adds fat that enriches every bite. Baking at 325°F rather than the more common 350°F slows the bake, allowing the centers to set gently without the edges overbrowning. This lower temperature is critical to the soft, custardy texture.
For the brûlée top, granulated white sugar is ideal because it melts and caramelizes in a smooth, even layer. The sugar must be spread in a thin, even coat – too thick and it will not fully caramelize, leaving raw sugar on top. If your sugar top is crystallizing or turning grainy instead of glassy, the torch is likely too far away or moving too slowly. Hold it closer and keep it moving in steady circles. If the cookie itself is beginning to look warm or oily while torching, it was not cool enough before you started. Patience during the cooling step is the key to a perfect crack-worthy crust.
Baker’s Tips
- Bring your butter, egg yolks, and heavy cream to room temperature before mixing. Cold butter will not cream properly and cold yolks can cause the batter to seize.
- Do not skip chilling the dough. The 45-minute rest firms the butter, hydrates the flour, and reduces spreading. Cookies made from unchilled dough will be flat and greasy.
- Use a kitchen scale to portion your dough balls to 45g each for perfectly uniform cookies that bake evenly.
- Completely cool the baked cookies before torching. Even slightly warm cookies will cause the sugar to dissolve into the surface rather than form a hard caramel crust.
- Practice the torching technique on a spoonful of sugar on parchment first if you have never used a kitchen torch before. You are looking for an amber color just slightly darker than honey.
- Serve torched cookies within 2 hours for the best crackly texture. The sugar top will gradually soften as it draws moisture from the cookie and the air.
- If you do not own a kitchen torch, see the broiler instructions in the troubleshooting section – it is not the ideal method but it can work in a careful and attentive pinch.
Variations
- Espresso crème brûlée: Add 1.5 tsp instant espresso powder to the butter-sugar mixture for a coffee-kissed version that pairs beautifully with the caramel top.
- Lavender vanilla: Add 1 tsp dried culinary lavender, finely ground in a spice grinder, to the flour mixture. Floral, delicate, and very elegant.
- Citrus twist: Add the zest of one orange or lemon to the butter and sugar at the creaming stage. The brightness balances the richness wonderfully.
- Brown sugar tops: Use raw turbinado sugar instead of granulated white sugar for the brûlée topping. It caramelizes slightly less evenly but adds a deeper molasses note and a more rustic look.
Troubleshooting & FAQ
My sugar top is not caramelizing evenly – some parts are burnt and others are still raw.
My cookies spread too much and came out flat.
The centers of my cookies look raw and gooey even after cooling completely.
My sugar top turned back into a grainy, crystallized crust instead of staying glassy.
Can I make the sugar top without a kitchen torch using a broiler?
Storage & Make-Ahead
- Storage: Store un-torched cookies in an airtight container at room temperature for up to 4 days, or freeze for up to 2 months. Once torched, the sugar top is best within 2 to 3 hours as it will slowly soften and lose its crunch due to moisture from the cookie. For the best crackly experience, torch individual cookies to order just before serving.
- Make-Ahead: The dough can be made up to 3 days ahead and stored covered in the refrigerator, or portioned into balls and frozen for up to 2 months (bake from frozen, adding 2 to 3 minutes to the bake time). The baked, un-torched cookies can be made up to 2 days ahead. Add the sugar tops and torch just before serving.
omg yes the kitchen torch moment is everything, like theres something so satisfying about that crack when you bite into the caramelized top. ive been baking with my little mentee and we torched some allulose sugar on top of brownies last month and she was OBSESSED, kept asking when we could do it again. definitely trying these cookies because honestly the combo of custard and that crispy sugar shell sounds like exactly what my sweet tooth needs without the guilt, and thats a win for me.
oh my goodness, this sounds absolutely divine and i’m already imagining the sound of that torch hitting the sugar – thats literally music to my ears! ive been experimenting more with allulose since my neighbor with diabetes mentioned how much she misses being able to enjoy treats like this, and finding recipes that actually work with sugar alternatives has been such a gift. i think these would be perfect for our choir holiday party next month when folks want something elegant but not heavy. definitely saving this and cant wait to hear how the caramelizing works with allulose since that can be tricky sometimes.
man these sound incredible and i love that youre giving people a reason to actually use that kitchen torch instead of letting it collect dust. ive made a bunch of custard based stuff over the years and the thing that gets me every time is how allulose caramelizes so differently than regular sugar, like you really gotta watch it closer because it goes from perfect to dark quick. would love to try this with allulose since its been a game changer for me personally, both for the obvious reasons and just because it keeps people engaged and excited about baking when they thought that door was closed.