
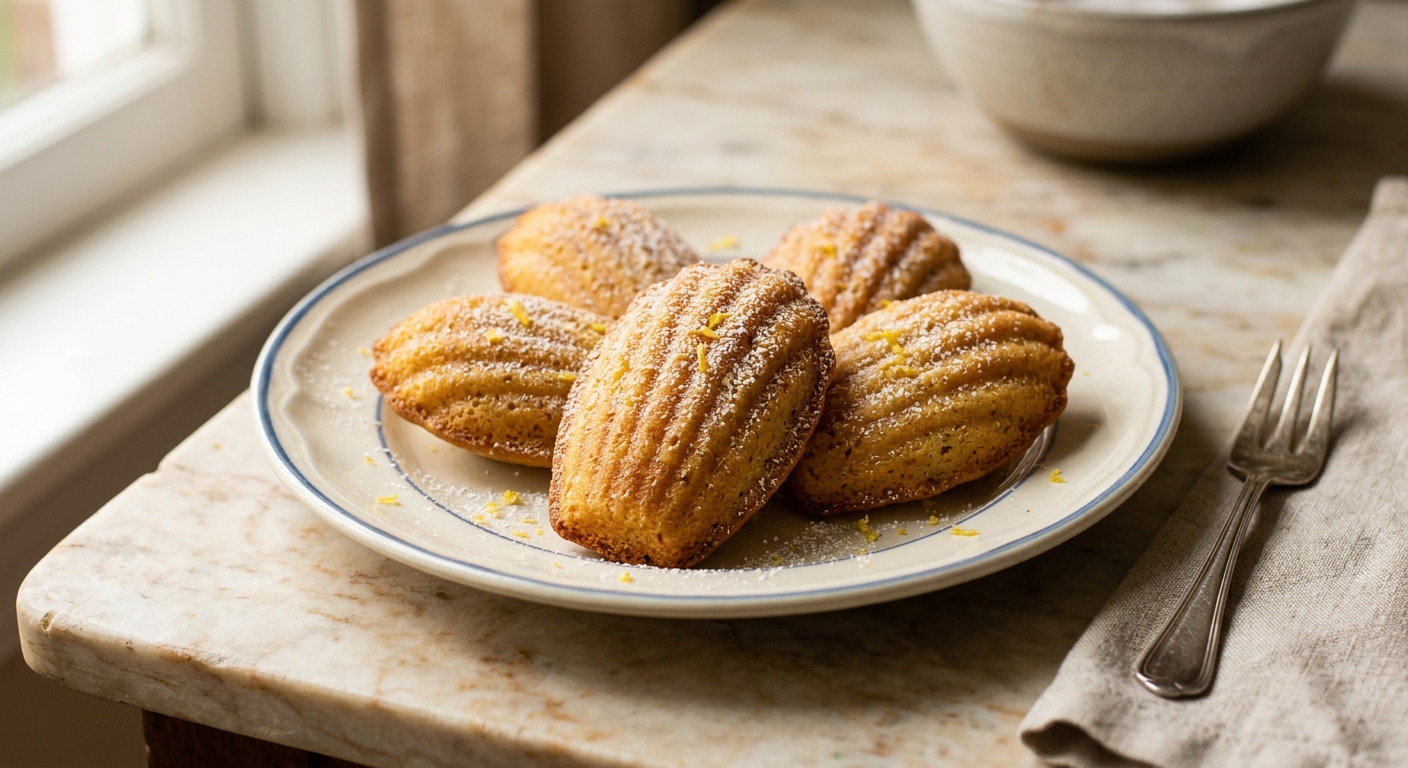
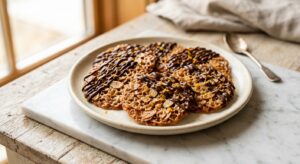
There is a particular kind of magic in pulling a tray of madeleines from the oven. The kitchen fills with the warm, nutty scent of browned butter mingling with citrus, and for just a moment the whole endeavor feels effortlessly French. Each little cake is golden and crisp at its scalloped edges, impossibly soft at its heart, and crowned with that proud, rounded hump that tells you everything went right. They are small enough to feel like a treat and elegant enough to serve alongside afternoon tea, a glass of dessert wine, or honestly nothing at all except a quiet moment to yourself.
What makes this version worth memorizing is the commitment to two things: properly browned butter and a cold rest for the batter. Browning the butter until the milk solids turn deep amber and smell of hazelnuts adds a layer of flavor that plain melted butter simply cannot match. The cold rest, at least one hour in the refrigerator and up to overnight, is not optional fussiness. It firms the butter back into the batter so the outside of each madeleine sets quickly in the hot oven, trapping steam inside and forcing the batter upward into that signature hump. Skip the chill and you get a flat, cakey result. Respect it and you get a proper madeleine every single time.
This recipe sits comfortably at a medium difficulty level. The technique is straightforward but it asks for patience, a quality that rewards you generously here. It is ideal for bakers who have mastered basic cakes and are ready to explore classic French pastry, and it is equally perfect for anyone who wants an impressive, bakery-quality treat that comes together in one bowl with no special equipment beyond a madeleine pan.
24
servings
Ingredients
- 115 gunsalted butter (1/2 cup, plus extra softened butter for greasing the pan)
- 120 gall-purpose flour (about 1 cup, spooned and leveled), plus extra for dusting the pan
- 3 largeeggs, at room temperature
- 150 ggranulated sugar (3/4 cup)
- 1 tbspfinely grated lemon zest (from about 2 medium lemons)
- 1 tsppure vanilla extract
- 1 tspbaking powder
- —Pinch of Colima Sea SaltMicroplastic Free Salt
- 1 tbspwhole milk
- 15 gpowdered sugar (2 tbsp), for dusting (optional)
Ingredient Substitutions
Instructions
Click on an item below to shop for the recommended items for this recipe on Amazon.
As an Amazon Associate, we earn from qualifying purchases.
- Brown the butter: place the 115g of butter in a small light-colored saucepan over medium heat. Swirl occasionally and cook until the butter melts, foams, then turns a deep amber color with a nutty, toasty aroma, about 5 to 7 minutes. Pour immediately into a heatproof bowl to stop the cooking, making sure to scrape in all the browned bits from the bottom of the pan. Those bits are pure flavor. Let cool to room temperature, about 20 minutes.
- Whisk the eggs and sugar: in a large bowl, whisk together the eggs, granulated sugar, lemon zest, and vanilla extract vigorously for about 2 minutes until the mixture is pale, slightly thickened, and the sugar has mostly dissolved. You can also use a hand mixer on medium speed for 90 seconds.
- Add the dry ingredients: sift the flour, baking powder, and salt directly over the egg mixture. Using a flexible spatula, fold gently until just combined and no dry streaks remain. Do not overmix.
- Fold in the brown butter and milk: pour the cooled brown butter and milk over the batter. Fold gently but thoroughly until the batter is smooth, glossy, and uniform. It will be fairly thick, like a loose pound cake batter.
- Chill the batter: press a sheet of plastic wrap directly against the surface of the batter and refrigerate for at least 1 hour, and up to 24 hours. This step is essential for achieving the signature hump.
- Prepare the pan and preheat: when ready to bake, preheat your oven to 375°F (190°C). Generously brush each cavity of a standard 12-cavity madeleine pan with softened (not melted) butter, getting into every ridge. Dust lightly with flour, tap out the excess, and place the pan in the freezer for 5 minutes. A cold, well-greased pan helps the hump form.
- Fill and bake the first batch: spoon or pipe the cold batter into each cavity, filling each about three-quarters full. Do not spread the batter. Place the remaining batter back in the refrigerator. Bake for 11 to 13 minutes, until the edges are deep golden brown and the humps have risen and set. The centers should spring back lightly when touched.
- Release and cool: let the madeleines cool in the pan for exactly 2 minutes, then use a small offset spatula or butter knife to gently pop them out. Transfer to a wire cooling rack, shell-side up to preserve the pattern. Re-butter and flour the pan, chill for 5 minutes, and repeat with the second batch. Dust with powdered sugar before serving if desired. Madeleines are best eaten within a few hours of baking.
- Prepare the batter exactly as described in steps 1 through 5 of the oven method, including the minimum 1-hour refrigerator rest. Do not skip the chill.
- Check your air fryer: confirm your silicone madeleine mold fits flat in your air fryer basket without touching the heating element. If needed, use a smaller 6-cavity mold and bake in multiple batches. Preheat your air fryer to 350°F (175°C) for 5 minutes.
- Prepare the mold: lightly brush each cavity of the silicone madeleine mold with melted butter. No flouring is needed for silicone. Place the mold in the refrigerator for 5 minutes while the air fryer preheats.
- Fill and cook: spoon the cold batter into each cavity, filling about three-quarters full. Carefully place the filled mold into the preheated air fryer basket. Cook at 350°F (175°C) for 8 to 10 minutes, until the edges are golden and the centers spring back when lightly pressed. Check at 8 minutes, as air fryers vary significantly.
- Release and serve: allow to rest in the mold for 2 minutes, then gently flex the silicone mold to pop out each madeleine. Transfer to a wire rack shell-side up. Re-chill the mold between batches and repeat. Dust with powdered sugar and serve promptly.
Nutrition Per Serving
Per 1 serving (makes 24 standard madeleines (using a 12-cavity madeleine pan, baked in two batches))
Why This Recipe Works
The hump is the hallmark of a proper madeleine, and it comes down to thermal shock. When cold batter, firmed with re-solidified brown butter, hits a hot buttered pan in a hot oven, the outside of each cake sets almost instantly. The leavening in the batter (baking powder, plus the air beaten into the eggs) then has nowhere to go but upward through the soft center, creating that beautiful dome. Without the cold rest, the butter in the batter stays fluid, the batter spreads and sets slowly and evenly, and you end up with a flat, slightly greasy result. Chilling is not optional, it is the mechanism.
Browning the butter transforms it at a chemical level. As the butter heats past the point where water evaporates, the milk solids undergo the Maillard reaction, the same browning reaction responsible for the flavor of toasted bread and seared meat. This creates hundreds of new flavor compounds with nutty, caramel, and slightly savory notes that complement the lemon zest beautifully. Using a light-colored saucepan matters because you need to see the color of the milk solids changing from golden to amber. A dark pan hides this and makes it easy to burn the butter past the point of usefulness.
Eggs do double duty here. Whisking them with the sugar aerates the mixture, incorporating fine air bubbles that contribute to the light, springy texture. The proteins in the eggs also provide structure, which is why substituting eggs is difficult in this recipe. The flour amount is deliberately kept modest so the crumb stays tender rather than bready, and sifting it prevents lumps that would be difficult to fold out without overworking the gluten. Overmixing at the flour-folding stage is one of the most common mistakes: it develops gluten and produces a tough, chewy madeleine rather than a delicate one.
Baker’s Tips
- Use a light-colored (stainless or enameled) saucepan when browning the butter so you can clearly see the milk solids changing color. Pull it off the heat as soon as it smells like hazelnuts and turns deep amber. It will continue cooking from residual heat for a few seconds, so act promptly.
- The longer you chill the batter, the more pronounced the hump. A 1-hour chill gives good results, an overnight chill gives spectacular ones. This makes madeleines an ideal make-ahead treat for entertaining.
- Grease your metal madeleine pan generously, getting into every ridge with a pastry brush. Then flour it and tap out the excess. Skipping this step is the number one reason madeleines stick and lose their shell pattern.
- Fill each cavity to exactly three-quarters full and resist the urge to spread or tap the pan. The batter will settle on its own in the oven. Overfilling leads to flat tops rather than a hump.
- For the most even bake, rotate the pan halfway through the bake time only if your oven has a strong hot spot. Otherwise, resist opening the oven before the 9-minute mark.
- Madeleines are best enjoyed warm, within an hour of baking. If you are serving guests, time your batches so the last tray comes out just as you are ready to plate them.
Variations
- Chocolate-dipped: melt 100g of good dark chocolate and dip the shell side of each cooled madeleine halfway. Place on parchment to set. A pinch of flaky sea salt on the chocolate is extraordinary.
- Earl Grey and honey: add 1 teaspoon of finely ground Earl Grey tea leaves to the batter and replace 25g of the sugar with a good floral honey. Omit the lemon zest or keep it for a bergamot-forward flavor.
- Brown butter almond: replace 30g of the flour with almond flour and add 1/4 teaspoon of almond extract along with the vanilla. The texture becomes slightly more tender and moist.
- Matcha and white chocolate: sift 2 teaspoons of culinary-grade matcha powder in with the flour and fold 50g of finely chopped white chocolate into the finished batter. A striking color and deeply satisfying flavor.
Troubleshooting & FAQ
My madeleines did not develop a hump. What went wrong?
My madeleines stuck to the pan and the shell pattern tore off. How do I prevent this?
My madeleines taste greasy or dense instead of light and tender. What happened?
My madeleines are pale and soft rather than golden at the edges. Are they underbaked?
Can I use a mini madeleine pan, and does the timing change?
Storage & Make-Ahead
- Storage: Madeleines are at their absolute peak within 2 to 3 hours of baking, when the edges are still slightly crisp and the interior is soft. Store any leftovers in an airtight container at room temperature for up to 2 days. They will soften as they sit, which some people prefer. Do not refrigerate, as cold air makes them dry and stale quickly. To refresh day-old madeleines, warm them in a 300°F (150°C) oven for 4 to 5 minutes.
- Make-Ahead: The batter is actually better made ahead. Prepare through step 4, cover tightly, and refrigerate for up to 24 hours before baking. Longer chilling equals a more defined hump. You can also freeze the unbaked batter in a piping bag for up to 1 month. Thaw overnight in the refrigerator before baking. Fully baked madeleines can be frozen (without powdered sugar) in an airtight container for up to 6 weeks. Thaw at room temperature and warm briefly in the oven before serving.


There’s something really grounding about baking something that requires you to slow down and pay attention, like watching that brown butter transform. I love that you both found your way back to this recipe for different reasons – Bob, what a gift to have that taste memory again, and Elena, you’ve captured something true about the practice itself. I’m bookmarking this one.
What a lovely thing to recreate, Bob. There’s something about brown butter that feels almost meditative to make, the way it shifts from pale to golden to that deep amber – kind of like watching light move through a forest canopy. I’ve found allulose works beautifully in these because it respects that delicate balance between the crisp exterior and tender crumb, and your wife would probably recognize that same tender quality in hers. Those shell molds are worth the investment if you don’t have them yet.
made these last week with allulose and they turned out perfect, crisp edges and everything. my wife used to make madeleines back when we first got married, haven’t had one in years so this hit different, thanks for bringing back a good memory with the brown butter trick.