
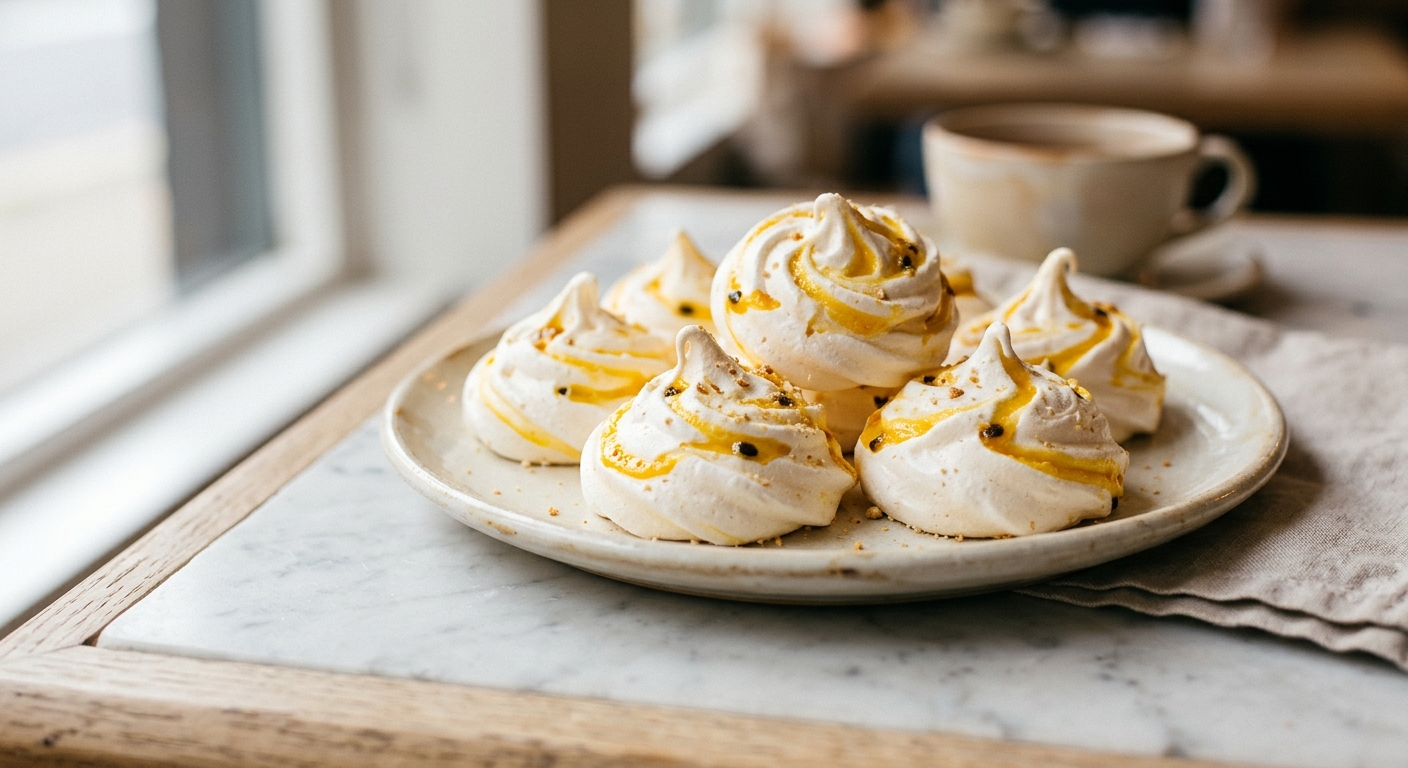
There is something almost magical about meringue: the way a bowl of egg whites transforms into something billowing and glossy, holding stiff peaks that look too beautiful to eat. These little kisses shatter at first bite into a cloud of sweetness, with a faint chew at the center and a bright punch of passionfruit that cuts right through the sweetness. They look like something from a Parisian patisserie window, and yet your kitchen can smell exactly like that on any given afternoon.
What sets this version apart is the careful balance of sweeteners. Stevia alone can leave a bitter, slightly medicinal aftertaste in meringue, so we pair it with powdered allulose, which mimics the bulk and hygroscopic behavior of caster sugar far better than stevia can on its own. Allulose also helps stabilize the foam and contributes to that signature crisp shell, while the stevia keeps the overall sweetness bright without loading the recipe with allulose’s cooling aftertaste. The passionfruit swirl is not just decorative: its natural acidity reinforces the egg white foam, giving you more stable peaks and a beautifully glossy finish.
If you have never made meringue before, this is a wonderfully forgiving place to start. The kisses are small and piped freehand, so imperfect swirls are completely charming. The only equipment you truly need is a clean bowl, a hand mixer, and a piping bag (a zip-lock bag with the corner snipped works perfectly). This recipe is ideal for anyone managing blood sugar who still wants a dessert that feels genuinely special, and equally perfect for anyone who simply loves a delicate, elegant little bite.
30
servings
Ingredients
- 180 gegg whites, at room temperature (from about 5 large eggs)
- 120 gpowdered allulose, sifted (about 1 cup)
- 0.5 tsppure stevia extract powder (not liquid drops; use a brand with no fillers)
- 0.25 tspcream of tartar
- 1 tsppure vanilla extract
- 60 mlfresh or thawed frozen passionfruit pulp (from about 4 fresh passionfruit), seeds strained out for swirling or left in for texture
- 1 tspcornstarch (helps create a slightly chewy center; omit for fully crisp kisses)
- —Pinch of Colima Sea SaltMicroplastic Free Salt
Ingredient Substitutions
Instructions
Click on an item below to shop for the recommended items for this recipe on Amazon.
As an Amazon Associate, we earn from qualifying purchases.
- Position your oven rack in the center and preheat to 215°F (100°C). Line two large baking sheets with parchment paper. Make sure your mixing bowl and whisk attachment are completely clean and free of any grease; even a trace of fat will prevent the egg whites from whipping. Wipe them down with a cut lemon or white vinegar on a paper towel if you are not confident.
- Place the room-temperature egg whites and the pinch of fine sea salt into the bowl of your stand mixer (or a large bowl if using a hand mixer). Whip on medium speed until the whites are foamy and opaque, about 2 minutes. Add the cream of tartar and increase the speed to medium-high. Whip until soft peaks form, meaning the whites hold a peak that gently folds over at the tip, about 3 to 4 minutes more.
- With the mixer running on medium speed, add the sifted powdered allulose one heaping tablespoon at a time, waiting about 15 seconds between additions. This slow incorporation is essential: rushing it deflates the foam. Once all the allulose is added, add the stevia extract powder and the cornstarch. Increase speed to high and whip until the meringue is very stiff, glossy, and holds sharp peaks that stand straight up without drooping, about 4 to 5 minutes. Add the vanilla extract and mix for 30 seconds more. The meringue should feel smooth, not gritty, when rubbed between your fingers; if it still feels gritty, continue whipping for another minute.
- Drizzle 2 tablespoons of the passionfruit pulp over the surface of the meringue. Using a silicone spatula, fold it through just 3 to 4 times to create visible golden streaks without fully incorporating it. The swirl effect is intentional and beautiful. Reserve the remaining passionfruit pulp for serving alongside, or discard.
- Transfer the meringue to a large piping bag fitted with a large open star tip (such as a Wilton 1M). Pipe small kisses onto the prepared baking sheets, holding the bag perpendicular to the sheet about 1 cm above the surface, squeezing gently, and then pulling up sharply to create a peak. Each kiss should be about 4 cm (1.5 inches) wide at the base. Leave about 2.5 cm (1 inch) of space between kisses.
- Bake both trays at once for 1 hour and 15 minutes, rotating the pans halfway through. The kisses should be dry to the touch and lift cleanly off the parchment. When the time is up, turn the oven off and leave the kisses inside with the door cracked open about 2 cm using a wooden spoon. Let them rest in the cooling oven for a full 1 hour. This slow cooling prevents cracking from temperature shock and finishes drying the centers.
- Remove from the oven and allow to cool completely on the pans before transferring. Serve immediately or store in an airtight container.
- Prepare the meringue exactly as described in steps 1 through 5 of the oven method, including the passionfruit swirl and piping. Use parchment paper cut to fit your air fryer basket. Important: weigh the parchment down with a few small ceramic ramekins around the edges if your air fryer has a powerful fan, or the paper will fly into the heating element. Alternatively, pipe the meringues directly onto a perforated silicone air fryer mat.
- Pipe the kisses onto the parchment, leaving 2 cm between each one. Do not overcrowd the basket; work in batches of 8 to 12 kisses depending on the size of your air fryer.
- Set the air fryer to 200°F (93°C). If your air fryer does not go below 250°F (120°C), it is not suitable for this method as the meringues will brown and crack before they dry through. Place the basket in the air fryer and bake for 35 to 40 minutes without opening the drawer until the minimum time has elapsed.
- Check for doneness: the kisses should feel completely dry on the outside and lift cleanly off the parchment. Turn the air fryer off and leave the basket in place for 30 minutes to rest. This helps prevent cracking.
- Remove from the basket carefully, as air fryer-baked meringues are slightly more fragile until fully cooled. Cool completely on a wire rack before storing. Repeat with remaining batches, allowing the air fryer to return to temperature between batches.
- Prepare the meringue exactly as described in steps 1 through 5 of the oven method. Line dehydrator trays with non-stick dehydrator sheets or parchment paper cut to fit. Do not use mesh dehydrator mats, as the meringue will stick in the holes.
- Pipe the kisses onto the lined trays, spacing them about 1.5 cm apart. Because dehydrators have gentle airflow, you do not need to worry about the parchment lifting. You can load multiple trays at once for a large batch.
- Set the dehydrator to 155°F (68°C) and place the trays inside. Dehydrate for 3 hours, then check: the kisses should feel completely firm and dry to the touch and should release cleanly from the sheet. If there is any give at the base, continue dehydrating for up to 1 additional hour, checking every 20 minutes.
- Once fully dried, turn the dehydrator off and leave the door slightly ajar for 30 minutes to allow gradual cooling. This prevents condensation forming on the warm meringues when they hit room temperature air.
- Remove carefully and cool completely before storing. Dehydrated meringue kisses tend to stay crisp the longest, making this method ideal if you are making them more than a day ahead.
Nutrition Per Serving
Per 1 serving (makes approximately 30 small meringue kisses)
Sweetener: allulose and stevia
Why This Recipe Works
Meringue is essentially a foam, and foam is inherently unstable. What keeps it from collapsing is the network of denatured egg white proteins that form around each air bubble when you whip the whites. Heat from the oven causes these proteins to set permanently, which is why a properly dried meringue stays crisp and light. The challenge with sugar-free meringue is that granulated sugar plays a structural role beyond sweetness: it dissolves into the aqueous phase of the egg white foam, increasing viscosity and making the bubble walls more elastic and resistant to popping. Allulose, with its similar crystal structure to sucrose, does a credible job of mimicking this when used in its powdered form and added gradually. Powdered allulose dissolves more readily than granular, which is why we sift it and add it one spoon at a time, giving it time to dissolve into the foam rather than sitting undissolved and weighing the bubbles down.
Cream of tartar is acetic acid’s better-behaved cousin: it lowers the pH of the egg whites, which tightens the protein network, making the foam stiffer and more stable at lower volumes. This means you reach stiff peaks with less risk of overbeating, and the finished meringue is more resistant to weeping or collapsing. The passionfruit pulp contributes its own mild acidity for the same reason, which is why we add it as a swirl rather than fully incorporating it: too much liquid would destabilize the foam, but a gentle ribbon gives you flavor, color, and a small additional stabilizing benefit without compromising the structure. The cornstarch, meanwhile, absorbs moisture during baking and contributes to the marshmallow-like chew at the center that makes a meringue kiss genuinely satisfying rather than just airy.
One important note on troubleshooting: allulose is more hygroscopic than sugar in some conditions, meaning finished meringues can absorb ambient moisture and become sticky or weep. This is not a failure of technique but a property of the sweetener. Keeping the kisses in a sealed container with a desiccant, and serving them within 5 days, is the best prevention. If your kitchen is very humid on baking day, use allulose instead of allulose: allulose produces a slightly stickier raw meringue but a more humidity-resistant finished product.
Baker’s Tips
- Room temperature egg whites whip to a significantly greater volume than cold ones because the proteins are more relaxed and unfold more easily. Separate your eggs while cold (it is easier to avoid breaking yolks), then leave the whites on the counter for 30 minutes before whipping.
- Any trace of egg yolk, water, or grease in your bowl will prevent the whites from whipping properly. Wipe your bowl and whisk with a paper towel moistened with white vinegar before starting, then dry thoroughly.
- Sifting the powdered allulose before adding it is not optional: unsifted allulose often contains small clumps that will not dissolve evenly and can cause gritty meringue or weeping.
- Test your oven temperature with an oven thermometer before baking. Most home ovens run hotter than their dial suggests, and even 20 degrees too high will cause the meringues to brown, crack, and taste eggy.
- The ‘rub test’ for readiness: once all the allulose is added and the meringue looks glossy, rub a small amount between your thumb and forefinger. If it feels smooth, you are ready. If it still feels like fine sand, keep whipping. This is your most reliable indicator of properly dissolved sweetener.
- Pipe onto parchment, never foil or a bare baking sheet. Meringue sticks to foil and will tear, and a bare sheet conducts too much heat from the bottom. Parchment is the only reliable liner for this recipe.
- If you do not have a piping bag, use a large zip-lock bag with one corner snipped to about 1.5 cm. The kisses will be slightly less defined but just as delicious.
Variations
- Lemon and lavender: Replace the passionfruit pulp with 2 tablespoons of fresh lemon juice swirled through the meringue, and add 1 teaspoon of culinary lavender to the piping bag before filling. The lavender catches between the meringue and looks stunning.
- Chocolate-dipped: Once the kisses are fully cooled, dip the bases in 60g of melted 85% dark chocolate (naturally low in sugar) and set on parchment until firm. This adds richness and makes them feel more like a confection.
- Strawberry swirl: Replace the passionfruit pulp with 3 tablespoons of fresh strawberry puree, strained. The color is a beautiful blush pink and the flavor is universally loved.
- Mini pavlova version: Pipe the meringue into 6 larger nests (about 8cm wide) instead of 30 small kisses. Bake for 1 hour 30 minutes and cool in the oven. Fill with whipped cream (or coconut cream) and fresh passionfruit just before serving. Serves 6.
Troubleshooting & FAQ
My meringue won’t reach stiff peaks and looks soupy or grainy. What went wrong?
My meringue kisses are weeping (little droplets forming on the surface) or have become sticky. Why?
My kisses cracked during or after baking. Is that a problem?
My meringues taste bitter or have a strange aftertaste. What can I do?
The kisses stuck to the parchment and tore when I tried to remove them. How do I prevent this?
Storage & Make-Ahead
- Storage: Store in an airtight container at room temperature for up to 5 days. Meringue is highly sensitive to humidity, so avoid storing in the refrigerator (condensation will make them weep and become sticky). If you live in a humid climate, add a small food-safe silica gel packet to the container, or place a sheet of parchment between layers. Do not freeze.
- Make-Ahead: These meringue kisses are an excellent make-ahead treat. Bake them up to 4 days before serving and store in an airtight container at room temperature. They actually improve slightly on day two as the centers finish drying. Do not add any fresh passionfruit garnish until just before serving.


Oh Yolanda, I’m so glad someone tackled meringue with stevia, because you’re right, it’s tricky! I’ve found that the whipping time makes all the difference, kind of like how patience pays off in a garden, and these sound like they’d be perfect for feeding a crowd of kids without the sugar crash afterwards. The passionfruit swirl is such a lovely touch, too, those bright little bursts of tartness. I’m definitely giving this a try at our next neighborhood gathering.
omg these look incredible, love that youre making meringue work with stevia because honestly thats where ive always struggled. gonna try this for sure, passionfruit swirl is such a classy touch. i make a lot of treats for the kids in my mentorship program and theyre always asking for something sweet that doesnt make them crash, so this is literally perfect timing!
these sound absolutely perfect honestly, theres something about meringue that just feels celebratory even though its basically just eggs and sweetener, and adding passionfruit? that makes it feel special without being complicated. i love that you’re solving the stevia problem because yolanda’s totally right, it can be finicky. ive baked a ton of treats that felt impossible until someone just showed me it wasnt, and that’s what this recipe does for people trying to enjoy something delicious without the sugar crash. definitely trying this one.