
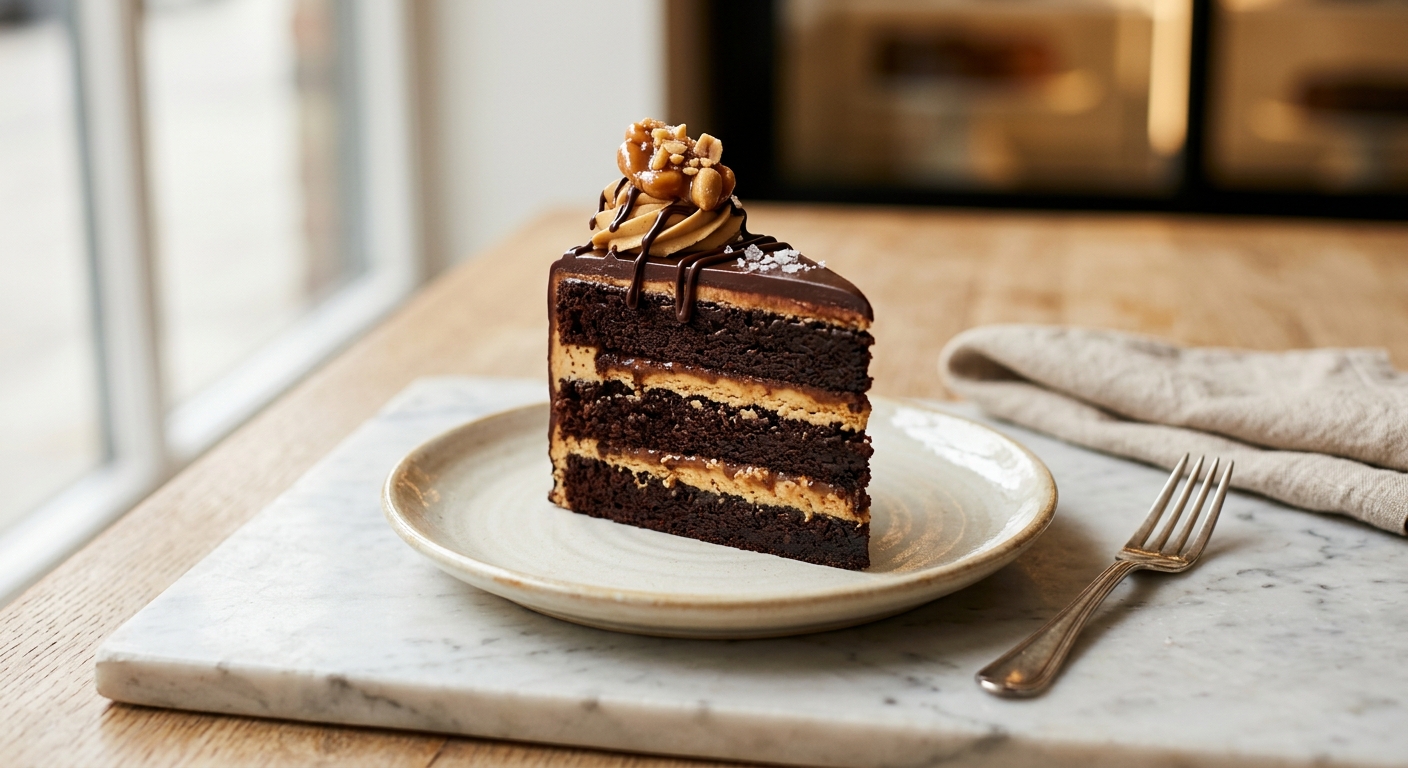
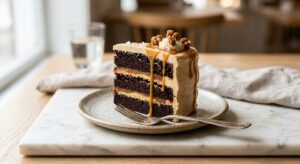
There is a moment, usually sometime in February or on a rainy Saturday afternoon, when a simple brownie just will not do. You need layers. You need that specific thrill of cutting through thick frosting and watching a tall, dark slice topple gently onto the plate. This is that cake. Deep, almost bitter dark chocolate sponge layers, each one dense and moist from a combination of hot coffee and Dutch-process cocoa, stacked with a peanut butter buttercream that is whipped until impossibly light. A poured dark chocolate ganache drips down the sides like something out of a bakery window, and the whole thing is scattered with salted roasted peanuts that crack under the knife and remind you that contrast is everything in a great dessert.
What makes this version stand out is the double-hit of chocolate technique. The cake itself uses both Dutch-process cocoa and a full 113g of melted dark chocolate stirred into the batter, which gives the crumb a richness and depth that cocoa alone cannot achieve. Hot brewed coffee, rather than hot water, amplifies the chocolate flavor without making the cake taste like coffee at all. The peanut butter buttercream is built on a base of whipped unsalted butter and powdered sugar, but the key is adding a tablespoon of heavy cream and beating it for a full four minutes until the color lightens and the texture turns almost mousse-like. It is the kind of frosting that makes people ask what you put in it.
This is a medium-difficulty bake that will take the better part of an afternoon, but there is nothing technically daunting here. If you have baked a layer cake before, you can absolutely make this one. It is ideal for birthdays, dinner parties, or any occasion where you want to put something genuinely impressive on the table. The layers can be baked ahead and frozen, making the day-of assembly much more relaxed.
12
servings
Ingredients
- Buttercream
- 300 gall-purpose flour (about 2 1/2 cups, spooned and leveled)
- 75 gDutch-process cocoa powder (about 3/4 cup), sifted
- 113 gdark chocolate (70% cocoa), finely chopped
- 400 ggranulated sugar (about 2 cups)
- 100 glight brown sugar, packed (about 1/2 cup)
- 2 tspbaking soda
- 1 tspbaking powder
- 1 tspColima Sea SaltMicroplastic Free Salt
- 3 largeeggs, at room temperature
- 240 mlbuttermilk (1 cup), at room temperature
- 240 mlAvocado Oil100% Pure Avocado Oil (1 cup)
- 2 tsppure vanilla extract
- 240 mlhot brewed coffee or hot water (1 cup)
- 340 gunsalted butter (3 sticks / 1 1/2 cups), at room temperature
- 480 gpowdered sugar (about 4 cups), sifted
- 260 gsmooth natural peanut butter (about 1 cup), at room temperature
- 3 tbspheavy cream
- 1 tsppure vanilla extract
- 0.5 tspColima Sea SaltMicroplastic Free Salt
- Ganache
- 200 gdark chocolate (70% cocoa), finely chopped
- 200 mlheavy cream (about 3/4 cup plus 2 tbsp)
- 1 tbspunsalted butter
- Topping
- 80 gsalted roasted peanuts (about 1/2 cup), roughly chopped
- Finishing
- —Colima Sea SaltMicroplastic Free Salt such as Maldon
Ingredient Substitutions
Instructions
Click on an item below to shop for the recommended items for this recipe on Amazon.
As an Amazon Associate, we earn from qualifying purchases.
- Preheat your oven to 350°F (175°C). Grease three 8-inch round cake pans with butter or nonstick spray, line the bottoms with parchment paper circles, then grease the parchment and dust lightly with cocoa powder (not flour, to avoid white streaks on the dark cake).
- Melt the 113g chopped dark chocolate in a heatproof bowl set over a pot of barely simmering water, stirring until smooth. Remove from the heat and let cool for 5 minutes. In a large bowl, whisk together the flour, Dutch-process cocoa, granulated sugar, brown sugar, baking soda, baking powder, and salt until fully combined.
- In a separate large bowl or the bowl of your stand mixer, whisk together the eggs, buttermilk, oil, and vanilla extract until smooth and uniform. Stream in the melted chocolate while whisking gently. Pour the wet ingredients into the dry ingredients and stir with a spatula or beat on low speed until just combined. Finally, carefully stir in the hot coffee. The batter will be quite thin and pourable. This is correct.
- Divide the batter evenly between the three prepared pans (about 550g per pan if you are using a kitchen scale, which is highly recommended for even layers). Bake for 32 to 35 minutes, rotating the pans halfway through, until a toothpick inserted in the center comes out with just a few moist crumbs, not wet batter. The tops will spring back gently when lightly pressed.
- Let the cakes cool in the pans on a wire rack for 15 minutes, then run an offset spatula around the edges and turn them out onto the rack. Peel off the parchment and allow to cool completely, at least 1 hour, before frosting. If the layers have domed, use a serrated knife to level them once fully cool.
- While the cakes cool, make the peanut butter buttercream. Beat the room-temperature unsalted butter in a stand mixer fitted with the paddle attachment on medium-high for 3 minutes until pale and fluffy. Add the peanut butter and beat for another 2 minutes. Add the sifted powdered sugar in two additions, mixing on low after each addition to avoid a cloud of sugar. Add the heavy cream, vanilla, and salt, then increase the speed to medium-high and beat for a full 4 minutes. The buttercream will lighten in color and become noticeably fluffier. Taste and adjust salt.
- To assemble, place one cake layer on a cake board or serving plate. Spread about one-third of the buttercream over the top using an offset spatula. Place the second layer on top, repeat with another third of the buttercream, then add the third layer. Use the remaining buttercream to frost the top and sides in a smooth or slightly textured finish. Refrigerate the assembled cake for at least 30 minutes while you make the ganache.
- For the ganache, heat the heavy cream in a small saucepan over medium heat until it just begins to steam and small bubbles appear around the edge. Do not let it boil. Pour the hot cream over the 200g chopped dark chocolate in a heatproof bowl. Let it sit undisturbed for 2 minutes, then add the butter and stir gently from the center outward until completely smooth and glossy. Let the ganache cool at room temperature for 10 to 15 minutes until it thickens slightly to the consistency of warm honey. Transfer to a squeeze bottle or use a spoon to drizzle it around the top edge of the chilled cake, letting it drip down the sides. Pour any remaining ganache over the top and spread gently. Working quickly before the ganache sets, scatter the chopped salted peanuts over the top and finish with a pinch of flaky sea salt.
- Preheat your oven to 350°F (175°C). Grease a 9×13-inch baking pan with butter or nonstick spray, line with parchment paper leaving an overhang on the two long sides (for easy lifting), and grease the parchment.
- Prepare the full batter exactly as described in steps 2 through 3 of the oven method. Pour all the batter into the prepared pan and spread it into an even layer with a spatula. The pan will be about two-thirds full, which is correct.
- Bake for 38 to 42 minutes, rotating the pan once at the 20-minute mark. The cake is done when a toothpick inserted in the center comes out with just a few moist crumbs. The edges will pull away from the sides of the pan slightly. Cool completely in the pan on a wire rack, about 1 hour.
- Make a half batch of the peanut butter buttercream (use 170g butter, 240g powdered sugar, 130g peanut butter, 1.5 tablespoons cream, 0.5 teaspoon vanilla, and a pinch of salt). Spread it evenly over the cooled cake directly in the pan.
- Make a half batch of ganache (100g chocolate, 100ml cream, 0.5 tablespoon butter). Let it cool until it thickens to a spreadable consistency, about 20 minutes, then dollop it over the peanut butter layer and gently spread or swirl it with the back of a spoon for a marbled effect. Top with the chopped salted peanuts and flaky sea salt. Lift the cake out using the parchment overhang and slice into 12 to 16 portions.
- Preheat your oven to 350°F (175°C). Line two standard 12-cup muffin tins with paper liners. Do not skip the liners here as the batter is quite moist and will stick to unlined pans.
- Prepare the full batter as described in the oven method steps 2 through 3. Using a 60ml (1/4 cup) ice cream scoop or measuring cup, fill each liner about two-thirds full. Do not overfill as this batter rises noticeably.
- Bake for 18 to 22 minutes, rotating the pans once at the 10-minute mark, until a toothpick inserted in the center comes out with just a few moist crumbs. The tops will be set and spring back when gently pressed. Cool in the pans for 5 minutes, then transfer to a wire rack to cool completely, about 45 minutes.
- Prepare the full peanut butter buttercream recipe. Transfer it to a piping bag fitted with a large open star tip (such as a 1M or 2D). Pipe a generous swirl onto each cooled cupcake, starting at the outer edge and spiraling inward to a peak.
- Make the full ganache recipe and let it cool until thick but still pourable, about 15 to 20 minutes. Drizzle a teaspoon of ganache over each frosted cupcake, then immediately press a few chopped salted peanuts into the ganache before it sets. Finish with a tiny pinch of flaky sea salt on each one.
Nutrition Per Serving
Per 1 serving (makes one 8-inch three-layer cake)
Why This Recipe Works
The exceptional moistness of this cake comes down to two key decisions: using oil instead of butter, and adding both cocoa powder and melted chocolate. Oil stays liquid at room temperature, which means cake slices remain tender and soft even after a day or two. Butter, while delicious, contains water and milk solids that firm up when cool, leading to a denser crumb after the first day. The combination of Dutch-process cocoa and melted dark chocolate layers two different forms of chocolate flavor. Cocoa provides bittersweet depth and darkens the crumb, while melted chocolate adds fat, body, and that distinctive snap of flavor that cocoa alone lacks. The hot coffee serves a dual purpose: it helps dissolve and bloom the cocoa powder for maximum flavor extraction, and its slight acidity interacts with the baking soda to ensure a good rise.
The use of both baking soda and baking powder is intentional. Baking soda requires an acidic ingredient to activate, and here it reacts with the buttermilk and natural acids in the cocoa and coffee. This produces carbon dioxide quickly, giving the batter its initial rise. Baking powder, which contains its own acid, provides a second, slower rise in the oven heat. Together they ensure the cake lifts well and sets before the crumb structure collapses. The brown sugar, beyond its caramel flavor notes, is hygroscopic, meaning it attracts and holds onto moisture from the air, which contributes to the cake’s staying power.
The peanut butter buttercream is beaten for an extended time because the mechanical action of whipping incorporates air bubbles and changes the fat crystal structure of the butter, producing a lighter, creamier texture. Natural peanut butter, which contains no added stabilizers or hydrogenated oils, keeps the flavor clean and genuine. If the ganache sets too quickly or becomes grainy, it has likely been stirred too aggressively or the cream was too hot and seized the chocolate. If this happens, gently warm the ganache over a double boiler and stir slowly from the center. A tablespoon of warm cream can bring it back to a smooth, pourable consistency.
Baker’s Tips
- Bring all refrigerated ingredients, especially the eggs, buttermilk, and butter, to room temperature before starting. Cold eggs can cause the melted chocolate to seize, and cold buttermilk will create an uneven batter.
- Weigh your batter into the three pans using a kitchen scale for even layers. Uneven layers make stacking and leveling much harder.
- Do not overbake. This cake is meant to be deeply moist, and it will continue to cook slightly in the hot pan after you remove it from the oven. Pull it when the toothpick shows moist crumbs, not a clean stick.
- Chill the assembled cake for at least 30 minutes before pouring the ganache. The cold surface will help the ganache set faster and create cleaner drips that do not run all the way to the base.
- Let the ganache cool to the right consistency before using it. Too warm and the drips will be uncontrolled and pool at the base. Too cool and it will not flow. Test a drip on the side of the cold cake first and adjust timing accordingly.
- If your natural peanut butter has been sitting and the oil has separated, stir it thoroughly and bring it fully to room temperature before beating it into the buttercream. Cold or separated peanut butter will create a lumpy frosting.
Variations
- Peanut butter and jelly version: Spread a thin layer of raspberry or strawberry jam on each cake layer before the peanut butter buttercream for a nostalgic twist.
- Milk chocolate and hazelnut: Swap the dark chocolate for milk chocolate in both the cake and ganache, and replace the peanut butter with hazelnut spread in the buttercream. Top with toasted hazelnuts instead of peanuts.
- Spiced version: Add 1 teaspoon of ground cinnamon, 1/4 teaspoon of cayenne pepper, and 1/4 teaspoon of ground cardamom to the dry ingredients for a Mexican chocolate-inspired cake with gentle heat.
- Extra peanut butter crunch: Press a thin layer of peanut butter and crushed Oreo or chocolate wafer crumbs between the layers for added texture and a cookies-and-cream moment inside the cake.
Troubleshooting & FAQ
My cake layers came out domed in the center. How do I fix this?
My peanut butter buttercream is greasy or looks curdled. What went wrong?
The ganache drips ran all the way down the cake and pooled at the base. How do I get controlled drips?
My cake sank in the middle after baking. What caused this?
The cake layers stuck to the pans even though I greased them. How do I prevent this?
Storage & Make-Ahead
- Storage: Store the assembled cake covered at room temperature for up to 2 days, or loosely covered in the refrigerator for up to 5 days. Bring refrigerated slices to room temperature for 30 minutes before serving, as cold buttercream loses some of its lightness. Freeze unfrosted cake layers wrapped tightly in plastic wrap and foil for up to 3 months. Thaw overnight in the refrigerator still wrapped.
- Make-Ahead: The cake layers can be baked up to 2 days ahead, wrapped tightly in plastic wrap, and stored at room temperature, or frozen for up to 3 months. The peanut butter buttercream can be made up to 4 days ahead and refrigerated in an airtight container. Re-whip it with a stand mixer for 2 to 3 minutes before using to restore its fluffy texture. The ganache is best made the day of assembly but can be gently rewarmed in a heatproof bowl set over hot water if it sets too firm.
This is such a cool example of what I’m talking about when I say small systems actually matter – Marco, you’re creating something your whole community benefits from, and Diane, you found a way to reclaim joy in baking that works for your life now, and honestly that’s the kind of practical problem-solving that gets me genuinely excited. I’ve had the same experience with allulose in my own kitchen, that moment where you realize you don’t have to choose between “healthy” and “actually delicious” anymore, and a cake like this one (dark chocolate, salt, peanuts, that perfect balance of drama and restraint) feels like proof that the best solutions come from people just… figuring stuff
yo this sounds incredible, my team would demolish this at the gym after a good session. ive been trying to bake stuff thats actually good for you instead of just sugar bombs, and using allulose instead of regular sugar has been a game changer for me. gonna try this one for sure, the salted peanuts on top are exactly the kind of detail that makes people feel like they got something special, you know?
oh marco i love this energy, thats exactly what got me into baking again honestly. after i started running marathons a few years back i realized i wanted to actually enjoy desserts without feeling weird about it, and finding recipes like these changed everything for me. this cake looks absolutely worth it, plus theres something really grounding about baking something that tastes indulgent but isnt gonna have you crashing an hour later. definitely making this for my running club potluck next month